
Table of Contents >> Show >> Hide
- What Is a Straw Bale Raised Bed, Exactly?
- Benefits of a DIY Raised Garden Bed from Straw Bales
- What You Need
- Step-by-Step: How to Make a DIY Raised Garden Bed from Old Straw Bales
- Best Plants for Straw Bale Raised Beds
- How to Care for a Straw Bale Garden All Season
- Common Mistakes to Avoid
- What to Do With the Bales at the End of the Season
- Real-World Experiences and Lessons from Gardening in Old Straw Bales
- Final Thoughts
If your old straw bales are still hanging around after fall decorating season, congratulations: your porch clutter may secretly be a garden project. A DIY raised garden bed from old straw bales is one of the easiest ways to grow vegetables, herbs, and flowers without building a wooden frame, hauling a truckload of soil, or arguing with a shovel in compacted ground.
This method is often called straw bale gardening, but think of it as the laid-back cousin of a traditional raised bed. Instead of lumber and screws, your “bed” is the bale itself. As the straw starts to decompose, it creates a warm, fertile growing environment for roots. That means you can garden over poor soil, hard clay, gravel, or even a sunny patch of pavement. It is budget-friendly, beginner-friendly, and surprisingly productive when set up the right way.
The catch? You cannot just plop plants into a dry bale and hope for a miracle. Well, you can, but your tomatoes will probably respond with theatrical disappointment. To make this work, you need the right kind of bale, the right placement, and a short conditioning period before planting.
Here is exactly how to turn old straw bales into a temporary raised garden bed that looks clever, works hard, and earns bragging rights at backyard cookouts.
What Is a Straw Bale Raised Bed, Exactly?
A straw bale raised bed is a temporary garden bed made by arranging intact straw bales in place, conditioning them with water and nitrogen, and then planting directly into the top or pockets within the bale. Because the bales sit above the ground, they behave much like a traditional raised garden bed: they improve access, reduce some weed pressure, and let you garden where native soil is less than inspiring.
One of the biggest perks is convenience. You do not need carpentry skills, power tools, or a weekend devoted to moving wheelbarrows full of soil. You also do not need perfect land. If your yard is rocky, compacted, uneven, or just plain rude, straw bales can help you skip the worst part of garden setup.
Why Old Straw Bales Work
Old bales can work beautifully if they are still intact. That means the twine or wire is holding them together tightly, the bale has not started collapsing into compost confetti, and it is free from mold, herbicide contamination, and obvious weed-seed problems. In fact, slightly aged but still solid bales can be a smart choice because they are already a little closer to the decomposition stage you want.
Straw vs. Hay: This Matters More Than You Think
Use straw, not hay. Straw is the dry stalk left after grain harvest, while hay is cut forage full of seeds and leafy material. Hay tends to be denser and much more likely to sprout weeds. In other words, hay is more likely to turn your neat little vegetable patch into an accidental grass farm.
Also, ask where the straw came from. If it was treated with persistent herbicides, sensitive crops such as tomatoes, peppers, beans, and other broadleaf plants may struggle or become distorted. For edible gardening, clean, weed-free, herbicide-free bales are the safest bet.
Benefits of a DIY Raised Garden Bed from Straw Bales
There is a reason this method keeps showing up in extension advice and home gardening guides. It solves a lot of common problems fast.
- No digging required: great for hard, rocky, or compacted soil.
- Accessible height: easier on knees, hips, and backs than ground-level planting.
- Works in small or odd spaces: side yards, patios, driveways, and narrow sunny strips all become candidates.
- Fewer soil-related headaches: less concern about poor soil texture or some soil contamination issues.
- Reduced weed pressure: especially when placed over cardboard or newspaper.
- Budget-friendly: often cheaper than building a wood-framed bed.
- Compostable at season’s end: the used bales can be broken up and added to compost or spread as mulch.
The main downside is that straw bales are temporary. They usually last one growing season, sometimes a bit longer in mild conditions, but they are not forever beds. Think of them as seasonal raised beds with excellent manners and an expiration date.
What You Need
- 2 or more intact old straw bales
- Cardboard, newspaper, or another weed-blocking layer for the ground
- A hose, watering can, soaker hose, or drip line
- A high-nitrogen fertilizer for conditioning
- Finished compost, garden soil, or another quality growing medium
- Seeds or transplants
- A hand trowel
- Optional: compost thermometer, stakes, or rebar for extra stability
Step-by-Step: How to Make a DIY Raised Garden Bed from Old Straw Bales
Step 1: Choose the Right Location
Pick a spot that gets at least 6 to 8 hours of direct sun for most vegetables. Leafy greens and some herbs can tolerate a little less, but tomatoes, peppers, cucumbers, squash, and beans are sun lovers. Place your bales near a water source because conditioned straw dries faster than in-ground soil and you will be watering regularly.
Do not move bales after you start soaking them. A dry bale is manageable. A wet bale is basically a soggy couch with opinions.
Step 2: Prep the Ground Underneath
Mow or trim the area if needed and remove large weeds. Then lay down cardboard, several layers of newspaper, or another weed-blocking material beneath the bales. This helps smother existing growth and makes the raised bed cleaner from the start.
If you are gardening on pavement, gravel, or another hard surface, you can skip the weed battle, but you still want good placement and easy access around the bales.
Step 3: Arrange the Bales Correctly
Set the bales so the cut ends of the straw point up and down and the twine runs along the sides. That orientation helps with water penetration and planting. You can place the bales in a straight row, an L-shape, a U-shape, or a wider block, but keep access in mind. If the bed is too wide, tending the center becomes an awkward yoga class nobody asked for.
A practical rule: keep wider beds under about 4 feet across so you can reach the middle comfortably. If your bales are loose or you live in a windy spot, you can add stakes or rebar outside the bed for stability.
Step 4: Condition the Straw Bales Before Planting
This is the part many beginners skip, and it is also the part that makes the whole system work. Fresh or intact bales need time to begin decomposing. During that process, microbes heat up the interior of the bale and use nitrogen. If you plant too soon, roots can burn and young plants may struggle.
The goal of conditioning is simple: get the bale damp, active, and starting to compost, but cool enough for planting.
A Simple 10- to 12-Day Conditioning Schedule
- Days 1-3: Soak the bales thoroughly each day. You want water to run through the base.
- Days 4-6: Apply a high-nitrogen fertilizer and water it in well. Organic options such as blood meal or soybean meal can work, and synthetic high-nitrogen fertilizers are also commonly used. Follow product directions when needed.
- Days 7-9: Continue watering daily and use a lighter dose of nitrogen.
- Day 10: Water thoroughly but stop heavy feeding.
- Days 11-12: Check internal temperature. If the bale still feels hot a few inches in, keep watering and wait.
Many guides recommend planting when the interior has cooled to about 99°F or lower. If you have a compost thermometer, great. If not, use the low-tech method: push your fingers a few inches into the bale. If it feels noticeably hot, wait. Warm is fine. Hot is not.
Step 5: Add Growing Medium
Once the bale is conditioned, add a planting medium. You have two good options:
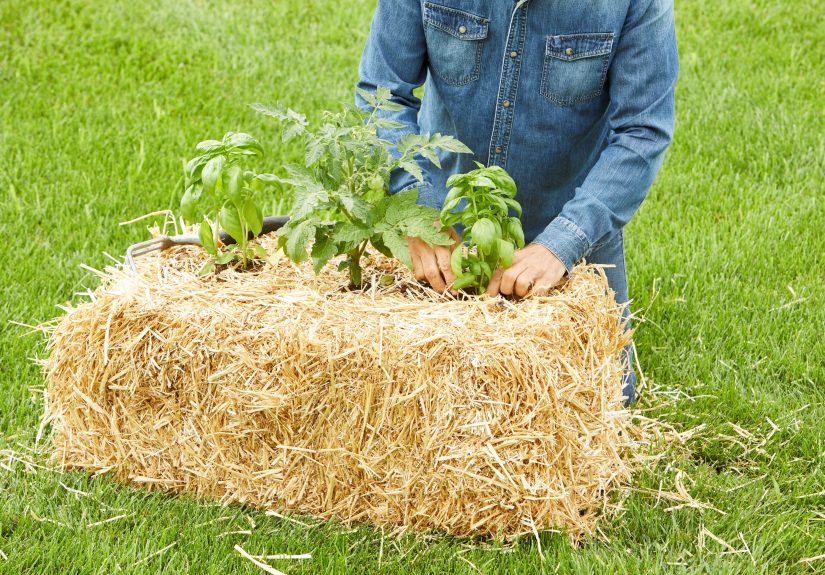
- Pocket method: Pull out small holes or pockets in the top of the bale and fill them with compost or garden soil for each transplant.
- Flat-top method: Spread a 2- to 4-inch layer of compost or garden soil across the top and plant into that layer.
The flat-top method is often easiest for seeds, while pockets work well for transplants like tomatoes, peppers, and herbs.
Step 6: Plant Your Crops
For transplants, dig or loosen a hole slightly larger than the root ball, add compost or soil, set the plant in at the same depth it was growing in its pot, and water thoroughly. For seeds, sow into the compost or soil layer according to packet directions.
Do not overcrowd the bale just because it looks big and hopeful. Straw bale beds still need air flow and sane spacing. A typical bale can often support about 2 to 3 tomatoes, 3 to 4 cucumbers, 3 to 5 peppers, or a couple of squash plants, depending on variety.
Best Plants for Straw Bale Raised Beds
Some crops take to this method like they were born for it. Others act like fussy houseguests.
Best Choices
- Tomatoes
- Peppers
- Eggplants
- Lettuce and leafy greens
- Cucumbers
- Beans
- Summer squash and small melons
- Annual herbs
- Strawberries
- Annual flowers such as zinnias and cosmos
More Challenging Crops
Root crops and larger field-style crops are usually trickier. Carrots, beets, potatoes, and corn can be less reliable in a single bale unless you adapt the setup, use more growing medium, or stack bales. If this is your first season, stick with easy performers and let success inflate your ego naturally.
How to Care for a Straw Bale Garden All Season
Watering
This is the most important maintenance task. Straw bales drain fast and dry out faster than many standard garden beds, especially in summer. Check moisture daily. In hot weather, once-a-day watering is common, and container-style watering habits are helpful. A soaker hose or drip irrigation system makes life much easier.
Feeding
Because microbes are still breaking down the bale and frequent watering can leach nutrients, regular feeding matters. A water-soluble fertilizer or gentle organic feeding schedule can help keep crops productive. If older leaves start yellowing early, that may be a sign your plants need more nitrogen.
Weeds, Pests, and Mushrooms
You will usually see fewer weeds than in a traditional bed, though some volunteer sprouts may pop out of the bale. Pull them while small. Ground-dwelling pests can be less of a problem because the plants are lifted off the soil surface, but you still need to watch for common garden pests and diseases.
And yes, mushrooms sometimes appear. That is not your garden being haunted. It is a sign decomposition is happening. Unless you are specifically trained to identify wild fungi, just remove them and move on.
Common Mistakes to Avoid
- Using hay instead of straw: more weeds, more regret.
- Skipping conditioning: hot bales can damage roots and starve plants of nitrogen.
- Planting too early: always check temperature first.
- Ignoring herbicide risk: clean, untreated bales matter.
- Underwatering: straw dries quickly, especially in summer heat.
- Overcrowding: a jungle is only charming in movies.
- Assuming the bale feeds everything forever: supplemental fertilizer is usually still needed.
What to Do With the Bales at the End of the Season
One of the best parts of this method is the cleanup. When the growing season ends, the bales are partially decomposed and full of organic matter. Break them apart and use the material as mulch, add it to a compost pile, spread it on garden paths, or work it into future beds to improve soil structure.
So even though the raised bed itself is temporary, it still leaves behind something useful. That is a pretty good deal for what began as old straw sitting around doing nothing except pretending to be rustic decor.
Real-World Experiences and Lessons from Gardening in Old Straw Bales
One of the most common experiences gardeners report with straw bale gardening is surprise at how quickly the setup goes from “cute idea” to “wait, this is actually working.” A traditional raised bed can take a weekend of measuring boards, leveling soil, hauling compost, and making at least one emergency trip to the hardware store because somebody forgot screws. Straw bales, by comparison, feel almost suspiciously easy. You line them up, soak them, feed them, wait for the heat to settle down, and suddenly you are planting lettuce into what used to be porch decor.
The first big lesson is that placement matters more than people expect. Gardeners who put bales in full sun near a hose usually have a much smoother season than those who place them in a charming but inconvenient corner of the yard. A straw bale bed that is ten steps from water gets watered. A straw bale bed that requires dragging a hose across patio furniture, a bicycle, and a suspiciously grumpy dog gets watered “in a minute,” which in gardening language can mean “after the leaves wilt dramatically.”
Another real-world observation is that the bales truly do behave more like containers than in-ground beds. They warm up quickly, which can be a gift in spring, but they also dry faster in summer. Many first-time growers start out thrilled by the easy setup and then realize by July that daily moisture checks are not optional. The upside is that once gardeners add a soaker hose or drip line, the system becomes much more relaxing. The bed starts feeling less like a science experiment and more like a dependable kitchen garden.
People also tend to notice that certain crops absolutely love the setup. Tomatoes, peppers, cucumbers, basil, lettuce, and summer squash often settle in fast, especially when planted into compost-rich pockets. Vine crops stay cleaner because the fruit is lifted off the ground, and harvest can feel noticeably easier because the planting height is more comfortable. For older gardeners or anyone with back or knee pain, that accessibility is not a minor perk. It is the difference between enjoying the garden and needing a recovery nap after five minutes of weeding.
There are also a few funny truths that show up almost every season. Mushrooms appear and alarm somebody. A bale starts sprouting grain and makes the gardener question all life choices. One tomato grows like a champion while another sulks for mysterious reasons. But that is not a failure of the method. That is just gardening being gardening.
Perhaps the most satisfying experience comes at the end of the season. Instead of hauling away worn-out materials, gardeners are left with partly composted organic matter that can be reused. The bed does not become trash. It becomes mulch, compost, or the beginning of better soil somewhere else. That full-circle quality is part of what makes an old straw bale raised bed so appealing. It is practical, forgiving, low-cost, and just a little bit ingenious. Not bad for something that started out as a bale of dried stalks minding its own business.
Final Thoughts
If you want a low-cost, low-construction way to grow food at home, a DIY raised garden bed from old straw bales is one of the smartest projects you can start. It gives you the benefits of raised bed gardening without lumber, digging, or a major budget. As long as you use clean straw, condition the bales properly, and stay on top of watering, you can grow a surprisingly productive garden in a very small footprint.
In short: do not throw those old straw bales away just yet. They might be the easiest raised bed you ever build, mostly because you barely build it at all.


