
Table of Contents >> Show >> Hide
- First: Is It Mold, Mildew, or Just “Bathroom Grout Being Bathroom Grout”?
- Safety Matters (Because “I’ll Just Hold My Breath” Is Not a Plan)
- What You’ll Need
- Step-by-Step: How to Remove Mold From Bathroom Tiles
- How to Remove Mold From Grout (Where Mold Goes to Hide)
- How to Remove Mold From Shower Caulk (Sometimes You Don’t Clean ItYou Replace It)
- How to Get Rid of Mold on Bathroom Walls (Painted Drywall, Not Tile)
- Common Mistakes That Make Bathroom Mold Worse
- How to Prevent Mold in Bathroom Tiles and Walls
- When to Call a Pro
- Quick FAQ
- Real-World Experiences: What Homeowners Learn After the Third “Why Is It Back?” Moment (About )
Bathroom mold has one job: to ruin your vibe. It turns bright grout into a speckled crime scene, makes your caulk look like it lost a bar fight, and
leaves behind that “old towel that never dried” smell. The good news? Most bathroom mold on tile and painted walls is beatable with the right plan,
the right cleaner, and a little patience (plus a brush that’s not afraid of overtime).
This guide walks you through how to remove mold from bathroom tiles, grout, and walls safely, what actually works (and what just makes it mad),
and how to keep it from coming back like a clingy ex with a key to your spare humidity.
First: Is It Mold, Mildew, or Just “Bathroom Grout Being Bathroom Grout”?
Most people use “mold” as a catch-all term, but bathrooms can host a few different villains:
- Mildew: Often looks like powdery gray or white film; usually surface-level and easier to clean.
- Mold: Can appear black, green, brown, or spotty; may dig deeper into porous materials or damaged grout/caulk.
- Staining: Sometimes you’ve killed the mold, but the discoloration remainsespecially in old grout or silicone caulk.
If the area smells musty even after cleaning, keeps returning within days, or you suspect moisture behind tile or inside walls, you may be dealing with
a hidden moisture problemnot just surface growth.
Safety Matters (Because “I’ll Just Hold My Breath” Is Not a Plan)
Mold cleanup is usually straightforward when it’s limited and on hard surfaces, but you should still protect yourself:
- Ventilate: open a window, run the exhaust fan, and keep the door open when possible.
- Wear gloves and eye protection, especially with bleach or hydrogen peroxide.
- Consider an N95-style respirator if you’re sensitive, the smell is strong, or you’ll be scrubbing a while.
- Never mix cleaners (especially bleach with ammonia or other products). Toxic fumes are a terrible bathroom accessory.
If the moldy area is larger than roughly a 3 ft. by 3 ft. patch (about 10 square feet), or if you have asthma, immune issues, or ongoing symptoms,
consider calling a professional for assessment and remediation.
What You’ll Need
Choose your tools based on where the mold is and how stubborn it’s acting.
Basic Gear
- Rubber gloves, eye protection
- Scrub brush (stiff for grout), old toothbrush for corners
- Microfiber cloths or disposable paper towels
- Spray bottle(s)
- Bucket of warm water
- Bathroom exhaust fan or a portable fan for drying
Cleaners (Pick One Path)
- Dish soap + water: Great first step for tiles and most walls.
- White vinegar (undiluted or diluted): Helpful on many surfaces, but avoid on natural stone (marble/limestone/travertine).
- 3% hydrogen peroxide: Popular for grout and mildew stains; bubbles are normal.
- Bleach solution: Effective on hard, nonporous surfaces when used correctly; use proper dilution and ventilation.
- Baking soda paste: Gentle abrasion for grout; often paired with hydrogen peroxide or soap.
- Oxygen bleach (powder): Helpful for stained grout; less harsh odor than chlorine bleach.
Step-by-Step: How to Remove Mold From Bathroom Tiles
1) Dry the Area First
Mold loves moisture. Before you clean, run the fan for 10–15 minutes and wipe off visible water. If you can, clean when the bathroom is dry
(not right after a steamy shower).
2) Wash With Soap and Warm Water
Start simple: spray warm water mixed with a few drops of dish soap, then scrub tiles and rinse. You’d be surprised how much “mold” is actually
soap scum holding hands with dirt.
3) Apply Your Mold-Fighting Cleaner
Use one of these methods:
- Vinegar method (tile-safe, not stone-safe): Spray vinegar, let sit 30–60 minutes, scrub, rinse, dry.
- Hydrogen peroxide method: Spray 3% hydrogen peroxide, let sit 10–15 minutes, scrub, rinse, dry.
-
Bleach solution method (hard, nonporous surfaces): Mix a fresh solution following label directions; do not exceed common safety guidance
of 1 cup household bleach per 1 gallon of water. Apply, scrub as needed, rinse, and air dry with ventilation.
After cleaning, dry the surface thoroughly. Mold doesn’t need much of an invitationjust a damp wall and your optimism.
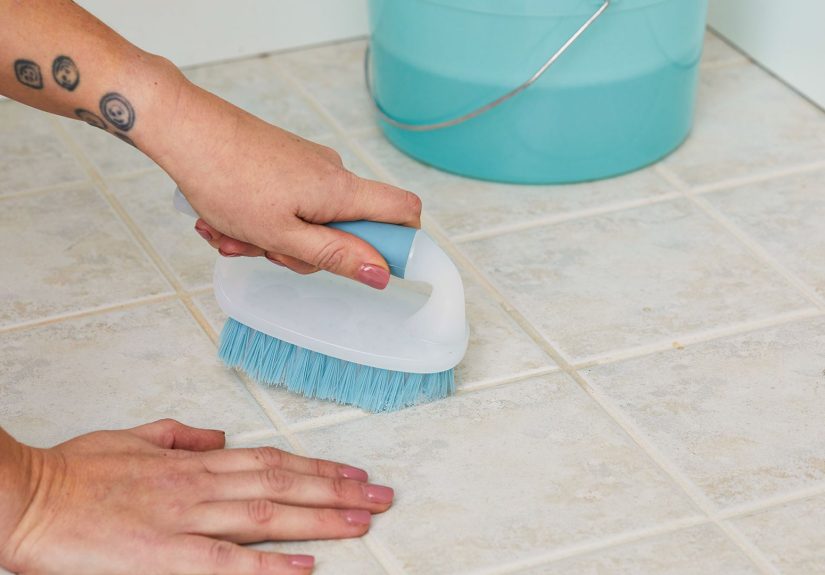
How to Remove Mold From Grout (Where Mold Goes to Hide)
Grout is porous. That means it can trap moisture, soap residue, and organic gunkbasically mold’s favorite buffet.
The goal is to remove what you can see, then dry and protect the grout so it’s less welcoming next time.
Option A: Baking Soda Paste + Scrub
- Make a paste with baking soda and a little water (think toothpaste thickness).
- Apply to grout lines and let sit 5–10 minutes.
- Scrub with a stiff brush, rinse, then dry.
Option B: Hydrogen Peroxide for Stubborn Spots
- Spray 3% hydrogen peroxide on grout (patch-test if you’re nervous).
- Let it sit 10–15 minutes.
- Scrub, rinse, and dry thoroughly.
Option C: Oxygen Bleach for Old Stains
If your grout looks permanently shadowed, it may be stained. Oxygen bleach powders (often sold as “color-safe” bleach) can brighten grout without
the intense chlorine smell. Mix per label directions, apply, wait, scrub, rinse, and dry.
Pro move: Once grout is clean and fully dry, apply a grout sealer. Sealing reduces water absorption, making future cleaning easier and
helping prevent mold in shower grout.
How to Remove Mold From Shower Caulk (Sometimes You Don’t Clean ItYou Replace It)
Silicone or latex caulk around tubs and showers is a mold magnet. If mold is only on the surface, you may be able to clean it. But if the caulk is
old, peeling, or stained all the way through, replacement is often the real fix.
Clean-It First Approach
- Ventilate well and wear gloves.
- Apply vinegar or a properly diluted bleach solution to the caulk line.
- Let it dwell (10–30 minutes depending on product), then scrub gently with a toothbrush.
- Rinse and dry completely.
Replace-It (When Mold Keeps Coming Back)
If the caulk stays stained, feels soft, or mold returns quickly, remove the old caulk, clean and dry the area, then re-caulk with a bathroom-rated,
mold-resistant product. This is one of those “annoying now, blissful later” tasks.
How to Get Rid of Mold on Bathroom Walls (Painted Drywall, Not Tile)
Painted walls are trickier than tile because drywall is porous. Surface mildew can often be cleaned, but recurring spots may signal moisture behind
the paint or poor ventilation.
For Light Surface Growth
- Open windows, run the fan, and protect nearby towels and rugs.
- Wash the area with soap and water first; rinse lightly.
- Use a mild cleaner (vinegar solution or hydrogen peroxide) and wipe gentlydon’t soak the wall.
- Dry immediately with a fan and clean cloth.
If Paint Is Bubbling, Soft, or Peeling
That can mean moisture is getting into the wall. Cleaning the surface won’t solve the underlying problem. Address leaks, condensation, or ventilation,
and consider professional evaluation if you suspect hidden mold.
Common Mistakes That Make Bathroom Mold Worse
- Painting or caulking over mold: It’s not “sealed in,” it’s “fed and insulted.” Clean and dry first.
- Using a ton of product but skipping drying: Moisture control is half the battle.
- Overusing harsh chemicals in a small space: Ventilation matters; your lungs deserve better.
- Ignoring the cause: A leak, a poorly vented fan, or constant humidity will keep the cycle going.
- Using vinegar on natural stone: Acid can etch and dull stone surfacesuse stone-safe cleaners instead.
How to Prevent Mold in Bathroom Tiles and Walls
Mold prevention is mostly moisture management with a side of good habits. The goal is to keep your bathroom from staying damp long after you leave.
Ventilation Habits That Actually Work
- Run the exhaust fan during showers and for at least 20–30 minutes after (set a timer so you don’t forget).
- If you don’t have a fan, crack a window and keep the door open to let steam escape.
- Don’t trap humidity by shutting the bathroom door immediately after a hot showerairflow helps everything dry faster.
Reduce Water Left Behind
- Squeegee shower walls and doors after use (it takes 30 seconds; future-you will brag about it).
- Hang towels and bath mats to dry; don’t pile them in a damp heap.
- Fix drips and leaks quicklyfaucets, showerheads, and that “tiny” crack in the grout line that isn’t tiny anymore.
Humidity Control
Aim to keep indoor humidity at or below about 50%. In sticky climates or bathrooms without good ventilation, a small dehumidifier can help.
If your mirror fog lasts forever, that’s a clue your bathroom is basically a sauna with plumbing.
Maintenance That Pays Off
- Deep-clean grout periodically and reseal when needed (especially in showers that get daily use).
- Replace failing caulk before mold becomes a permanent resident.
- Clean soap scum regularlyless food for mold.
When to Call a Pro
DIY is great until it isn’t. Consider professional mold remediation or a qualified contractor if:
- The affected area is larger than about 10 square feet.
- Mold keeps returning quickly even after thorough cleaning and drying.
- You suspect mold behind tile, inside walls, or under flooring (loose tiles can be a red flag).
- You have asthma, severe allergies, or immune concerns and symptoms flare when you clean.
- The moisture source is unclear (hidden leak, poor venting, or structural water intrusion).
Quick FAQ
Does bleach kill bathroom mold?
Bleach can be effective on hard, nonporous surfaces when used correctly and safely. But it’s not magic, and it’s not always the best first choice
especially in a small, poorly ventilated bathroom. No matter what cleaner you use, removing the moisture problem and drying thoroughly is essential.
Why does mold come back in my shower grout?
Usually because the grout stays damp, is unsealed or worn, or there’s soap scum feeding growth. Improve ventilation, reduce standing moisture,
deep-clean, and consider sealing the grout once it’s fully dry.
How do I know if mold is behind the tile?
Clues include loose or shifting tiles, crumbling grout, persistent musty odor, or stains that return fast. If you suspect hidden moisture,
it may require opening the wall or removing sections to inspect and repair.
Real-World Experiences: What Homeowners Learn After the Third “Why Is It Back?” Moment (About )
If you’ve ever cleaned your shower grout on a Sunday, felt proud, and then noticed black specks creeping back by Thursday, congratulationsyou’ve had the
classic bathroom mold experience. What many homeowners discover is that cleaning is only half the story; the other half is what the bathroom does
when nobody is looking (spoiler: it stays wet).
One common scenario: a household swaps cleaners repeatedlyvinegar one week, bleach the next, a “mystery spray” from under the sink after thatyet
the mold still returns. The missing piece is often drying time. Bathrooms without strong exhaust fans can hold onto humidity for hours, especially
after hot showers. In practice, people start seeing real improvement when they add a simple routine: run the fan on a timer for 30 minutes, keep the
door cracked open, and squeegee the walls. It’s not glamorous, but neither is scrubbing grout like you’re auditioning for a cleaning infomercial.
Another frequent lesson shows up around caulk. Homeowners try to “clean” moldy caulk until their toothbrush gives up. Sometimes the caulk is simply
too far gonemold has stained it or seeped into tiny imperfections. The breakthrough isn’t a stronger chemical; it’s replacement. When people remove the
old caulk, dry the area thoroughly, and apply a bathroom-rated, mold-resistant caulk, the problem often drops dramatically. The emotional arc is:
annoyance → regret → “Why didn’t I do this sooner?”
Grout tells its own story. Fresh, sealed grout is easier to keep clean. Older grout can become rough and porous over time, trapping soap scum and
moisture. Many homeowners report that once they do a deeper clean (often with a paste and a stiff brush), then let the shower dry fully before applying
a grout sealer, they spend far less time fighting recurring black spots. Think of sealer as a raincoat for your grout linesstill not invincible,
but much less absorbent.
Then there’s the “wall mystery.” People wipe mold off painted drywall near the shower, only to watch it reappear. Sometimes the fix is surprisingly
practical: the shower curtain is too short, water is splashing farther than anyone realized, or wet towels are hanging against the wall like a damp
blanket. Changing those habitslonger curtain liner, better splash control, towels drying on a rackcan make wall spots vanish without turning the
bathroom into a chemistry lab.
Finally, many homeowners realize the biggest mold trigger is the one they can’t see: tiny leaks. A slow drip behind the faucet trim, a loose showerhead
connection, or an older grout crack can keep materials damp 24/7. Once that moisture source is repaired, even “basic” cleaning methods suddenly work
better. The overall takeaway from real homes is simple: the best mold remover is a good planclean, rinse, and dryplus a bathroom that doesn’t stay
humid long after you’re done.


