
Table of Contents >> Show >> Hide
- The Burger Blueprint: What “Best” Actually Means
- Start With the Right Beef
- Form Patties That Grill Like Pros
- Seasoning: Keep It Bold, Keep It Simple
- Grill Setup: Heat Control Is Everything
- Grilling the Burgers: A Step-by-Step Method That Works
- Cheese Burgers: Melt Like You Mean It
- Buns and Toppings: Build a Burger That Doesn’t Collapse
- Common Mistakes That Ruin Grilled Burgers
- A Sample “Best Burger” Game Plan for a Weekend Cookout
- Conclusion: The “Best Burger” Is a System
- Experiences and Cookout Lessons That Make Burgers Even Better
If grilled burgers had a love language, it would be juicywith a side of crispy-brown crust and a bun that doesn’t dissolve into sad bread confetti. The good news: you don’t need fancy gadgets or a chef’s coat to make the best homemade burgers on the grill. You need the right beef, smart patty shaping, real heat control, and the confidence to stop poking your burgers like they owe you money.
This guide walks you through the whole processmeat selection, seasoning, grill setup (gas or charcoal), doneness, cheese melting, bun-toasting, topping strategy, and the common mistakes that turn “legendary cookout” into “we have cereal inside.” Let’s grill.
The Burger Blueprint: What “Best” Actually Means
The best grilled burger hits four targets at once:
- Flavorful beef (not just “meat disk”).
- Juiciness that doesn’t run out and vanish when you flip it.
- A browned crust (the “Maillard magic”) for big grilled flavor.
- Balanced build: bun, patty, toppings, sauceno structural collapse.
Start With the Right Beef
Choose a fatty-enough grind (yes, fat is your friend)
If you want burgers that stay juicy on a hot grill, you generally want ground beef around 80/20 (80% lean, 20% fat). Too lean and your burgers dry out fastespecially if you’re cooking for a crowd and timing gets… optimistic.
Fresh matters more than people admit
The difference between “pretty good” and “why is everyone suddenly quiet?” is often freshness. If you can, buy beef ground the same day. Even better: ask your butcher to grind it, or grind at home if you’re into that kind of delicious chaos.
Simple blend idea
Chuck is the classic choice because it’s beefy and naturally balanced. If you’re blending cuts, keep it straightforward and aim for that ~20% fat sweet spot. More complicated doesn’t automatically mean betterit just means more math.
Form Patties That Grill Like Pros
Don’t overwork the meat
Mixing ground beef too much can make patties dense and tough. Think: gentle shaping, not kneading bread dough. Handle it like it’s a delicate situation… because it is.
Pick a size that fits reality
A great “standard” burger patty is 5–6 ounces and about 3/4-inch thick. That thickness gives you time to develop a crust without turning the inside into burger jerky.
Make the patty wider than the bun
Burgers shrink a bit as they cook. If you start bun-sized, you may finish with a “slider that had big dreams.” Make patties about 1/2 to 1 inch wider than your bun.
Dimple the center
Press a shallow indentation in the middle of each patty (about the width of a couple fingers). This helps the patty stay flatter instead of puffing into a meatball dome. Flat burger = better sear + better topping stability.
Chill the patties (especially if it’s warm outside)
If you’re prepping ahead, refrigerate patties for 20–30 minutes (or longer) before grilling. Colder patties are easier to handle, stick less, and hold their shape better over high heat.
Seasoning: Keep It Bold, Keep It Simple
Salt + pepper is the foundation
The best grilled burger seasoning is often the simplest: salt and pepper. For most backyard burgers, that’s all you need to taste beefnot a spice rack audition.
When to season
Season the outside of the patties right before they hit the grill. Salting too early can pull moisture to the surface and change texture. Your goal is a great crust, not a wet handshake.
Optional flavor boosters (use restraint)
- Worcestershire sauce: a splash can add savory depth, but don’t turn your beef into soup.
- Garlic powder or onion powder: a light dusting works better than mixing chunks of raw onion into the patty (which can cause crumbling and uneven cooking).
- Smoked paprika: if you want “cookout vibes” even on a gas grill.
Avoid mixing in eggs, breadcrumbs, or lots of add-ins if you’re aiming for classic grilled burgers. That’s meatloaf territory. (Meatloaf is wonderful. It just shouldn’t pretend to be a burger.)
Grill Setup: Heat Control Is Everything
The secret weapon: two-zone grilling
Two-zone grilling means you create a hot direct-heat zone for searing and a cooler indirect-heat zone for finishing or escaping flare-ups. This is how you get a crust without burning, and how you stay calm when fat drips hit flames and the grill tries to audition for an action movie.
How to set up a two-zone charcoal grill
- Light charcoal in a chimney starter (or your preferred responsible fire method).
- When coals are ashed over, pile them on one side of the grill.
- Leave the other side with no coals (that’s your cooler zone).
- Preheat the grate, then clean it well.
How to set up a two-zone gas grill
- Preheat with all burners on high for 10–15 minutes.
- Then turn one side to medium-high (sear zone) and the other side to medium-low or off (indirect zone).
- Keep the lid closed between flips to maintain consistent heat.
Clean and oil the grates (do this, seriously)
Clean grates reduce sticking and help you get those gorgeous grill marks. After preheating, brush the grate, then lightly oil it using tongs and a folded paper towel dipped in oil. (Do not spray aerosol oil into open flames unless you enjoy surprise eyebrows.)
Grilling the Burgers: A Step-by-Step Method That Works
Step 1: Sear first, then manage heat
Place patties on the hot zone and let them sear. You’re building crust and flavor. If you move them too soon, they stick and tearlike a clingy relationship, but with more smoke.
Step 2: Flip with purpose
Flip once when the first side has a deep brown crust and releases easily. Some cooks flip more than once and still get great burgers, but one confident flip is a solid defaultespecially if you want clear grill marks and minimal fuss.
Step 3: Use the cool zone if flare-ups get wild
If flames spike, move burgers to the indirect side, close the lid, and let the grill calm down. You’re cooking burgers, not sacrificing them to the Fire Gods.
Step 4: Don’t press the patties
Pressing squeezes out fat and juicesthe stuff that makes burgers taste like burgers. If you want a thinner burger, start thinner. Don’t “flatten” it mid-cook and then wonder where the juiciness went.
Step 5: Cook to temperature, not vibes
Color lies. Timing varies. Wind is a liar. The only consistent truth is a thermometer.
Food safety note: In the U.S., consumer guidance commonly recommends cooking ground beef burgers to an internal temperature of 160°F. If you grind your own meat from whole cuts and handle it safely, some people choose lower final temperatures for donenessbut that comes with added risk and isn’t the standard safety recommendation.
How to temp a burger correctly
Insert the thermometer through the side into the center of the patty. That’s the thickest point and gives a more accurate reading than poking from the top (which can overshoot the center).
Cheese Burgers: Melt Like You Mean It
When to add cheese
Add cheese during the last 1–2 minutes of cooking. Close the lid to trap heat and melt it faster. If you’re on charcoal and your lid has seen better decades, you can tent burgers briefly with a metal bowl to create a mini “cheese sauna.”
Great melting cheeses
- American (melts like a dream)
- Cheddar (sharp, classic)
- Pepper Jack (spicy party guest)
- Swiss (mellow, excellent with mushrooms)
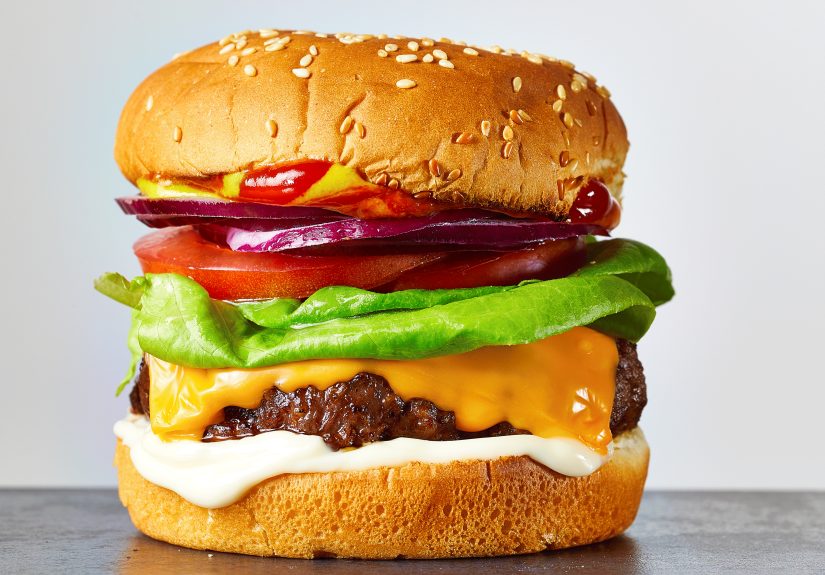
Buns and Toppings: Build a Burger That Doesn’t Collapse
Toast the buns
Toasting adds flavor, improves texture, and helps prevent sogginess. Toast cut-side down over indirect heat for 30–60 seconds, just until golden.
Pick toppings that match your burger style
Think in categories, not chaos:
- Crisp: lettuce, pickles, onions
- Juicy: tomato, grilled onions, sautéed mushrooms
- Rich: cheese, bacon, avocado
- Acidic/bright: pickles, pepper rings, mustard, vinegar slaw
- Saucy: burger sauce, mayo, BBQ sauce
Easy “burger sauce” that tastes like a cookout memory
Mix mayo + ketchup + a little pickle relish + a pinch of garlic powder. Optional: a drop of hot sauce or a squeeze of mustard.
Smart stacking order
A simple structure helps the burger stay intact:
- Bottom bun
- Sauce (acts like edible glue)
- Lettuce (a moisture barrier)
- Patty + cheese
- Onions/pickles/tomato
- Top bun + a little extra sauce (because joy)
Common Mistakes That Ruin Grilled Burgers
- Using super-lean beef: it dries out quickly.
- Overmixing/overhandling: leads to tough patties.
- Grill not preheated: causes sticking and pale burgers.
- Pressing patties: drains juiciness.
- Cooking by color: ground beef can brown before it’s safe or be pink when fully cooked.
- No plan for flare-ups: two-zone setup fixes this.
- Skipping bun toasting: makes everything soggy faster.
A Sample “Best Burger” Game Plan for a Weekend Cookout
For 6 burgers
- 2 to 2 1/4 lb 80/20 ground beef
- Kosher salt + black pepper
- 6 buns (potato buns are a great choice)
- 6 slices cheese (optional)
- Toppings: lettuce, tomato, onion, pickles
- Sauce: burger sauce or ketchup/mustard/mayo
Timeline
- T-45 minutes: Form patties, dimple, chill.
- T-20 minutes: Preheat grill, set up two zones, clean and oil grates.
- T-0: Season patties, grill over hot zone for crust, flip, finish with heat control.
- Last 2 minutes: Add cheese, toast buns.
- Serve: Build burgers and enjoy the sudden silence that means you did it right.
Conclusion: The “Best Burger” Is a System
The best homemade burgers on the grill aren’t about complicated recipes. They’re about a repeatable system: fatty-enough beef, gentle handling, smart heat zones, a good sear, thermometer confidence, and a bun that’s been toasted like it has self-respect. Once you nail those fundamentals, you can riff endlesslydifferent cheeses, sauces, toppings, bun styles, even different smoke woods on charcoal.
Master the system, and you’ll be the person everyone volunteers to “help” at the grillmostly because they want first dibs. You’ve been warned.
Experiences and Cookout Lessons That Make Burgers Even Better
There’s a specific kind of optimism that shows up right before grilling burgers for a group. It sounds like: “I’ll totally remember who wanted medium, who wanted well-done, and who said ‘surprise me.’” Then the grill gets hot, the first flare-up happens, someone asks if you can also grill onions, and your brain becomes a browser with 37 tabs open and no music playing.
One of the biggest real-world upgrades is learning that heat management beats heroics. When the grill flares, the instinct is to panic-flip, press, or shuffle burgers like they’re on a tiny treadmill. But the calmer move is the smarter move: slide burgers to the cooler zone, close the lid, and let the flames chill out. That one habit saves burgers from tasting like “campfire souvenir.” It also makes you look like you know what you’re doingwhich is half the fun of grilling.
Another cookout reality: people’s doneness preferences are… emotional. Some guests want a burger that’s still juicy and tender. Others want “no pink” in a voice that suggests pink is a felony. The easiest way to keep everyone happy without turning into a short-order cook is to standardize patty thickness, then use a thermometer and a simple sorting system. A cheap trick that works: put “most done” burgers toward the edge of the hot zone and “less done” closer to the center, or move finished burgers to the indirect side to hold warm while others catch up. Nobody needs to know your method. They just need to eat a great burger.
Then there’s the lesson you only learn after a few rounds: prep is the difference between fun and frantic. When toppings are chopped, buns are ready, sauce is mixed, and a clean platter exists, grilling feels like a party. When nothing is prepped, you’re sprinting between the cutting board and the grill while burgers cook unevenly and someone is looking for a plate like it’s a rare artifact. Even 10 minutes of prepsliced onions, pickles in a bowl, lettuce dried, cheese unwrappedmakes you faster, calmer, and (mysteriously) more popular.
One of the funniest “aha” moments for a lot of backyard grillers is realizing how much a toasted bun changes the entire experience. The first time you toast buns consistently, people start describing your burgers with words like “restaurant” and “somehow better,” even though you didn’t change the meat. That’s because toasted buns add structure and keep sauces from soaking in instantly. It’s the simplest upgrade that feels like cheating.
And finally: the social magic. Burgers are one of the rare foods that invite customization without turning dinner into a negotiation. If you set out a small “topping bar” (pickles, onions, lettuce, tomato, two sauces, maybe jalapeños), guests build their perfect bite and you get fewer questions mid-grill. Plus, it’s weirdly satisfying to watch someone create a towering masterpiece, take one bite, and immediately decide they should have used a smaller bun like a responsible adult.
So yestechnique matters. But the best grilled burger nights come from the little experience-based moves: controlling heat, organizing doneness, prepping toppings, and toasting buns like it’s your job. Do that, and you’ll get the best compliment a griller can receive: people quietly going back for seconds without announcing it.


