Table of Contents >> Show >> Hide
- What is a cup pull (and why does it instantly look “custom”)?
- Decoding the size: What “3 3/4 in.” really means
- Finishes that make this pull look totally different (same pull, new personality)
- Where this cup pull looks best: kitchens, baths, furniture, and built-ins
- Style pairing: cup pulls + knobs = a classic combo that works
- Placement that looks professional (and feels good to use)
- Installation guide: how to install a classic cast brass cup pull cleanly
- Care and cleaning: keep it gorgeous without accidentally stripping the finish
- Buying checklist: how to know you’re getting a “good one”
- FAQ: quick answers before you commit (or start drilling)
- Real-world experiences with a 3 3/4 in. Classic Cast Brass Cup Pull (about )
- Conclusion
If cabinet hardware had a résumé, the 3 3/4 in. classic cast brass cup pull would be the candidate who shows up in a perfectly pressed shirt,
gives a firm handshake, and somehow makes your kitchen look like it has its life together. It’s a small upgrade that punches way above its weight: easy to grab,
timeless in style, and sturdy enough to survive years of snack raids, midnight water runs, and the occasional “why is this drawer jammed?” moment.
In this guide, we’ll break down what makes this classic cast brass cup pull so popular, what “3 3/4 inch” actually refers to, how to choose a finish
(including unlacquered brass if you’re brave), how to place cup pulls so your drawers look intentionally designed (not “installed during a commercial break”),
and how to install them with clean, repeatable results.
What is a cup pull (and why does it instantly look “custom”)?
A cup pull (also called a bin pull) is a drawer pull with a half-moon “cup” shape. Your fingers tuck underneath and pull outward.
It’s one of those classic forms that works across design styles because it’s simple, functional, and visually tidyespecially on drawer fronts.
Compared with long bar pulls, cup pulls tend to feel a little more “built-in” and less “IKEA weekend sprint,” which is probably why they show up in everything from
Craftsman kitchens to modern pantries to vintage dressers.
Why “cast brass” matters
“Cast” generally means the pull is formed in a mold, producing a thicker, more substantial piece than lightweight stamped hardware. In real-life terms:
a solid cast brass cup pull typically feels weighty, doesn’t flex, and keeps its crisp shape over time. When you grab it, it feels like hardwarenot a
decorative suggestion of hardware.
Decoding the size: What “3 3/4 in.” really means
Here’s the part that saves you from drilling regret: overall length and center-to-center are not the same thing.
With many “3 3/4 inch cup pull” styles, the 3 3/4 in. is the approximate overall width of the pull across the face.
The critical measurement for installation is the center-to-center (C-C) spacingthe distance between the two screw holes.
For the commonly sold “3 3/4 inch classic cast brass cup pull” style, the overall size is typically around
3 3/4" wide and about 1" tall, with a 3 3/8" center-to-center screw spacing.
Always confirm measurements on your specific listing or packaging before drilling (hardware is consistent… until it isn’t).
Quick measuring tips (so your template isn’t “close enough”)
- Overall width: edge to edge on the visible face.
- Center-to-center: measure from the center of one screw hole to the center of the other.
- Projection: how far the pull sticks out (matters for tight walkways and drawer clearance).
Finishes that make this pull look totally different (same pull, new personality)
The fun part about a classic silhouette is that the finish can steer the vibe. This style is commonly offered in a handful of “period friendly” options, including:
unlacquered brass, polished nickel, satin nickel, and oil-rubbed bronze (plus variations like hand-aged or antique finishes).
Unlacquered brass: the “living finish” that gets better with time
Unlacquered (or “raw”) brass is not sealed with a protective clear coat, so it naturally oxidizes and develops patina. Translation:
it will change. It will darken. It may get brighter in high-touch spots. It may develop character. If you love the idea of hardware that ages like leather boots,
unlacquered brass cabinet hardware is your new best friend.
If you prefer it bright and shiny forever, unlacquered brass will feel like adopting a pet that sheds. Not “bad,” just… honest.
You can slow patina with gentle cleaning and optional wax, or polish it occasionally if you want to reset the shine (just know that polishing can reduce that aged look).
Polished nickel: crisp, classic, and surprisingly flexible
Polished nickel reads clean and upscale. It plays nicely with white paint, marble-look counters, and transitional cabinetry.
It also tends to look less “yellow” than polished brass, which can be a bonus if you want warmth without going full vintage glam.
Satin nickel: the practical crowd-pleaser
Satin nickel is the “I want it to look good, but I also have hands” finish. It hides fingerprints better than high-polish options,
works with stainless appliances, and feels modern without shouting.
Oil-rubbed bronze: moody, cozy, and great at hiding real life
Oil-rubbed bronze is a go-to for traditional, farmhouse, and warm-toned interiors. It can also develop subtle highlights with use,
depending on the finish process. If your household has a high drawer-open frequency (aka: everyone eats), bronze can be forgiving and handsome.
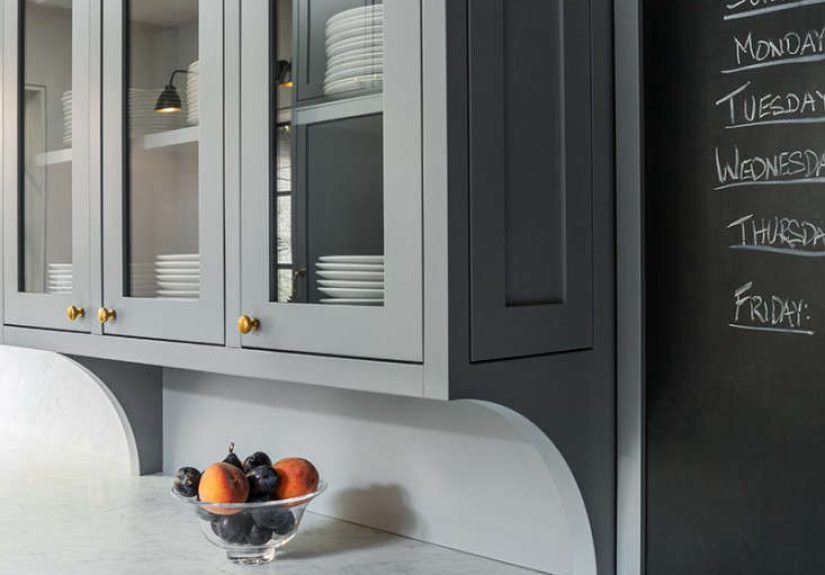
Where this cup pull looks best: kitchens, baths, furniture, and built-ins
A classic bin pull is most at home on drawers. That’s where the shape is both practical and visually balanced. A few ideas:
Kitchen drawers
- Shaker cabinets: cup pulls add instant “designer kitchen” energy without changing the doors.
- Slab fronts: the curved silhouette softens sharp lines and adds grip.
- Pantry drawers: especially helpful when you’re juggling a cereal box and your dignity.
Bathroom vanities
On vanities, cup pulls feel tidy and classic. They’re also easy to grab with damp handsuseful when you’re trying not to drip water everywhere
(and failing anyway).
Dressers, nightstands, and vintage furniture refreshes
This is one of the simplest ways to update a thrifted dresser or a hand-me-down nightstand. A brass drawer pull can make a basic piece feel intentional,
especially if you match the finish to your lamp, mirror frame, or picture frames.
Style pairing: cup pulls + knobs = a classic combo that works
Many designers mix cup pulls on drawers with knobs on doors. It’s visually calm and keeps the focus on your cabinetry rather than turning your kitchen
into a hardware showroom. If you want a more uniform look, you can also use cup pulls on some doors (like tall pantry pull-outs), but drawers are their natural habitat.
Matching metals without making it “matchy-matchy”
- Warm + warm: unlacquered brass with warm wood tones, creams, or deep greens.
- Cool + cool: polished or satin nickel with grays, whites, and stainless appliances.
- Contrast: brass pulls on navy cabinets, bronze pulls on light oakhigh impact, still classic.
Placement that looks professional (and feels good to use)
Hardware placement is where good kitchens quietly separate themselves from “we tried.” Cup pulls are usually installed on the upper portion of the drawer front,
often around the top third. Why? It’s comfortable to grab, and it visually aligns with how drawers are used.
Simple placement rules that prevent cabinet chaos
- Be consistent: pick a placement and repeat it across similar drawers.
- Use a template or jig: eyeballing is fun until you step back and realize one pull is doing interpretive dance.
- Consider drawer height: taller drawers often look best with pulls placed slightly higher than center.
- Wide drawers: one centered pull is common, but very wide drawers may look better with two pulls (and can feel easier to open).
Installation guide: how to install a classic cast brass cup pull cleanly
Installing a cabinet cup pull is a straightforward DIY, but precision matters. The biggest secret is not “drill carefully.”
It’s: make a repeatable system so every pull lands in the same place.
Tools you’ll actually use
- Tape measure or ruler (for layout)
- Pencil
- Painters tape (helps prevent tear-out and gives you a clean marking surface)
- Level or small square (optional but helpful)
- Drill + bit sized for your screws
- Template/jig (store-bought or DIY)
- Screwdriver (often better than driving screws with a drill at the final step)
Step-by-step (the “no drama” method)
-
Confirm center-to-center spacing.
Don’t assume. Measure your pull’s screw holes (or check the manufacturer spec) before you mark anything. -
Decide placement on one drawer first.
Use painters tape on the drawer front and mark your intended location. Hold the pull up and test the feel. -
Create a repeatable template.
If your pull has a less-common spacing (like 3 3/8"), an adjustable jig can save the day. A DIY template works too:
trace the pull’s hole locations onto cardboard or a thin scrap of wood and use it as a drilling guide. -
Mark holes carefully.
Measure twice, mark once, then check symmetry (especially on centered placements). A small square helps keep marks aligned. -
Drill clean holes.
Drill straight. If you’re nervous, start with a smaller pilot hole and move up. Painters tape can reduce chipping on painted fronts. -
Install screws by hand for the last turns.
This helps avoid over-tightening, stripped screws, or pulling the hardware off-level. -
Repeat using the same template.
The goal is consistency. Your future self will thank you every time you look at the finished wall of drawers.
Pro tip: watch for screw length
Drawer fronts vary in thickness. Many pulls use machine screws (often 8-32), and the correct screw length depends on your drawer front plus any false front.
Too long and the screw bottoms out; too short and the pull feels loose. If the pull ships with screws, they’re usually sized for common cabinet frontsbut “common”
is not a legally binding promise.
Care and cleaning: keep it gorgeous without accidentally stripping the finish
Most finishes do best with a soft cloth, mild soap, and water. The biggest threats are abrasive pads,
harsh cleaners, and acids that can change or remove patina.
Finish-specific care basics
-
Unlacquered brass: expect patina. Clean gently. If you want to keep it brighter, polish occasionallybut understand that polishing may remove aged character.
Some people use wax to slow down oxidation on high-touch hardware. - Polished/satin nickel: wipe with a damp soft cloth, dry immediately. Avoid abrasive cleaners that can dull the finish.
- Oil-rubbed bronze: gentle cleaning is key. Avoid harsh chemicals and abrasives; consider occasional light maintenance as recommended by the manufacturer.
Buying checklist: how to know you’re getting a “good one”
Not all cup pulls are created equal. If you want that satisfying, high-quality feel, look for these signals:
1) Material honesty
Solid cast brass typically costs more than zinc alloy or thin stamped metalbut it also tends to feel better, wear better, and age more gracefully.
If weight matters to you (and it probably does), cast brass is a great bet.
2) Comfortable edge
A smooth, rolled edge isn’t just a detailit’s daily comfort. Hardware that feels sharp or thin gets annoying fast.
3) Finish that fits your lifestyle
If you love patina, go unlacquered. If you want low maintenance, satin finishes often hide fingerprints better.
If your style leans traditional and cozy, oil-rubbed bronze can be a perfect match.
4) Correct center-to-center spacing
This is the big one. If you’re replacing existing pulls, match the existing C-C measurement to avoid drilling new holes.
If you’re starting fresh, choose a spacing you can install consistentlypreferably with a jig or an adjustable drilling guide.
FAQ: quick answers before you commit (or start drilling)
Is a 3 3/4" cup pull too small for big drawers?
Not necessarily. For many standard kitchen drawers, it looks classic and proportional. For very wide drawers, you can still use one centered pull,
but two pulls may feel more balanced and can reduce twisting when opening heavy drawers.
Can I mix cup pulls with bar pulls?
You can, but keep a plan. A common strategy is cup pulls on drawers and bar pulls on tall pull-outs or pantry drawersjust make sure finishes and shapes feel related.
Will unlacquered brass look “dirty”?
It can look aged, which some people love and others interpret as “someone spilled time on it.” If you want uniform shine, choose lacquered/polished finishes instead.
If you want warmth and character, unlacquered brass is the whole point.
Real-world experiences with a 3 3/4 in. Classic Cast Brass Cup Pull (about )
People who switch to a 3 3/4 inch classic cast brass cup pull often report the same first reaction: “Wait… why does this feel so much nicer?”
That’s the cast-brass effect. Even when the style looks understated, the hardware can feel noticeably sturdier in your hand than lightweight alternatives.
On busy kitchen drawersthink utensils, snacks, towels, and the mysterious “miscellaneous” drawerthis matters more than you’d expect. You interact with these pulls
dozens of times a day, and the difference between a thin, sharp edge and a smooth, substantial cup is the difference between “fine” and “quietly satisfying.”
Another common experience: the cup pull handle shape makes drawers easier to open when your hands aren’t in perfect conditionwet hands after washing
dishes, floury hands mid-baking, or hands full of something you probably shouldn’t be juggling. Because your fingers hook into the cup, the grip feels secure without
needing to pinch or pull from the tips of your fingers the way some sleek modern pulls require. Parents also tend to like cup pulls because they’re less “catchy” on
clothing and less likely to leave you hooked like a fish when you walk by too close. (We’ve all been there.)
Finish choice is where people’s stories really diverge. With unlacquered brass hardware, the most frequent “experience” is watching the finish evolve.
At first it can look brighter than expectedalmost too shiny for a “vintage” kitchen. Then, slowly, the tone warms and deepens. High-touch areas can become
slightly brighter or smoother, while less-touched areas darken, creating natural contrast. Some homeowners love this lived-in look because it feels authentic, like the
kitchen has history even if the cabinets are new. Others decide they prefer a more consistent finish and switch to satin nickel or bronze after realizing they don’t
enjoy “watching metal develop a personality.”
Installation experiences are also pretty consistent: the first drawer takes the longest, and the rest go fastif you commit to a template or jig.
Many DIYers say the biggest win is making a test setup on one drawer front, stepping back, and checking alignment in natural light before drilling everything else.
It’s surprisingly easy to place hardware slightly too high or too low on the first try; once you lock in the placement, repeatability becomes your best friend.
And if your pull uses a less-common center-to-center spacing, adjustable jigs (or a carefully made DIY template) can be the difference between a tidy,
professional look and an afternoon spent muttering at a tape measure.
Finally, a small but real experience: cup pulls tend to make cabinetry feel calmer. There’s less visual clutter than with long bars everywhere, and the curved silhouette
adds softnessespecially in kitchens with lots of straight lines. People often describe the end result as “custom,” even when nothing else changed. Which is the whole
magic trick: you didn’t remodel the kitchen. You just gave your drawers better jewelry.
Conclusion
The 3 3/4 in. classic cast brass cup pull is one of those rare hardware choices that works across styles, feels great in the hand, and delivers a high-end look
without a high-drama installation. Nail the center-to-center spacing, use a template for consistent placement, and choose a finish that matches your patience
for maintenanceespecially if you’re tempted by unlacquered brass and its charming tendency to evolve. Install it well once, and it’ll quietly improve your daily routine for years.