Table of Contents >> Show >> Hide
- What “Templates” Mean in Word (So You Don’t Fight the Wrong Boss)
- Way #1: Add Templates by Using Word’s Built-In Template Gallery (Fastest)
- Way #2: Add Downloaded Templates to Word’s “Personal/Custom” Templates (So They Show Up Where You Expect)
- Way #3: Create Your Own Template (and Attach It to Documents Like a Pro)
- Quick Checklist: Choose the Right Method
- Conclusion
- Real-World Experiences: What Actually Happens When You Start Using Word Templates (500+ Words)
If you’ve ever copied last month’s report, changed the date, and sworn you’d “make a real template someday,” welcome.
Microsoft Word templates are basically your future self doing your present self a favorlike meal prep, but for documents.
In this guide, you’ll learn three practical ways to add templates in Microsoft Word so they’re easy to find, easy to reuse,
and (most importantly) hard to accidentally wreck.
What “Templates” Mean in Word (So You Don’t Fight the Wrong Boss)
A Word template is a starter file that can include layouts, styles, placeholder text, headers/footers, logos,
tables, and even automation. When you create a new document from a template, Word makes a fresh copyyour original stays clean.
Common template file types you’ll see
- .dotx Standard Word template (no macros).
- .dotm Macro-enabled Word template (includes VBA macros).
- .dot Older Word template format (for legacy compatibility).
One more thing: Word also has a “normal” template behind the scenes (often called Normal.dotm) that affects
default behavior. It’s powerfulbut treating it like a junk drawer is how templates turn into chaos gremlins. We’ll keep it tidy.
Way #1: Add Templates by Using Word’s Built-In Template Gallery (Fastest)
This is the easiest option when you just need something solid and professional in a few clicksresumes, flyers, invoices,
cover letters, calendars, newsletters, and more. Word includes a built-in gallery, and Microsoft also offers a huge online
library of templates you can browse and download.
How to find and use built-in templates (Windows and Mac)
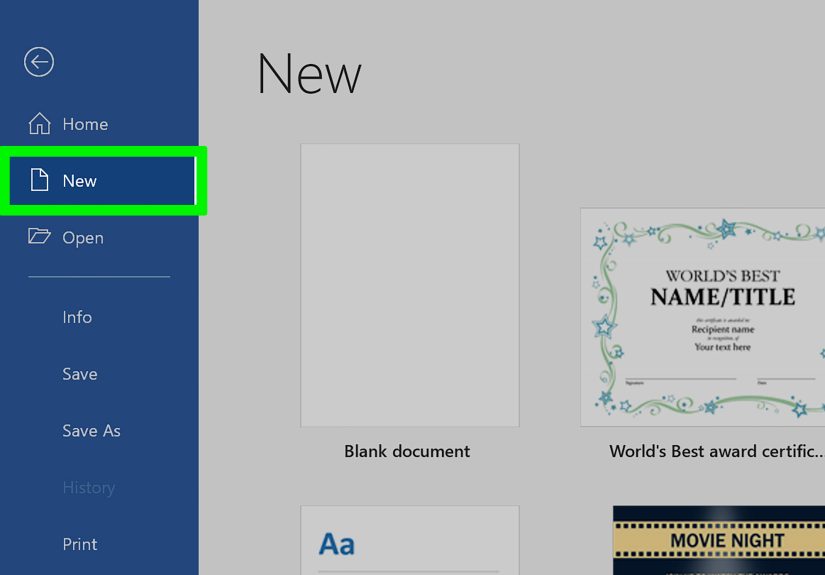
- Open Word.
- Go to File > New.
- Browse categories or use the search bar (try “resume,” “proposal,” “invoice,” or “letterhead”).
- Click a template to preview it, then select Create.
Make it yours without breaking the template
- Replace placeholder text (names, dates, headings) first.
- Update styles instead of manually formatting every line. For example, change the “Heading 1” style once,
and all Heading 1 titles update automatically. - Save as a new document (DOCX) for the final version so the original template stays reusable.
Example: Turning a built-in resume into your “personal master”
Let’s say you pick a resume template. You customize fonts, spacing, and section titles until it feels like “you.”
Now do this smart thing: save that customized version as your own template so you can reuse it every time you apply
for a new role. You’ll learn exactly how in Way #3.
Best for: anyone who wants speed, decent design, and fewer formatting headachesespecially for one-off documents.
Way #2: Add Downloaded Templates to Word’s “Personal/Custom” Templates (So They Show Up Where You Expect)
Sometimes the built-in gallery isn’t specific enough, and you download a template from a trusted source (like Microsoft’s
template library, a university department, or your workplace). The big mistake people make is saving it “somewhere” and then
wondering why Word can’t find it later.
The fix is simple: save templates to Word’s designated templates folder and (if needed) set Word’s
Default personal templates location. Then your templates appear under the Personal/Custom area when you create new documents.
Step-by-step: Add templates on Windows
- Download the template (usually .dotx or .dotm). If it arrives as a .docx file, you can still convert it to a template (Way #3).
-
Save it into your templates folder.
A common default location is:
DocumentsCustom Office Templates - In Word, go to File > Options > Save.
- Find Default personal templates location and set it to your templates folder (for example, your Custom Office Templates folder).
- Close and reopen Word (yes, it’s the classic “turn it off and on again,” but it works).
- Go to File > New. Look for Personal or Custom to see your templates.
Step-by-step: Add templates on Mac
- Download the template file (.dotx or .dotm).
-
Move it into Word’s templates folder on Mac. A common location is:
~/Library/Group Containers/UBF8T346G9.Office/User Content/Templates - In Word, go to Word (menu) > Preferences > File Locations.
- Select User templates, then set/modify the folder location to the templates folder you’re using.
- Restart Word, then check File > New for your personal templates.
Quick safety note: Download smart
Templates can include macros (.dotm). If you didn’t expect automation, don’t enable macros casuallyespecially if the template
didn’t come from a trusted organization. For most users, .dotx templates are the safer, simpler default.
Troubleshooting: “My template doesn’t show up in Personal/Custom”
- Wrong file type: Word templates should be .dotx or .dotm. If it’s a .docx, convert it (Way #3).
- Wrong folder: Confirm the Default personal templates location points to the folder where you saved the template.
- Cloud confusion: Templates stored in synced folders can behave oddly. If it won’t appear, test by placing a copy in the local templates folder.
- Word needs a restart: Yes, really. Word sometimes won’t refresh the Personal list until you reopen it.
Best for: anyone building a small library of templates (work docs, client proposals, branded letters) and wanting them accessible in two clicks.
Way #3: Create Your Own Template (and Attach It to Documents Like a Pro)
This is the power move. Instead of hunting for templates, you build your own “perfect starting point” once, and then reuse it forever.
You can also apply (attach) a template to an existing documentuseful when you receive messy files and need them to match your formatting standards.
A. Create a template from an existing document (the easiest way)
- Open a document that already looks the way you want (fonts, headings, spacing, branding, etc.).
- Clean it up:
- Replace real names with placeholders like “Company Name” or “Client Name.”
- Remove sensitive data (seriously, don’t template your phone number into a client-facing doc unless you mean it).
- Update styles (Home > Styles) so the template is consistent.
- Go to File > Save As.
- Choose Word Template (*.dotx) (or Word Macro-Enabled Template (*.dotm) if it contains macros).
- Save it in your templates folder (the same folder you set in Way #2).
Example: A branded proposal template
A strong proposal template usually includes:
- Cover page with your logo and a clean title layout
- Prebuilt headings like “Scope,” “Timeline,” “Pricing,” and “Terms”
- Table styles that don’t look like they time-traveled from 2003
- Footer with page numbers and company info
Once saved as a .dotx, every new proposal starts polished, consistent, and on-brandwith zero copy/paste drama.
B. Apply (attach) a template to an existing document
Here’s where Word feels like it’s hiding a useful feature behind a secret door. To attach a template, you typically use the
Developer tab and the Document Template option (sometimes shown as “Templates and Add-ins”).
- Open the document you want to fix.
-
If you don’t see the Developer tab:
- Windows: File > Options > Customize Ribbon > check Developer.
- Mac: Word > Preferences > Ribbon & Toolbar > enable Developer.
- Go to Developer > Document Template (or “Templates and Add-ins”).
- Click Attach, then choose your template file (.dotx or .dotm).
-
Optional (but powerful): check Automatically update document styles.
Use this carefully: it can clean up inconsistent formatting fast, but it can also change the look of content if your styles don’t match. - Click OK.
When “Automatically update styles” is your best friend (and when it’s chaos)
Turn it on when your template styles are clearly defined and you want the document to conform (great for reports, manuals, proposals).
Leave it off when the document has heavy custom formatting you can’t risk changing (like a final legal document with very specific spacing).
C. Bonus: Make templates load automatically (advanced, team use)
Some organizations use “global templates” that load when Word starts (often for shared macros, add-ins, or standardized tools).
This is usually managed by IT because it can affect every document you open. If you’re working solo, you can keep things simple:
store templates in your Personal/Custom folder and create new documents from them as needed.
Best for: professionals, teams, and anyone who wants consistent formatting, repeatable workflows, and less time fighting the formatting toolbar.
Quick Checklist: Choose the Right Method
- You need a template right now: Use Way #1.
- You downloaded templates and want them to appear in Word’s Personal/Custom list: Use Way #2.
- You want your own reusable “master doc” and the ability to standardize messy documents: Use Way #3.
Conclusion
Templates aren’t just “pretty layouts”they’re a time-saving system. Use Word’s built-in gallery when speed matters, store downloaded templates
in the right folder so Word can actually find them, and create your own .dotx/.dotm templates when you want consistency and control.
Once your template setup is dialed in, Word stops being a formatting battlefield and starts acting like the productivity tool it claims to be.
Real-World Experiences: What Actually Happens When You Start Using Word Templates (500+ Words)
The first time most people “use a template,” it’s accidental. They open a file called “Proposal_Template_FINAL_v7_REALFINAL.docx,” edit it,
and thensurprisesave over the original. Congratulations, you’ve invented a new sport: Template Jenga. One wrong move and your whole system collapses.
When you switch to real templates (.dotx/.dotm), Word creates a new document each time, which quietly eliminates that risk. It feels like a small change,
but it’s one of those “why didn’t I do this sooner” moments.
In practice, the biggest win isn’t just faster document creationit’s consistent formatting under pressure.
Think about the last time you had to send something in five minutes: a client letter, a school form, a memo to leadership, a quick proposal.
You didn’t have time to debate fonts or spacing. You needed a document that looked professional immediately. Templates give you that baseline.
You start writing instead of designing.
Another real-world lesson: styles matter more than you think. People often build “templates” by manually formatting textbold here,
14pt there, extra spacing everywhere. It looks fine until you reuse it, copy sections around, or paste content from another document. Suddenly headings
change size, bullet spacing gets weird, and your table borders develop a personality. When you build templates using Word styles (Heading 1, Heading 2,
Normal, Table Grid variants), the document behaves predictably. Updating one style can clean up an entire document in seconds.
Attaching templates to existing documents can be a lifesaver, but it’s also where people get spooked. The “Automatically update document styles”
checkbox is powerful. In real use, it’s best treated like hot sauce: amazing in the right dose, disastrous if you pour it on without tasting.
If you’re standardizing internal reports, turning it on can instantly align headings, body text, and spacing across the file. But if someone has heavily
customized formattingespecially in a client deliverableyou may want to attach the template without auto-updating, then selectively apply styles where needed.
Teams learn quickly that templates are also about trust. If your template folder is a mess, people stop using it. If your template names are unclear,
people will grab whatever seems close and hack it. The fix is boring but effective: name templates like a product. “Client Proposal (Short),” “Invoice (Monthly),”
“Internal Memo (One Page),” “Resume (Professional).” Keep them in one folder. Put the folder path in a quick onboarding note. Then templates become the default habit.
Finally, templates reduce “hidden labor.” The time you spend nudging margins, fixing headings, and aligning logos is real time. It’s just time that never gets counted.
Once your templates are set, you’re not just saving minutesyou’re saving attention. And in the real world, attention is the scarce resource. Word templates won’t solve
every problem, but they will stop you from wasting brainpower on the same formatting decisions over and over. Your documents get more consistent, your workflow gets smoother,
and you’ll spend less time muttering “why is this doing that” at your screen.