
Table of Contents >> Show >> Hide
- Why Windowsills Get So Dirty in Spring
- 1. Start Dry Before You Start Wet
- 2. Match the Cleaner to the Sill Material
- 3. Use Tiny Tools for Tight Corners
- 4. Let Stubborn Buildup Soften Before You Scrub
- 5. Clean the Whole Window Zone, Not Just the Sill
- 6. Dry Everything Thoroughly and Check for Moisture Problems
- 7. Build a Two-Minute Spring Maintenance Habit
- Common Windowsill Cleaning Mistakes to Avoid
- Experience: What Spring Windowsill Cleaning Is Really Like in a Lived-In Home
- Conclusion
Spring has a funny way of exposing the parts of your home that have been quietly collecting evidence all winter. Sunlight gets brighter, windows get opened, pollen starts freeloading indoors, and suddenly your windowsill looks less “fresh seasonal transition” and more “tiny ledge-shaped archaeological dig.”
The good news is that cleaning a windowsill during spring does not require a hazmat suit, a dramatic soundtrack, or a five-step ritual passed down by Victorian housekeepers. It does, however, require the right order of operations, the right tools, and a little restraint. In other words: do not spray a muddy mess into existence and call it a plan.
If you want a sill that looks cleaner, feels cleaner, and stays cleaner longer, these seven pro-approved tips will help you tackle dust, pollen, grime, and the occasional mystery speck with less frustration and better results.
Why Windowsills Get So Dirty in Spring
Spring is peak windowsill season for a reason. After months of closed windows, condensation, trapped dust, and overlooked corners, warmer weather invites in fresh air along with pollen, dirt, insect debris, and whatever the wind feels like donating. Add indoor dust from blinds, curtains, pet hair, and everyday foot traffic, and your windowsill becomes a magnet for buildup.
That is why pros typically treat the sill as part of the whole window zone: the ledge, the tracks, the frame, the screen, and even the nearby window treatments. Clean one piece and ignore the rest, and the mess has a way of boomeranging back.
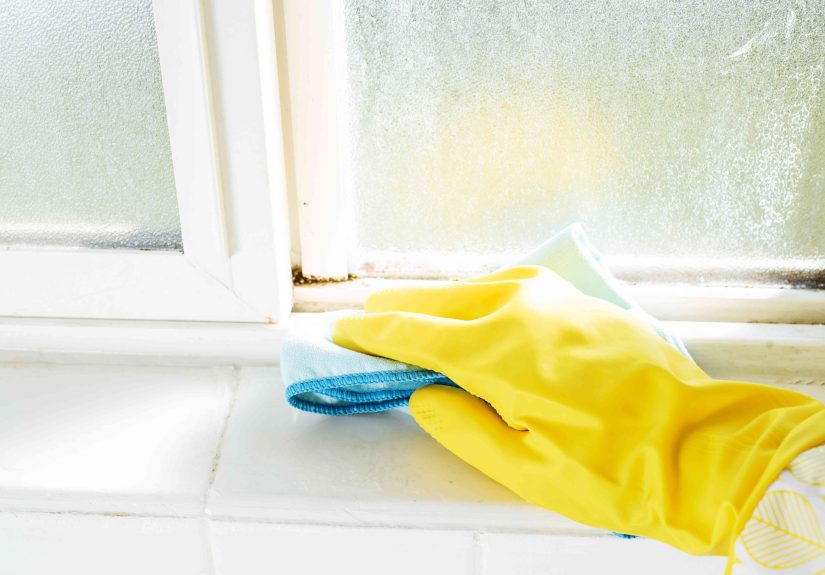
1. Start Dry Before You Start Wet
Vacuum first, then wipe
The biggest windowsill-cleaning mistake is spraying cleaner onto loose dust and debris. That turns dry dirt into sludge, which is deeply unpopular with both professional cleaners and people who value their Saturday.
Start by removing everything from the sill: planters, candles, frames, random coins, the rock your kid brought in three months ago, all of it. Then use a vacuum with a crevice or brush attachment to lift away loose dirt from the sill, tracks, and corners. If you do not have a vacuum attachment small enough, use a soft paintbrush, dry microfiber cloth, or handheld duster to sweep debris outward before wiping.
This first dry pass matters because it prevents smearing and makes the next step much faster. It also helps you see what you are really dealing with. Sometimes what looks like a huge stain is just a thick little dust blanket having an identity crisis.
Pro move: Open the window before vacuuming so you can reach the back edge of the sill and the track channels more easily. Those hidden corners are where spring grime loves to squat.
2. Match the Cleaner to the Sill Material
Mild beats harsh most of the time
Not every windowsill wants the same treatment. A painted wood sill, a vinyl sill, and an aluminum track may all sit in the same window area, but they do not all respond well to the same cleaner.
For routine spring cleaning, the safest starting point is warm water mixed with a few drops of dish soap. Dampen a microfiber cloth, not the sill itself, and wipe the surface thoroughly. This works especially well for painted finishes, vinyl, and most everyday grime. It is gentle, practical, and unlikely to create new problems while solving the old ones.
If you are dealing with mineral residue or stubborn grime on vinyl or metal areas, a diluted vinegar solution can help cut buildup. But be careful with real wood or delicate finishes. Wood can react poorly to acidic or overly wet cleaning methods, and soaking any sill is a bad idea. Think “lightly damp” rather than “small indoor rainstorm.”
Good rule: Start with the mildest cleaner that can reasonably do the job. You can always level up. It is much harder to apologize to a damaged finish.
3. Use Tiny Tools for Tight Corners
The heroes of this job are not glamorous
Windowsills and tracks are full of awkward creases, seams, grooves, and corners that a standard cloth simply cannot reach. This is where detail tools earn their moment in the spotlight.
An old toothbrush is excellent for loosening grime in tracks and around trim. Cotton swabs work well in tiny corners and around locking hardware. A soft detailing brush or even a clean paintbrush can sweep out dry debris without scratching surfaces. Wrap a cloth around a butter knife or flat craft stick if you need to reach into narrow channels, but do it gently and avoid jamming the tool into fragile edges.
For a kitchen windowsill, for example, you may notice greasy dust around the corners if the window sits near the stove. A toothbrush dipped in soapy water can break that residue loose far better than a folded rag. In a bathroom window, the issue may be condensation residue or mildew-prone grime in the track. A narrow brush gives you the control to clean it without flooding the area.
Translation: Small tools make the job look fussy, but they actually save time. Five minutes of detail work beats fifteen minutes of ineffective scrubbing with a giant sponge.
4. Let Stubborn Buildup Soften Before You Scrub
Patience is a cleaning product too
If your sill has caked dirt, stuck-on pollen residue, or old grime that seems emotionally attached to the surface, do not go straight to aggressive scrubbing. Let a cleaner sit for a few minutes first so it can loosen the buildup.
A simple baking soda paste can help with stubborn spots on durable surfaces. Apply a small amount, let it sit briefly, and then work it loose with a damp cloth or soft brush. For vinyl or metal tracks, a vinegar-based solution may help break down mineral deposits or dingy residue. Again, do not use that approach on wood unless you know the finish can tolerate it.
The key is controlled moisture. You want enough product to soften grime, not so much that liquid pools in the track or seeps into the surrounding trim. Overwetting is how a quick clean turns into water marks, swelling, or mildew trouble later.
Example: If your living room sill has visible blackened dust packed into the track corners, dab cleaner precisely where the buildup sits, wait a few minutes, then scrub with a toothbrush and wipe away the loosened mess with paper towel or a cloth. It is less dramatic than brute-force scrubbing, but more effective.
5. Clean the Whole Window Zone, Not Just the Sill
Screens, frames, blinds, and curtains are all accomplices
You can make a windowsill sparkle, but if the screen is dusty and the blind is shedding grime every time it moves, your victory will be brief.
Spring is the ideal time to clean the surrounding window area in one session. Vacuum or brush the screen first. If it needs a deeper clean, remove it and wash it gently with warm, sudsy water, then let it dry completely before reinstalling. Wipe the frame, trim, and nearby ledges with a damp microfiber cloth. Dust blinds or shades, and if your curtains are washable, launder them according to the care label.
This whole-zone approach keeps dust from immediately resettling onto the freshly cleaned sill. It also makes the room feel noticeably brighter. Clean glass gets the glory, but clean edges are what make the whole window look polished.
Design bonus: Once the sill is clean, it actually becomes usable again. A tiny herb pot, a vase, or a single candle looks intentional on a clean sill. On a dusty sill, it just looks like decor with trust issues.
6. Dry Everything Thoroughly and Check for Moisture Problems
Clean is good. Clean and dry is better.
Once you finish wiping, dry the sill, tracks, and corners with a clean microfiber cloth. This step is easy to skip and surprisingly important. Lingering moisture can leave streaks, attract new grime, and create conditions that encourage mold or mildew, especially in humid rooms or around older windows.
As you dry, inspect the area. Do you see condensation stains, peeling paint, soft wood, black specks, or musty odor? Those are clues that the issue is not just dirt. It may be moisture intrusion, repeated condensation, or poor airflow. If you clean the sill beautifully but ignore the reason it keeps getting damp, you will be repeating the same spring chore on a very annoying loop.
If you notice recurring moisture, open the window when weather allows, improve ventilation, and wipe away condensation promptly. If mold-like growth keeps returning or the sill feels damaged, the fix may go beyond cleaning and into repair territory.
Bottom line: A dry sill stays cleaner longer, looks better, and is less likely to become a science project.
7. Build a Two-Minute Spring Maintenance Habit
The secret is not cleaning harder. It is cleaning sooner.
After a deep clean, maintenance becomes pleasantly boring. That is exactly what you want.
Once or twice a week during spring, give the sill a fast reset. Use a dry microfiber cloth, duster, or vacuum brush to remove pollen and dust before it builds up. Wipe away any condensation when you see it. Shake out or dust window treatments regularly. If you keep decor on the sill, choose fewer items and lift them when you dust instead of cleaning around them like you are outlining a crime scene.
This habit takes about two minutes per window, and it saves you from another deep-clean marathon later. It also helps allergy season feel a little less aggressive, because you are not letting dust and pollen pile up indoors where they can keep circulating.
Simple schedule: Deep clean once at the start of spring, then do quick maintenance weekly until pollen season calms down.
Common Windowsill Cleaning Mistakes to Avoid
Even a well-meaning cleaning session can go sideways. Here are the mistakes that make windowsills harder to clean, easier to damage, or quicker to get dirty again:
Spraying cleaner on top of dust: This creates muddy streaks instead of removing debris.
Using too much water: Excess moisture can sit in tracks, soak into trim, and encourage mold.
Skipping the drying step: A damp sill may look fine for ten minutes and dingy by dinner.
Using harsh tools: Metal scrubbers and overly stiff brushes can scratch finishes.
Ignoring the screen and frame: They will redeposit dust onto your freshly cleaned sill.
Using the wrong cleaner on wood: Vinegar and heavy moisture are not universal solutions.
Experience: What Spring Windowsill Cleaning Is Really Like in a Lived-In Home
In real homes, cleaning a windowsill during spring is rarely just about a windowsill. It usually starts with one innocent glance in bright morning light. You open the blinds, the sun pours in, and suddenly the sill you have not thought about since colder weather arrived is fully visible in high definition. There is dust gathered in the corners, a faint yellow film from pollen, maybe a few tiny leaves or insect wings in the track, and a level of grime that somehow managed to hide in plain sight all winter.
The experience is especially relatable in busy households. In a kitchen, the sill often collects a strange mix of outdoor dust and indoor residue, especially if it sits near the sink or stove. In bedrooms, the buildup is usually softer and fluffier, thanks to lint, fabric dust, and pollen sneaking in from cracked-open windows. In bathrooms, the bigger issue tends to be moisture. The sill may look only mildly dirty until you notice specks in the corners or a stubborn line where condensation has dried again and again.
One of the most common experiences people describe is underestimating how much cleaner the entire room feels once the sill is done. A dusty sill quietly drags down the look of the whole window. But after a proper clean, the glass seems clearer, the trim looks sharper, and the room feels brighter even if you did not change anything else. It is one of those home tasks with a surprisingly high visual payoff for the amount of work involved.
There is also a practical satisfaction to the process. Vacuuming the dry debris first often delivers that immediate “well, that was definitely necessary” moment. Then comes the detail work with a toothbrush or cotton swab, which is oddly rewarding because it removes the dirt packed into places a cloth cannot touch. It is not glamorous, but it feels precise. A lot of spring cleaning jobs feel endless. Windowsill cleaning usually feels finite, which is refreshing.
Another real-world experience is discovering that maintenance matters more than intensity. People often scrub hard once, feel accomplished, and then ignore the area for months. But the windowsills that stay cleanest are usually the ones that get a very quick weekly pass with a microfiber cloth or vacuum brush. That tiny habit prevents the dramatic buildup that makes the chore feel miserable later. In other words, the best spring windowsill strategy is less “deep-clean warrior” and more “calm, mildly smug person with a routine.”
There is also a seasonal emotional side to it. Cleaning the sill often signals a shift out of winter mode. You wash the grime away, let in more light, maybe put a plant or a small vase back on the ledge, and the room feels awake again. It is one of those small household resets that makes spring feel real. Not in a magazine-perfect way, but in a lived-in, windows-open, fresh-air-and-better-light kind of way.
And perhaps that is why this particular task tends to stick with people. It is not just about removing dirt. It is about making the edges of a home feel lighter, cleaner, and more intentional. The windowsill may be a small surface, but during spring, it can punch far above its square footage.
Conclusion
Cleaning your windowsill during spring is one of those chores that seems minor until you do it properly and realize how much fresher the whole room looks. The formula is simple: remove dry debris first, use the gentlest effective cleaner, get into the corners, treat stubborn buildup patiently, clean the surrounding window area, dry everything well, and keep up with quick maintenance while pollen season is in full swing.
Do that, and your windowsill stops being a dusty catch-all and starts doing what it was meant to do: frame the light, hold a little charm, and avoid looking like it lost a fight with the outdoors.


