
Table of Contents >> Show >> Hide
- Why Reupholster a Basic Office Chair for Your Craft Room?
- Step Zero: Is Your Chair Worth Saving?
- Planning Your Office Chair Makeover
- Tools and Materials Checklist
- Step-by-Step: How to Reupholster a Basic Office Chair
- Design Ideas for a Craft Room Office Chair
- Care, Maintenance, and Safety Tips
- Common Mistakes to Avoid
- Real-Life Experiences: Lessons from Reupholstering a Basic Office Chair
- Conclusion
That sad, squeaky, basic black office chair in the corner? The one with the mystery stain
and the cushion that gave up somewhere around 2018? Good news: it’s about to become the star
of your craft room. Reupholstering a basic office chair is one of the easiest ways to add
color, personality, and comfort to your creative spacewithout dropping designer-chair money.
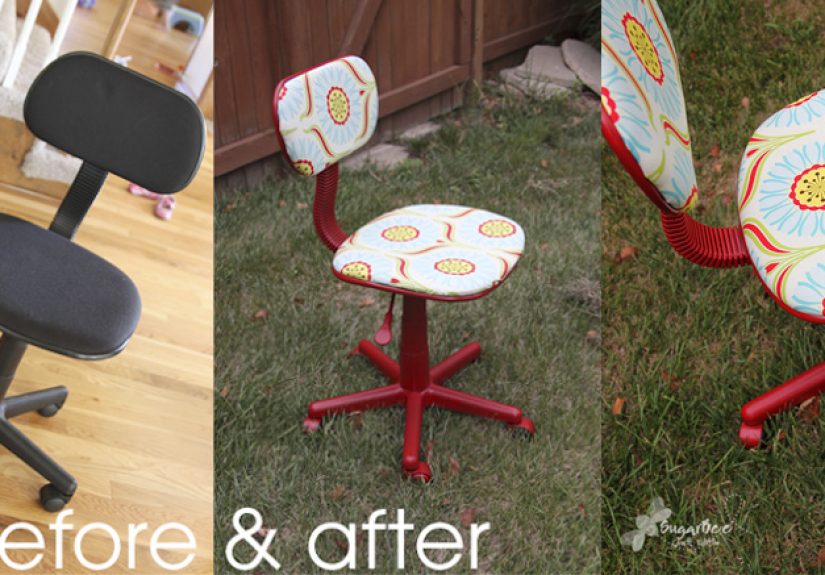
In the original Remodelaholic-style project, a plain task chair got a bright
new fabric and instantly looked custom and intentional in the craft room. The beauty of this
kind of makeover is that you don’t need an upholstery degree or a garage full of tools.
A staple gun, a good fabric, and a free afternoon can completely transform your workspace.
In this guide, we’ll walk through how to take a basic office chair apart, re-cover it, and put
it back together so it looks like it came from a boutique, not the clearance aisle. We’ll
also talk about choosing durable upholstery fabric, give design ideas for craft rooms, and end
with some real-world “I actually did this” experiences to help you avoid the usual DIY drama.
Why Reupholster a Basic Office Chair for Your Craft Room?
Your craft room is supposed to be a happy place. But a drab, worn-out office chair can drag
the whole vibe down. Reupholstering is the perfect middle ground between tossing the chair
and living with it forever:
- It’s budget-friendly. Most reupholster projects use 1–2 yards of fabric, plus staples. That’s usually way cheaper than a new ergonomic chair.
- You keep the comfort you already like. If the chair fits your body but the fabric is wrecked, a makeover is smarter than starting from scratch.
- You get a custom look. You’re not stuck with gray, black, or “office beige.” You can match your craft room colors, your favorite patterns, or even seasonal decor.
- It’s a sustainable choice. Reusing a chair frame and just replacing the fabric and cushion reduces waste and extends the life of something you already own.
And if you spend long hours sewing, scrapbooking, painting, or working at your Cricut,
a supportive, inviting chair turns “just one more project” into a lot less back pain.
Step Zero: Is Your Chair Worth Saving?
Before you grab a staple gun, check the basics:
- Frame: The base and back should feel solid. If metal is bent or plastic is cracked, fabric can’t fix that.
- Mechanisms: Does the chair still raise, lower, and tilt properly? If the gas lift is dead or the tilt is broken, consider whether repairs are worth it.
- Foam: If the seat feels like plywood, you may need to replace or add foam when you reupholster.
If the structure is good, you’ve got a perfect candidate for a craft room reupholster makeover.
Planning Your Office Chair Makeover
Choosing the Right Fabric for a Craft Room Chair
Craft rooms are high-traffic, high-mess spaces. You’re dealing with paint, glue, markers,
coffee, and occasionally glitter, which never truly leaves. That means your office chair
fabric needs to be tough and easy to clean, not just cute.
Look for these qualities in your upholstery fabric:
- Durability: Fabrics made for upholstery, like polyester blends, microfiber, canvas, or performance cotton, hold up better to constant sitting and scooting around.
- Tight weave: The tighter the weave, the better the fabric resists snagging, pilling, and wear.
- Easy to clean: Check for “stain-resistant,” “easy-clean,” or “performance fabric” on the label.
- Medium to darker colors or small prints: These hide little spills, smudges, and stray threads better than solid white or ultra-light colors.
Try to avoid fabrics that crush easily, snag quickly, or are hard to cleanlike low-quality
faux leather that cracks, delicate viscose, or heavily embroidered fabrics. They look gorgeous
on day one and tired by week three, especially in a chair you use daily in a creative space.
Picking a Pattern That Works in a Craft Room
This is where you can have fun. In a craft room, your office chair can be bold without
overwhelming the rest of the space. Consider:
- Large florals or geometrics to turn the chair into a focal piece.
- Small-scale prints (dots, tiny florals, subtle stripes) for a softer, vintage or cottage feel.
- Two-tone look: One fabric on the front, another on the back of the backrest for a “designer” feel.
- Color tie-ins: Pull colors from your craft room rug, storage bins, or wall art so the chair looks intentional.
If you’re using a directional pattern (stripes, chevrons, or anything with a “right side up”),
remember you’ll need to pay attention to how the pattern lines up on the seat and back.
Tools and Materials Checklist
Here’s what you’ll typically need for a basic office chair reupholster project:
- 1–2 yards of upholstery-weight fabric (measure your chair to be safe)
- Staple gun (manual, electric, or pneumatic) and plenty of staples
- Flathead screwdriver or staple remover for pulling out old staples
- Scissors or rotary cutter
- New foam or batting (optional, if the cushion is worn out)
- Measuring tape
- Marker or fabric chalk
- Camera or phone (to take reference photos as you disassemble)
- Basic screwdriver or Allen wrench set for removing seat/back from base
Optional but nice to have: spray adhesive to hold foam in place, a fabric steamer for smoothing
wrinkles, and upholstery pliers if you’re dealing with stubborn staples.
Step-by-Step: How to Reupholster a Basic Office Chair
1. Disassemble the Chair
Flip the chair over and look for screws holding the seat and back to the base. Remove the
seat and back pieces and set the rolling base aside so it’s not constantly trying to escape
across the floor while you work.
If there are armrests attached directly to the seat or back, you may need to unscrew those
as well. Keep all screws and hardware in a small bowl or labeled bag so nothing disappears
under the fabric pile.
2. Take Photos and Remove the Old Upholstery
Before you rip anything apart, take photos of the underside of the seat and back. These shots
are your “map” when you’re putting the chair back together.
Then, carefully remove the old staples using a flathead screwdriver or a staple lifter.
Lift the fabric away, saving each piece as a template. Underneath, you’ll usually find foam
or batting and sometimes a thin dust cover or backing layer.
If the foam is still supportive, you can reuse it. If it’s flat, crumbly, or smells like
it’s seen things, replace it with fresh foam cut to size.
3. Refresh the Cushion (Optional but Recommended)
A new fabric on top of a dead cushion is like putting lipstick on a nap. If your seat feels
hard, add or replace foam:
- Use high-density foam for better long-term comfort.
- Add a layer of batting over the foam to soften edges and prevent sharp corners.
- Use spray adhesive to keep foam from shifting as you stretch the fabric.
This step makes a huge difference if you spend hours at your craft table cutting, gluing,
or working on delicate projects.
4. Use Old Fabric as a Pattern and Cut the New Fabric
Lay the old fabric pieces on top of your new fabric. Align any patterns or stripes the way
you want them to appear on the finished chair. Add a little extra margin (about an inch)
if the old upholstery felt tight or difficult to stretch.
Trace around the old pieces with fabric chalk or a marker and cut out your new pieces.
For patterned fabric, make sure the main motif is centered on the seat and balanced
on the backrest. That small detail makes a DIY project look professional.
5. Staple the New Fabric in Place
Place the fabric face down, then center the foam and chair seat (or back) on top. Start
stapling in the middle of one side, pulling the fabric snug but not overly tight.
Then move to the opposite side and add a few staples, working your way out toward the corners.
For a smooth finish:
- Alternate sides as you staple so tension stays even.
- At corners, fold the fabric like wrapping a presentcreate neat pleats or a single clean fold.
- Sit on the seat before you finish stapling everything to check for wrinkles or looseness.
Repeat the process for the chair back. Some chairs have a plastic backing that snaps over
the stapled fabric; others use a dust cover. Either way, the goal is to hide your staple line
and give the back a finished look.
6. Reassemble the Chair
Once the seat and back are covered, reattach them to the chair base using the original screws.
Double-check that everything is tight and that the chair still adjusts properly.
Roll it into your craft room, adjust the height for your worktable, and take a moment to
admire how much more cheerful and “you” it looks compared to the original generic fabric.
Design Ideas for a Craft Room Office Chair
Not sure what direction to go in? Here are some fun ideas to spark your creativity:
- Bold floral chair in a white room: Perfect if your craft room has mostly neutral walls and furniture. A big floral chair becomes your art piece.
- Color-block look: Use one solid color on the seat and a coordinating pattern on the back.
- Vintage-inspired: Try ticking stripes, tiny florals, or cottage-core prints to match a retro sewing or quilting space.
- Modern graphic: Geometric prints, brushstroke patterns, or abstract designs pair well with minimalist storage and pegboards.
- Theme to match your craft: Think sewing motifs, paint-splatter patterns, or subtle crafty icons if you can find them in upholstery-weight fabric.
Remember, it’s your craft roomthis is where you can be as playful as you want. If you regret
a fabric choice later? Good news. You now know exactly how to reupholster the chair again.
Care, Maintenance, and Safety Tips
Once your office chair is reupholstered, a tiny bit of maintenance keeps it looking great:
- Vacuum regularly to pick up threads, dust, and lint.
- Spot clean quickly when you spill paint water or coffee. Blot, don’t scrub.
- Check staples and seams every so often, especially if you have kids or pets who like to spin in the chair.
- Use a fabric protector spray if your material allows it, especially for light-colored or heavily used chairs.
Also, be honest about how you use the chair. If you often climb on it to reach a high shelf
(we’ve all done it), make sure the base and casters are really sturdyand maybe consider
a step stool instead.
Common Mistakes to Avoid
- Using thin or non-upholstery fabric: Quilting cotton is adorable but often too thin for a chair you sit in daily.
- Not adding enough fabric: Cutting too close to the template can leave no room for pulling and stapling.
- Ignoring pattern direction: Nothing ruins a makeover like upside-down flowers or diagonal stripes that were meant to be straight.
- Skipping foam replacement: New fabric on top of worn-out foam still feels uncomfortable.
- Over-stapling one side first: This creates weird ripples. Always alternate sides as you go.
Real-Life Experiences: Lessons from Reupholstering a Basic Office Chair
Reupholstering a basic office chair for a craft room is one of those projects that looks
intimidating in theory but is surprisingly doable in real life. The first time many DIYers
tackle it, they usually experience the same roller coaster of emotions: excitement, mild
panic, “why are there so many staples,” and then proud satisfaction when the chair finally
rolls back into the room looking brand new.
One of the biggest “aha” moments people have is realizing how forgiving the process is.
As long as your fabric is pulled evenly and your staples are secure, small imperfections
rarely show once the chair is upright. Tiny pleats at the corners, a slightly off-center
motif on the backnone of that will matter once you start using the chair in your craft
space every day. What you notice is how much more cheerful and personal it feels.
Another common learning moment is underestimating how tough old staples can be. Many basic
office chairs seem to have been assembled by a person who was paid per staple. The first
half hour of your project may be spent slowly prying them out and wondering if this was
a terrible idea. The trick is to go slowly, work in good light, and take breaks. Once the
old fabric is off, the “fun part” of stretching and stapling the new fabric goes much faster.
People also often say they wish they had upgraded the foam sooner. When you sit in the
chair for hours while sewing or cutting vinyl, every bit of cushioning counts. Adding a
fresh layer of high-density foam or batting can completely change how supportive the chair
feels. Many DIYers report that after reupholstering and refreshing the cushion, their old
budget chair feels more comfortable than their newer store-bought one.
Pattern placement is another big lesson learned. The first time, it’s easy to just cut
around the template without thinking about where the main motif will land. Then you flip
the seat over and realize the giant flower is off to one side or a stripe is angled slightly.
By the second project, most people lay the old fabric carefully on the new material and
adjust until the pattern sits exactly where they want it before cutting. That small time
investment pays off in a professional-looking finish.
Finally, a lot of crafters talk about how this project changes the way they see other
furniture. Once you’ve successfully reupholstered a basic office chair, you start eyeing
thrift-store finds and hand-me-down pieces differently. A tired-looking desk chair, a
dated accent chair, even dining chairs with worn seats stop being “junk” and start looking
like opportunities. For a craft room, that’s especially powerfulyou can build a space that
feels cohesive and curated without spending a fortune, simply by updating fabric and
finishes on pieces you already own or can find secondhand.
In the end, a reupholstered office chair becomes more than just a seat. It’s a little
confidence boost every time you roll up to your cutting mat or sewing machine. You didn’t
just buy a cute chairyou made it. It matches your space, your style, and the creative
energy you want in your craft room. And the best part? Once you know how easy it is, it
probably won’t be the last chair you makeover.
Conclusion
Transforming a basic office chair into a custom craft room showpiece is absolutely within
reach, even if you’ve never touched upholstery before. By choosing durable, easy-clean
fabric, refreshing the cushion, and following a simple disassemble–recover–reassemble
process, you can give a forgotten chair a second life.
Whether you go bold and colorful or soft and subtle, a reupholstered office chair instantly
upgrades your creative workspace. It’s comfortable, budget-friendly, and uniquely yours
exactly what a craft room deserves.


