
Table of Contents >> Show >> Hide
- Why a Dollar Store Bathroom Backsplash Actually Makes Sense
- What Materials Work Best for a Dollar Tree DIY Backsplash?
- How to Plan the Look Before You Stick Anything to the Wall
- The Most Important Step: Wall Prep
- Step-by-Step: How to Install a Dollar Tree DIY Backsplash in a Bathroom
- How to Make a Cheap Bathroom Backsplash Look Expensive
- Common Mistakes That Ruin a Budget Bathroom Reno
- Is a Dollar Tree Backsplash Worth It?
- Extra DIY Experiences and Real-World Lessons From Budget Bathroom Makeovers
- Final Thoughts
A bathroom renovation can get expensive fast. One minute you are innocently browsing paint swatches, and the next minute you are pricing out tile saws, grout floats, and a vanity that costs more than your first laptop. That is exactly why the Dollar Tree DIY backsplash trend has become such a crowd-pleaser. It delivers the visual payoff of a mini makeover without demanding a full-scale remodel, a contractor, or a dramatic speech to your bank account.
The idea is simple: use budget-friendly peel-and-stick materials, smart wall prep, and a few finish details to create a bathroom backsplash that looks polished, protects the wall behind the sink, and gives tired builder-grade space some personality. The secret is not just buying cheap materials. The real magic is knowing where low-cost products work, where they do not, and how to install them so the finished result looks intentional instead of “I panic-decorated at 9 p.m.”
In this guide, you will learn how to plan a budget bathroom reno with dollar-store materials, choose the right backsplash style, prep the wall correctly, install it neatly, and make it hold up in a humid bathroom. You will also get realistic expectations, common mistakes to avoid, and extra experience-based advice at the end so your project looks more “small-space glow-up” and less “sticky situation.”
Why a Dollar Store Bathroom Backsplash Actually Makes Sense
A backsplash is one of the most strategic upgrades you can make in a bathroom because it lives in a small area with a big visual impact. The wall behind the vanity catches toothpaste splatter, water spots, soap drips, and whatever chaos happens when someone rushes through a Monday morning routine. Even a simple peel-and-stick surface can make that zone easier to wipe down while giving the room color, texture, and a finished edge.
A Dollar Tree backsplash idea is especially appealing in powder rooms, guest bathrooms, rental spaces, and dated vanity areas where you want a quick transformation without removing drywall or learning advanced tiling skills. Since most bathroom backsplash areas are fairly small, the total material cost can stay surprisingly low. That makes this project ideal for renters, first-time DIYers, house flippers on a budget, or anyone who enjoys the thrill of making a room look better for the price of takeout.
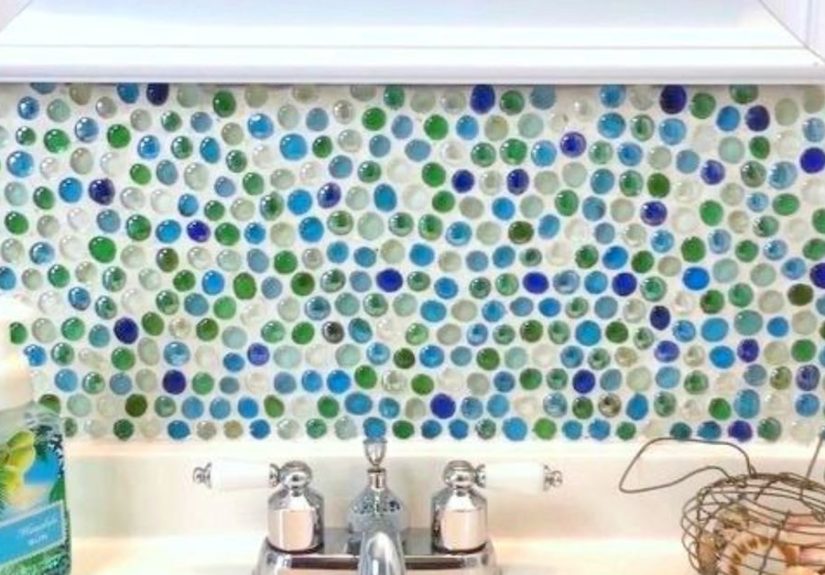
What Materials Work Best for a Dollar Tree DIY Backsplash?
Not every bargain-bin product belongs near a sink. The smartest version of this project combines low-cost materials with good judgment. In a bathroom, the best choices are usually vinyl or PVC peel-and-stick wall tiles, removable backsplash panels, or peel-and-stick wallpaper designed for humid rooms. The goal is to use something that can handle light splashes, wipe clean easily, and adhere well to a smooth wall.
Good options for a budget-friendly bathroom backsplash
- Peel-and-stick faux subway tiles for a classic look
- Marble-look vinyl tiles for a more upscale vanity area
- Patterned peel-and-stick sheets for boho, vintage, or cottage bathrooms
- Dollar-store contact paper only if it is thick, wipeable, and placed away from constant wetness
- Trim pieces, flexible molding, or painted wood strips to frame the backsplash and make it look custom
What to skip
- Thin paper liners that wrinkle at the first hint of humidity
- Products meant for shelves only, unless you are treating this as a very temporary update
- Anything installed inside a shower or in a spot with constant direct water spray
- Highly textured walls that prevent full adhesive contact
This is the line that matters most: a peel-and-stick bathroom backsplash works best around the vanity and sink wall, not as a substitute for real tile in the shower. If the space gets occasional splashes and steam, you are in good shape. If it gets blasted like a car wash, choose a more durable material.
How to Plan the Look Before You Stick Anything to the Wall
Budget DIY succeeds when it looks deliberate. Before you peel a single backing sheet, decide what style you want the bathroom to communicate. Do you want fresh farmhouse? A modern black-and-white vanity wall? Soft marble that fakes luxury for less? A tiny powder room can handle a bolder pattern, while a main bathroom often looks calmer with classic shapes like subway tile or stone-inspired panels.
Measure the width of the vanity and the height of the backsplash area. Then lay out your tiles or sheets on the floor or countertop to see how the pattern repeats. If you need cuts near outlets, mirrors, or side walls, plan those early. Starting with a centered layout usually produces the cleanest look, especially when the backsplash sits directly under a mirror.
It also helps to think in layers. The backsplash is only one part of the makeover. Pair it with a fresh coat of paint, updated hardware, a new light fixture, or a framed mirror, and suddenly your “cheap bathroom upgrade” starts flirting with “stylish renovation.”
The Most Important Step: Wall Prep
Here is the unglamorous truth: the success of a DIY peel-and-stick backsplash is mostly decided before installation starts. Smooth, clean, dry walls matter more than optimism. Adhesive products love flat surfaces and hate dust, grease, old soap film, loose paint, and textured drama.
Prep checklist for the best adhesion
- Clean the wall thoroughly with a degreasing cleaner or mild soap, then let it dry completely
- Patch holes or dents with spackle and sand smooth
- Scrape away peeling paint or flaky caulk
- Make sure any newly painted wall has fully cured before application
- If installing over old tile, fill deep grout lines so the new surface sits flatter
- Use painter’s tape and a level to mark your starting line
This is not the place to rush. A five-dollar backsplash installed on a properly prepped wall can look shockingly good. The same backsplash slapped onto a dusty, damp, textured surface will start curling at the corners like it is trying to escape.
Step-by-Step: How to Install a Dollar Tree DIY Backsplash in a Bathroom
1. Measure the backsplash zone
Measure the width behind the vanity and decide how high the backsplash should go. Some people stop a few inches above the countertop, while others run the material up to the bottom of the mirror for a more dramatic look. A taller backsplash can make a cheap material look more intentional, almost like a design feature instead of an afterthought.
2. Dry-fit the pattern
Place the sheets in position without removing the backing. Check how seams align and where cuts will land. This is the moment to notice if one skinny sliver on the edge will ruin the vibe. Shift the layout now, not later.
3. Start with a level line
Use a level and lightly mark a guide on the wall. Bathrooms love to pretend they are square when they are not, so trust your level, not your eyeballs. Your countertop, vanity top, or mirror frame may not be perfectly straight.
4. Peel slowly and apply with pressure
Remove a little backing at a time instead of ripping the whole sheet open like a holiday gift. Line up the first piece carefully, press it into place, and smooth outward to push out air bubbles. A plastic smoother, credit card wrapped in a cloth, or dry microfiber towel can help.
5. Trim around outlets and edges
Use a utility knife, sharp scissors, or a straightedge to cut clean lines. For outlets, remove the cover plate first and trace the opening carefully. Small, precise cuts look far more professional than aggressive “close enough” carving.
6. Seal the edges that meet water-prone areas
Once the backsplash is installed, apply a thin bead of bathroom-safe silicone or acrylic caulk where the backsplash meets the countertop or vanity top, and in any exposed corner seams that might catch splashes. This step helps keep moisture from sneaking behind the material and also gives the whole project a more finished look.
7. Press again and let it settle
Go over every tile or panel with firm pressure. Pay extra attention to edges and seams. Then let the adhesive settle according to product instructions before exposing the area to heavy steam or cleaning.
How to Make a Cheap Bathroom Backsplash Look Expensive
This is where style does the heavy lifting. Low-cost materials do not have to look cheap if the overall design is clean. One of the easiest ways to upgrade the final appearance is to keep the pattern simple and the installation crisp. Busy prints can work in a powder room, but a vanity backsplash usually benefits from order, symmetry, and neat trim.
Easy designer tricks
- Choose white, soft gray, greige, or marble-look finishes for a timeless effect
- Use peel-and-stick subway tile in a running bond pattern for a classic bathroom style
- Frame the backsplash with painted trim or slim molding
- Coordinate the backsplash with black, brass, or brushed nickel hardware
- Replace builder-grade mirrors with framed versions to make the wall feel intentional
- Keep clutter off the vanity so the backsplash stays visible
A small bathroom does not need twenty design ideas at once. It needs one good idea repeated confidently. If your backsplash has a strong pattern, keep the wall color quiet. If the backsplash is subtle, let a bold mirror or sconce have its moment.
Common Mistakes That Ruin a Budget Bathroom Reno
The most common mistake is treating peel-and-stick products like magic. They are convenient, but they are not miracle workers. If the wall underneath is damp, bumpy, dirty, or cracked, the backsplash will advertise that fact almost immediately.
Avoid these rookie errors
- Installing on textured walls without sanding or smoothing first
- Skipping the dry fit and discovering too late that the pattern drifts
- Using a backsplash product in a direct shower zone
- Ignoring loose corners instead of re-pressing or sealing them right away
- Choosing an ultra-thin material and expecting it to hide deep flaws
- Forgetting caulk where the backsplash meets the sink or countertop
Another mistake is assuming “temporary” means “zero prep needed.” In reality, removable products still need smart installation. The difference between a renter-friendly upgrade and a future peeling headache often comes down to ten extra minutes of cleaning and leveling.
Is a Dollar Tree Backsplash Worth It?
Yes, with the right expectations. A Dollar Store DIY backsplash is absolutely worth it when your goal is to refresh a vanity wall, improve the appearance of an outdated bathroom, and spend as little as possible while still getting a visible transformation. It is especially worthwhile in small spaces where even a modest material upgrade changes the entire feel of the room.
No, it is not a forever solution in every bathroom. It will not replace professionally installed tile in a wet shower area, and the cheapest versions may not age gracefully in a heavily used family bathroom. But for a guest bath, powder room, apartment vanity, or quick home staging project, it can be one of the highest-impact low-cost upgrades you can make.
Think of it this way: this project is not pretending to be luxury stone. It is a clever, affordable design move that creates a cleaner, prettier backdrop where you brush your teeth and contemplate whether that expensive serum is doing anything at all.
Extra DIY Experiences and Real-World Lessons From Budget Bathroom Makeovers
One of the funniest things about a budget-friendly bathroom reno is how small decisions suddenly feel huge. A sample tile that looked chic under store lighting can look weirdly yellow under your bathroom bulb. A gorgeous bold print can feel like too much once it is sitting behind a sink, a faucet, a tray, a soap dispenser, and the electric toothbrush that somehow always ends up in the middle of the vanity like it pays rent. That is why experience teaches you to slow down and test the visual weight of a material before committing.
People also learn quickly that cheap materials do not automatically mean a cheap-looking room. In fact, the opposite can happen. A very simple white or marble-look peel-and-stick backsplash paired with a clean vanity top and fresh paint often looks better than a cluttered bathroom filled with more expensive finishes that do not coordinate. The room starts to feel calmer, brighter, and easier to clean, which is honestly the dream for most bathrooms.
Another common experience is discovering that prep work is the real makeover. Many DIYers start the project excited about the pretty part, then realize the wall behind the vanity is holding onto years of residue, old caulk, and random mystery spots that no one wants to identify. Once that wall gets cleaned, patched, sanded, and freshly painted, the whole bathroom already looks better before the backsplash even goes up. The peel-and-stick tile becomes the finishing touch, not the sole hero trying to rescue a rough surface.
There is also a confidence factor. Bathroom projects can intimidate beginners because the room feels functional and technical. But a vanity backsplash is often the perfect starter project. It teaches measuring, cutting, leveling, pattern planning, and caulking in a manageable area. If one tile goes wrong, the entire house does not collapse in disappointment. You peel it back, fix it, and carry on. That is a pretty good life lesson, actually.
Experienced DIYers also know that humidity changes everything. A powder room with little steam is much more forgiving than a busy bathroom used by multiple people every day. In high-humidity spaces, neat sealing around the bottom edge matters more, ventilation matters more, and material choice matters more. That does not mean you cannot do a dollar-store-inspired backsplash there. It just means you should be a bit pickier and a bit more meticulous. The cheaper the product, the more your installation quality has to carry the project.
Finally, there is the emotional payoff, which should not be underestimated. A tired bathroom can make an entire home feel neglected. Updating that one small wall behind the sink can make the space feel fresh, cared for, and personal. It can give a rental more charm, make a guest bathroom look intentional, or help a dated vanity stop looking like it came free with the house in 1998. And when the project cost stays low, the satisfaction is even sweeter. There is a special kind of joy in looking at a polished backsplash and knowing it came from smart planning, a handful of affordable supplies, and the refusal to let an ugly wall keep winning.
Final Thoughts
A Dollar Tree DIY backsplash for a bathroom is proof that a smart small-space update can do a lot with a little. With the right material, proper wall prep, a level starting line, and clean caulked edges, you can create a vanity backsplash that looks stylish, protects the wall, and makes the whole bathroom feel more finished. It is not about pretending a dollar-store product is the same as custom tile. It is about using affordable materials strategically and getting the biggest visual return for the least amount of money.
In other words, this is not just a cheap fix. It is a clever one. And in the world of home improvement, clever often ages better than expensive.


