Table of Contents >> Show >> Hide
- What Is Gradient Infill in 3D Printing?
- Why Traditional Infill Can Be Wasteful
- How Gradient Infill Works
- Gradient Infill vs. Adaptive Cubic, Gradual Infill, and Lightning Infill
- When Gradient Infill Makes the Most Sense
- When Gradient Infill Is Not Worth the Trouble
- Best Slicer Settings for Practical Gradient Infill
- Real-World Examples of Gradient Infill Strategy
- Common Mistakes to Avoid
- Experience Notes: What Printing With Gradient Infill Teaches You
- Conclusion: Smarter Plastic Beats More Plastic
In 3D printing, infill is the quiet little skeleton hiding inside your part. It does not get the glamour of silky outer walls, crisp chamfers, or that first-layer photo everyone posts like it is a newborn baby. But infill often decides whether a print feels solid, survives a drop, supports its top layers, or turns into a crunchy plastic waffle under pressure.
The problem is simple: traditional infill treats the inside of a model too evenly. You choose 10%, 20%, 40%, or 100%, and the slicer spreads that density through the whole object. That works for many prints, but it is not always smart. A phone stand does not need the same internal strength everywhere. A bracket does not experience stress evenly from edge to center. A tool handle needs toughness near the shell and mounting points, not necessarily in the soft, sleepy middle.
That is where gradient infill enters the workshop wearing safety glasses and a suspiciously clever grin. Instead of filling the entire print at one density, gradient infill places more plastic where it matters most and less plastic where it does not. The result can be a stronger, lighter, faster, and more efficient 3D printassuming you understand how to use it correctly.
What Is Gradient Infill in 3D Printing?
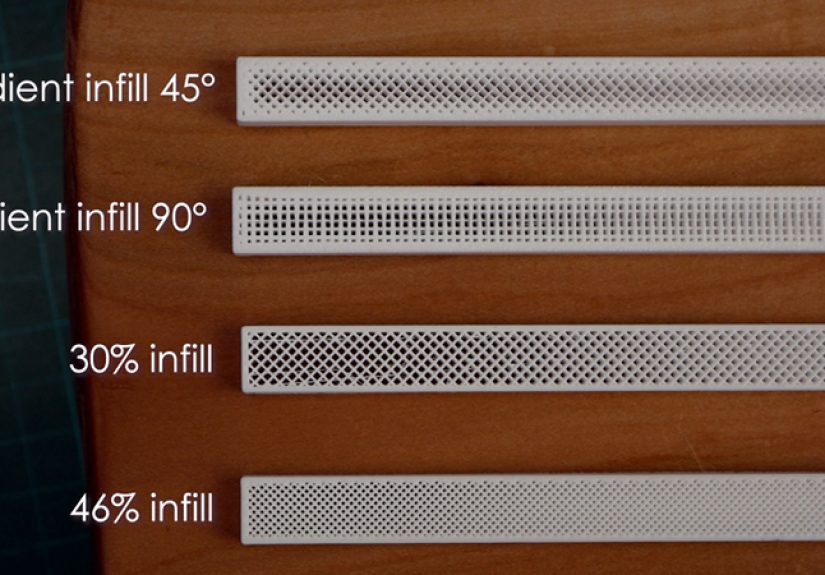
Gradient infill is a variable-density infill strategy that changes how much internal material is used across different areas of a 3D printed part. In plain English, it means the slicer or post-processing method can make one region dense and another region sparse inside the same model.
Most hobbyists know standard infill settings: grid at 20%, gyroid at 15%, cubic at 30%, lightning infill for display models, and so on. Those settings apply broadly across the model. Gradient infill takes a more local approach. It asks, “Where does this print actually need support, stiffness, or strength?” Then it puts plastic there instead of wasting filament in areas that are mostly along for the ride.
There are several forms of gradient or variable infill. Some approaches increase density near the outer walls. Others increase density near top surfaces to prevent sagging. Some use modifier meshes to reinforce bolt holes, hinge areas, clamp zones, or thin arms. More experimental methods alter extrusion width dynamically, creating a smooth transition between dense and sparse internal regions.
Why Traditional Infill Can Be Wasteful
Standard infill is useful because FDM printing does not need to produce fully solid plastic objects. A 20% infill part can often be strong enough for prototypes, enclosures, organizers, fixtures, and decorative pieces. A 100% infill part, meanwhile, may sound heroic, but it can be slow, heavy, expensive, and sometimes not much better in real-world performance than a smarter combination of walls, top layers, and moderate infill.
In many mechanical parts, the highest stresses occur near the surface. When a beam bends, the outer regions experience more tension and compression than the center. That means stuffing the very middle with extra plastic may not improve strength as much as expected. It may simply increase print time while making your filament spool look nervous.
Traditional infill also creates a compromise between strength and speed. High infill density can improve stiffness and compression resistance, but it increases material use and print duration. Low infill saves time and filament, but it may weaken the part, reduce support for top layers, and cause surface drooping over wide gaps. Gradient infill tries to escape that compromise by distributing material more intelligently.
How Gradient Infill Works
The basic idea is to vary internal structure based on distance, geometry, or expected load. A slicer or post-processor can calculate which areas are closer to the shell, top surfaces, or selected reinforcement zones, then adjust the infill density or extrusion amount accordingly.
1. More Plastic Near the Walls
One common method places denser infill close to the outer perimeter and gradually reduces density toward the center. This makes sense for many functional prints because the shell and nearby internal structure often carry much of the bending load. It can also improve the feel of the part because the outer region becomes better supported.
For example, imagine printing a large rectangular handle. A uniform 40% infill may work, but it uses material everywhere. A gradient approach might use dense internal structure near the walls and a lighter center. The handle can feel solid from the outside while avoiding unnecessary plastic in the low-stress core.
2. Denser Infill Under Top Layers
Another version focuses on supporting top surfaces. Some slicers include gradual infill settings that increase infill near the top of the model and reduce it lower down. This is especially helpful for prints with broad top surfaces, where too little support underneath can cause sagging, gaps, or rough top layers.
This method is not always the same as true load-based gradient infill, but it solves a very practical problem: keeping the roof from looking like it had a rough weekend. For large decorative models, boxes, planters, terrain pieces, and cosplay parts, denser support near the top can produce better surfaces without filling the entire object heavily.
3. Modifier-Based Reinforcement
Modern slicers such as PrusaSlicer, Bambu Studio, and others allow users to apply different settings to specific areas of a model using modifier shapes. You can add a cube, cylinder, sphere, or custom mesh that overlaps part of the model, then assign different infill density, wall count, layer settings, or extrusion width inside that region.
This is not always a smooth gradient, but it is one of the most practical ways to put more plastic exactly where you want it. A mounting boss can get 70% infill while the rest of the enclosure stays at 15%. A hinge barrel can be reinforced without turning the entire print into a brick. A screw hole area can receive extra perimeters and denser infill so it does not crack after the second enthusiastic tightening.
4. Dynamic Extrusion Width
More experimental gradient infill methods adjust extrusion width during infill moves. Instead of changing only the spacing between infill lines, the printer can extrude thicker internal lines near the perimeter and thinner lines toward the center. This can create a smooth material gradient without completely redesigning the infill pattern.
Dynamic extrusion can be powerful, but it demands a well-calibrated printer. Direct-drive extruders generally respond faster to rapid flow changes than long Bowden systems. If the printer cannot keep up, the gradient may turn into inconsistent under-extrusion, blobs, slipping filament, or the classic “why did I touch the settings?” moment.
Gradient Infill vs. Adaptive Cubic, Gradual Infill, and Lightning Infill
The phrase gradient infill is often used broadly, but different slicers approach the idea in different ways.
Adaptive Cubic Infill
Adaptive cubic infill automatically changes cell size depending on the distance from walls and surfaces. It tends to be denser near the outer regions and more open in the center of large volumes. This is useful for big prints because it can reduce material use while still supporting the outer shell and top layers.
Gradual Infill
Gradual infill usually changes density along the vertical direction. It is often used to increase internal support near top layers while using less infill below. This is excellent for improving top surface quality without printing the entire part at a high density.
Lightning Infill
Lightning infill is designed mainly to support top surfaces with minimal internal material. It is great for fast display models and large decorative objects, but it is not the best choice for functional parts that need strength from multiple directions. Think of lightning infill as scaffolding, not a bodybuilder.
Modifier Meshes
Modifier meshes let users define specific zones with different print settings. This is often the most controllable option for functional parts because you can reinforce predictable stress points. It is not always automatic, but it gives designers precise control over where extra plastic goes.
When Gradient Infill Makes the Most Sense
Gradient infill shines when a part has uneven strength requirements. It is especially useful for larger FDM prints, functional prototypes, brackets, handles, enclosures, tooling, jigs, fixtures, and parts with screw bosses or loaded edges.
Consider a wall-mounted hook. The area around the screw holes and the curved hook base needs more strength than the decorative outer end. A uniform 50% infill might work, but it wastes material. A smarter setup might use three or four walls, 20% gyroid infill across the part, and a modifier region with 60% infill around the screw holes and hook root.
Another example is a drone component. Weight matters, but so does strength near motor mounts and frame arms. Gradient or modifier-based infill allows designers to reinforce critical areas while keeping the rest lightweight. The same logic applies to robotics parts, camera mounts, workshop fixtures, and custom automotive interior clips.
When Gradient Infill Is Not Worth the Trouble
Not every print deserves advanced infill strategy. A small keychain, simple figurine, vase-mode object, or desk organizer may print perfectly with normal infill. If the part is tiny, the difference between uniform and gradient infill may be too small to matter.
Gradient infill also may not help much when the part is loaded primarily in pure tension or pure compression through the entire cross-section. In those cases, a more uniform internal structure may be better. For serious engineering applications, you should test the part under real load conditions rather than assuming a slicer trick will magically defeat physics. Physics is rude like that.
Another limitation is slicer compatibility. Some slicers offer built-in adaptive infill options. Others require modifier meshes. Experimental smooth-gradient methods may require G-code post-processing, which is not ideal for beginners. If your workflow depends on predictable repeatability, keep changes documented and test before printing production parts.
Best Slicer Settings for Practical Gradient Infill
There is no universal perfect setting, but the following approach works well for many functional FDM prints.
Start with Walls First
For strength, do not rely only on infill. Increasing wall count often improves durability more efficiently than simply raising infill density. A functional print may start with three to five walls, depending on nozzle size and part geometry. If a part breaks at the shell, more infill in the center will not save it.
Use Moderate Base Infill
A base infill of 15% to 30% is often enough for general functional parts. Gyroid, cubic, grid, and triangular patterns all have useful roles. Gyroid is popular for multi-directional loads and smoother motion. Grid and triangular patterns can be stronger in certain directions but may create more vibration or nozzle collisions if poorly tuned.
Add Dense Zones Where Needed
Use modifier meshes around screw holes, tabs, hinges, clip roots, bearing seats, and loaded interfaces. These areas may benefit from 50% to 80% infill, extra walls, or increased top and bottom layers. The goal is not to make the whole model solid. The goal is to reinforce the “danger zones.”
Mind Infill-to-Wall Overlap
Infill must bond properly to the walls. Too little overlap can leave weak connections. Too much overlap can cause rough surfaces, bulging, or over-extrusion. If the print feels strong internally but separates near the wall, check infill overlap, flow calibration, temperature, and print speed.
Slow Down Heavy Infill
Dense infill and wide extrusion lines require the hot end to push more plastic. If the printer moves too fast, under-extrusion can weaken the internal structure. Slowing infill speed or raising nozzle temperature slightly can help, especially with thicker infill lines or high-flow materials.
Real-World Examples of Gradient Infill Strategy
Example 1: Shelf Bracket
A shelf bracket experiences high stress near the mounting holes and the inside corner where the arm meets the wall plate. Instead of printing the whole bracket at 70% infill, use 25% gyroid or cubic infill overall, add four or five walls, and place dense modifier zones around the screw holes and inside corner. This approach can save filament while improving strength where failure is most likely.
Example 2: Electronics Enclosure
An electronics box mostly needs clean walls and good screw posts. The flat panels do not need heavy internal fill, but screw bosses need toughness. Use low to moderate infill for the body, extra walls for the shell, and high-density modifiers around screw posts. This makes the enclosure lighter and faster to print while reducing cracked mounting points.
Example 3: Tool Handle
A custom tool handle benefits from a strong outer region and comfortable weight. Dense infill near the surface can improve stiffness and feel, while a lighter core reduces material use. If the handle has a metal insert or threaded rod, reinforce the insert zone with higher density and extra perimeters.
Common Mistakes to Avoid
The first mistake is assuming higher infill always means a stronger part. Strength depends on material, layer adhesion, wall count, print orientation, nozzle temperature, geometry, and how the load is applied. A poorly oriented 80% infill part can fail faster than a well-designed 25% infill part with smart walls and reinforcement.
The second mistake is using gradient infill without checking the slicer preview. Always inspect the internal structure layer by layer. Make sure dense zones actually cover the areas you want to reinforce. Modifier meshes can miss the target if they are slightly misplaced, and adaptive infill may behave differently depending on model size and wall thickness.
The third mistake is ignoring print calibration. Gradient infill depends on consistent extrusion. If your E-steps, flow rate, pressure advance, retraction, or temperature are poorly tuned, fancy infill will not rescue the part. It will simply fail with more creativity.
Experience Notes: What Printing With Gradient Infill Teaches You
After experimenting with variable infill strategies, one lesson becomes obvious: the slicer preview is your best friend. It is tempting to trust the setting name and send the print immediately, but the preview often reveals surprises. A modifier meant to strengthen a screw boss may not reach deep enough. Adaptive infill may leave a larger center cavity than expected. Gradual infill may help the top surface but do almost nothing for a side-loaded bracket. The preview is where theory puts on work boots.
Another practical lesson is that walls matter more than many beginners expect. When I first started thinking about stronger prints, the instinct was always to raise infill. A part failed? Add infill. A bracket flexed? Add infill. A small tab snapped? Add infill and glare at the printer. But many failures begin at the outer shell, layer lines, corners, or thin features. Adding one or two extra walls often improves the part more than jumping from 25% to 60% infill. Gradient infill works best when it supports a thoughtful wall strategy, not when it tries to replace one.
Testing also shows that local reinforcement is more satisfying than global overbuilding. For example, a printed clamp may only need extra density around the hinge, screw channel, and jaw root. Printing the entire clamp nearly solid makes it heavier and slower, but it does not necessarily solve the exact weak point. A targeted modifier feels like adding a brace to a house instead of filling the basement with concrete because a door squeaks.
Material behavior matters too. PLA is stiff and easy to print, so dense infill can create very rigid parts, but it may crack under impact or heat. PETG is tougher and more flexible, which can make moderate infill with good walls perform better for clips or brackets. Nylon and fiber-filled filaments add another layer of complexity because moisture, nozzle wear, and layer adhesion affect strength dramatically. Gradient infill is not a magic recipe; it is a seasoning. The material is still the main dish.
One of the best uses for gradient-style thinking is prototyping. Print version one with moderate infill, test it, mark the failure area, and reinforce only that zone in version two. This turns every failed print into useful data instead of emotional damage. If a tab breaks, reinforce the tab root. If a screw post cracks, add walls and local density. If the top surface sags, use gradual infill or more top layers. The workflow becomes smarter, cheaper, and less wasteful over time.
The final experience-based takeaway is simple: use gradient infill when the part has a job. For decorative prints, keep things simple. For functional prints, think like the part. Where will it bend? Where will it be squeezed? Where will screws bite? Where will layers try to separate? Once you answer those questions, gradient infill becomes more than a slicer trick. It becomes a design habit.
Conclusion: Smarter Plastic Beats More Plastic
Gradient infill is one of the most practical ideas in modern FDM 3D printing because it challenges the old habit of using one internal density everywhere. Instead of asking, “How much infill should this whole print have?” it asks a better question: “Where does this print actually need plastic?”
That small change can lead to lighter parts, faster prints, better top surfaces, stronger mounting points, and less wasted filament. Whether you use adaptive cubic infill, gradual infill, modifier meshes, or experimental dynamic extrusion, the goal is the same: put material where it earns its keep.
For casual prints, standard infill is still perfectly fine. But for brackets, jigs, enclosures, handles, mounts, and other functional parts, gradient infill gives makers a smarter way to balance strength, weight, time, and cost. Your printer already knows how to put plastic down. Gradient infill helps it put plastic down with a little more wisdomand perhaps slightly less spaghetti energy.
Note: This article is an original synthesis based on real 3D printing practices, slicer behavior, print-quality guidance, and additive-manufacturing principles. It is written for web publication and does not copy source text or include unnecessary citation placeholders.