
Table of Contents >> Show >> Hide
- Why Ground Chicken Makes a Legit Pizza Crust
- Ingredients
- Step-by-Step: High-Protein Ground Chicken Pizza Crust
- 1) Preheat like you mean it
- 2) Mix the crust (hands are the best tool)
- 3) Shape it: thinner = crispier, even = sturdier
- 4) First bake: set the “dough”
- 5) Drain + (optional but awesome) flip
- 6) Rest before topping (yes, it matters)
- 7) Add toppings with a little restraint
- 8) Second bake: melt and finish
- How to Keep Chicken Crust from Getting Soggy
- Flavor Variations That Don’t Taste Like “Diet Pizza”
- Nutrition: How “High-Protein” Are We Talking?
- Food Safety Notes (Because This Crust Is Literally Meat)
- Make-Ahead, Storage, and Reheating
- FAQ: High-Protein Ground Chicken Pizza Crust
- Conclusion
- Real-World “Chicken Crust” Experiences (So Yours Goes Smoothly)
- SEO Tags
Pizza night is fun until your crust shows up wearing a carb sweater two sizes too big.
Enter: high-protein ground chicken pizza crusta flourless, gluten-free, low-carb base that
still lets you do the most important part of pizza: pile on toppings like you mean it.
This is the kind of recipe that makes your fridge feel like a meal-prep influencer.
You get a crust that’s savory, sturdy, and surprisingly sliceablebuilt from ground chicken,
cheese, egg, and smart technique. Think of it as “protein pizza” that doesn’t taste like punishment.
Why Ground Chicken Makes a Legit Pizza Crust
Traditional dough relies on gluten (or at least starch) to stretch, trap air, and crisp. Chicken has… none of that.
So we borrow structure from three places:
- Protein network: As chicken cooks, proteins tighten and set, forming the base “sheet.”
- Egg: The binder that helps the mixture set as a cohesive round instead of “seasoned crumble.”
- Cheese: Melts, then firms as it coolsadding chew, flavor, and extra glue.
The secret isn’t complicated ingredientsit’s moisture management and a two-stage bake.
Do that, and you’ll get a keto-friendly pizza crust that can handle sauce without turning into
a puddle of regret.
Ingredients
This makes one 12-inch-ish pizza (about 2–4 servings depending on whether you’re a “two slices” person or a
“this is basically a round chicken sandwich” person).
For the ground chicken crust
- 1 lb ground chicken (lean is great; ultra-lean can dry outmore on that below)
- 1 large egg
- 1 to 1 1/2 cups shredded mozzarella (low-moisture works best)
- 1/3 to 1/2 cup grated Parmesan
- 1 tsp Italian seasoning
- 1/2 tsp garlic powder
- Salt + black pepper (start with 1/2 tsp salt if your cheeses are salty)
- Optional: pinch of red pepper flakes, smoked paprika, or dried oregano for extra attitude
Topping ideas (choose your adventure)
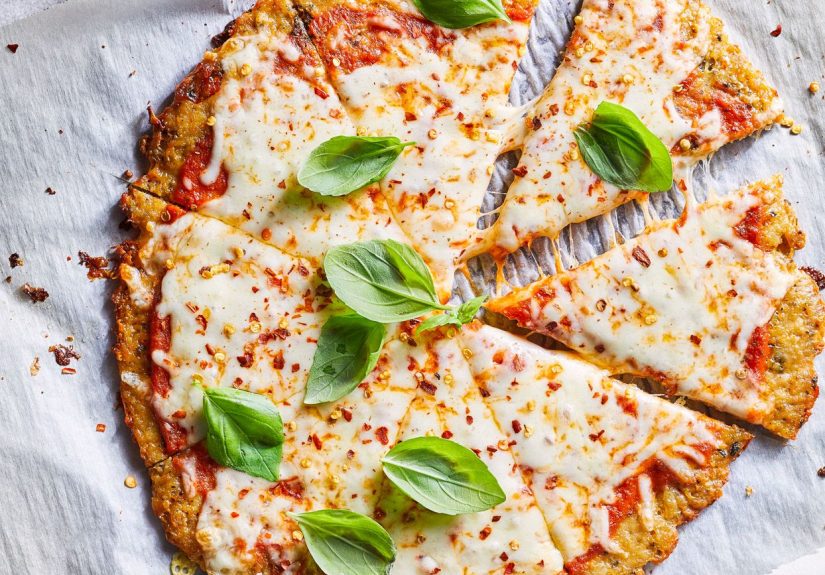
- Classic: pizza sauce + mozzarella + pepperoni + basil
- BBQ vibe: barbecue sauce + red onion + smoked cheese + cilantro
- Chicken Parm energy: marinara + mozzarella + Parmesan + pepper flakes
- Buffalo Caesar chaos (in a good way): Buffalo sauce + Parmesan + Caesar salad on top after baking
- Veg-forward: pesto + mushrooms + spinach (sauté first) + goat cheese
Step-by-Step: High-Protein Ground Chicken Pizza Crust
1) Preheat like you mean it
Heat your oven to 400°F. Line a large sheet pan with parchment paper
(not foil, not vibes, parchment).
Lightly mist the parchment with cooking spray or brush with a thin layer of oil.
2) Mix the crust (hands are the best tool)
In a large bowl, combine ground chicken, egg, mozzarella, Parmesan, and seasonings.
Mix until uniformno dry pockets of cheese, no lonely spices stuck to the side.
If you’re squeamish, wear disposable gloves. If not, welcome to the culinary handshake.
3) Shape it: thinner = crispier, even = sturdier
Scoop the mixture onto the parchment and press into a round about 1/4–1/2 inch thick.
Aim for an even thickness across the center and edges so it cooks consistently.
If your edges are too thin, they’ll crisp faster than the middle.
If your middle is too thick, it’ll act like a sponge when sauce shows up.
4) First bake: set the “dough”
Bake for 18–25 minutes (time depends on thickness and your oven) until the top looks
cooked and the edges are starting to brown. You’re looking for “firm and set,” not “tan line.”
5) Drain + (optional but awesome) flip
Pull the pan out. You’ll likely see some rendered liquid/fat. Carefully blot with paper towels,
or tilt the pan and spoon off excess liquid (carefullyhot chicken juice is not a spa treatment).
Want a stronger, crispier base? Flip it. Place another sheet of parchment over the crust,
set another pan on top, then flip. Peel off the top parchment and bake another 5–8 minutes.
This helps dry the underside and boosts structure for heavier toppings.
6) Rest before topping (yes, it matters)
Let the crust rest 5–10 minutes. This cooling window lets cheese firm up and helps the crust
resist becoming soggy when sauce hits.
Think of it as letting your crust “put on a raincoat.”
7) Add toppings with a little restraint
Spread a thin layer of sauce. Add cheese and toppings.
If your toppings are watery (fresh mozzarella, mushrooms, pineapple, tomatoes), either:
pre-cook them, pat them dry, or use them sparingly.
Chicken crust is heroic, not magical.
8) Second bake: melt and finish
Return the pizza to the oven for 8–12 minutes until cheese is melted and bubbly.
For extra browning, you can broil for 1–2 minutes at the endjust don’t walk away,
because broilers turn “golden” into “campfire” in about five seconds.
How to Keep Chicken Crust from Getting Soggy
Most “my chicken crust fell apart” stories come down to moisture. Fix that, and you win.
Use low-moisture cheese
Low-moisture shredded mozzarella generally behaves better than fresh mozzarella. Fresh is delicious,
but it releases water and can soften the crust.
Don’t drown it in sauce
A thin layer is plenty. If you want more flavor, reduce your sauce on the stove for 5–10 minutes
to thicken itbig taste, less liquid.
Pre-cook watery toppings
Mushrooms, zucchini, spinach, and onions release moisture. Quick sauté them first.
Your crust will thank you by staying in one piece.
Let the crust rest before topping
That short rest helps the cheese-protein matrix firm up, which improves sliceability.
It’s the difference between “pizza slice” and “tasty casserole scoop.”
Flavor Variations That Don’t Taste Like “Diet Pizza”
1) BBQ Chicken-Crust Pizza
Swap pizza sauce for barbecue sauce, then top with shredded mozzarella (or smoked gouda),
thin red onion, and cooked chicken pieces if you want extra chew.
Finish with cilantro or green onions. Optional: ranch drizzle if you’re feeling
unapologetically American.
2) Chicken Parm Pizza
Keep the crust Italian-seasoned, then top with marinara, mozzarella, and extra Parmesan.
Add crushed red pepper. This one tastes like your favorite comfort food got a gym membership.
3) Buffalo Caesar “Salad Pizza”
Bake the crust, then top lightly with Buffalo sauce and Parmesan and melt it.
After it comes out, pile on a Caesar salad (romaine + Caesar dressing + shaved Parm).
Hot, cold, crunchy, creamyyour mouth gets a standing ovation.
4) Pesto Veggie
Use pesto as the base, then add sautéed mushrooms and spinach, plus a sprinkle of goat cheese.
It’s bright, herby, and tastes like something you’d overpay for in a trendy neighborhood.
Nutrition: How “High-Protein” Are We Talking?
Exact macros depend on your chicken’s fat percentage and how much cheese you use,
but chicken crust pizzas commonly land around 25–36g protein per serving
(sometimes more) when sliced into 4 servings.
If you slice into 6–8 pieces, you’re still looking at a very protein-forward situation.
To push protein even higher without making the crust dry:
- Use part-skim mozzarella (still melts well, trims calories)
- Add toppings like turkey pepperoni, grilled chicken, or shrimp
- Serve with a Greek yogurt ranch dip for extra protein
Food Safety Notes (Because This Crust Is Literally Meat)
Since you’re baking ground chicken as a flat round, treat it like any ground poultry dish:
cook to a safe internal temperature of 165°F using a food thermometer.
Also: don’t rinse raw chickenwater splashes spread bacteria around your sink and counter.
Keep raw chicken separate from ready-to-eat foods, wash hands, and sanitize surfaces.
Make-Ahead, Storage, and Reheating
Make-ahead crust
Bake the crust (first bake + optional flip), cool completely, then refrigerate up to 2 days.
When you’re ready: top and bake until hot and bubbly.
Freezing
Freeze the baked crust (no toppings) between sheets of parchment in a freezer bag for up to
2 months. Thaw in the fridge overnight, then top and bake.
Reheating slices
Best options:
- Oven/toaster oven: 375°F until hot (keeps it firm)
- Skillet: medium heat with a lid for a few minutes (crisps the bottom)
- Microwave: works, but expect softer texture (still delicious, just less “slice swagger”)
FAQ: High-Protein Ground Chicken Pizza Crust
Can I use ground turkey instead?
Yes. Ground turkey works similarly. The flavor is slightly different, and fat percentage matters the same way:
too lean can dry out; too fatty can get greasy. Either way, the technique still wins.
Do I have to flip the crust?
Not mandatory, but flipping helps if you want a firmer, drier baseespecially if you’re doing heavier toppings
or extra sauce. If you skip it, just blot the liquid and bake a few extra minutes.
Why did my crust stick?
Usually: no parchment, weak parchment, or not enough oil/spray. Chicken crust likes to cling.
Parchment plus a light grease layer is the easiest fix.
Why is it falling apart when I slice?
Common reasons:
- Crust too thick in the middle
- Too much sauce or watery toppings
- No rest time before topping
- Not baked long enough to fully set
Try a thinner, more even press, a longer first bake, and a short rest before topping.
Conclusion
A high-protein ground chicken pizza crust is one of the easiest ways to turn pizza into a
genuinely filling mealwithout flour, without gluten, and without sacrificing the joy of a cheesy, bubbly slice.
Nail the technique (parchment, moisture control, two-stage bake), and you’ll have a sturdy base for everything
from classic pepperoni to chaotic Caesar salad toppings.
Bonus: it’s weeknight-friendly, meal-prep-able, and flexible enough to fit low-carb, keto, and high-protein goals.
Basically, it’s pizza… with better posture.
Real-World “Chicken Crust” Experiences (So Yours Goes Smoothly)
Let’s talk about what actually happens when you make chicken crust pizza in a normal kitchenmeaning: you’re hungry,
your oven preheats slower than your impatience, and somebody asks “is this really pizza?” from the other room.
These are the practical lessons that show up again and again for home cooks, plus a few “you’ll laugh later” moments.
First: the mix will feel a little weird. Ground chicken plus cheese plus egg doesn’t look like doughbecause it isn’t.
It looks like the early draft of a meatball that got accepted into art school. That’s normal. The biggest win is mixing
until everything is evenly distributed so the crust sets consistently. When clumps of cheese sit in one area, that spot
bakes firmer while another stays soft, and your slices get that “one corner flops dramatically” thing.
Second: shaping is the unglamorous hero. Most people press the center too thick because it feels safer, like building a
pizza bunker. But chicken crust doesn’t need a bunker; it needs even thickness. A thinner, uniform round bakes faster,
browns better, and holds toppings like it’s proud of itself. If you’re unsure, think “slightly thicker than a tortilla,
thinner than a burger patty,” and you’re in the neighborhood.
Third: you will see liquid. Don’t panic. Chicken renders moisture and fat, and the sheet pan will look like it’s auditioning
for a soup role. The trick is what you do next: blot, spoon off, or carefully tilt and drain. This is where a lot of people
level up from “tastes good but messy” to “wait, this actually slices.” If you’re making this often, you’ll start doing the
optional flip because it feels like cheatingin the best way.
Fourth: topping strategy matters more than you think. Chicken crust can handle toppings, but it hates being flooded. Thickened
sauce, pre-cooked veggies, and a light hand turn this into a reliable weeknight staple. If you want a mountain of toppings,
build in layers: a whisper of sauce, a base layer of cheese, then toppings, then a final sprinkle. That cheese layer acts like
a moisture barrier so your crust doesn’t absorb liquid like a sponge that just got promoted to “pizza.”
Fifth: the “rest time” is not optional if you want clean slices. This is the step most people skip because it feels like waiting
is illegal when the kitchen smells like pizza. But five to ten minutes lets everything firm upespecially the cheese in the crust
so you can cut wedges instead of performing a delicious excavation. If you’re serving guests, resting also keeps the toppings from
sliding off like they’re late for a meeting.
Finally: expect your first attempt to be good, and your second attempt to be great. The recipe is simple, but your oven and your
chicken brand have personalities. Once you learn how quickly your crust browns and how much liquid it releases, you’ll dial it in.
And then you’ll do the ultimate flex: casually saying, “Oh this? It’s just my protein pizza,” while everyone else quietly realizes
they could be eating pizza more often and still hit their goals. That’s the real magic.


