
Table of Contents >> Show >> Hide
- The Real-World Price Range (From “Cute” to “Committed”)
- What You’re Actually Paying For
- The “Utility Tax”: How Sinks, Cooktops, and Outlets Change Everything
- Kitchen Island Cost Breakdown: A Practical Cheat Sheet
- Three “Realistic” Price Scenarios (With Specific Examples)
- Size and Layout: The Hidden Cost Driver Nobody Brags About
- Will a Kitchen Island Increase Home Value?
- Ways to Save Money Without Ending Up With a Wobbly Regret
- So… What Should You Budget?
- of Real-World “Experience” (What People Commonly Run Into)
A kitchen island is basically the kitchen’s social butterfly: it wants to host, it wants to help, it wants to hold
snacks while you “taste-test” cheese five times. But when you start pricing one out, that friendly island can feel
less like a warm gathering spot and more like a tiny mortgage with drawers.
So how much does a kitchen island really cost? The honest answer is: it depends on whether you’re buying
a movable cart that politely minds its own business, or you’re building a fully loaded “command center” with
plumbing, power, and a countertop that costs more than your first car.
The Real-World Price Range (From “Cute” to “Committed”)
Most homeowners land in a broad middle range, but kitchen islands span a wild spectrum:
- Rolling cart / small movable island: roughly $100–$800+ (cheap, cheerful, and noncommittal)
- Basic built-in island (no plumbing, no major electrical): often $900–$6,500
- Midrange island with nicer finishes and a few upgrades: commonly $4,000–$10,000+
- High-end custom island with “extras” (sink, cooktop, appliances, specialty stone): $10,000–$20,000+ (and yes, it can go higher)
Here’s the key: the island itself is rarely the only cost. What you’re really paying for is a bundle of
materials, labor, and “surprise bonus projects” (like patching flooring after you move cabinetry or opening up
walls for wiring). The island is the headlineyour existing kitchen is the supporting cast that may demand a raise.
What You’re Actually Paying For
Think of kitchen island pricing like building a burger. The “base” matters, the “toppings” matter, and if you add
a fryer and a milkshake machine, you’re no longer ordering lunchyou’re opening a restaurant.
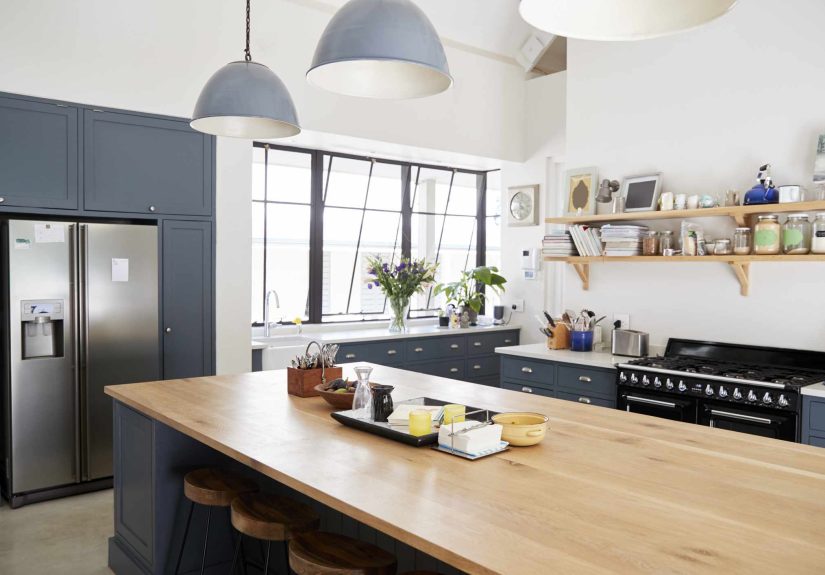
1) The Base: Cabinets, Drawers, and Structure
The island base is typically a run of cabinet boxes (stock, semi-custom, or custom) plus panels, trim, toe kicks,
and hardware. Your price swings based on:
- Cabinet type: stock (most affordable), semi-custom (more sizes and features), custom (made-to-order, premium pricing)
- Construction: plywood boxes tend to cost more than particle board/MDF but may hold up better long-term
- Interior upgrades: pull-out trash, spice racks, deep drawers, rollout shelves, soft-close hardware
- Finish: painted, stained, specialty colors, or furniture-style detailing
A practical reality: islands often “inherit” costs from full-kitchen cabinet pricing because they’re made from the
same materials and lines. Even if you’re only adding an island, you may still be buying cabinets, panels, and a
finish that has to match the rest of the kitchenmeaning fewer bargain shortcuts than you’d like.
Example: A simple island base built from two or three stock base cabinets can be relatively
affordable. Add decorative end panels and upgraded hardware, and the same footprint can jump noticeablywithout
changing the size at all.
2) The Countertop: Where Budgets Go to “Just Look Around”
The countertop is often the island’s biggest single line itemespecially if you choose stone or add a waterfall
edge (the dramatic side panel that makes your island look like it belongs in a design magazine and your wallet
belong in witness protection).
Common countertop cost drivers include:
- Material: laminate and butcher block are usually cheaper; quartz, granite, marble, and specialty surfaces climb fast
- Thickness and edge profiles: thicker slabs and fancy edges add fabrication costs
- Cutouts: sink, faucet, cooktop, pop-up outleteach cutout adds time and complexity
- Seams and support: large islands may require strategic seams or additional reinforcement
- Waterfall edges: require more slab material and careful matching, often raising the price significantly
If you’re trying to keep costs sane, the countertop is one of the smartest places to make deliberate choices.
Many homeowners overspend here because the island is the centerpieceand it’s hard to choose “budget-friendly”
when you can choose “dramatic.” (Quartzite will never whisper, “Maybe consider laminate.”)
3) Labor: The Quiet Budget Boss
A built-in island isn’t just “set it down and admire.” It needs to be anchored, leveled, aligned, and finished so
it looks intentionalnot like it wandered in and sat down.
Labor often includes:
- Delivery, assembly, and installation of cabinets and panels
- Countertop templating, fabrication, and installation
- Trim work, scribing, paint touch-ups, and hardware installation
- Potential flooring patches if you’re adding an island where none existed before
And if you add plumbing, electrical, or gas? Congratulations: you’ve invited specialists to the partyand they
don’t work for pizza and compliments.
The “Utility Tax”: How Sinks, Cooktops, and Outlets Change Everything
The fastest way to turn a “basic island” into a “why is this so expensive?” island is to add utilities. The island
becomes a mini remodel because you’re not just buying componentsyou’re re-routing systems inside your home.
Electrical: Outlets, Lighting, and Dedicated Circuits
Even a simple island often needs at least one outlet (and sometimes more), plus possibly a dedicated circuit if
you’re adding appliances like a microwave drawer, beverage fridge, or induction cooktop.
- Basic outlet installation: typically a few hundred dollars per outlet, depending on access and complexity
- GFCI protection: common for kitchen receptacles and may add cost
- Dedicated circuit: can push costs higher, especially if the panel is far or access is difficult
- Island lighting: pendants look great, but new wiring + switches + patch/paint adds up
Budget reality: if the electrician has to fish wire through finished ceilings or open walls,
electrical costs can shift from “annoying” to “memorable.”
Plumbing: The Sink and the Sneaky Costs Behind It
Adding a sink is a popular upgradeprep sinks, bar sinks, or a full work sinkbut plumbing is rarely “just plug
it in.” A sink requires supply lines, a drain, venting considerations, and often a disposal or dishwasher
connection depending on your setup.
A straightforward sink installation is one thing. Moving plumbing across the room is another. If your kitchen
doesn’t already have plumbing near the island location, you may need more invasive work (and potentially a
permit/inspection).
Gas and Ventilation: Cooktops Are the Price Escalator You Can See From Space
Want a cooktop on the island? It can be awesome for entertaining. It can also be the moment your island budget
starts doing cardio.
- Gas line work: adding or relocating gas piping can add significant cost, plus permitting and inspection
- Ventilation: island cooktops often need an island hood (or a downdraft system), and ductwork can be a major expense if it has to run through ceilings
- Electrical upgrades: electric or induction cooktops may require dedicated circuits or higher amperage wiring
If your island includes a cooktop, your “island project” can start to look suspiciously like a partial kitchen
remodel. Which is finejust don’t pretend it’s a small add-on while your contractor quietly updates the estimate.
Kitchen Island Cost Breakdown: A Practical Cheat Sheet
Below is a simplified breakdown of common island cost pieces. Your exact numbers depend on region, materials,
and how much your house fights back during installation.
| Cost Component | What It Covers | Typical Range (Very General) |
|---|---|---|
| Island base (cabinets + panels) | Cabinet boxes, end panels, trim, hardware | $500–$6,000+ |
| Countertop | Material + fabrication + install | $300–$6,000+ |
| Installation labor | Mounting, leveling, finishing | $300–$2,000+ |
| Electrical add-ons | Outlets, circuits, lighting, inspections | $200–$2,500+ |
| Plumbing add-ons | Sink install, drains, supply lines | $400–$5,000+ |
| Cooktop + ventilation | Appliance hookup, gas/electrical, hood/ducting | $1,500–$10,000+ |
The ranges overlap because islands vary wildly: size, features, and how difficult it is to run utilities are
everything.
Three “Realistic” Price Scenarios (With Specific Examples)
Scenario A: The “Add Storage, Don’t Start a Construction Saga” Island
What it is: Stock or semi-custom cabinet base, butcher block or laminate top, one outlet, no
plumbing.
Who it’s for: People who want function, extra workspace, and sanity.
Common total: roughly $1,500–$4,500, depending on finishes and local labor.
Example build: Two 24-inch base cabinets + one 18-inch drawer base, finished end panels, butcher
block top, and a single GFCI outlet on the side. You get prep space, storage, and seating potential without
relocating half your kitchen’s infrastructure.
Scenario B: The “Looks Custom, Priced Midrange” Island
What it is: Semi-custom cabinetry, quartz top, seating overhang, upgraded drawers/pull-outs, and
a couple of outlets (possibly a dedicated circuit for a beverage fridge or microwave drawer).
Who it’s for: Most modern kitchens aiming for that “finished designer” look.
Common total: roughly $5,000–$12,000.
Example build: A 7-foot island with deep drawers, pull-out trash, quartz countertop, decorative
legs or furniture-style panels, and under-counter storage designed for entertaining. This is the sweet spot where
you feel fancy without needing a second job.
Scenario C: The “Full-Service Island” (Sink and/or Cooktop)
What it is: Custom cabinetry, stone top (often thicker or more premium), sink and/or cooktop,
plus ventilation and significant electrical/plumbing work.
Who it’s for: Larger kitchens, frequent entertainers, serious cooks, or people who have already
accepted that budgets are suggestions.
Common total: roughly $12,000–$25,000+ (and yes, higher is possible).
Example build: A 9-foot island with a prep sink, dishwasher drawer, induction cooktop, outlets
concealed in a pop-up unit, and an island hood with ductwork routed through the ceiling. It’s awesome. It’s also
no longer “just an island.”
Size and Layout: The Hidden Cost Driver Nobody Brags About
People love talking about countertop choices. They talk less about clearance, traffic flow, and the fact that an
island that’s too big turns your kitchen into a hallway obstacle course.
Many design guidelines recommend maintaining generous clearance around an island (often in the 42–48 inch range
depending on traffic and whether multiple cooks share the space). Bigger islands can be more expensive not just
because of materials, but because they can force layout changesmoving appliances, shifting lighting, or
relocating utilities. That’s how “we just wanted an island” turns into “we moved the refrigerator and now nothing
fits.”
Will a Kitchen Island Increase Home Value?
A well-designed island can make a kitchen feel larger, more functional, and more “today,” which buyers tend to
love. But ROI is tricky: the best financial returns typically come from improvements that keep the kitchen
livable, cohesive, and not wildly over-personalized.
In broader remodeling data, smaller or “minor” kitchen updates often perform better on resale than major
overhauls. That doesn’t mean you shouldn’t build the island you wantit just means the smartest island is one
that fits the kitchen, looks intentional, and doesn’t require heroic maintenance or ultra-niche features.
Ways to Save Money Without Ending Up With a Wobbly Regret
Choose a simpler countertop (or save stone for the perimeter)
If you love quartz or granite but hate the price, consider using a budget-friendly top on the island (like butcher
block) and saving premium surfaces for other areasor vice versa. The island is a focal point, yes, but it’s also
a workhorse. Don’t buy a delicate material that makes you scared of spaghetti sauce.
Skip plumbing unless it solves a real problem
A sink on the island sounds great, but if it forces major plumbing relocation, ask yourself whether it truly
improves workflow. Sometimes the best island is simply more prep space and storageno pipes required.
Use stock cabinet sizes creatively
Stock cabinets are often dramatically cheaper than custom. A skilled designer or contractor can combine stock
units in a way that looks customespecially with the right end panels, toe kicks, and hardware.
Plan electrical early
Adding outlets is usually cheaper when planned into the build (before drywall patching, paint touch-ups, and
finish work). Late changes are where “small upgrades” become “change orders.”
Keep the island appropriately sized
Bigger isn’t always better. A smaller island can still add storage and seating while reducing cabinet and
countertop costsand keeping your kitchen comfortable to move through.
So… What Should You Budget?
If you want a clean, realistic planning number:
- Basic built-in island: budget $3,000–$6,500 if you’re avoiding major utility work.
- Midrange, nicer finishes: budget $5,000–$12,000 if you want quartz, upgraded storage, and multiple outlets.
- Island with sink/cooktop: budget $12,000–$25,000+ if utilities are moving and ventilation is involved.
The smartest way to get an accurate number is to treat the island like a mini project proposal:
decide your must-haves (storage? seating? sink?), choose your countertop material, then price utilities separately.
When those three buckets are clear, your quotes stop feeling like a magic trick.
of Real-World “Experience” (What People Commonly Run Into)
Homeowners who add a kitchen island often describe the experience as a mix of excitement (“We’re finally getting
the kitchen we want!”) and confusion (“Why did the quote go up when we changed… nothing?”). One of the most common
lessons is that the island cost isn’t only about the islandit’s about how the island interacts with everything
around it.
A frequent “aha” moment happens during layout planning. People start with a dream-sized islandeight feet long,
waterfall edges, seating for four, maybe a sinkand then discover their kitchen needs breathing room. Once they
account for comfortable clearance, appliance doors swinging open, and traffic flow, they realize the island has
to shrink. Interestingly, many homeowners report that a slightly smaller island feels better to live with, even
if it wasn’t their original vision. The bonus: a smaller footprint often lowers countertop and cabinet costs too.
Another common experience: the countertop selection starts as a “quick decision” and becomes a surprisingly big
emotional event. People compare quartz patterns, granite movement, edge profiles, thickness, and waterfall seams
and then they see the fabrication line item. That’s when many homeowners pivot to a strategy they later feel proud
of: choosing a durable, mid-priced option for the island, or picking butcher block for warmth and using stone
elsewhere. The most satisfied homeowners tend to be the ones who choose materials based on how they actually cook
and clean, not just what looks amazing in a staged photo.
Utility upgrades are also a big “experience” driver. Adding a sink sounds simple until you learn what it means to
run plumbing through floors, adjust drains, and coordinate inspections. Adding a cooktop often triggers a second
wave of decisions: ventilation, duct routing, ceiling work, and whether the added cost genuinely improves daily
life. Many homeowners who initially wanted a cooktop on the island end up choosing a prep-focused island instead,
because they’d rather keep splatter and heat on the perimeter and use the island for gathering.
People also commonly say they underestimated finish detailsend panels, trim, decorative legs, matching paint,
and hardware. Those “small” items are exactly what makes an island look built-in and intentional. The projects
that feel most successful usually aren’t the ones with the most expensive featuresthey’re the ones where the
island looks like it belongs, works smoothly (drawers and doors open cleanly), and supports how the household
actually uses the kitchen: weeknight dinners, homework, coffee breaks, and yes, snack hovering.
In the end, the most repeated homeowner takeaway is simple: decide what job you want the island to do, and spend
money where it helps that job. Extra storage? Invest in drawers and organizers. Entertaining? Prioritize seating
and durable surfaces. Prep work? Focus on countertop space and smart placement. When the island has a clear role,
the budget stops feeling randomand the finished result feels worth it.


