
Table of Contents >> Show >> Hide
- Why a Deck Box Planter Beats a Regular Planter
- Design Choices Before You Cut Anything
- Tools and Materials
- Suggested Dimensions and Cut List (Adjustable)
- Step-by-Step: How To Build the Cedar Deck Box Planter
- Step 1: Prep and pre-sand your boards
- Step 2: Build two side frames (legs + rails)
- Step 3: Connect the frames to form the box
- Step 4: Add panel slats (and leave breathing room)
- Step 5: Build and install the storage floor
- Step 6: Create the planter zone at the top
- Step 7: Build the lid (hinged access for the storage compartment)
- Step 8: Add finishing details that matter outdoors
- Finish Options (and what they do)
- Planting: What Works Best in a Deck Box Planter
- Common Mistakes (so you don’t invent new curse words)
- Maintenance and Seasonal Care
- of Real-World Experience: What Building One Actually Feels Like
- Conclusion
A cedar deck box planter is the backyard equivalent of a multitool: it holds your gardening stuff, hides the mess, and still manages to look like you’ve got your life together.
It’s part planter, part deck box, and part “please don’t look behind that chair where I threw all the cushions.”
In this guide, you’ll build a sturdy, good-looking cedar deck box planter with a real storage compartment and a removable planter insertso you get drainage where you need it,
and dry storage where you want it. I’ll walk you through design options, a practical cut list you can tweak, step-by-step assembly, finishing, and the little details that keep outdoor projects
from turning into soggy regrets.
Why a Deck Box Planter Beats a Regular Planter
A standard planter gives you flowers. A deck box planter gives you flowers and a place to stash hand tools, hose nozzles, seed packets, small bags of soil, outdoor candles,
and whatever else tends to wander around a patio like it pays rent.
- Two jobs, one footprint: Great for small decks and tight patios.
- Cleaner sight lines: Storage stays out of view, plants stay on display.
- Healthier plants: You can design proper drainage instead of “hope and vibes.”
- Cedar perks: Naturally rot-resistant and lightweight enough to build without needing a forklift.
Design Choices Before You Cut Anything
1) Pick a size that fits your space (and your back)
Most deck box planters look best between 36–60 inches long, around 16–20 inches deep, and 22–28 inches tall.
That height keeps the planter visually “furniture-like,” and it’s comfortable to work around without constant bending.
If you’re placing it against a railing, measure your railing height and aim for a planter top that lands a few inches below itso you don’t block the view and invite the HOA’s
strongest feelings.
2) Decide on your planter insert approach
You have three common options:
- Removable crates/bins: A clever approach is using sturdy plastic crates lined with landscape fabric. They drain well, reduce soil weight, and lift out for cleanup.
- A single lined planter cavity: Build one big planter compartment and line it with heavy plastic or a purpose-made liner.
- Individual pots dropped in: The easiest maintenancejust swap pots seasonally.
I’ll focus on a removable-insert build because it’s forgiving, easy to refresh, and less likely to turn your whole project into a damp terrarium.
3) Drainage and rot prevention (the “don’t skip this” section)
Outdoor wood fails for two reasons: standing water and trapped moisture. Your mission is to keep water moving and airflow happening.
- Drainage: If you use a liner, add drain holes and keep them clear with gravel or a small mesh screen.
- Separation: Keep soil and wet liner material from sitting directly against cedar whenever you can.
- Ventilation: The storage compartment needs air gaps (even small ones) so humidity doesn’t build up.
- Feet: Lift the box slightly off the deck with pads or short feet so water doesn’t wick up from below.
4) Hardware: fasteners and hinges that survive outdoors
Cedar contains natural compounds that can react with certain metals and cause staining, so choose exterior-friendly fasteners. For a clean-looking build that won’t rust streak your cedar,
stainless steel screws are the “set it and forget it” option. If you’re budget-conscious, hot-dipped galvanized can work well for many outdoor cedar projects,
but avoid cheap electroplated fasteners outdoors.
For the lid, you can go simple (two exterior hinges) or upgrade with lid stays/soft-close supports so the lid doesn’t slam shut on fingers. Your future knuckles will send a thank-you note.
Tools and Materials
Tools
- Miter saw or circular saw with a guide
- Drill/driver + bits (including countersink bit)
- Pocket hole jig (optional but very helpful)
- Clamps (at least two)
- Tape measure, square, pencil
- Orbital sander + 80/120/180 grit
- Staple gun (if lining inserts with fabric)
Materials
- Cedar: 4×4 posts for legs (or doubled 2x4s), plus 1x boards for panels and trim
- Top rails: 5/4 deck boards or 1×6 cedar for a thicker, beefier rim
- Bottom and lid slats: 1×4 or 1×6 cedar
- Fasteners: Stainless or hot-dipped galvanized exterior screws; pocket hole screws if using a jig
- Exterior glue: Waterproof wood glue (rated for exterior use)
- Hinges: Two exterior-rated hinges (plus optional lid stays)
- Planter insert: Crates/bins + landscape fabric (or a pre-made liner)
- Finish: Exterior oil, stain, or clear sealer (or leave it unfinished and let it weather)
Suggested Dimensions and Cut List (Adjustable)
Here’s a practical “middle-of-the-road” size that fits most decks without looking like you parked a canoe on your patio:
48" long × 18" deep × 26" tall.
The planter zone sits at the top, with a storage compartment below and a hinged lid for access.
Simple cut list (for a 48" × 18" × 26" build)
Note: cedar sizes are nominal; actual dimensions vary. Always measure your boards.
- Legs: (4) 4×4 cedar posts @ 26"
- Upper rails (long sides): (2) 5/4 boards @ 48"
- Upper rails (short sides): (2) 5/4 boards @ 18"
- Lower rails (long sides): (2) 1×4 @ 44" (fits between legs)
- Lower rails (short sides): (2) 1×4 @ 14" (fits between legs)
- Side panels: (varies) 1×4 or 1×6 boards cut to span between rails
- Bottom slats: (6–8) 1×4 @ 44" (leave small gaps for airflow/drainage)
- Lid frame (optional): (2) 1×4 @ 48" and (2) 1×4 @ 18"
- Lid slats: (6–8) 1×4 @ 18" or 48" depending on lid orientation
If you want a more “built-in” look, add a small trim cap around the top edge or a face frame on the front. If you want a more modern style, keep the lines square,
minimize trim, and use consistent slat spacing.
Step-by-Step: How To Build the Cedar Deck Box Planter
Step 1: Prep and pre-sand your boards
Cut boards slightly long, then trim to final length so ends are crisp and square. Cedar is soft, so it dents easilysand flat surfaces now while pieces are still manageable.
A quick pass at 120 grit is usually plenty before assembly.
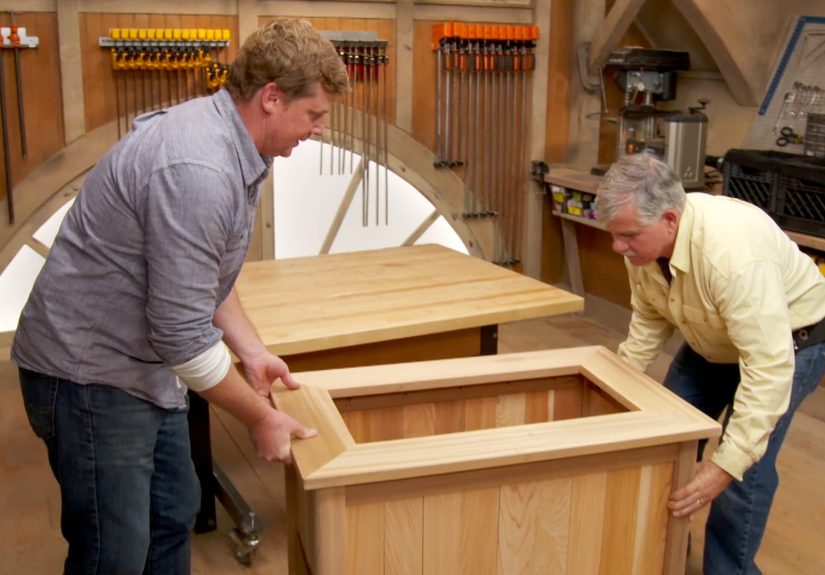
Step 2: Build two side frames (legs + rails)
Lay two legs flat and connect them with an upper rail and a lower rail. Repeat for the other side. This creates two sturdy “ladder” frames.
- Place the upper rail near the top (flush or with a small reveal).
- Place the lower rail where you want the storage floor to sit (typically 6–10" off the ground).
- Joinery options: pocket holes, countersunk screws, or half-lap joints if you’re feeling fancy.
Pro move: pre-drill near board ends to prevent splittingespecially in cedar.
Step 3: Connect the frames to form the box
Stand the two side frames upright and connect them with the long rails (upper and lower). Check for square by measuring diagonals. If the diagonals match, you’re square.
If they don’t, gently persuade the box into alignment with clamps. (This is the only acceptable form of persuasion in woodworking.)
Step 4: Add panel slats (and leave breathing room)
Attach cedar slats to the sides and ends. For a clean look and better weather performance, leave a small gap (about 1/8") between slats so boards can expand/contract
and water won’t get trapped.
Want a more “deck box” vibe? Run the slats horizontally. Want “planter” energy? Vertical slats look great too. Either way, keep spacing consistent.
Step 5: Build and install the storage floor
Install the bottom slats across the lower rails. Leave small gaps between slats for airflow and to let incidental moisture escape. This is storagenot a submarine.
Step 6: Create the planter zone at the top
You’re aiming for a top area that holds your planter inserts securely while keeping wet soil isolated from the storage below.
- Option A (removable crate/bin): Build a “rim” or ledge inside the top opening so the insert sits on a lip.
- Option B (drop-in pots): Add a simple top deck with cutouts sized to the pots.
If you’re using crates or bins, line them with landscape fabric (or filter fabric) so soil stays put while water drains. Staple the fabric neatly and trim excess.
This makes seasonal refreshes easy: lift out the insert, dump tired soil, and reset.
Step 7: Build the lid (hinged access for the storage compartment)
The lid can be as simple as a slatted panel attached with exterior hinges, or as structured as a framed lid that stays flatter over time.
A framed lid (a rectangle of 1x4s with slats on top) resists warping better than a single wide board.
- Attach the hinges to the back upper rail and lid.
- If you want a safer lid, add lid stays so it won’t slam shut.
- Test the swing: you want smooth motion with no rubbing.
Step 8: Add finishing details that matter outdoors
- Feet/pads: Add rubber pads, composite shims, or small cedar feet to lift the box slightly off the deck.
- Vent gaps: If your panels are tight, consider a small hidden gap at the back for airflow.
- Edge treatment: Lightly round over sharp edges to prevent splintering and improve finish adhesion.
Finish Options (and what they do)
Cedar can be left unfinished and it will weather to a silvery gray. If you like that coastal look, do nothing and act like it was intentional all along.
If you want to preserve the warm cedar color, use an exterior UV-protective sealer or oil. If you want color, choose an exterior stain rated for decks/fences.
- Clear sealer/oil: Best for highlighting cedar grain; requires periodic re-coating.
- Semi-transparent stain: Adds color while showing grain; hides minor imperfections.
- Paint: Works, but cedar tannins can bleeduse proper primer if painting.
Planting: What Works Best in a Deck Box Planter
Aim for plants that match your planter depth and sun exposure. A top insert depth around 10–12 inches is great for herbs, annuals, and many ornamentals.
If you want small shrubs, you’ll want deeper inserts or larger pots.
Easy, rewarding combos
- Herb bar: Basil, thyme, rosemary, chives (plus mint in its own pot so it doesn’t take over the world).
- Pollinator buffet: Salvia, lavender, zinnias, and alyssum.
- Low-maintenance color: Geraniums, marigolds, petuniasclassic for a reason.
Common Mistakes (so you don’t invent new curse words)
- No drainage plan: Wet soil + trapped water = rot, mold, and sad plants.
- Wrong fasteners: Cheap screws can rust or react, causing stains on cedar.
- Skipping pre-drilling: Cedar splits easily near endsespecially when you’re in a hurry.
- Over-tight slat spacing: Wood moves. Give it room.
- Storing damp items: Storage is for dry goodsdon’t toss in a dripping hose nozzle and call it “organized.”
Maintenance and Seasonal Care
Once built, this is an easy project to keep looking good:
- Re-coat finishes as needed (typically every 1–2 seasons depending on sun exposure).
- Empty and refresh soil yearly for heavy feeders (like basil and petunias).
- Before winter, remove inserts if you expect freeze-thaw cycles that crack plastic.
- Wipe down storage interior if humidity builds up; add a small vent gap if needed.
of Real-World Experience: What Building One Actually Feels Like
The first time you build a cedar deck box planter, you’ll think, “This is basically a rectangle with a lid. How hard can it be?” That’s woodworking’s version of saying,
“I’ll just check one email.” Next thing you know, it’s 9:47 p.m., you’re holding a hinge in one hand, a drill in the other, and questioning why time moves differently outside.
Here’s what tends to happen in real life: cedar is friendly, but it’s also soft. If you clamp too aggressively, you can leave little dents that magically appear right where your eyes go first.
So I learned to use scrap wood under clamps and to sand edges early. Cedar also likes to split near endsespecially if you’re driving screws close to corners. The simple fix is pre-drilling,
but the emotional fix is accepting that “I can probably get away without it” is rarely correct.
The planter insert decision is where you win or lose the long game. When you build a single big planter cavity, it looks seamlessuntil you realize you’ll eventually want to refresh soil,
fix a liner tear, or rescue a plant that’s having a dramatic moment. Removable inserts make maintenance ridiculously easier. Lining a crate with landscape fabric feels almost too simple,
but it’s one of those ideas that just works: water drains, soil stays put, and you can lift the whole thing out without excavating your project like an archaeologist.
Lid alignment is the other “real life” checkpoint. Hinges don’t care about your confidence. If your box is even slightly out of square, the lid will tell on you immediately.
I now dry-fit the lid, mark hinge locations carefully, and test the swing before final fastening. If you add lid stays, you’ll feel like a genius every time the lid doesn’t slam shut.
It’s a small upgrade with a big “wow, this feels expensive” payoff.
Finishing is where patience pays rent. Cedar can look amazing with a clear exterior oil, but the sun is relentless. A UV-protective sealer helps, and re-coating becomes part of the rhythm
like cleaning the grill or pretending you’re going to organize the garage. The upside is that even weathered cedar looks good, so if you miss a maintenance window, your project won’t
immediately look like a soggy pallet behind a restaurant.
My favorite unexpected benefit: once you have the storage compartment, you actually start putting things away. Not perfectly, not always, but enough that your deck looks calmer.
And when the planter is bursting with herbs or flowers, people stop noticing what’s inside the box anywaywhich is, frankly, the best kind of home improvement.
Conclusion
Building a cedar deck box planter is a satisfying weekend project that combines practical outdoor storage with the kind of greenery that makes a deck feel finished.
If you prioritize drainage, use outdoor-rated fasteners and hardware, and keep moisture away from the storage compartment, you’ll end up with a piece that looks custom,
holds up to weather, and earns compliments you will absolutely accept like you milled the cedar yourself.


