
Table of Contents >> Show >> Hide
- What Is a Hair Stick?
- Best Twigs for Carving a Hair Stick
- Tools and Materials You’ll Need
- Safety First: Keep the Craft Fun, Not Dramatic
- Step-by-Step: How to Carve a Hair Stick from a Twig
- Step 1: Choose a Straight, Healthy Twig
- Step 2: Decide the Shape
- Step 3: Remove Bark and High Spots
- Step 4: Carve the Tapered Point
- Step 5: Shape the Shaft
- Step 6: Carve the Top
- Step 7: Let Green Wood Dry Slowly
- Step 8: Sand Through the Grits
- Step 9: Burnish for Extra Smoothness
- Step 10: Apply a Simple Finish
- How to Use Your Twig Hair Stick
- Design Ideas for a Handmade Hair Stick
- Common Mistakes to Avoid
- Care and Maintenance
- Experience Notes: What You Learn After Carving a Few Twig Hair Sticks
- Conclusion
- SEO Tags
A hair stick is one of those magical little accessories that looks elegant, costs almost nothing to make, and quietly announces, “Yes, I am the kind of person who can turn a twig into fashion.” Better yet, carving a hair stick from a twig is a beginner-friendly woodworking project that does not require a garage full of tools, a lumber rack, or the emotional stamina needed to assemble flat-pack furniture.
With a straight twig, a sharp carving knife, sandpaper, and a little patience, you can make a smooth, beautiful, handmade hair accessory that actually works. The key is choosing the right wood, shaping it safely, sanding it until it glides through hair, and finishing it with a simple oil or wax so it feels pleasant in the hand and on the scalp.
This guide walks you through how to carve a hair stick from a twig step by step, including wood selection, safety tips, shaping methods, finishing options, and practical lessons from real carving experience. Your first hair stick may not look like it came from a boutique craft fair, but it can still hold a bun like a tiny wooden superhero.
What Is a Hair Stick?
A hair stick is a slender pin used to secure buns, twists, and updos. Unlike a regular hairpin, a wooden hair stick is usually longer, sturdier, and decorative enough to be seen. It can be simple and rustic, polished and elegant, or carved with a small topper such as a bead, spiral, leaf, mushroom, moon, or rounded knob.
The most useful hair sticks are smooth, slightly tapered, and not too sharp. The point should slide through hair without scratching the scalp. The body should have enough texture to grip, but not so much that it snags strands. Think “smooth river pebble,” not “angry toothpick.”
Best Twigs for Carving a Hair Stick
Not every twig deserves a second life as a hair accessory. Some are too brittle, too crooked, too punky, or too mysterious. When carving something that will touch hair and skin, choose wood that is solid, safe, and comfortable to handle.
Good Wood Choices
For a DIY hair stick, look for straight twigs from common hardwoods such as maple, apple, pear, birch, beech, cherry, or dogwood. These woods are often strong enough for daily use and can sand to a smooth finish. Fruitwood twigs, especially apple and pear, are popular because they carve nicely and often have attractive color.
Freshly pruned twigs are easier to carve because green wood is softer. However, green wood can shrink or crack as it dries, so carve it a little oversized, let it dry slowly, and do your final sanding later. Dry twigs are harder to carve but more stable once finished.
Woods to Avoid
Avoid yew, oleander, poison ivy, poison oak, poison sumac, and any wood you cannot identify. Also be cautious with woods known to irritate some people, such as black walnut or certain exotic hardwoods. Wood dust can bother the skin, eyes, and lungs, so wear a dust mask when sanding and stop using any wood that causes itching, sneezing, rash, or irritation.
How to Collect a Twig Responsibly
The best twig comes from your own yard, a friend’s yard with permission, or a branch already removed during proper pruning. If you cut a living branch, make a clean pruning cut just outside the branch collar so the tree can seal the wound more effectively. Never strip bark or branches from public parks, trails, or protected areas unless collection is clearly allowed. When in doubt, ask first. Trees are generous, but park rangers are not decorative.
Tools and Materials You’ll Need
- A straight twig, about 6 to 8 inches long and roughly pencil-thick to finger-thick
- Pruning shears or a small hand saw
- A sharp carving knife or whittling knife
- Cut-resistant glove for your holding hand
- Sandpaper in several grits: 80, 120, 180, 220, and 320 or 400
- Pencil for marking the design
- Optional: small file, rasp, drill, bead, cord, or wood burner
- Mineral oil, jojoba oil, beeswax, or a wood-safe oil-and-wax blend
- Clean cloth for buffing
Safety First: Keep the Craft Fun, Not Dramatic
Sharp tools are safer than dull tools because they require less force. A dull knife makes you push harder, and pushing harder is how a calm afternoon becomes a bandage commercial. Always carve away from your body, keep your fingers out of the cutting path, and use controlled, shallow cuts instead of big heroic slices.
Work while seated at a stable table or bench. Keep your twig supported. Wear a cut-resistant glove on the hand holding the wood. If the knife slips, the glove gives you a second chance to continue your project without adding “unexpected medical research” to your day.
Step-by-Step: How to Carve a Hair Stick from a Twig
Step 1: Choose a Straight, Healthy Twig
Pick a twig that is mostly straight, solid, and free from deep cracks, insect holes, rot, or soft spots. A slight natural curve can look beautiful, but a wild zigzag shape will be harder to use in hair. For most people, a finished length of 5.5 to 7 inches works well. Thick or long hair may need 7 to 8 inches.
Cut the twig a little longer than needed so you have room to trim the ends. If the bark is loose or damaged, peel it away. If the bark is tight and attractive, you can leave some of it near the decorative top for a rustic look, but the shaft that slides through hair should be smooth.
Step 2: Decide the Shape
Before carving, decide whether you want a simple tapered stick, a rounded topper, a flat paddle top, or a decorative end. Beginners should start with a simple design: a smooth shaft, rounded top, and gently tapered point. This shape is practical, elegant, and forgiving.
Use a pencil to mark the final length. Mark the area that will become the pointed end. If you want a topper, mark where the decorative section stops and the functional shaft begins.
Step 3: Remove Bark and High Spots
Hold the twig firmly and use light knife strokes to shave away bark, bumps, and small side nubs. Work slowly. Rotate the twig often so you keep the shape balanced. If you remove too much from one side, your hair stick may develop a dramatic lean, like it has strong opinions about gravity.
Do not worry about perfection yet. At this stage, you are roughing out the form. The goal is to create a comfortable blank that is straight enough, smooth enough, and ready for finer shaping.
Step 4: Carve the Tapered Point
The point of a hair stick should be rounded and smooth, not needle-sharp. Start about 1.5 to 2 inches from one end and shave gradually toward the tip. Rotate the stick after every few cuts to create an even taper.
A safe hair stick point should part hair without poking the scalp. Test the shape against your palm, not your head. If it feels scratchy in your hand, it will definitely feel rude on your scalp.
Step 5: Shape the Shaft
The shaft can be round, oval, or slightly flattened. A perfectly round stick looks classic, but a slightly oval shape often holds better because it resists rolling in the hair. Use gentle cuts to remove uneven areas, then switch to coarse sandpaper to refine the shape.
A good finished thickness is usually around 1/4 inch to 3/8 inch for average hair. Very thick hair may need a stronger stick closer to 1/2 inch at the widest point. Avoid making the middle too thin, or the stick may snap when twisted into a bun.
Step 6: Carve the Top
The top is where personality enters the chat. You can round it into a knob, flatten it into a paddle, leave a small natural branch fork, or carve a simple leaf shape. If this is your first handmade hair stick, keep the topper simple. A rounded end is comfortable, sturdy, and attractive.
If you want to add a hanging bead or tassel, drill a small hole through the top after the stick has dried. Do not drill too close to the edge, or the wood may split. Sand the hole carefully so it does not catch hair.
Step 7: Let Green Wood Dry Slowly
If you carved a fresh twig, let it dry before final sanding and finishing. Place it somewhere cool, shaded, and airy for several days to a couple of weeks, depending on thickness and wood type. Avoid direct sun, heaters, or hot windowsills, which can dry the outside too quickly and cause cracks.
If the ends begin to check, trim them slightly. For extra protection, you can rough carve the blank, seal the ends with a little wax, and let it dry slowly before the final shaping. Wood moves as moisture changes, so patience here gives you a stronger, smoother finished hair stick.
Step 8: Sand Through the Grits
Sanding is where the hair stick becomes hair-friendly. Start with 80 or 120 grit if the surface is rough. Move through 180, 220, and then 320 or 400 grit for a polished feel. Sand lengthwise along the grain whenever possible.
Do not skip from very coarse grit straight to fine grit. Each grit removes the scratches from the previous one. If you rush this step, your hair will know. Hair is surprisingly honest about rough wood.
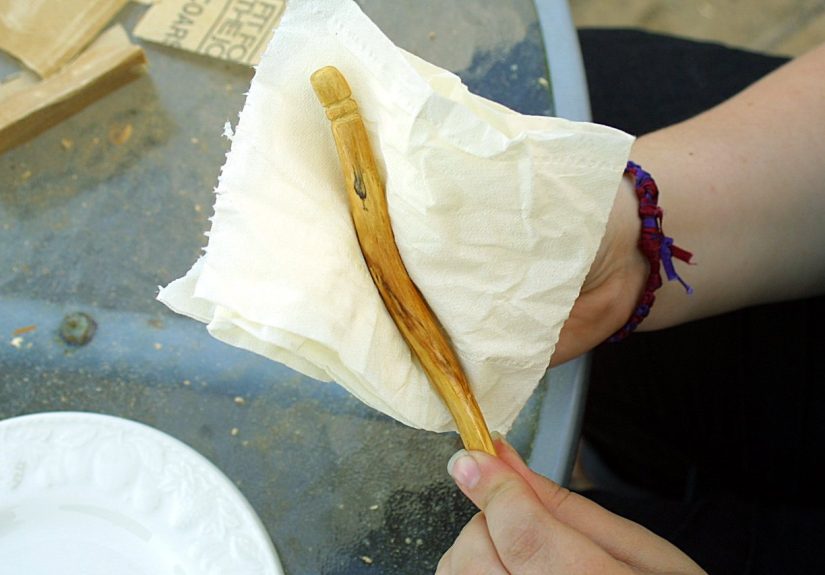
Step 9: Burnish for Extra Smoothness
After sanding, rub the hair stick firmly with a piece of brown paper bag, denim, soft cloth, or clean hardwood scrap. This is called burnishing. It compresses tiny wood fibers and adds a subtle sheen without chemicals.
Pay special attention to the point and the shaft. Run the stick through a folded piece of fabric. If it snags the fabric, keep sanding. If it glides smoothly, you are close to finished.
Step 10: Apply a Simple Finish
A light finish helps protect the wood and makes the hair stick more pleasant to use. Mineral oil, jojoba oil, and beeswax are common choices for small handmade wooden accessories. Apply a thin coat with a cloth, let it soak in, then wipe away the excess. If using wax, buff until the surface feels smooth rather than sticky.
Avoid heavy varnishes, mystery stains, or finishes with strong odors unless you know they are fully cured and safe for skin contact. A hair stick lives near your scalp, hair oils, and sometimes heat from the sun, so simple is usually better.
How to Use Your Twig Hair Stick
Gather your hair into a bun or twist. Push the hair stick into the edge of the bun, angle it toward the scalp, scoop a little hair underneath, then rotate and slide it through the bun. The stick should lock the twist in place without needing brute force.
If the stick slips out, it may be too smooth, too short, or too thin for your hair type. If it pulls or snags, sand it more. If it pokes, round the tip. The perfect hair stick feels secure but not painful, like a helpful little forest assistant.
Design Ideas for a Handmade Hair Stick
Rustic Natural Stick
Leave a little bark near the top and polish the rest smooth. This style looks earthy and handmade without requiring advanced carving skills.
Minimalist Smooth Stick
Carve the entire twig into a clean, tapered shape and finish it with oil and wax. This is the most wearable everyday design.
Beaded Hair Stick
Drill a small hole in the top and attach a bead, charm, or cord. Keep decorations lightweight so they do not pull the stick out of place.
Carved Topper
Try a simple mushroom, acorn, crescent moon, heart, or leaf. Start with basic shapes before attempting tiny animals, unless you enjoy accidentally inventing new species.
Common Mistakes to Avoid
The first mistake is choosing weak wood. A twig that is cracked, spongy, or insect-damaged will not become stronger because you believe in it. Start with sound material.
The second mistake is making the tip too sharp. Hair sticks are not weapons, and your scalp should not have to negotiate peace terms. Round the point until it slides comfortably.
The third mistake is under-sanding. A hair stick must be smoother than most carved items because it moves through delicate strands. Sand, test, sand again, and buff.
The fourth mistake is applying too much oil or wax. A greasy hair stick can stain fabric, attract lint, or make hair look oily. Thin coats are your friend.
The fifth mistake is expecting the first attempt to be perfect. Twig carving is a small craft with big learning value. Each stick teaches you how wood grain behaves, how your knife cuts, and how much sanding is enough.
Care and Maintenance
Keep your wooden hair stick dry when possible. Do not wear it in the shower or leave it soaking on a bathroom counter. If it gets wet, wipe it dry and let it air out.
Every few months, refresh the finish with a tiny amount of oil or wax. Buff thoroughly before using it again. If the surface ever feels rough, lightly sand with 320 or 400 grit and reapply finish.
Experience Notes: What You Learn After Carving a Few Twig Hair Sticks
The first thing you learn when carving a hair stick from a twig is that twigs are not as simple as they look. From a distance, every twig appears straight, charming, and ready for its makeover. Once you start carving, you discover hidden curves, tiny knots, bark pockets, color changes, and grain that suddenly decides to run in the opposite direction. That is part of the fun. A twig hair stick is not factory-made, and it should not look like it was copied and pasted from a catalog.
One of the best experiences is working with fruitwood. Apple twigs, for example, often have a warm color and a pleasant density. They can be firm enough to hold shape but not so hard that carving feels like arguing with a chair leg. The trick is to remove wood in small slices. Whenever I tried to hurry the process, the knife followed the grain too aggressively and took off more than planned. Slow carving gives better control and fewer “well, that is a design feature now” moments.
Another lesson is that sanding matters more than carving for comfort. A hair stick can have a slightly uneven handmade shape and still work beautifully if it is silky smooth. But even a perfectly shaped stick becomes annoying if one tiny ridge catches hair. Testing with fabric is a great habit. Pull the stick through a folded cotton cloth. If the cloth catches, hair probably will too. That simple test saves a lot of frustration.
The size also takes experimenting. A short stick may look cute but disappear into thick hair. A long stick can hold better but may feel like you are wearing a chopstick antenna. For medium hair, a finished length around 6 to 7 inches is a comfortable starting point. For thick, curly, or waist-length hair, a longer and slightly thicker stick is usually better. The best design depends on the hairstyle, not just the wood.
The most satisfying moment comes after applying the finish. A plain twig suddenly shows grain, color, and character. The oil deepens the wood, the wax adds a soft glow, and the whole piece begins to look intentional. It is a tiny transformation, but it feels rewarding because you made something useful from a branch most people would step over.
Finally, carving twig hair sticks teaches patience in the friendliest way. The project is small enough to finish without feeling overwhelmed, but detailed enough to teach knife control, sanding discipline, wood selection, and finishing. It is also delightfully low-pressure. If one twig cracks, you have not ruined expensive lumber; you have gained a lesson and an excuse to go find another twig. That is a pretty good deal for an afternoon craft.
Conclusion
Learning how to carve a hair stick from a twig is a simple, satisfying project for anyone interested in DIY accessories, beginner wood carving, or nature-inspired crafts. Start with a safe, solid twig, carve slowly, round the tip, sand until smooth, and finish with a light oil or wax. The result is a handmade wooden hair stick that is practical, personal, and much more charming than anything hiding at the bottom of a bathroom drawer.
Your first twig hair stick may be rustic. Your second will be smoother. By the third, you may start inspecting every fallen branch like it is auditioning for a role in your hair routine. That is when you know the hobby has officially taken root.


