
Table of Contents >> Show >> Hide
- Why Cast Iron Makes Steak Better
- Pick the Right Steak for Pan-Searing
- Steak Prep: The Unsexy Steps That Make It Perfect
- Tools You’ll Want (So You Don’t Have to Guess)
- Perfect Cast Iron Steak: Step-by-Step
- Step 1: Preheat the pan properly
- Step 2: Add oil (then steak, immediately)
- Step 3: Sear the first side (don’t poke it)
- Step 4: Flip and sear the second side
- Step 5: Butter baste for flavor (and bragging rights)
- Step 6: Check temperature and finish
- Steak doneness temperature guide
- Step 7: Rest (yes, really)
- Step 8: Slice correctly and serve
- How to Cook Thick Steaks Without Burning the Outside
- Flavor Upgrades That Don’t Require a Culinary Degree
- Common Mistakes (and How to Fix Them)
- What to Serve With a Cast Iron Steak
- Conclusion: Your Cast Iron Pan Is the Shortcut to Steak Confidence
- Extra: of Real-World Cast Iron Steak Experiences
If you’ve ever paid steakhouse money for a steak and thought, “This is amazing… but also my wallet is crying,”
I’ve got good news: you can absolutely cook a perfect steak at home in a cast iron pan. Cast iron is basically
the superhero of stovetop cookingheavy, loyal, and extremely good at holding heat. (Like your friend who always
runs hot and refuses to wear a jacket.)
This guide breaks down exactly how to get that deep brown crust, juicy center, and “who made this?” confidence
when you set the plate down. We’ll cover steak selection, seasoning, heat control, doneness temps, butter basting,
and the small details that make a huge difference. By the end, you’ll be the person people text when they’re
standing in the meat aisle looking confused.
Why Cast Iron Makes Steak Better
Cast iron wins the steak game for one main reason: it holds heat like it’s holding a grudge. When your steak hits
the pan, cast iron doesn’t cool down as quickly as lighter pans, so you get consistent high heataka the conditions
needed for a gorgeous sear.
- Better crust: High, steady heat helps the surface brown deeply without steaming.
- More even cooking: Cast iron reduces hot/cold spots once preheated properly.
- Great for basting: The pan’s shape and heat retention make butter-basting easier.
- Oven-friendly: Perfect for thicker steaks that need a quick finish in the oven.
Pick the Right Steak for Pan-Searing
You can technically cook any steak in cast iron, but some cuts are basically born for it. For the best combo of
flavor and tenderness, look for good marbling (those little white streaks of fat). Fat = flavor and insurance.
Best cuts for cast iron steak
- Ribeye: Rich, forgiving, and famously delicious.
- New York strip: Beefy flavor, solid tenderness, great crust potential.
- Sirloin: Leaner, still tastyjust don’t overcook it.
- Filet mignon: Very tender but mildbenefits from butter basting and a good sauce.
Thickness matters (a lot)
For the classic pan-seared steak method, aim for 1 to 1.5 inches thick. Thin steaks cook too fast
and can go from “perfect” to “sad” in about 45 seconds. Very thick steaks (2 inches+) are still doable, but they
often need an oven finish or a reverse-sear approach.
Steak Prep: The Unsexy Steps That Make It Perfect
Great steak starts before the pan ever gets hot. Your goal is simple: dry surface, well-seasoned meat, and a plan.
(This is also good life advice.)
1) Pat it dry like you mean it
Moisture is the enemy of crust. If the steak is wet, it steams first, and steam is the opposite of sear. Use paper
towels and pat both sides until the surface feels dry.
2) Salt early if you can (dry brine)
If you have time, salt the steak at least 40 minutes ahead (or up to overnight) and leave it
uncovered in the fridge on a rack. This “dry brine” helps season deeper and dries the surface for better browning.
If you don’t have time, salt right before cookingjust don’t salt it and then wait 10 minutes (that’s the window
where the salt pulls moisture out and it hasn’t reabsorbed yet).
3) Pepper timing (optional but helpful)
Pepper can scorch at very high heat. If you love peppery crust, go for it. If you’re sensitive to bitter notes,
add pepper near the end or after cooking. Either way, salt is non-negotiable.
4) Bring it closer to room temp (but don’t get risky)
Letting the steak sit out for 20–30 minutes can help it cook more evenly. You don’t need hours.
Food safety note: don’t leave raw steak out for extended periodskeep it reasonable and cook promptly.
Tools You’ll Want (So You Don’t Have to Guess)
- Cast iron skillet: 10–12 inches is ideal for one or two steaks.
- Instant-read thermometer: The fastest path to consistent doneness.
- Tongs: For flipping and holding the steakavoid stabbing with a fork.
- Oil with a high smoke point: Avocado, canola, grapeseed, or refined safflower.
- Butter + aromatics: Garlic, thyme, rosemaryoptional, but very “restaurant.”
- Splatter guard: Optional, but your stovetop will send a thank-you note.
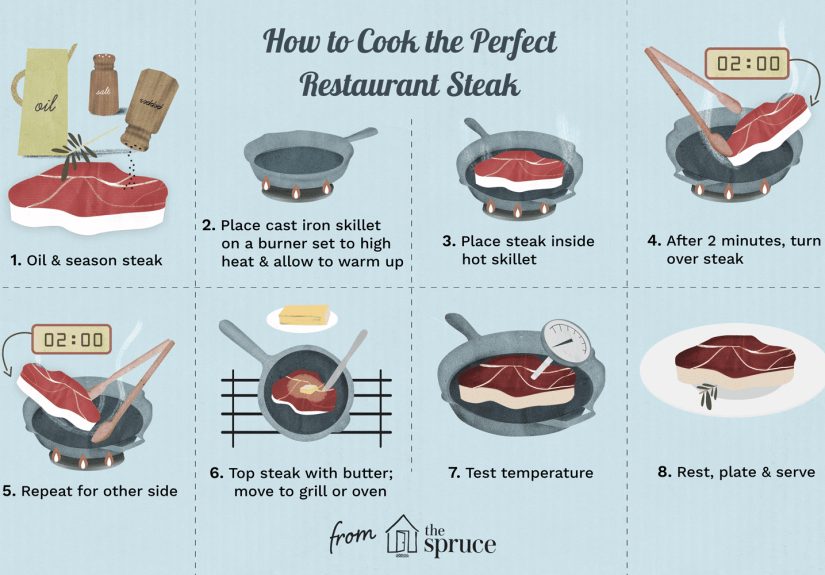
Perfect Cast Iron Steak: Step-by-Step
Step 1: Preheat the pan properly
Put your cast iron pan over medium-high heat and let it preheat for 5–8 minutes.
Cast iron needs time. You’re aiming for a pan that’s very hot, not “kinda warm but optimistic.”
If you flick a drop of water in and it dances and evaporates quickly, you’re in the zone.
Step 2: Add oil (then steak, immediately)
Add about 1–2 teaspoons of high smoke-point oil and swirl to coat. The oil should shimmer.
If it’s smoking aggressively, lower the heat a bit and let it calm down before you add the steak.
Step 3: Sear the first side (don’t poke it)
Lay the steak in the pan and press it gently for the first few seconds so the surface makes full contact.
Now leave it alone for 2–3 minutes (for a 1–1.5 inch steak). If you keep moving it,
you interrupt crust formation. Crust needs commitment.
Step 4: Flip and sear the second side
Flip with tongs and sear another 2–3 minutes. For thicker steaks, you’ll likely need a little
more time overall. At this point, you can also sear the edgeshold the steak upright with tongs and render the fat
cap for 20–40 seconds.
Step 5: Butter baste for flavor (and bragging rights)
Lower heat to medium. Add 1–2 tablespoons of butter plus optional garlic cloves and herbs.
As the butter foams, tilt the pan and spoon the butter over the steak repeatedly for 30–90 seconds.
This adds flavor and helps finish cooking more gently.
Step 6: Check temperature and finish
Use an instant-read thermometer and aim to pull the steak a few degrees before your final doneness,
because the temperature rises as it rests (carryover cooking).
Steak doneness temperature guide
| Doneness | Pull From Heat | Final After Rest |
|---|---|---|
| Rare | 120–125°F | 125–130°F |
| Medium-rare | 125–130°F | 130–135°F |
| Medium | 135–140°F | 140–145°F |
| Medium-well | 145–150°F | 150–155°F |
| Well-done | 155–160°F | 160°F+ |
Step 7: Rest (yes, really)
Rest the steak on a plate or cutting board for 5–10 minutes. This helps juices redistribute
so they stay in the steak instead of flooding your plate like a tiny beefy tragedy.
Step 8: Slice correctly and serve
Slice against the grain for maximum tenderness. Finish with flaky salt, a squeeze of lemon,
or a quick pan sauce if you’re feeling fancy.
How to Cook Thick Steaks Without Burning the Outside
If your steak is 2 inches thick, the outside can brown fast while the middle stays undercooked. Two reliable
solutions: an oven finish or a reverse sear.
Option A: Sear then oven-finish
- Sear both sides in cast iron as usual (about 2 minutes per side).
- Move the pan to a preheated oven at 400°F.
- Cook until the steak hits your target pull temperature.
- Rest, slice, and pretend it was effortless.
Option B: Reverse sear (extra consistent)
Reverse sear is great when you want a super even interior. Cook the steak in a low oven first, then sear at the end.
- Heat oven to 250°F.
- Place steak on a rack over a baking sheet.
- Cook until it’s about 10–15°F below your final target.
- Sear in a screaming-hot cast iron pan for a quick crust.
Flavor Upgrades That Don’t Require a Culinary Degree
Compound butter (the “steakhouse” cheat code)
Mix softened butter with garlic, parsley, chives, lemon zest, or a pinch of chili flakes. Add a small dollop on
the resting steak and watch it melt like edible applause.
Simple cast iron pan sauce
- Remove steak and pour off excess fat (leave a teaspoon behind).
- Add minced shallot and cook 30 seconds.
- Deglaze with a splash of wine or broth, scraping browned bits.
- Simmer to reduce, then swirl in a small knob of butter.
Common Mistakes (and How to Fix Them)
“My steak is gray, not brown.”
- Pan wasn’t hot enough. Preheat longer.
- Steak surface was wet. Pat it dry (seriously).
- Too crowded. Cook one steak at a time if needed.
“It’s crusty outside but undercooked inside.”
- Steak is thickuse oven finish or reverse sear.
- Heat is too high for too longmoderate after searing.
“It’s cooked through but not tender.”
- Could be the cuttry ribeye or strip for best results.
- Slice against the grain.
- Don’t skip resting.
“My kitchen looks like a smoke test.”
- Use a high smoke-point oil and avoid extra-virgin olive oil for searing.
- Turn on your vent fan early and crack a window.
- Lower heat slightly once the crust is set and butter-baste at medium.
What to Serve With a Cast Iron Steak
Steak is a main character, but it appreciates a strong supporting cast:
- Crispy potatoes: roasted, smashed, or skillet-fried.
- Simple salad: something bright and acidic to cut the richness.
- Green vegetables: asparagus, broccoli, green beans, or a garlicky sauté.
- Steakhouse vibe: creamed spinach, mushrooms, or a wedge salad.
Conclusion: Your Cast Iron Pan Is the Shortcut to Steak Confidence
Cooking the perfect steak in a cast iron pan isn’t about secret chef magicit’s about controlling heat, drying the
surface, seasoning well, and using temperature as your truth serum. Once you nail the basics, you can riff with
butter basting, herbs, pan sauces, and different cuts. And the best part? You’ll know exactly when your steak is
doneno guessing, no sacrificing a perfectly good ribeye to the “cut it open and hope” method.
Extra: of Real-World Cast Iron Steak Experiences
The first time I tried to cook a cast iron steak, I made two classic mistakes: I didn’t dry the steak well, and I
didn’t preheat the pan long enough. I basically introduced raw beef to a lukewarm skillet and asked them to become
a steakhouse masterpiece together. The result was edible, surebut the crust was pale and shy, like it didn’t want
to be photographed. That’s when I learned the “dry + hot” rule. A steak doesn’t brown because it’s talented; it
browns because the surface is dry enough and the pan is hot enough to do the job.
Another early lesson: salt has a schedule. I used to salt right before cooking every time and couldn’t understand
why some steaks were incredible and others felt like they were missing something. Once I started salting 40 minutes
ahead (or the night before when planning a bigger dinner), the difference was obviousmore even seasoning, better
texture, and a crust that formed faster. It felt like I’d unlocked a level in a video game where the reward is
“juicier steak” and “less stress.”
Then came the smoke alarm era. For a while, cooking steak meant opening every window, waving a dish towel like a
frantic orchestra conductor, and pretending it was all “part of the process.” Eventually I realized I didn’t need
to run the pan at maximum nuclear heat for the entire cook. Preheat well, sear hard, then back down to medium for
basting and finishing. That one change cut the smoke dramatically while still delivering that deep brown crust. My
kitchen stopped feeling like it was training for a firefighter exam.
Thermometer confidence is real, too. Before using an instant-read thermometer, I cooked steaks based on vibes.
Sometimes the vibes were correct. Sometimes the vibes were a liar. The thermometer didn’t just improve accuracyit
improved my mood. When you can pull a steak at 128°F for medium-rare and watch it coast upward while resting, you
feel like you’re in control. It turns steak night from “hope this works” into “this is going to work.”
My favorite cast iron moment happened when I made steak for someone who insisted restaurants were the only place
to get a real crust. I did the basics: dry-brined a thick New York strip overnight, preheated the cast iron like it
owed me money, seared both sides, basted with butter and thyme, and rested it properly. When it hit the cutting
board, the crust crackled softly and the inside was a warm pink edge-to-edge. The look on their face was the best
garnish I’ve ever served. The lesson: great steak isn’t a mysteryit’s a repeatable routine, and cast iron is the
best teammate you can have.


