Table of Contents >> Show >> Hide
- First: Know What You’re Cutting (Because Not All Glass Plays Nice)
- Tools & Materials: Your “Don’t Make It Weird” Checklist
- Safety Setup: The Part Everyone Skips… Until They Regret It
- How the “Score and Snap” Method Actually Works
- Step-by-Step Overview: Cutting a Straight Line
- Cutting a Mirror: Same Skill, Slightly Different Personality
- Cutting Glass Tile, Acrylic, and Other Look-Alikes
- Troubleshooting: Why Your Cut Isn’t Working (and What to Do Instead)
- When You Should Call a Pro (AKA: The Smart Flex)
- Practical DIY Examples (Where This Skill Pays Off)
- Experience Notes: 10 Things DIYers Learn After Their First Cut (500+ Words)
- 1) The sound matters more than your confidence
- 2) “One clean score” is not a suggestion
- 3) Most problems start before you even touch the cutter
- 4) Tiny strips are harder than they look
- 5) Oil is not magic, but it’s a nice assistant
- 6) Mirrors teach humility
- 7) Edge smoothing is part of the job, not an optional “nice touch”
- 8) Cleanup is where you prove you’re a responsible adult
- 9) Practicing on scrap is not a cliché
- 10) The best DIYers know when to outsource
- Conclusion: Cut Smart, Stay Safe, and Let Physics Be Your Friend
Cutting glass sounds like one of those skills you unlock only after you’ve built a shed with your bare hands and
own at least three levels. In reality, it’s more like learning to slice a bagel: it’s simple once you respect the
blade (and stop rushing like you’re on a cooking show).
This guide breaks down how DIYers cut glass safely and cleanly for common home projectspicture frames, cabinet
inserts, small window repairs, and craft buildswhile also explaining when the smartest move is to let a glass shop
do the cutting. If you’re under 18, treat this as educational information and involve a capable adult or a pro for
hands-on work. Glass is not the place to “wing it.”
First: Know What You’re Cutting (Because Not All Glass Plays Nice)
Glass you can usually cut at home
- Annealed (standard) glass common in picture frames and older window panes.
- Some mirrors basically glass with a reflective coating on the back.
- Thin craft glass used for small DIY and art projects.
Glass you generally should NOT cut at home
-
Tempered glass once tempered, it’s designed to break into many small pieces if stressed. It’s
typically sized before tempering, not after. -
Laminated safety glass has a plastic interlayer; it’s a different process and usually not a
beginner DIY situation. -
Large sheets size and leverage increase risk fast. Big panels are where accidents and waste
love to happen.
Translation: if you’re working on a shower door, a modern tabletop, a glass railing, or anything that was built to
meet safety glazing standards, assume it’s tempered and plan on ordering a custom piece instead of cutting it.
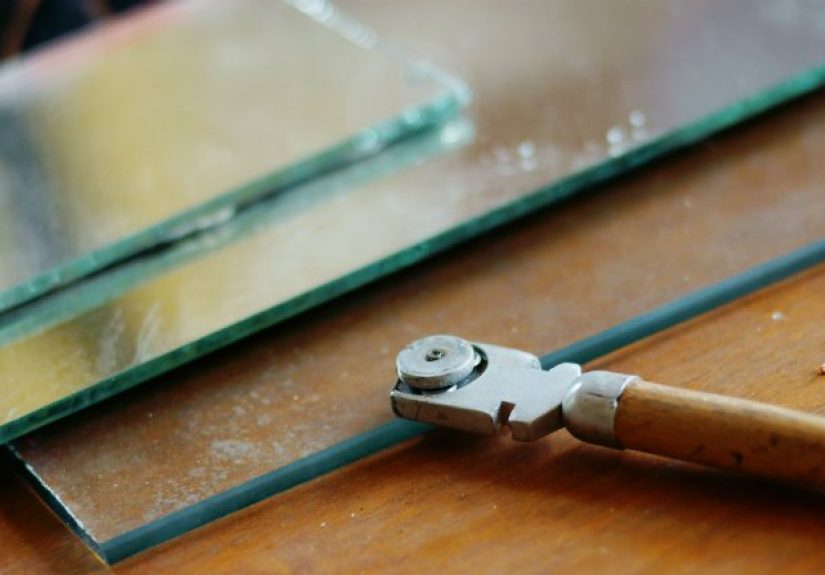
Tools & Materials: Your “Don’t Make It Weird” Checklist
You don’t need a workshop full of specialized gear, but you do need the right basics. Cutting glass is a precision
taskmore “calm and steady” than “power tools and vibes.”
Must-haves
- Glass cutter (wheel-type; oil-fed is nice but not required)
- Straightedge (metal ruler or framing squaresomething that won’t flex)
- Marker or grease pencil for your cut line
- Measuring tape
- Cutting oil (if your cutter isn’t oil-fed; helps the score stay clean)
- Glass cleaner and lint-free cloth/paper towels
Strongly recommended for safety and cleaner breaks
- Safety glasses (non-negotiable)
- Cut-resistant gloves or sturdy work gloves
- Closed-toe shoes (because toes are not a PPE category)
- Running pliers (especially helpful for snapping along the score line)
- Emery stone or fine sandpaper for smoothing sharp edges
- A flat, stable work surface (and a protective layer like cardboard or a blanket)
Safety Setup: The Part Everyone Skips… Until They Regret It
Glass cutting is manageable, but it deserves respect. A tiny sliver can ruin your day faster than stepping on a LEGO.
Set up like you’re doing a serious jobbecause you are.
- Clear your workspace. No clutter, no dangling cords, no “I’ll just move that later.”
- Keep kids and pets away. Glass shards are sneaky and travel like they have frequent-flyer status.
- Work in good light. If you can’t see the score line clearly, you can’t cut it cleanly.
- Have a cleanup plan. A small box for offcuts, a damp paper towel for dust, and a sturdy trash container.
- Don’t cut on your lap. This should not need to be said, but here we are.
How the “Score and Snap” Method Actually Works
Most DIY glass cutting isn’t sawing through glass like wood. Instead, you score the surface with a
glass cuttercreating a controlled weak linethen apply pressure so the glass breaks along that score.
Think of it like folding a crisp sheet of paper along a crease. You’re not “cutting all the way through” so much as
telling the glass where it should break.
Step-by-Step Overview: Cutting a Straight Line
The steps below describe the standard approach used for small DIY projects. If you’re inexperienced, practice on
inexpensive scrap first. The goal is consistencynot heroics.
1) Clean the glass (yes, really)
Dirt, grit, or sticky residue can make the cutter wheel skip or wander. Clean both sides, let it dry, and wipe it
again if your hands smudge the area where you’ll score.
2) Measure and mark your cut line
Measure twice, mark once, then measure the markbecause the mark is now the boss. For window repairs, double-check
that you’re measuring the opening correctly and accounting for fit. For frames, confirm whether you need the glass
to sit under tabs, points, or clips.
3) Position a straightedge as a guide
Align your straightedge with the cut line, then hold it firmly. If it moves during the score, the score line can
curveleading to chips or a bad break. Some DIYers add a strip of painter’s tape to the straightedge for grip and
to help protect the glass surface.
4) Oil the cutter (if needed) and score once
A light touch of cutting oil helps many cutters produce a cleaner score. Then, with steady pressure, run the wheel
along the straightedge in one continuous pass. A consistent “scratch” sound usually means the wheel is scoring well.
Important: score once. Re-scoring the same line often makes things worselike trying to “fix” a haircut
with another haircut.
5) “Run” the break and snap along the score
Once scored, the glass needs controlled pressure to break along that line. Common approaches include aligning the
score with the edge of a work surface or using tools designed to help separate along the score. The goal is gentle,
even forcenot a dramatic bend that creates surprise fractures.
6) Smooth sharp edges
Fresh-cut glass edges are sharpsometimes invisibly sharp. Use an emery stone, sanding block, or appropriate abrasive
to knock down the edge. A few careful passes can make the piece much safer to handle and install.
Cutting a Mirror: Same Skill, Slightly Different Personality
Mirrors are usually standard glass with a reflective backing. The basic process is similar, but the backing can chip
or flake if you rush or force the break. A few mirror-specific tips:
- Clean thoroughlyfingerprints and dust can disrupt the score.
- Support the mirror well to prevent flexing (flex is the enemy of clean breaks).
- Expect the edge to be sharp and imperfectplan to smooth it carefully.
- For big mirrors, consider a shop cutlarge panels are higher risk and higher cost to replace.
Cutting Glass Tile, Acrylic, and Other Look-Alikes
Glass tile
Glass tile is its own adventure. Many DIYers use wet saws with diamond blades to reduce chipping and improve control,
especially for larger cuts. For small trims or detail work, specialized hand tools exist, but the learning curve is real.
Acrylic / Plexiglass
Acrylic is not glass, even if it tries to dress like it. It can be scored and snapped when thin, but thicker sheets
often cut better with saws designed for plastic. If your project calls for a “glass look” but you want easier cutting,
acrylic may be a safer, simpler alternative.
Tempered glass
Tempered glass generally can’t be cut after tempering. If you need a specific size, order it made to size or replace
it with a piece designed for your application. If you’re unsure whether a piece is tempered, treat it like it is until
proven otherwisebecause guessing wrong can end with a pile of glittery glass confetti.
Troubleshooting: Why Your Cut Isn’t Working (and What to Do Instead)
The score line looks faint or uneven
This can happen if the cutter wheel is worn, the glass is dirty, or pressure is inconsistent. A fresh cutter wheel,
proper lubrication (if applicable), and a stable straightedge make a big difference.
The glass won’t snap on the score
Usually this means the score didn’t create a clean fault line, or the pressure wasn’t applied evenly. Forcing it can
cause the break to wander. If the piece is valuable, stop and consider having it cut professionally.
The break “runs” off the line
Common causes include a crooked score, stopping and starting mid-score, or trying to cut too close to the edge or into
a tiny strip. Some cuts are simply too delicate for beginner DIY workespecially narrow pieces.
Chipping along the cut
Chipping can result from a rough snap, poor support under the glass, or the wrong approach for the material (like glass
tile with hand tools). Slow down, support better, and match the tool to the job.
When You Should Call a Pro (AKA: The Smart Flex)
DIY is greatuntil the “savings” becomes “I just bought the same glass twice.” Consider professional cutting if:
- You suspect the glass is tempered or laminated.
- The panel is large (big windows, tabletops, doors).
- You need complex shapes (curves, holes, notches).
- The glass is expensive or hard to replace.
- You’re doing a safety-critical application (showers, railings, doors).
A local glass shop can often cut standard glass to size quickly, and you’ll usually get cleaner edges, better safety,
and less chance of turning your weekend project into a Monday errand.
Practical DIY Examples (Where This Skill Pays Off)
Example 1: Replacing a picture frame pane
If a frame has broken glass, cutting a replacement pane can be a cost-effective fixespecially for odd sizes. Measure
the opening carefully, cut standard glass, smooth edges, and install with the frame’s tabs or points.
Example 2: Small window repair in older wood sash
Older windows often use standard glass. Cutting a piece to fit can work well, but the installation (glazing points,
putty, and weatherproofing) is its own skill set. If you’re unsure, have the glass cut professionally and focus your DIY
energy on the sash repair.
Example 3: Cabinet door insert
Swapping a solid panel for glass can add style fast. For this kind of project, many DIYers choose tempered glass for
durabilitymeaning you’ll want to order it cut to size rather than cutting it at home.
Experience Notes: 10 Things DIYers Learn After Their First Cut (500+ Words)
People rarely mess up glass cutting because they’re “bad at DIY.” They mess up because glass is honest: it responds to
physics, not optimism. Here are the most common real-world lessons DIYers share after their first few attemptsplus how
to use those lessons to get better fast.
1) The sound matters more than your confidence
Many first-timers expect silencethen panic when the cutter makes a scratchy noise. That sound is often a good sign.
What you don’t want is a chattering, skipping, or squealing that changes pitch mid-line. A steady sound usually means
the wheel is tracking consistently.
2) “One clean score” is not a suggestion
The urge to go back over the line is powerful, especially if the score looks light. But re-scoring can create multiple
weak points, which encourages the break to wander. If you think the score is truly bad, it’s often better to start over
on a new piece (or practice on scrap) than to “double down” on a shaky score.
3) Most problems start before you even touch the cutter
A surprising number of bad breaks come from poor setup: a wobbly table, a straightedge that slides, or glass that
flexes because it’s not supported. DIYers who improve the fastest usually don’t “cut harder”they stabilize better.
If you want cleaner results, start by upgrading your work surface and clamping or bracing your straightedge when possible.
4) Tiny strips are harder than they look
Cutting a big rectangle feels doable. Cutting a skinny 1/2-inch strip feels like it should be easieruntil it isn’t.
Narrow pieces can break unpredictably because there’s less material to distribute force evenly. If your project demands
narrow strips, consider having them cut at a shop or redesigning to use a wider piece.
5) Oil is not magic, but it’s a nice assistant
Cutting oil doesn’t make you a glass wizard, but it can reduce friction and help the cutter wheel glide. DIYers often
notice fewer skips and cleaner lines when the tool is lubricated appropriatelyespecially with basic handheld cutters.
6) Mirrors teach humility
The reflective backing adds drama. Even with a good score, some mirrors chip at the edge or flake at the coating if the
break is forced. The common workaround is patience: stable support, careful separation, and thorough edge smoothing.
Also, many DIYers decide that paying a few dollars for a shop cut is cheaper than replacing a large mirror twice.
7) Edge smoothing is part of the job, not an optional “nice touch”
DIYers often finish a cut, admire the result, then immediately realize the edge is sharp enough to threaten the fabric
of reality. A quick pass with an emery stone or abrasive turns “hazardous” into “handleable.” It also reduces the chance
of small chips later during installation.
8) Cleanup is where you prove you’re a responsible adult
Glass dust and micro-shards can linger. Experienced DIYers wipe surfaces with a slightly damp disposable towel, sweep
carefully, then check the area again in better light. It’s boringand it’s exactly how you avoid finding a glass sliver
with your sock tomorrow.
9) Practicing on scrap is not a cliché
The first cut is rarely perfect. The second is usually better. By the fifth, most people have discovered the pressure,
posture, and pace that work for them. Practicing on inexpensive glass (or small offcuts) is the quickest way to learn
without turning your “real piece” into an expensive lesson.
10) The best DIYers know when to outsource
There’s zero shame in having a glass shop cut the pieceespecially for tempered glass, big panels, or costly projects.
In fact, choosing a pro cut often makes the rest of your DIY work easier: the fit is better, the edges are cleaner, and
you can focus on installing or building instead of stressing over a high-stakes snap.
Conclusion: Cut Smart, Stay Safe, and Let Physics Be Your Friend
Cutting glass is a classic DIY skill: simple in concept, picky in execution, and wildly satisfying when it goes right.
Use the correct tools, keep the glass clean, score once with steady control, and handle the break and edges with care.
Just as importantly, recognize when glass type (like tempered) or project scale makes professional cutting the safer,
smarter option. Your goal isn’t just a piece of glass that fitsit’s a project you finish with all your fingers still
eligible for texting.