
Table of Contents >> Show >> Hide
- What Is a Water Hammer Arrester?
- Signs You May Need a Water Hammer Arrester
- Where Should You Install a Water Hammer Arrester?
- Choose the Right Type of Water Hammer Arrester
- Tools and Materials You May Need
- How to Install a Water Hammer Arrester Step by Step
- Special Notes for Common Installations
- Common Mistakes to Avoid
- Do You Also Need to Secure the Pipes?
- When to Call a Plumber
- Final Thoughts
- Real-World Experiences Installing a Water Hammer Arrester
- SEO Tags
If your pipes go bang-bang every time the washing machine shuts off, congratulations: your plumbing is auditioning for a drum solo. That noise is usually water hammer, a pressure shock that happens when flowing water is forced to stop suddenly. It can sound dramatic, feel annoying, and over time it may put extra stress on valves, fittings, and supply lines.
The good news is that installing a water hammer arrester is often a manageable fix, especially at problem fixtures like washing machines, dishwashers, refrigerators with ice makers, and some toilets or fast-closing faucets. The even better news? You do not need to become a full-time philosopher of pipes to understand how it works. You just need the right arrester, the right location, and a little patience with threaded fittings that always seem confident until they leak.
In this guide, you will learn what a water hammer arrester does, where it should go, how to install one step by step, what mistakes to avoid, and when the smarter move is to call a plumber. By the end, you should be able to quiet those banging pipes and restore peace to your laundry room, kitchen, or bathroom.
What Is a Water Hammer Arrester?
A water hammer arrester is a small plumbing device designed to absorb the shock wave created when water flow stops abruptly. Inside the arrester is a sealed chamber, typically with a piston or diaphragm and a cushion of air or gas. When the pressure surge arrives, the device absorbs part of that energy instead of allowing your pipes to rattle like they are trying to escape the wall.
Think of it as a shock absorber for your plumbing. Your car has them. Your knees wish they still had them. Your pipes deserve them too.
Modern arresters are usually preferred over old-fashioned air chambers. A simple capped vertical pipe can lose effectiveness over time because it may fill with water. A sealed arrester is more reliable, more compact, and usually easier to install at a fixture connection.
Signs You May Need a Water Hammer Arrester
You are a strong candidate for this fix if you notice any of these symptoms:
- Loud banging or thudding when the washer, dishwasher, or ice maker stops filling
- Pipes that shudder behind a wall after a toilet finishes refilling
- A sharp knock when a quick-closing valve shuts off
- Recurring noise that did not improve after tightening pipe straps or lowering pressure a little
Water hammer is most common near appliances and fixtures with fast-acting valves. Washing machines are famous for it because their solenoid valves shut off quickly. Dishwashers, ice makers, and some modern plumbing fixtures can do the same thing.
Where Should You Install a Water Hammer Arrester?
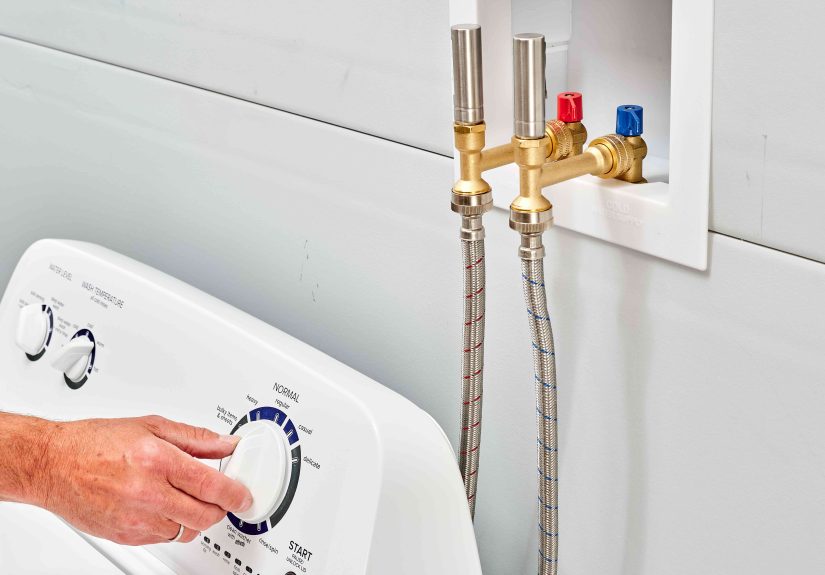
The best location is usually as close to the source of the shock as practical. In plain English, install it near the appliance or valve that causes the noise. On many residential jobs, that means right at the shutoff valve or connection point for the fixture.
Typical locations include:
- Washing machine: one on the hot side and one on the cold side
- Dishwasher: near the dishwasher supply connection
- Refrigerator ice maker: near the ice maker supply box or valve
- Toilet: a mini arrester on the toilet supply line if flushing causes hammer
- Sink or faucet line: near the fast-closing valve if that is the culprit
Some manufacturers note that many residential arresters can be installed horizontally or vertically, which helps in tight spaces. Still, always check the instructions for the exact model you buy, because the packaging is not decorative fiction.
Choose the Right Type of Water Hammer Arrester
Before you buy anything, match the arrester to the fixture and connection style. That is the difference between “simple Saturday fix” and “why am I holding three adapters and new regrets?”
1. Screw-On Washing Machine Arresters
These are among the easiest options. They typically thread directly onto the hot and cold supply valves, and then the washer hoses connect to the arrester. This is the most beginner-friendly installation.
2. Compression or Threaded Mini Arresters
These work well on toilets, dishwashers, and sink supplies. They may install inline at the stop valve or with a tee fitting, depending on the setup.
3. Sweat, Press, or Push-to-Connect Arresters
These are often used when you are opening the plumbing line itself. They are better suited to someone comfortable with soldering, press systems, or approved push-fit connections.
4. Fixture Outlet Boxes With Integrated Arresters
These are common for washing machines and ice makers in remodels or new construction. They give you a cleaner built-in solution, but installation is more involved than simply threading on a device.
Tools and Materials You May Need
- Water hammer arrester sized for your fixture
- Adjustable wrench or tongue-and-groove pliers
- Bucket or towel
- Tee fitting, if required by your setup
- Replacement supply hose, if the old one is worn
- Thread seal tape if recommended for threaded pipe connections
- Flashlight for tight cabinet or laundry spaces
If the connection is corroded, cramped, or soldered into the line, your “quick fix” may turn into a medium-sized plumbing project. That is your cue to slow down and assess honestly.
How to Install a Water Hammer Arrester Step by Step
Step 1: Identify the Fixture Causing the Hammer
Do not install blindly like a plumbing pirate. Run the appliance or fixture and confirm where the noise starts. If the banging happens only when the washing machine stops, that is your prime suspect. If it happens all over the house, you may also need to look at pressure issues or unsecured piping.
Step 2: Shut Off the Water Supply
Turn off the local shutoff valve to the appliance or fixture. If there is no local shutoff, turn off the main water supply. Open a nearby faucet or fixture to relieve pressure in the line. Keep a bucket and towel ready, because even “drained” lines somehow store one last splash of disrespect.
Step 3: Disconnect the Existing Supply Line
For a washing machine, disconnect the hot and cold hoses from the shutoff valves. For a toilet or dishwasher, disconnect the supply tube from the stop valve or fixture connection. Inspect the hose or tube while you are there. If it is old, cracked, kinked, or corroded, replace it now instead of pretending Future You enjoys repeat visits.
Step 4: Attach the Water Hammer Arrester
Install the arrester onto the valve or fitting according to the product design.
- For a screw-on washer arrester: thread it onto the valve by hand, then snug it gently with a wrench
- For an inline or tee-style arrester: install it at the connection point designated by the manufacturer
- For a push-to-connect or sweat model: prepare the pipe carefully and follow the approved installation method for that connection type
Do not over-tighten. This is plumbing, not arm wrestling. Too much force can damage threads, crush washers, or create a leak that was not there five minutes ago.
Step 5: Reconnect the Supply Line
Reconnect the hose or supply tube to the other side of the arrester. Make sure hot connects to hot and cold connects to cold. This sounds obvious, but so does “do not put your phone in the sink,” and yet history keeps happening.
Step 6: Turn the Water Back On
Slowly reopen the shutoff valve or main supply. Check every connection for leaks. If you see a drip, shut the water back off and gently tighten the connection or reseat the washer if needed.
Step 7: Test the Fixture
Run the appliance or fixture through a cycle and listen. If the noise is gone or dramatically reduced, you win. If the pipes still bang, the problem may involve loose pipe supports, excessive water pressure, or hammer occurring at another fixture too.
Special Notes for Common Installations
Installing on a Washing Machine
This is the classic use case. Shut off both valves, disconnect both hoses, thread one arrester onto each valve, reconnect the hoses, then test. It is usually one of the easiest plumbing upgrades a homeowner can do.
Installing on a Dishwasher
Space is usually tighter, and access may involve removing the lower panel or pulling the unit slightly forward. A mini arrester may be installed on the hot water supply line near the shutoff or connection point. Because dishwasher spaces are awkward, work slowly and protect the floor.
Installing on a Toilet
If flushing causes a bang, a mini arrester installed on the toilet supply can help. This is especially useful when fast refill valves create a sharp stop in the line. Be sure you have enough clearance behind the toilet before buying the device.
Common Mistakes to Avoid
- Installing it too far from the problem fixture: closer is usually better
- Buying the wrong connection type: thread, compression, sweat, press, and push-fit are not interchangeable by wishful thinking
- Ignoring water pressure: high pressure can worsen hammer and may require a pressure-reducing valve
- Leaving pipes loose: an arrester helps, but unsecured piping can still rattle
- Over-tightening fittings: this creates leaks instead of preventing them
- Using an expansion tank as a substitute: an expansion tank solves thermal expansion, not water hammer at fast-closing fixtures
Do You Also Need to Secure the Pipes?
Very often, yes. A water hammer arrester absorbs shock, but loose pipes can still move and tap against framing, drywall, or ductwork. If you have access to the piping, inspect for missing straps, worn supports, or contact points that could amplify noise. In some cases, securing the pipe properly makes as much difference as the arrester itself.
When to Call a Plumber
Call a licensed plumber if:
- The hammer affects multiple fixtures throughout the house
- You suspect very high water pressure
- The install requires cutting into copper, PEX, or finished walls
- The shutoff valves are old, stuck, or leaking
- You are dealing with concealed piping, repeated leaks, or code questions
There is no shame in outsourcing a project when the alternative is turning one noisy valve into a small indoor waterfall.
Final Thoughts
Installing a water hammer arrester is one of those rare home fixes that can be both practical and deeply satisfying. The parts are usually compact, the concept is simple, and the result is immediate: fewer thuds, less shaking, and a plumbing system that behaves more like a civilized household utility and less like a percussion section.
The keys are choosing the right arrester, placing it near the fast-closing valve, avoiding over-tightening, and remembering that secure pipes still matter. If you start with a washing machine or ice maker line, this can be a very approachable DIY job. If the system is more complex, a plumber can help you size and place devices properly.
Either way, once the banging stops, you will wonder why you waited so long to silence the pipes. Your walls will be quieter. Your nerves will be calmer. Your washing machine can go back to doing laundry instead of trying to start a garage band.
Real-World Experiences Installing a Water Hammer Arrester
In real homes, water hammer rarely announces itself politely. It usually shows up as a random thud at 10:47 p.m. when someone starts the dishwasher, or as a violent bang every time the washer switches cycles. Many homeowners first assume something is loose in the appliance itself. Then they check the hoses, stare at the wall, run the machine again, and realize the noise is coming from the plumbing line. That moment is both frustrating and weirdly comforting, because at least the house is not haunted. Probably.
One of the most common experiences is with older laundry rooms. A homeowner swaps in a newer washing machine and suddenly the pipes start slamming. The old machine may have shut off water more slowly, while the new one uses faster valves. In that case, installing a pair of screw-on arresters at the hot and cold shutoffs often feels almost magical. The job takes a short amount of time, the connection style is simple, and the improvement is immediate. People often describe the result the same way: “I ran the washer again just to enjoy the silence.” That is a very relatable victory.
Kitchen installations tend to be less glamorous. Dishwashers and refrigerator ice makers are notorious for forcing you into cramped spaces where your elbows discover muscles they have never met before. A refrigerator ice maker line may be tucked into a box behind the appliance, while a dishwasher connection may hide under the sink or behind a lower access panel. The arrester itself is usually not the hard part. The hard part is reaching the connection without turning into a folded lawn chair. Still, once installed, the difference is noticeable, especially in open-plan homes where every pipe noise seems to echo through the entire first floor.
Another common lesson from experience is that an arrester is not a miracle cure for every noise. Some people install one and still hear a lighter tapping sound. That usually leads to the next discovery: loose pipe supports. In practice, the best outcome often comes from a one-two punch of adding the arrester and securing the nearby piping. Homeowners are sometimes surprised by how much movement exists in a supposedly fixed plumbing line. A pipe that can shift even a little may keep knocking against framing when water stops abruptly.
There is also the pressure factor. In homes with higher water pressure, the hammer tends to sound sharper and more dramatic. Some people install an arrester, improve the noise, then later discover a pressure-reducing valve was also needed. That is a valuable reminder that plumbing symptoms can have layers. The banging noise may be the headline, but the root cause can include pressure, support, fixture design, and valve speed all working together like a very annoying orchestra.
Perhaps the biggest takeaway from real-world installations is that this is one of those rare fixes that can make a home feel instantly better. It is not flashy. Nobody posts glamorous before-and-after photos of an arrester under a sink. But the first time a washer finishes filling without a wall-rattling bang, it feels like the house finally exhaled. Quiet plumbing is one of those luxuries you do not fully appreciate until you get it back.


