
Table of Contents >> Show >> Hide
- What You Need Before You Start
- First, Confirm Your Wii Is Actually on Menu 4.3
- How to Find Your Wii MAC Address
- Prepare the SD Card the Smart Way
- Download the Correct LetterBomb Package
- Install Homebrew on Wii Menu 4.3
- What Happens After Installation?
- What Can You Do with Wii Homebrew?
- Common Problems and How to Fix Them
- Best Practices After You Install Homebrew
- Why Wii Menu 4.3 Homebrew Is Still Popular
- Final Thoughts
- Experience: What It’s Really Like to Install Homebrew on Wii Menu 4.3
- SEO Tags
Note: This guide is for running legal homebrew apps, utilities, and community-made software on an original Nintendo Wii. It is not a guide for piracy, shady downloads, or turning your console into a tiny crime scene.
If your old Wii is still sitting under a TV stand like a retired sports legend waiting for one more season, good news: Wii Menu 4.3 can still be a fantastic setup for homebrew. Installing the Homebrew Channel gives your console a second life, opening the door to hobbyist apps, media tools, preservation projects, retro-friendly utilities, and a surprisingly active enthusiast scene. In other words, your dusty white box can go from “remember Wii Sports?” to “wait, this thing can do that?”
The best part is that installing Homebrew on Wii Menu 4.3 is not especially complicated when you use the right method. For most original Wii consoles on 4.3, the easiest path is LetterBomb, a software exploit that works through the Wii Message Board. You do not need to open the console, solder anything, or wear a lab coat while whispering “enhance” at the screen. You just need the right system version, a compatible SD card, your Wii’s MAC address, and a little patience.
What You Need Before You Start
Before you install Homebrew on Wii Menu 4.3, gather the basics first. Doing this now saves you from the classic mid-process panic of “Why is the bomb letter not here?”
- An original Nintendo Wii running System Menu 4.3
- A compatible SD or SDHC card, ideally freshly formatted
- A computer with an SD card reader
- Your Wii’s MAC address
- The correct LetterBomb package with the bundled HackMii Installer
For Wii Menu 4.3, an SDHC card up to 32GB is typically the sweet spot. Bigger cards can be a gamble, and gambling is more fun in Mario Party than during system setup. A small, reliable card formatted to FAT32 is usually the least dramatic option.
First, Confirm Your Wii Is Actually on Menu 4.3
From the Wii Menu, open Wii Options, then Wii Settings. In the top-right corner, you should see the system version. If it says 4.3U, 4.3E, 4.3J, or 4.3K, you’re in the right place. That final letter matters because it identifies the console’s region, and LetterBomb needs the correct region to generate the proper file.
This guide is intended for an original Wii, not a Wii U running Wii mode. That distinction matters, because Wii Menu 4.3 homebrew setup on an original Wii is different from the process used on vWii.
How to Find Your Wii MAC Address
You will need your MAC address because the LetterBomb generator uses it to create a signed file for your specific console. On the Wii, go to:
- Wii Button on the main menu
- Wii Settings
- Move to Page 2
- Select Internet
- Select Console Information
Your Wii’s MAC address appears at the top of the screen. Write it down carefully. One wrong character here can ruin the whole plan, and the Wii is not known for giving emotionally supportive error messages.
Prepare the SD Card the Smart Way
Format your SD card to FAT32 before copying anything over. A clean card helps avoid weird detection issues, old leftover files, and the kind of troubleshooting rabbit hole that turns a 20-minute setup into an accidental weekend project.
Keep the card simple. Do not bury files in random folders. For the initial install, you want the LetterBomb files placed exactly where they belong, right on the root of the SD card.
Download the Correct LetterBomb Package
On your computer, use the official LetterBomb generator. Enter your Wii region, type in your MAC address, and make sure the option to bundle the HackMii Installer is selected. Then download the package by choosing either wire. Yes, either one. This is the rare internet decision where both options really do work.
Once downloaded, extract the ZIP file. You should end up with a private folder and a boot.elf file. Copy both items to the root of the SD card, not inside another folder.
That last detail matters. If the files are nested too deeply, the Wii will act like it has never met you before.
Install Homebrew on Wii Menu 4.3
Step 1: Insert the SD Card Properly
Put the SD card into the front SD slot on the Wii. Do not use a USB-to-SD adapter in the USB port for this step. The exploit expects the front SD slot.
Step 2: Return to the Wii Menu
Power on the Wii and go back to the regular menu screen.
Step 3: Open the Wii Message Board
Now open the Wii Message Board. This is where LetterBomb shows up as a message.
Step 4: Find the Red Letter with the Bomb
Look for a red envelope with a bomb icon. If you do not see it today, check yesterday and tomorrow. Also make sure your Wii’s date and time are correct. That tiny calendar detail has ruined many first attempts and inspired many dramatic sighs.
Step 5: Launch the Exploit
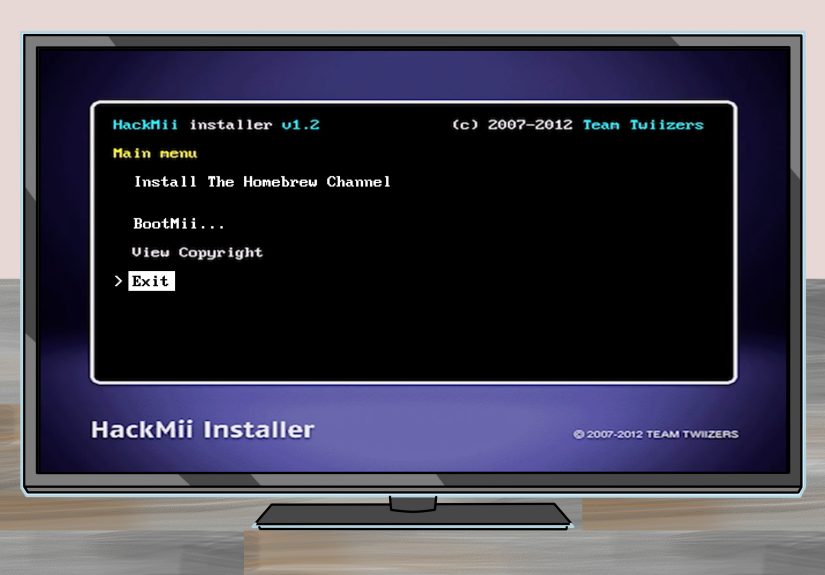
Select the red letter. The screen should go dark for a moment, and then the installer should begin loading. If you see a scam warning, that is normal. In fact, it is a good sign. The HackMii Installer is free, and if anyone ever tried to sell it to you, they were basically charging money for something the community intended to be free.
Step 6: Install the Homebrew Channel
Once the installer finishes its checks, choose the option to install the Homebrew Channel. Confirm the prompts, let the installer do its thing, and wait for the system to return you to the menu.
Step 7: Consider Installing BootMii Too
If the installer offers BootMii, install it. On some Wiis it can install in a stronger form, while on others it may only install as IOS. Either way, it is worth considering because it adds recovery and backup value. Not every Wii supports the most powerful BootMii option, so do not panic if you see limitations. That is normal behavior, not a cosmic judgment of your console.
What Happens After Installation?
Once installed, the Homebrew Channel appears on the Wii Menu like a normal channel. That is the magic of it. You do not need to re-run the exploit every single time you want to launch homebrew. Open the channel, and it will scan for compatible apps on your SD card.
Most homebrew apps use a simple folder structure. Typically, you create an apps folder on the root of the SD card, then add subfolders for each app. Inside each app folder, the main executable is usually named boot.dol or boot.elf. Optional files like icon.png and meta.xml make everything look nicer inside the Homebrew Channel.
What Can You Do with Wii Homebrew?
This is the part where people get excited, and understandably so. Installing Homebrew on Wii Menu 4.3 is not just about the install itself. It is about what comes next.
- Run community-made applications and utilities
- Use media tools built for the Wii
- Experiment with preservation and hobbyist software
- Explore retro-friendly projects made for legitimate homebrew use
- Give an aging console a fun second act
A modded Wii can become a quirky little all-in-one entertainment box. It is not modern, sleek, or fast by today’s standards, but neither is a diner jukebox, and people still love those. The charm is part of the appeal.
Common Problems and How to Fix Them
The Red Letter Does Not Appear
Check the Wii’s date and time first. Then look at messages from yesterday and tomorrow. If that still fails, verify the MAC address and region you used when generating LetterBomb. Also make sure the files are on the root of the SD card.
The SD Card Is Not Recognized
Try formatting the card again to FAT32. Use a different SD card if possible. Some cards simply behave better with the Wii than others. Smaller, simpler, non-fancy cards are often the heroes of this story.
The Installer Loads but Something Feels Off
Read the prompts carefully and do not rush through them. The installer is doing real system checks, and this is not the time to button-mash like you are escaping a boss fight.
You Are Unsure About BootMii
Install it if available, especially if you care about backups and recovery. If your Wii only supports a limited BootMii install, that is still useful. Think of it as a seatbelt: not glamorous, but you are happier when it is there.
Best Practices After You Install Homebrew
Once the Homebrew Channel is working, resist the urge to dump fifty random files onto the SD card from the sketchiest corners of the internet. A clean setup is easier to manage and far safer.
- Keep your SD card organized
- Use trusted community resources
- Install one app at a time at first
- Make backups where possible
- Stick to legal homebrew software and utilities
The goal is not to turn your Wii into chaos with a power button. The goal is to make it more useful, more interesting, and more fun.
Why Wii Menu 4.3 Homebrew Is Still Popular
There is something charmingly stubborn about Wii homebrew. The console is old, the interface is unapologetically from another era, and yet it remains one of the most approachable homebrew platforms around. The process is simple enough for beginners, flexible enough for hobbyists, and nostalgic enough to make the whole thing feel like a weekend project with personality.
That is why searches for how to install Homebrew on Wii Menu 4.3 never really disappear. People keep rediscovering old Wiis in closets, thrift stores, media cabinets, and family garages. Then they realize the machine still has plenty of life left. Homebrew is what turns that realization into a plan.
Final Thoughts
Installing Homebrew on Wii Menu 4.3 is one of the easiest ways to make an old console interesting again. With the proper SD card, the correct MAC address, the official LetterBomb package, and a careful trip through the HackMii Installer, you can set up the Homebrew Channel without opening the system or dealing with anything overly technical.
The keys to success are simple: use the correct region, double-check your MAC address, keep the SD card clean, and do not panic if the red letter shows up on the wrong day. After that, the Homebrew Channel gives your Wii a second life that is more playful, more flexible, and honestly more fun than a console this old has any right to be.
Your Wii may be from another gaming generation, but with homebrew, it does not have to act its age.
Experience: What It’s Really Like to Install Homebrew on Wii Menu 4.3
There is a very specific feeling that comes with installing Homebrew on a Wii Menu 4.3 system for the first time. It starts with a mix of curiosity and low-level fear, like you are trying to revive an artifact from a more innocent internet era. You pull the Wii out, untangle the cables, clean off some dust, and suddenly you are right back in the age of Miis, weather channels, and fitness games that insisted gentle arm flailing counted as elite athletics.
The actual setup process feels surprisingly human once you start. You are not buried under command lines or weird jargon every five seconds. Instead, it is a sequence of simple actions: find the version, grab the MAC address, prep the SD card, load the files, check the message board. The hardest part is usually trusting that the process is really this straightforward. A lot of people expect the complicated part to jump out from behind a curtain wearing a villain mustache. Most of the time, it never does.
What really stands out is the moment you find the red LetterBomb message. It feels goofy, dramatic, and weirdly brilliant. Nintendo’s message board was originally meant for cute little notes and updates, and here it is helping breathe new life into a console years later. There is something very on-brand about the Wii being modded through what looks like a cartoon letter. Even the exploit has personality.
Then the Homebrew Channel appears on the menu, and that is the point where the project shifts from theory to reward. The console suddenly feels open-ended. Not broken open, just opened up. That difference matters. Instead of feeling like you “beat” the Wii, it feels more like you unlocked a second layer of usefulness that had been waiting politely in the background.
For many people, the bigger surprise is not that the install works. It is that the Wii still feels worth using afterward. Homebrew makes the system feel less like outdated hardware and more like a compact hobby machine. The interface is still clunky in a charming way. The output is still old-school. The storage limitations are still very Wii. But the whole experience gains a kind of homemade magic. You stop looking at the console as a relic and start seeing it as a project platform with character.
And maybe that is why Wii homebrew remains so appealing. It is not just about apps or customization. It is about rescuing a piece of gaming history and making it useful again. It is about hearing the Wii startup sound in the present tense instead of the past tense. Most of all, it is about the joy of taking something familiar, slightly forgotten, and wonderfully odd, and giving it one more genuinely fun chapter.


