
Table of Contents >> Show >> Hide
- Why Leveling Matters (More Than Your Shed’s Feelings)
- Before You Dig: The “Don’t Regret This Later” Checklist
- Tools and Materials You’ll Actually Use
- Step-by-Step: How to Level the Ground for a Shed
- Step 1: Mark the shed footprint (and give yourself breathing room)
- Step 2: Measure the slope like you mean it
- Step 3: Strip sod and remove soft topsoil
- Step 4: Decide: cut, fill, or split the difference
- Step 5: Compact the subgrade (yes, even the dirt)
- Step 6: Add landscape fabric (your future self will thank you)
- Step 7: Build a frame if you’re doing a gravel pad
- Step 8: Add gravel in layers and compact each layer
- Step 9: Screed the surface for a clean, level finish
- Step 10: Confirm level, square, and drainage
- Choose Your Shed Foundation Style (and What “Level” Means for Each)
- How to Handle a Sloped Yard Without Losing Your Weekend
- Common Leveling Mistakes (So You Don’t Star in Your Own DIY Blooper Reel)
- A Quick Example: Leveling for an 8×10 Shed Gravel Pad
- Conclusion: A Level Shed Is a Happy Shed (and a Happier You)
- Real-World Experiences: What Leveling a Shed Taught Me (So It Teaches You Less Expensively)
If your shed sits on a wonky base, it will behave like a grumpy old house: doors that “politely refuse” to close, windows that jam, and a floor that slowly convinces gravity to store your stuff in one corner. The fix isn’t magic. It’s leveling. And yes, it’s the least glamorous part of the projectlike flossing for your backyardbut it’s the part that makes everything else work.
This guide walks you through how to level ground for a shed the right way: planning, measuring slope, cutting and filling, compacting, and choosing a shed foundation style (gravel pad, pavers, blocks, or slab). You’ll get step-by-step instructions, real-world tips, and a few “learn from my mistakes” momentsso your shed sits flat, stays dry, and doesn’t develop a dramatic lean like it’s auditioning for a pirate movie.
Why Leveling Matters (More Than Your Shed’s Feelings)
Level ground isn’t about perfection for perfection’s sake. It’s about avoiding problems that get expensive and annoying fast:
- Doors and windows work correctly: A shed frame twists when the base is out of level, and then your door becomes a daily wrestling match.
- Water goes away (not under): A low spot invites puddles. Puddles invite rot, rust, and mosquitoes that file for squatter’s rights.
- The shed lasts longer: A stable shed base reduces settling, shifting, and freeze-thaw movement.
- Floor stays solid: Uneven support can make floors bounce, sag, and squeak like an old stair in a haunted house.
Before You Dig: The “Don’t Regret This Later” Checklist
1) Check rules, setbacks, and common sense
Many areas have shed rulessize limits, property line setbacks, and permit requirements (especially for larger sheds or permanent foundations). Add HOA rules if you live where lawns have opinions. If you’re unsure, call your local building department. Five minutes now beats moving a shed later, which is basically CrossFit for your soul.
2) Call 811 (seriouslydo this)
In the U.S., 811 is the free “before you dig” service. You request a utility locate, and buried lines get marked. It’s a small step that can prevent very large, very spicy problems (and sometimes it’s legally required). Even if you’re only digging a few inches for a gravel shed pad, call anyway.
3) Pick the right spot: drainage first, aesthetics second
The perfect shed location is not “where it looks cutest.” It’s where water doesn’t collect and where your shed won’t become an accidental amphibian habitat. Watch how rainwater moves in your yard. Avoid low areas. If the ground stays soggy, plan for extra drainage and a deeper gravel base.
Tools and Materials You’ll Actually Use
You can go full pro with lasers and plate compactorsor you can do a solid DIY job with basics. Here’s a realistic list:
- Measuring: tape measure, stakes, string line, line level or long level (4–6 ft), and/or a builder’s level
- Layout: marking paint or flour (yes, flour worksjust don’t do it right before a windy day)
- Digging: flat shovel, spade shovel, rake, mattock/grub hoe for roots
- Leveling & screeding: long straight 2×4 or straight board
- Compacting: hand tamper (small shed) or rented plate compactor (bigger shed)
- Base materials (typical): landscape fabric, crushed stone/compacted gravel (often “3/4-inch minus” or similar)
- Optional but helpful: wheelbarrow, work gloves, safety glasses, hearing protection
Step-by-Step: How to Level the Ground for a Shed
This is the universal process, whether you’re building a gravel shed foundation, setting pavers, or preparing for blocks or a slab. The details change, but the logic doesn’t.
Step 1: Mark the shed footprint (and give yourself breathing room)
Start by marking the shed’s footprint with stakes and string. Most foundations should extend beyond the shed footprint so you’re not balancing the building on the edge of your prep work. A common DIY approach is giving yourself about a foot of extra space around the perimeter (or at least enough for drainage and maintenance).
Want your corners square? Use the 3-4-5 method: measure 3 feet along one side, 4 feet along the other, and the diagonal between those points should be 5 feet if the corner is 90 degrees. Scale it up (6-8-10, 9-12-15) for better accuracy.
Step 2: Measure the slope like you mean it
Stretch string lines across the footprint and use a line level (or a long level on a straight board). Measure the distance from the string down to the ground at multiple points. This tells you where the high spots are (you’ll cut those down) and where the low spots are (you’ll fill those up).
Rule of thumb: it’s usually better to remove high soil than to pile a bunch of loose fill on the low side. Fill can settle if it isn’t compacted in layersand yes, it will settle right after you finish and congratulate yourself.
Step 3: Strip sod and remove soft topsoil
Remove grass, roots, and the dark, organic topsoil layer. Organic material decomposes and settles. You want firm subsoil underneath your basethink “boring and compact,” not “spongy and full of life.”
Step 4: Decide: cut, fill, or split the difference
If your site is slightly out of level, you can cut high spots and fill low areas with compactable material (not fluffy topsoil). If you’re dealing with a noticeable slope, you have options:
- Cut into the slope: remove soil on the high side to create a level “bench.”
- Build up the low side: add compacted gravel inside a framed pad (and compact in layers).
- Use a raised foundation approach: blocks, skids, or piers can make more sense on steep ground.
Pro tip: don’t use loose topsoil or sand as your main leveling base. Use processed gravel/stone that compacts and drains well.
Step 5: Compact the subgrade (yes, even the dirt)
Once your excavation is roughly level, compact the exposed soil. If the soil feels “springy,” it will settle. Compacting now helps your shed foundation stay level long-term.
Step 6: Add landscape fabric (your future self will thank you)
Landscape fabric helps separate soil from gravel, reduces weed growth, and keeps the base from turning into a muddy lasagna over time. Overlap seams by several inches and secure with landscape staples.
Step 7: Build a frame if you’re doing a gravel pad
For a gravel shed pad, many DIYers use pressure-treated timbers to form a rectangle. Set the frame in place, check it for level, and adjust by adding a little gravel under low spots. This frame becomes your “container” so the gravel stays where you put itunlike your motivation on a hot Saturday afternoon.
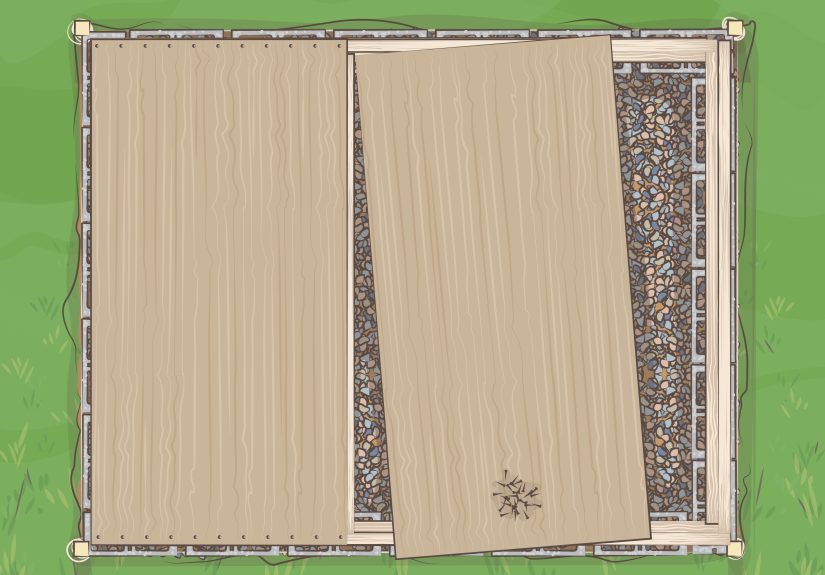
Step 8: Add gravel in layers and compact each layer
For most shed gravel bases, you’ll excavate enough depth to fit a stable layer of compacted stone. A common range is around 4–6 inches of compacted gravel for many small to medium sheds, with deeper bases for heavier or wetter conditions.
- Add about 2 inches of gravel.
- Rake it roughly level.
- Compact it thoroughly (hand tamper or plate compactor).
- Repeat until you reach your target depth and elevation.
Why layers? Because compactors don’t magically compress 6 inches evenly in one pass. Compacting in lifts reduces settling and makes the base sturdier.
Step 9: Screed the surface for a clean, level finish
Screeding is just dragging a straight board across the top to shave down high spots and fill low spots. Use a long straight 2×4, rest it on your frame edges (if you built one), and pull it across with a slight side-to-side motion. Check level in multiple directions. The goal is a flat, consistent surfacenot “close enough if you squint.”
Step 10: Confirm level, square, and drainage
Check the finished base diagonally and side-to-side. If you’re using pavers, you want truly level. If you’re pouring concrete, you may intentionally slope it for drainage (more on that below). For gravel pads, many builders keep it level while ensuring water won’t funnel under the shed (site grading around the shed matters a lot).
Choose Your Shed Foundation Style (and What “Level” Means for Each)
Option A: Gravel shed pad (the crowd favorite)
A compacted gravel shed foundation is popular for a reason: it drains well, supports weight evenly, and is DIY friendly. The key is using the right type of stone (angular, compactable) and compacting it thoroughly.
Best for: most storage sheds, especially wood sheds that benefit from staying dry underneath.
Watch out for: poor compaction (settling), and sloppy edges (gravel migration).
Option B: Pavers on a gravel base (nice if you want a clean “floor”)
A paver shed base can be great for smaller shedsespecially if you want a tidy surface. The secret is that the pavers aren’t the foundation. The base underneath is. Many paver systems use a compacted gravel base plus a thin layer of bedding sand (often around 1 inch) before placing pavers.
Best for: small sheds, resin sheds, and areas where you want a neat perimeter.
Watch out for: skipping base depth or compaction (pavers will settle and go uneven).
Option C: Blocks or skids on compacted gravel (simple, quick, and surprisingly common)
Concrete blocks or pressure-treated skids can support an on-grade shed foundation when the base is properly leveled and supported. Many guides recommend placing blocks or skids on a compacted gravel bedoften around a few inches deepso soil erosion and shifting are less likely.
Best for: smaller sheds, temporary or movable sheds.
Watch out for: soft soil, poor drainage, and wind uplift (consider anchors in windy areas).
Option D: Concrete slab (permanent, heavy-duty, and not messing around)
If you’re building a workshop shed, parking heavy equipment, or constructing something large enough to trigger code requirements, a concrete slab foundation might be worth it. Slabs typically sit on a compacted gravel base (often a few inches) to improve drainage and stability.
Drainage note: exterior slabs are commonly sloped away from structures so water doesn’t run back toward your building. Some concrete guidance suggests a slope of about 1/8 inch per foot away from the house for patios and similar slabs. Your situation may vary based on local code and site conditions, but the principle is the same: water should not pool at the slab edge.
How to Handle a Sloped Yard Without Losing Your Weekend
If your yard slopes, your mission is to create a stable plane. Here are practical approaches that keep you out of trouble:
Approach 1: Cut the high side and use gravel to fine-tune
This is often the most stable method: remove soil from the high side until you’re close to level, then use compacted gravel to get the final grade. The less “fill” you rely on, the less settling you fight later.
Approach 2: Build a timber frame and fill with compacted gravel
If you need to raise the low side, a framed gravel pad helps contain the material. Add gravel in 2-inch lifts and compact thoroughly. If the slope is significant, consider stepping the timbers or engineering a proper retaining edge so the fill doesn’t creep outward over time.
Approach 3: Consider piers/footings for big sheds or steep slopes
If your shed is large (or your slope is aggressive), piers or frost-depth footings may be more appropriate and sometimes required. This is where local codes and frost line depth matter most.
Common Leveling Mistakes (So You Don’t Star in Your Own DIY Blooper Reel)
- “It looks level” syndrome: Use string lines and a level. Your eyes lieespecially after hour three of digging.
- Compacting once and calling it a day: Compact in layers. A fluffy base settles. Settling makes your shed lean.
- Leaving topsoil under the base: Organic soil decomposes. Decomposing means sinking.
- Ignoring drainage around the pad: Even a perfect pad can get undermined if water funnels toward it.
- Building right on grade with no separation layer: Fabric and gravel reduce moisture and improve stability.
A Quick Example: Leveling for an 8×10 Shed Gravel Pad
Let’s make it concrete (but not literallyyet). Say you’re prepping an 8×10 shed and you want a gravel base with a little extra room for drainage and maintenance:
- Mark a roughly 10×12 rectangle (gives you about a foot extra per side).
- String lines corner to corner; square it with the 3-4-5 method.
- Measure slope: if you find a 3-inch drop across the site, plan to cut the high side and build up the low side with compacted gravel.
- Remove sod/topsoil; excavate to fit about 4–6 inches of compacted stone (adjust for your frame height and desired final elevation).
- Compact soil, lay landscape fabric, then add gravel in 2-inch lifts, compacting each lift.
- Screed the top flat and re-check level in multiple directions.
The result: a base that drains, stays stable, and doesn’t quietly sabotage your shed doors.
Conclusion: A Level Shed Is a Happy Shed (and a Happier You)
Leveling the ground for a shed is mostly patience and process: measure carefully, remove organic soil, compact the subgrade, build a stable base (often gravel), and check level more times than feels socially acceptable. Do it right and your shed will sit square, shed water, and keep your gear dry for years. Do it “good enough,” and you’ll be back out there re-leveling after the first season like it’s an annual tradition you never wanted.
If you’re unsure which foundation type is best, default to a well-built gravel pad for most backyard sheds. If you’re going large, heavy, or permanent, talk to your local building department and consider a slab or frost-depth solution. Either way, the best shed upgrade isn’t a fancy windowit’s a base that stays put.
Real-World Experiences: What Leveling a Shed Taught Me (So It Teaches You Less Expensively)
The first time I leveled ground for a shed, I learned a powerful lesson: the yard is not a static object. It is a living, shifting, water-moving, root-growing entity that laughs at optimism. I marked my neat little rectangle, eyeballed it (mistake), dug until it “looked right” (bigger mistake), and laid down gravel in one heroic dump (the kind of mistake that deserves its own documentary).
Day one felt amazing. The pad looked flat. I stood there with a rake like I’d just discovered civilization. Then rain happened. Not a flood. Not a hurricane. Just regular rain. And the next morning my pad had subtle dips that were invisible until I put a level on a board and realized the bubble was trying to escape. That’s when I understood compaction isn’t optional. Gravel isn’t a “set it and forget it” material until you compact it like you mean itideally in layers. One thick layer can look fine on top while staying loose underneath, which is basically a time-release settling system.
The second lesson was about soil. If you leave topsoil under the base, you’re building on compost’s future. Topsoil is soft because it’s full of organic material. Organic material breaks down. When it breaks down, it shrinks. When it shrinks, your shed settles. I went back, removed more of that soft layer than I originally wanted to, and the project immediately got harderbut also immediately got better. The pad stopped behaving like a mattress.
Third lesson: water is either your friend or your landlord. If water runs toward your shed site, it will try to move in. I started paying attention to runoff patterns and grading around the pad. A slight change in surrounding gradejust making sure water doesn’t funnel under the shedcan matter as much as the pad itself. If you’re in clay soil or a wet spot, go deeper with gravel, prioritize drainage, and don’t pretend a shallow base will “probably be fine.” It will be fine right up until it isn’t.
Fourth lesson: “level” is a direction, not a vibe. A tiny twist across the diagonal can make a shed door act like it’s haunted. Checking level side-to-side is good. Checking corner-to-corner is better. Checking it again after compaction is best. The number of times you check level should feel mildly ridiculous. That’s how you know you’re doing it right.
Finally, I learned that renting the right tool can be the difference between “fun DIY weekend” and “why do my legs feel like spaghetti?” A hand tamper can handle small pads if you’re patient, but for anything bigger, a plate compactor is worth it. It’s loud, it vibrates, and it turns loose gravel into a foundation that feels like it belongs under something importantlike your shed, your sanity, and your future free time.
If you take nothing else from these experiences, take this: spend your effort on measuring, excavation, and compaction. That’s the hidden backbone of the whole project. The shed is the trophy, but the base is the part that actually wins.


