
Table of Contents >> Show >> Hide
- Why Make Cake Pops Without Sticks?
- What Are Cake Pops Without Sticks, Exactly?
- Ingredients You’ll Need
- Tools That Make Life Easier
- How to Make Cake Pops Without Sticks Step by Step
- Step 1: Bake and Cool the Cake
- Step 2: Crumble the Cake into Fine Crumbs
- Step 3: Add Frosting Gradually
- Step 4: Roll into Balls
- Step 5: Chill Until Firm
- Step 6: Melt the Coating
- Step 7: Dip Without Sticks
- Option A: Fork Method (Easiest for beginners)
- Option B: Toothpick + Spoon Method
- Option C: Dipping Tool Method
- Step 8: Let Them Set
- Best Coating Tips for Smooth, Pretty Cake Balls
- Common Mistakes and How to Fix Them
- Food Safety Tips for Cake Pops Without Sticks
- How to Store and Freeze No-Stick Cake Pops
- Flavor Ideas for Cake Pops Without Sticks
- Serving Ideas That Make Them Look Fancy
- Conclusion
- Extra Experiences and Real-World Baking Lessons (500+ Words)
If you love cake pops but hate the whole “why is this one sliding off the stick like a tiny dessert landslide?” situation, welcome. You’re in the right kitchen. The good news: you can absolutely make cake pops without sticksand they’re still adorable, delicious, and party-ready. In fact, they’re often easier to dip, easier to store, and way less dramatic.
Think of them as the cooler cousin of traditional cake pops: part cake ball, part cake truffle, all joy. You still get that soft, fudgy center and snappy chocolate shell, but without foam blocks, lollipop sticks, or balancing acts worthy of a circus. This guide walks you through the full process, plus troubleshooting, coating tips, food safety basics, storage, and a bonus section of real-world baking experiences to help you avoid common mistakes.
Why Make Cake Pops Without Sticks?
Traditional cake pops are fun, but they come with extra steps: dipping the stick, securing the ball, chilling again, and praying gravity behaves. Going stick-free gives you a simpler workflow and a dessert that looks just as polished when served in mini liners, candy cups, or a platter with drizzle and sprinkles.
Benefits of No-Stick Cake Pops
- Easier dipping: Use a fork, dipping tool, or toothpick instead of a stick.
- Less breakage: No stick means no “pop fell into the chocolate” tragedy.
- Cleaner storage: They stack better in containers than upright stick pops.
- Great for parties: Serve them as cake truffles, dessert bites, or edible gifts.
- Flexible style: Make classic balls, domes, or slightly flattened bites.
And yesthis is a totally legit variation. Many bakers and recipe developers treat stick-free cake pops as cake truffles or cake balls, using the same base mixture and coating method.
What Are Cake Pops Without Sticks, Exactly?
At their core, cake pops are crumbled cake mixed with frosting until the texture holds together. Then the mixture is rolled into balls, chilled, and coated in melted chocolate or candy melts. When you skip the stick, you’re essentially making cake balls or cake trufflessame concept, just easier to handle and serve.
The texture goal is important: the center should feel moist and fudgy, but not greasy or mushy. If the mixture is too wet, your cake balls will slump, crack, or become difficult to coat. If it’s too dry, they’ll crumble when you roll or dip them.
Ingredients You’ll Need
Basic Cake Pop (No-Stick) Ingredients
- 1 baked cake (boxed or homemade), fully cooled
- 1/2 to 1 cup frosting (start small and add gradually)
- 10–16 oz candy melts, almond bark, or chocolate for coating
- Optional: 1–2 teaspoons shortening (for candy melts, if needed) or a little oil for real chocolate
- Sprinkles, crushed cookies, nuts, coconut, or drizzle for decorating
Optional Flavor Add-Ins
- Vanilla, almond, or peppermint extract (tiny amounts)
- Cream cheese frosting for tangy flavor
- Crushed Oreos or graham crackers
- Citrus zest for lemon or orange cake balls
Pro tip: Add frosting slowly. Some cakes are already moist, and you may need much less than a full cup. The mixture should hold when squeezed, not smear like wet cement.
Tools That Make Life Easier
- Large mixing bowl
- Baking sheet or tray lined with parchment/wax paper
- Cookie scoop or tablespoon (for uniform size)
- Microwave-safe bowl or glass measuring cup (great depth for dipping)
- Fork, toothpick, or spiral dipping tool
- Cooling rack or parchment-lined tray for setting
- Mini paper candy cups (optional, but cute)
If you’ve ever fought with a shallow bowl of melted coating, use a deep mug or glass measuring cup instead. It helps you get a smoother, more even coat with less mess.
How to Make Cake Pops Without Sticks Step by Step
Step 1: Bake and Cool the Cake
Bake your cake according to the recipe or box directions. Let it cool completelyno shortcuts. Warm cake creates steam, and steam is the enemy of smooth coating and clean texture. If you’re using leftover cake, that works too (as long as it’s fresh and safe to use).
You can bake the cake a day ahead, cover it, and finish the cake balls the next day. That actually makes the process feel less chaotic.
Step 2: Crumble the Cake into Fine Crumbs
Break the cooled cake into a large bowl and crumble it until there are no big chunks. You want fine, even crumbs so the finished cake balls stay smooth and don’t look like rocky little planets.
Hands work great here. A mixer can also help, but don’t overdo it. You’re aiming for fluffy crumbs, not cake paste.
Step 3: Add Frosting Gradually
Add frosting a little at a time and mix until the cake starts holding together when squeezed. Start with about 1/2 cup, then increase only if needed. This is the part where a lot of people go wrong: too much frosting makes dense, heavy centers and can cause dipping problems.
The ideal texture is similar to soft cookie dough or truffle fillingmoist, cohesive, and easy to roll, but not sticky enough to glue itself to your fingers forever.
Step 4: Roll into Balls
Scoop about 1 tablespoon of mixture and roll into balls. A small cookie scoop helps keep them uniform, which means they chill and coat evenly. Place them on a lined tray.
For a no-stick version, you can also make slightly flattened rounds (like mini domes). These are easier to dip with a fork and less likely to roll around while drying.
Step 5: Chill Until Firm
Refrigerate the cake balls until firmusually 1 to 2 hours. If you’re in a hurry, freeze them briefly, but don’t turn them into frozen marbles. Over-chilled centers can create temperature shock when dipped in warm coating, which may cause cracks.
A good rule: cold and firm is great; frozen solid is not. If they’ve been in the freezer a while, let them sit a few minutes before dipping.
Step 6: Melt the Coating
You can use candy melts, almond bark, or chocolate. Melt slowly using short microwave bursts (stirring between each) or a double boiler. For candy melts, avoid adding water, milk, or other liquid ingredientsthey can make the coating seize. If it’s too thick, thin it with a little shortening or a candy-melt thinning aid.
If you’re using real chocolate (not candy melts), a tiny bit of neutral oil can help with fluidity. The goal is a smooth, pourable coating that clings without creating a super thick shell.
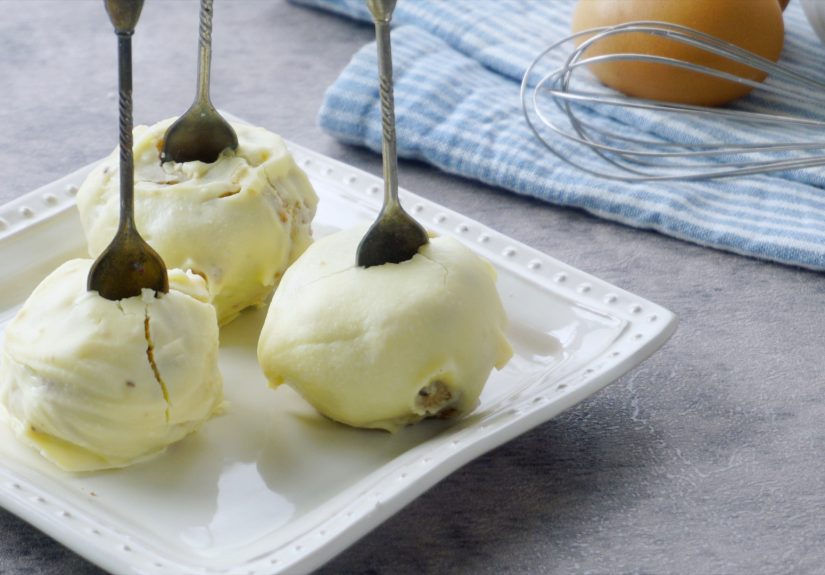
Step 7: Dip Without Sticks
Now for the fun part. You’ve got three easy options:
Option A: Fork Method (Easiest for beginners)
- Drop one chilled cake ball into the melted coating.
- Use a fork to roll it gently until coated.
- Lift it out and tap the fork lightly on the bowl to remove excess coating.
- Slide it onto parchment using a toothpick or second fork.
Option B: Toothpick + Spoon Method
- Set the cake ball on a fork or spoon.
- Spoon coating over the top until fully covered.
- Let excess drip off, then transfer to parchment.
Option C: Dipping Tool Method
If you make these often, a spiral dipping tool is fantastic. It helps you lift and flip cake truffles cleanly with less fingerprint drama.
Decorate immediately while the coating is still wet. Add sprinkles, crushed nuts, toasted coconut, or a contrasting drizzle. If you wait too long, the decorations won’t stick and you’ll be forced into a last-minute “glue with more chocolate” rescue mission.
Step 8: Let Them Set
Place coated cake balls on parchment and let them set at room temperature or in the refrigerator. Once set, transfer to an airtight container.
For a polished look, serve them in mini candy cups or paper liners. Suddenly they go from “snack blob” to “dessert boutique” with almost no effort.
Best Coating Tips for Smooth, Pretty Cake Balls
1) Use the Right Consistency
Thick coating creates heavy shells and lumpy finishes. Thin, smooth coating gives that clean bakery-style snap. If you’re using candy melts, follow candy-specific thinning rules (shortening or a product made for candy coating). If you’re using chocolate, keep it gently warm and fluid.
2) Dip in Small Batches
Keep most of the cake balls chilled and only bring out a few at a time. This helps them hold shape while you work and keeps the process controlled instead of chaotic.
3) Don’t Overheat the Coating
Overheated coating becomes thick, scorches easily, and loses that smooth finish. Melt slowly. Stir often. Be patient. This is dessert, not a race car pit stop.
4) Watch the Temperature Difference
If your cake balls are extremely cold and your coating is very warm, the shell may crack as it sets. Chill the centers until firm, but avoid dipping them straight from a deep freeze if they’re rock hard.
Common Mistakes and How to Fix Them
Problem: The Cake Balls Fall Apart While Dipping
Cause: Not enough chilling, or the mixture is too dry.
Fix: Chill longer and add a little more frosting next time.
Problem: The Centers Feel Greasy or Too Dense
Cause: Too much frosting.
Fix: Start with less frosting and add only until the crumbs hold together.
Problem: The Coating Is Thick and Clumpy
Cause: Overheated candy melts or coating not thinned properly.
Fix: Melt gently and thin correctly (shortening for candy melts, small amount of oil for real chocolate).
Problem: The Shell Cracks
Cause: Temperature shock (very cold centers + warm coating), or a too-thick shell.
Fix: Let frozen cake balls sit a few minutes before dipping; keep coating smooth and not too hot.
Problem: Decorations Won’t Stick
Cause: You waited too long.
Fix: Decorate immediately after coating each piece (or work in tiny batches).
Food Safety Tips for Cake Pops Without Sticks
Because cake pops use baked cake, frosting, and often eggs or dairy-based ingredients, treat them like a perishable dessert. Here are the basics:
- Don’t taste raw batter or raw flour mixtures. Flour is a raw ingredient and can carry harmful germs. Raw eggs can also pose risk.
- Wash hands and tools after handling raw eggs, flour, and batter.
- Refrigerate finished cake balls if not serving soon, especially in warm weather.
- Use the two-hour rule for perishable foods left at room temperature (less if it’s very hot).
- Store in an airtight container to protect texture and freshness.
If you’re making them for gifting or events, keep them cool and avoid direct sun or heat. Candy coating may look sturdy, but it can soften fast in a warm room.
How to Store and Freeze No-Stick Cake Pops
Refrigerator Storage
Store in an airtight container in the refrigerator. Many recipe developers recommend about 1 week for best quality. Place parchment between layers if stacking to prevent smudging.
Freezer Storage
You can freeze uncoated cake balls or fully coated ones. For best results, freeze in a single layer first, then transfer to a freezer-safe container or bag. Thaw in the refrigerator overnight before serving.
Freezing the uncoated centers is especially handy if you want to prep ahead and dip later for a party.
Flavor Ideas for Cake Pops Without Sticks
Classic Combos
- Chocolate cake + chocolate frosting + dark chocolate coating
- Vanilla cake + vanilla frosting + white chocolate coating
- Red velvet cake + cream cheese frosting + white coating
- Lemon cake + vanilla frosting + white coating + lemon zest
Fun Upgrades
- Birthday cake truffles: Funfetti cake + vanilla frosting + rainbow sprinkles
- Cookies & cream: Chocolate cake + vanilla frosting + crushed cookie topping
- Mocha bites: Chocolate cake + espresso frosting + dark drizzle
- Holiday peppermint: Chocolate cake + peppermint extract + crushed candy canes
Serving Ideas That Make Them Look Fancy
- Place each in a mini candy cup for a bakery-style tray
- Arrange on a cake stand with a drizzle pattern underneath
- Pack in a cookie tin with parchment for gifting
- Serve as a dessert board with brownies, berries, and mini cookies
- Use as cupcake toppers (yes, extra dessert on dessert)
Conclusion
If you’ve been wondering how to make cake pops without sticks, the answer is simple: make the same delicious cake-and-frosting center, chill it well, and dip it like a truffle. You’ll save time, avoid stick-related disasters, and still get that irresistible bite-size treat everyone grabs first.
The secret is balance: don’t overdo the frosting, don’t overheat the coating, and don’t over-chill the centers right before dipping. Once you nail those three things, you can make endless variations for birthdays, holidays, gifts, or random Tuesday cravings. (Honestly, Tuesday cravings are the strongest category.)
Stick or no stick, the magic is the same: soft cake center, smooth chocolate shell, and a dessert that disappears way faster than it took to make.
Extra Experiences and Real-World Baking Lessons (500+ Words)
One of the most common experiences bakers have with no-stick cake pops is discovering that the “easy version” still has a personality. The first batch usually teaches humility. You start confidently: cake is baked, frosting is ready, music is playing, and suddenly the mixture is either too dry to hold a ball or so soft it feels like frosting wearing a cake costume. That moment is actually useful. Once you learn to add frosting graduallyjust enough to bind the crumbseverything gets easier. A lot of home bakers say their second batch is dramatically better simply because they stop treating frosting like an all-at-once ingredient.
Another very real experience: the coating stage looks easy online and slightly chaotic in real life. The first few pieces are usually “practice truffles.” One may fall off the fork. Another may come out looking like a meteor. A third somehow gets six times more sprinkles than the others because you panicked and poured. Then, right around number five or six, your hands figure it out. You start tapping off excess coating more gently, moving faster while the shell is still wet, and decorating with intention instead of fear. By the end of the tray, you suddenly feel like you should open a tiny dessert shop called “Actually Pretty Cake Balls.”
Temperature is another lesson that shows up fast. Many bakers have had the experience of pulling cake balls straight from the freezer because they want them super firm, then dipping them in warm coating and watching little cracks appear. It feels unfair, but it’s common. The fix is simple: chill until firm, not frozen solid, or let them rest for a few minutes before dipping. Once people adjust that one step, cracking often drops dramatically. It’s one of those small details that makes a big difference and makes you feel like you unlocked a hidden baking level.
There’s also the “coating consistency revelation.” Beginners often assume thicker coating is better because it seems sturdier. Then they dip a cake ball and realize the shell is so thick it starts pooling at the bottom like a winter coat. Experienced bakers quickly learn that smooth, fluid coating wins every time. If you’re using candy melts, thinning properly is a game changer. If you’re using real chocolate, gentle heat and patience matter more than brute-force microwaving. Once the coating flows well, the whole process gets less messy and way more fun.
Serving no-stick cake pops also tends to surprise people in a good way. Without sticks, they’re easier to arrange, transport, and package. Bakers often put them in mini paper cups and realize they look more polished than the stick version. They travel better in containers, they fit dessert boards nicely, and guests can grab them without juggling a stick. For family parties, this becomes a favorite because kids love them, adults take “just one” (then quietly take three), and cleanup is simpler.
Finally, one of the best experiences is how flexible they are. Many home bakers start with a leftover cake rescue missionsomething like, “I have half a sheet cake and no plan.” Then those leftovers become the best dessert on the table. That’s the magic of no-stick cake pops: they feel fancy, but they’re forgiving. Even the imperfect ones can be dressed up with drizzle, crushed cookies, or a shower of sprinkles and suddenly look intentional. And once you make a batch that turns out exactly rightsmooth shell, soft center, no cracksyou’ll probably start “accidentally” baking extra cake on purpose.


