
Table of Contents >> Show >> Hide
- What Is a Conibear Trap (and Why It’s Different)?
- Before You Start: The Three Big Risks People Underestimate
- How to Set a Conibear Trap: 12 Steps (The Safe, Legal Checklist)
- Step 1: Confirm the exact problem you’re trying to solve
- Step 2: Check state and local regulations first (yes, before buying anything)
- Step 3: Decide if trapping is actually necessary
- Step 4: Choose the most humane and lowest-risk method that works
- Step 5: If a body-grip trap is being considered, involve a licensed professional
- Step 6: Get proper education and hands-on instruction
- Step 7: Plan for safety like you’re planning for a toddler with a PhD in curiosity
- Step 8: Secure permissions and define boundaries
- Step 9: Prepare the right documentation and compliance plan
- Step 10: Establish a frequent check schedule (and stick to it)
- Step 11: Know your plan for outcomes before you begin
- Step 12: Finish the job with prevention, not just removal
- Humane Alternatives That Often Work Better Than Traps
- When You Should Call a Professional Immediately
- FAQ: Common Questions People Ask About Conibear Traps
- Field Notes and Real-World Experiences (What People Learn the Hard Way)
- Conclusion
If you searched how to set a Conibear trap, you’re probably dealing with a real wildlife problemflooded property, burrow damage, missing fish, or “something is living under my shed and paying zero rent.” A quick reality check, though: a Conibear (a.k.a. body-grip trap) is a high-risk, often lethal device. It can seriously injure animals, pets, and people when mishandled, and it’s regulated differently depending on where you live.
Because of the danger involved, this article does not provide physical, step-by-step instructions for triggering or installing a body-grip trap. Instead, you’ll get a practical, SEO-friendly, “real life” guide focused on the part that actually keeps you safe and out of trouble: legal compliance, humane decision-making, and professional best practices. Think of it as the smart checklist you complete before any trapping happensso you don’t end up with a citation, a hurt pet, or a very awkward conversation with your neighbor.
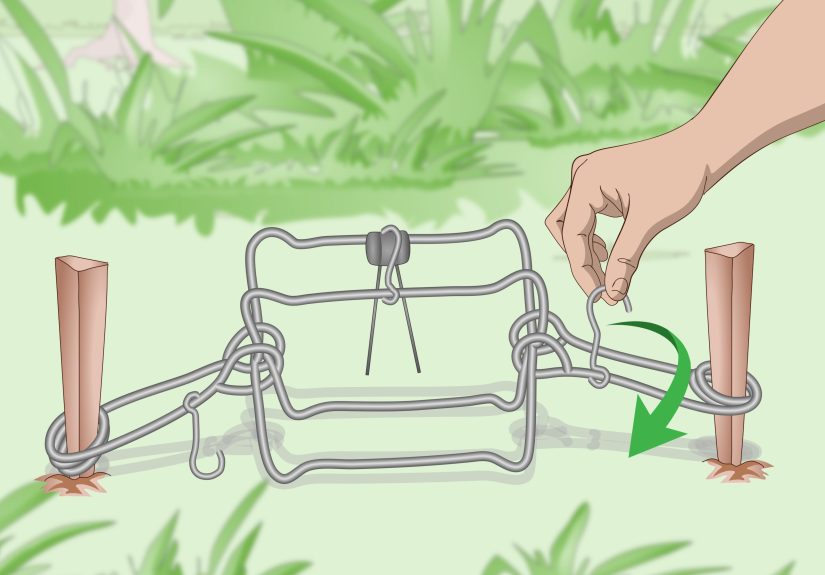
What Is a Conibear Trap (and Why It’s Different)?
A Conibear trap is a body-grip trap designed to close quickly and hold an animal by the body. Unlike live-capture cage traps, body-grip traps are typically intended to restrain or dispatch an animal, depending on the model, placement, and local regulations. That’s exactly why states often have strict rules about where they can be used (land vs. water), how they must be set, what species they’re allowed for, and whether they require special training or permits.
In plain English: this isn’t “just another trap.” It’s closer to a power tool than a mousetrapuseful in trained hands, dangerous in untrained hands, and absolutely not something you want to freestyle with at midnight because you watched a 30-second clip online.
Before You Start: The Three Big Risks People Underestimate
1) Legal risk: “But I’m on my property!” isn’t always a defense
Wildlife laws can be very specific about trapping seasons, protected species, required trap checks, allowed trap types, and where a body-grip trap can be deployed. Some places restrict them near trails, in certain public areas, or in settings that could catch pets or non-target wildlife. The safest move is to treat your state wildlife agency regulations as the rulebooknot a suggestion.
2) Safety risk: people and pets get hurt fast
Body-grip traps can cause serious injury if mishandled. The “I’ll be careful” plan tends to fall apart the first time your hands are cold, you’re tired, or a curious dog thinks you’re placing a new toy in the brush. If kids or pets have access to the area, the risk jumps dramatically.
3) Humane risk: non-target animals are a real possibility
Non-target catches can happen in any trapping scenario, but the stakes are higher with body-grip traps. That’s why professionals emphasize site selection, regulation compliance, and using the least risky method that solves the problem.
How to Set a Conibear Trap: 12 Steps (The Safe, Legal Checklist)
Below are the 12 steps that responsible trappers and wildlife control professionals typically follow before any body-grip trapping occurs. If you want a “do it right” approach, start here.
Step 1: Confirm the exact problem you’re trying to solve
“Something is out there” is not an identification. Determine what’s happening (tracks, droppings, damaged plants, gnawed wood, flooded areas, burrow openings, noises in the attic). If you can’t identify the species confidently, don’t escalate to dangerous tools. Misidentification is how you catch the wrong animalor violate laws protecting certain wildlife.
Step 2: Check state and local regulations first (yes, before buying anything)
Look up your state wildlife agency rules for trapping: seasons, licenses, legal trap types, landowner permissions, and required check intervals. Some jurisdictions restrict body-grip traps to specific environments or require additional training. If you’re thinking, “I’ll check later,” congratulationsyou’ve just invented a future problem.
Step 3: Decide if trapping is actually necessary
Many wildlife conflicts are solved without trapping at all. Exclusion (sealing entry points), habitat modification (removing food sources), and deterrents often fix the problem with less risk. Trapping tends to be the right choice when the damage is ongoing, the animal can’t be excluded immediately, or legal removal is required.
Step 4: Choose the most humane and lowest-risk method that works
When trapping is necessary, live-capture options (like cage traps) may be more appropriate in residential areasespecially where pets and neighbors exist. Body-grip traps may be legal and effective in certain professional contexts, but they’re not the default “best” option for every situation.
Step 5: If a body-grip trap is being considered, involve a licensed professional
If your situation truly calls for a body-grip trap, your best next step is contacting a licensed nuisance wildlife control operator (NWCO) or a certified trapper in your area. They know the legal requirements, safe handling practices, and how to reduce non-target risk. This isn’t about gatekeepingthis is about preventing harm.
Step 6: Get proper education and hands-on instruction
Many states offer trapper education programs, and professionals often train with approved materials and supervised practice. If your area requires certification, treat that requirement as a safety featurenot a hoop to jump through.
Step 7: Plan for safety like you’re planning for a toddler with a PhD in curiosity
Identify who and what could enter the area: dogs, outdoor cats, kids, hikers, delivery drivers, your neighbor’s “friendly” dog that treats fences as suggestions. If you cannot guarantee separation from people and pets, body-grip trapping is a poor choice.
Step 8: Secure permissions and define boundaries
Only trap where you have explicit permission and clear property boundaries. If the animal activity overlaps property lines, work with neighbors and a professional. Wildlife doesn’t carry a GPS or respect your survey stakes.
Step 9: Prepare the right documentation and compliance plan
Responsible trapping includes records: license numbers (if required), dates, locations, and compliance checks. Some areas require trap tags, reporting, or specific marking rules. Being organized isn’t just “nice”it’s how you avoid legal trouble and keep the process ethical.
Step 10: Establish a frequent check schedule (and stick to it)
Many jurisdictions have rules on how often traps must be checked. Beyond legal compliance, frequent checks reduce suffering and non-target risk. If you can’t check as required, don’t trapuse exclusion, deterrents, or professional services instead.
Step 11: Know your plan for outcomes before you begin
Ask yourself: If you catch the target animal, what is the legal next step? If you catch a non-target animal, what will you doand who will you call? If the answer is “I’ll figure it out,” pause. Ethical wildlife control means you plan for every likely outcome before you create one.
Step 12: Finish the job with prevention, not just removal
Trapping without prevention is like mopping with the faucet still on. Once the immediate problem is solved, use exclusion, repairs, and habitat changes to prevent a repeat. Otherwise, nature will send the next tenant… and they also won’t pay rent.
Humane Alternatives That Often Work Better Than Traps
Exclusion: block access to the “nice cozy place”
Seal entry points under sheds, around decks, or into attics using appropriate materials (hardware cloth, solid repairs, and proper ventilation where needed). Timing mattersavoid trapping animals inside or separating dependent young. When in doubt, consult a professional.
Habitat modification: remove the all-you-can-eat buffet
Secure trash, bring pet food indoors, clean fallen fruit, protect compost, and remove brush piles that provide shelter. If you make the area less attractive, wildlife often relocates on its own.
Deterrents and barriers: boring is beautiful
Motion lights, fencing, and species-appropriate deterrents can reduce activity. No deterrent is magic, but layered solutionsbarriers plus cleanup plus repairswork surprisingly well.
When You Should Call a Professional Immediately
- If the animal is in your living space (attic, walls, crawlspace) and you can’t safely identify it.
- If pets or children have access to the area where you’d consider trapping.
- If you suspect rabies risk or unusual animal behavior.
- If local laws are unclear or you’re near public land, trails, or shared spaces.
- If the problem involves flooding, major property damage, or repeated re-entry.
FAQ: Common Questions People Ask About Conibear Traps
Are Conibear traps legal everywhere?
No. Legality varies widely by state and sometimes by county or municipality. Rules can also differ by species, season, and whether trapping is on land or in water. Always check your local regulations first.
Are they considered humane?
Humaneness depends on lawful, professional use, correct context, and minimizing non-target risk. Many jurisdictions regulate them tightly for this reason. If your setting makes a non-target catch likely, a different method is usually more humane.
What’s the safest approach for homeowners?
For most homeowners, the safest path is exclusion and deterrence first, then working with a licensed wildlife control operator if removal is required. DIY body-grip trapping is high-riskespecially around pets and neighbors.
Field Notes and Real-World Experiences (What People Learn the Hard Way)
Wildlife conflicts have a way of turning normal adults into sleep-deprived detectives. You start with “something knocked over my trash can,” and by day three you’re outside at 2 a.m. whispering, “Show yourself, raccoon,” like you’re starring in a low-budget nature thriller. And that’s exactly when people make risky decisionsbecause frustration is loud and regulations are quiet.
One common experience shared by landowners is realizing the “problem animal” is actually a symptom. The real issue might be a bird feeder that’s basically a 24/7 snack bar, a crawlspace vent that’s more invitation than barrier, or a compost bin that smells like a five-star buffet to anything with a nose. When those underlying attractants are fixed, wildlife activity often drops dramaticallysometimes without any trapping at all. People are often surprised (and slightly annoyed) that the best solution is… cleaning up and repairing things. Nature is rude like that.
Another lesson that comes up a lot: neighbors and pets change everything. In rural areas, professional trappers may have more legal and practical options than someone in a suburban neighborhood where a dog could wander into the wrong place at the wrong time. Many homeowners report that once they started thinking like a safety manager“Who could enter this area? What happens if a non-target animal shows up?”they quickly shifted toward exclusion, barriers, and professional help. It’s not because they’re scared; it’s because they’re being responsible.
People also learn that prevention is the part that actually sticks. Removal can feel like “victory,” but wildlife is not a one-time event. If there’s shelter, food, and access, something else eventually moves in. Homeowners who solved the issue long-term usually mention the same trio: block access, remove attractants, and keep the property less appealing. The success stories are rarely dramatic; they’re boring in the best wayno late-night stakeouts, no ongoing damage, and no surprise guests under the deck.
Finally, there’s the emotional side people don’t expect. Even when someone starts out thinking “I just want it gone,” many end up caring about doing it humanely and legally. They don’t want suffering, they don’t want a non-target animal harmed, and they don’t want to explain to their kid why a neighborhood cat didn’t come home. That’s why the best experience-based advice tends to be the same: slow down, verify the species, follow the rules, and choose the method that solves the problem with the least risk.
Conclusion
If you’re dealing with nuisance wildlife, it’s normal to want a fast, definitive fix. But with a high-risk device like a Conibear/body-grip trap, the smartest move is to prioritize legal compliance, safety, and humane outcomes. Start by identifying the species, checking regulations, and using lower-risk methods whenever possible. If a body-grip trap is truly appropriate and legal in your situation, involve trained, licensed help and follow all required education and safety practices. The goal isn’t just “remove the animal”it’s solve the problem without creating a bigger one.


