
Table of Contents >> Show >> Hide
- Why YouTube Controls Keep Ruining Your Screenshot
- Way 1: Pause the Video, Let the Controls Fade, Then Use Your Built-In Screenshot Tool
- Way 2: Use YouTube Keyboard Shortcuts to Find the Exact Frame Before You Capture
- Way 3: Use Browser Features Like Picture-in-Picture or Native Snapshot Tools
- Way 4: Use a Screenshot Extension or Capture App for One-Click Results
- How to Get Cleaner YouTube Screenshots Every Time
- Common Reasons Your Screenshot Still Shows Controls
- Which Method Should You Use?
- Real-World Experiences: What It’s Actually Like Taking YouTube Screenshots Without Controls
- Conclusion
You know the moment. You pause a YouTube video at the exact perfect frame, ready to grab a screenshot for a tutorial, presentation, recipe, design reference, or meme folder that definitely has a noble purpose. Then the playback bar, pause button, title overlay, and assorted visual party crashers decide they also want to be in the picture. Rude.
The good news is that taking screenshots on YouTube without controls is absolutely doable, and you do not need to become a browser wizard living inside secret menus. In most cases, the cleanest results come from a mix of timing, built-in screenshot tools, YouTube keyboard shortcuts, and a browser feature or extension when you want less hassle and more precision.
Below are four practical ways to capture a clean YouTube frame without controls, plus tips on when each method works best, what to avoid, and how to get sharper results. Whether you are on Windows, Mac, or bouncing between browsers like a caffeinated squirrel, one of these methods will fit your workflow.
Why YouTube Controls Keep Ruining Your Screenshot
YouTube’s player is designed to keep controls visible when your cursor is moving, when you tap the screen on mobile, or right after you pause. That is helpful when you want to scrub the timeline, but not so helpful when you are trying to capture a clean still image.
In other words, the trick is not really “How do I screenshot YouTube?” It is “How do I make the controls disappear long enough to capture the frame I want?” Once you think of it that way, the problem gets much easier to solve.
Way 1: Pause the Video, Let the Controls Fade, Then Use Your Built-In Screenshot Tool
Why this is the easiest method
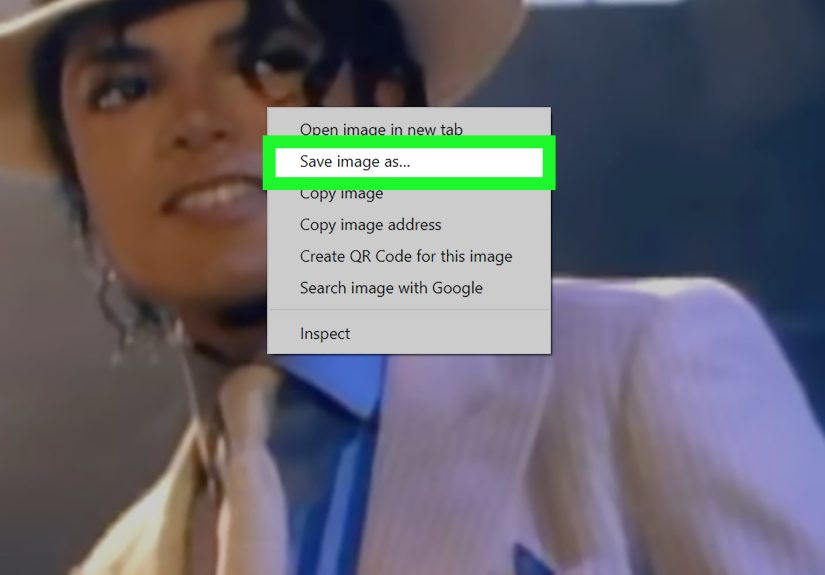
This is the simplest and most reliable approach for most people. Pause the video, move your cursor away from the player, wait a second or two for the controls to fade out, and then use your computer’s built-in screenshot shortcut.
If you only need a screenshot once in a while, this is the no-fuss option. No browser add-ons, no extra software, no ritual involving moonlight and browser flags.
How to do it on desktop
- Open the YouTube video and move to the moment you want.
- Pause the video.
- Move your mouse cursor off the player area.
- Wait until the controls and overlay disappear.
- Take the screenshot using your system shortcut.
Useful screenshot shortcuts
- Windows: Press Windows + Shift + S to open Snipping Tool and select just the video area.
- Mac: Press Shift + Command + 4 to capture a selected part of the screen.
- Full-screen capture on Mac: Press Shift + Command + 3.
Best use cases
- Saving a clean image from a tutorial or lecture
- Capturing a slide, diagram, or on-screen example
- Grabbing a frame for a blog post, classroom notes, or design mood board
Pros
- Fast and built into your operating system
- No extra downloads required
- Works in nearly every browser
Cons
- You may miss the exact frame if the timing is tricky
- Controls can reappear if your cursor twitches at the wrong time
- Less precise for action-heavy videos
Pro tip: Put the video in full-screen mode first if you want a larger, cleaner image. A bigger video frame usually gives you a better screenshot, especially for tutorials and presentations where text needs to stay readable.
Way 2: Use YouTube Keyboard Shortcuts to Find the Exact Frame Before You Capture
Why this method is better for precision
If Way 1 is the easy route, this is the smart route when accuracy matters. YouTube supports keyboard shortcuts that let you pause playback and step through a video frame by frame. That is incredibly useful when you are trying to capture a split-second expression, a product close-up, a sports motion, or a cooking shot where the sauce looked perfect for exactly half a second and then chaos returned.
Key shortcuts that matter
- K to play or pause the video
- F to enter full screen
- , to go back one frame while paused
- . to move forward one frame while paused
- J and L to jump backward or forward 10 seconds
How to use this method
- Click the video player once so it is active.
- Press F for full screen if you want a larger image.
- Press K to pause.
- Use , and . to move frame by frame until you land on the exact shot you want.
- Wait for the controls to disappear.
- Take a screenshot with Snipping Tool on Windows or the Mac screenshot shortcut.
Why this works so well
Instead of trying to pause at the perfect moment with reflexes borrowed from a professional gamer, frame-by-frame stepping lets you calmly inch your way to the exact shot. It is much more precise, and it saves you from taking fifteen nearly identical screenshots just to get one usable image.
Best use cases
- Sports analysis
- How-to videos and software demos
- Recipe steps
- Animation, film, or editing reference
- Capturing text or subtitles at the cleanest moment
Common mistake to avoid
Do not leave your cursor floating over the timeline while you line things up. If your mouse is parked on the player, the controls may stay visible forever like an uninvited houseguest.
Way 3: Use Browser Features Like Picture-in-Picture or Native Snapshot Tools
Why this method is underrated
Browsers are not just windows to the internet anymore. They are tiny operating systems with opinions. Some of them also give you surprisingly useful ways to capture video more cleanly.
Firefox is especially handy here. It includes screenshot tools, supports Picture-in-Picture, and has long been known for exposing video-related options that can help with cleaner captures. If your goal is to reduce clutter on the screen and isolate the video, browser-level tools can make that easier.
Option A: Use Picture-in-Picture for a cleaner capture area
Picture-in-Picture opens the video in a smaller floating window. This can help when the main YouTube page is crowded with comments, recommendations, or other on-page distractions. In Firefox, you can also control whether Picture-in-Picture controls are shown, which can help you reduce clutter even further.
- Open the video in Firefox.
- Launch Picture-in-Picture.
- Resize the floating window to the size you want.
- Pause on the desired frame.
- Move the cursor away so the controls are not hovering over the image.
- Take the screenshot.
Option B: Use a native snapshot-style feature when available
In some Firefox video contexts, users may also see a native option to save a video snapshot. When available, this can be one of the cleanest ways to grab a frame because it is closer to extracting the image than photographing the whole screen.
Best use cases
- Cleaner captures when the YouTube page feels busy
- Multitasking while keeping the video visible
- Users who already prefer Firefox
Pros
- Can reduce page clutter
- Good for repeated captures
- Helpful when full-screen mode is inconvenient
Cons
- Behavior can vary a bit by browser
- Some snapshot options are browser-specific
- Not always as straightforward as a plain screenshot shortcut
Way 4: Use a Screenshot Extension or Capture App for One-Click Results
Why this is the best method for frequent use
If you grab YouTube screenshots often, a dedicated tool can save you a ton of time. Some browser extensions add a screenshot button directly to the YouTube player, while capture apps like Snagit let you record or open video, move to a precise frame, and save that frame as an image.
This is the method for people who do not want to wrestle with timing every single time. It is the “I have places to be” option.
Examples of tools that help
- Browser extensions: Some Chrome and Firefox extensions add a screenshot button to the player or let you save a frame with a keyboard shortcut.
- Capture apps: Tools like Snagit can save a specific video frame as an image and are useful if you work with tutorials, documentation, or training material.
How to use this method
- Install a reputable screenshot extension or capture app.
- Open the YouTube video and navigate to the frame you want.
- Use the tool’s screenshot button or frame-capture feature.
- Save or copy the image.
What to look for in a good extension
- Works specifically with YouTube video frames
- Lets you save to file or copy to clipboard
- Has clear permissions and recent updates
- Does not ask for suspicious access it clearly does not need
Best use cases
- Content creators and bloggers
- Teachers building lesson material
- Designers saving visual references
- Anyone who takes screenshots from videos regularly
A quick word of caution
Install only trusted extensions from official browser stores, and check permissions before clicking “Add.” If an extension claims it needs access to your entire digital soul just to save a video frame, back away slowly.
How to Get Cleaner YouTube Screenshots Every Time
Use full screen when possible
A larger video area usually means a sharper capture. Full screen is especially helpful when you need to read text, see fine details, or crop later without losing quality.
Turn off captions before capturing
If subtitles are not part of the shot you want, switch them off first. Otherwise, your perfect screenshot may come with an unwanted line of dialogue at the bottom that changes the whole composition.
Pause before motion blur becomes a problem
Fast action can look soft, especially in lower-resolution videos. Using frame-by-frame controls helps you find the crispest available frame.
Crop after capture if needed
Even when you get a clean image, a quick crop can remove borders, browser edges, or stray UI elements. Windows Snipping Tool, Preview on Mac, and many basic editors can do this in seconds.
Common Reasons Your Screenshot Still Shows Controls
- Your mouse is still hovering over the player.
- You just clicked the video and did not wait long enough.
- You are on mobile and tapped the screen right before the screenshot.
- The browser extension or Picture-in-Picture window is showing its own controls.
- You are trying to capture during active playback instead of pausing first.
In most cases, the fix is simple: pause, move the pointer away, wait a beat, then capture.
Which Method Should You Use?
If you want the fastest casual method, use Way 1. If you need exact timing, use Way 2. If you like browser-based tricks and cleaner floating video windows, try Way 3. If this is part of your regular workflow and you value speed, Way 4 is probably your winner.
For most people, the sweet spot is a combination of Way 2 and Way 1: step frame by frame with YouTube shortcuts, let the controls fade, then use your built-in screenshot tool. It is accurate, free, and works across common desktop setups.
Real-World Experiences: What It’s Actually Like Taking YouTube Screenshots Without Controls
In real life, taking screenshots from YouTube without controls is less about one magical trick and more about finding a routine that fits the kind of videos you watch. For example, when I am pulling still frames from tutorial videos, the easiest method is almost always pausing the clip, letting the controls fade, and using a partial-screen capture. It works because tutorial videos usually have slower pacing. I have a second or two to breathe, line things up, and grab the shot without feeling like I am trying to catch lightning in a coffee mug.
Things get more interesting with fast-moving content. Sports clips, dance videos, gaming footage, and movie trailers are where the ordinary pause-and-screenshot method starts to feel clumsy. You pause too early and the frame looks awkward. You pause too late and the best moment is gone. That is where YouTube’s frame-by-frame controls feel like a secret handshake. Once you start using the comma and period keys to move backward and forward one frame at a time, it becomes strangely satisfying. Suddenly you are not guessing anymore. You are picking the exact frame like a person who definitely has control over their life.
I have also found that browser choice matters more than people expect. On a cluttered YouTube page, comments, sidebars, and suggested videos can make the screen feel noisy, even if they are not directly inside your screenshot. Using a browser feature like Picture-in-Picture can calm the whole experience down. A floating video window is easier to position, easier to isolate, and sometimes just easier on the brain. When the goal is a clean image, reducing visual chaos around the video helps more than you would think.
For anyone who captures frames often for work, the experience changes again. Repeating the same manual steps ten or twenty times gets old fast. That is when an extension or dedicated capture app starts to feel less like a luxury and more like a sensible life choice. If you create blog posts, lesson plans, social graphics, or product documentation, one-click frame capture can save a surprising amount of time. It also cuts down on those tiny frustrations that pile up over the day, like controls reappearing, cursor placement issues, or taking the same screenshot three times because the first two were slightly off.
The biggest lesson from all of this is simple: there is no single “best” method for everyone. The best method is the one that matches the kind of video, the level of precision you need, and how often you do it. Casual user? Keep it simple. Detail nerd? Use frame stepping. Heavy-duty screenshot collector with fifteen folders named “final-final-real-final”? Get a dedicated tool and enjoy the peace.
Conclusion
Taking screenshots on YouTube without controls is not complicated once you know what is actually causing the mess. In most cases, the cleanest path is to pause the video, let the controls disappear, and use your device’s built-in screenshot tool. If timing matters, YouTube’s frame-by-frame shortcuts are the real hero. And if you do this regularly, browser features and screenshot extensions can make the whole process much smoother.
The bottom line is simple: you do not need to settle for screenshots covered in playback bars and giant pause icons. With the right method, you can capture a clean YouTube frame that looks polished, readable, and ready for whatever project you are working on.


