
Table of Contents >> Show >> Hide
- Why Turning Pants Into Shorts Is Such a Smart DIY
- Choose the Right Pants First
- What You Need
- How to Turn Pants Into Shorts: Step by Step
- Fabric-Specific Tips That Make a Big Difference
- How to Make DIY Shorts Look Better Than “Just Cut”
- Common Mistakes to Avoid
- Style Ideas for Your New Shorts
- Extra Experience: What You Learn After Turning More Than One Pair of Pants Into Shorts
- Final Thoughts
- SEO Tags
Some DIY projects feel like they require a workshop, three power tools, and a degree in textile engineering. This is not one of them. Turning pants into shorts is gloriously simple, surprisingly satisfying, and a great way to rescue a pair that no longer works at full length. Maybe the knees are blown out. Maybe the hem is shredded. Maybe the pants are fine, but summer showed up acting like it pays rent. Either way, this is one of the easiest clothing upcycles you can do at home.
The trick is not just cutting the legs off and hoping for the best. The trick is knowing where to cut, how to finish the edge, and which pants are worth transforming in the first place. Get those decisions right, and your DIY shorts can look intentional, flattering, and genuinely wearable instead of “I lost a fight with a pair of scissors.”
In this guide, you’ll learn exactly how to turn pants into shorts, whether you want frayed denim cutoffs, polished hemmed chino shorts, or casual lounge shorts with a cuff. We’ll cover tools, measuring, hemming options, fabric-specific tips, common mistakes, and real-life experience that makes the second pair come out even better than the first.
Why Turning Pants Into Shorts Is Such a Smart DIY
There’s a reason this project has stayed popular for years: it solves several problems at once. It helps you extend the life of clothes, save money, customize the fit, and experiment with style without committing to a brand-new purchase. If the waist and hips still fit well, shortening the legs can give the garment a completely new life.
It is also beginner-friendly. You can make decent shorts with sharp scissors and careful measuring. Add an iron and a sewing machine, and you can make them look impressively polished. Add confidence, and suddenly you’re staring at other items in your closet like a reality-show makeover host.
Choose the Right Pants First
Before you cut anything, pause for one very glamorous question: are these pants actually good candidates? Not all pants want to become shorts. Some are eager. Some are emotionally unavailable.
Best pants for turning into shorts
- Jeans with a good waist and hip fit
- Chinos and cotton twill pants
- Linen or lightweight casual pants
- Joggers or lounge pants with straight or slightly tapered legs
- Pants that are damaged only below the knee
Pants that can be tricky
- Very skinny jeans, because the leg opening may become too tight around the thigh
- Dress pants with lining or delicate drape
- Pants with side zippers, cargo details, or knee shaping exactly where you want to cut
- Stretch fabrics that roll, shift, or distort while cutting
If you are working with skinny jeans, pay extra attention to the leg opening. A pair that fits beautifully at the ankle may become oddly tight when shortened to mid-thigh. In that case, you may need to add a side slit or open the outer seam a bit for comfort and movement.
What You Need
- Pants
- Sharp fabric scissors
- Measuring tape or ruler
- Tailor’s chalk, pencil, or washable fabric marker
- Pins or clips
- Iron and ironing board
- Needle and thread or a sewing machine
- Seam ripper, if you want to remove the original hem
- Hem tape, if you want a temporary no-sew option
Use real fabric scissors if possible. Kitchen scissors are fine for opening snack bags and destroying cardboard boxes, but fabric deserves better. Dull blades can chew the edge, shift the grain, and make a clean cut much harder.
How to Turn Pants Into Shorts: Step by Step
1. Try the pants on and decide the finished length
Put the pants on before you mark anything. This is the moment to decide whether you want short shorts, Bermuda shorts, knee-length shorts, or something in between. Stand naturally, look in a mirror, sit down once, and make sure the length still feels right when you move.
Mark the place where you want the finished shorts to end. Then add extra length below that mark for the hem or frayed edge. This is important. In DIY clothing, optimism is lovely, but extra fabric is better.
2. Add hem allowance
How much extra length you add depends on the finish:
- For a double-fold sewn hem: add about 1 inch
- For a deeper cuff: add 1 1/2 to 2 inches
- For a raw or frayed denim hem: add 1/2 to 1 inch, depending on how much fray you want
If you are unsure, cut longer. Always longer. You can trim more later. You cannot negotiate with fabric after it’s gone.
3. Mark both legs carefully
Lay the pants flat on a hard surface and smooth them out without stretching the fabric. Match the side seams and inseams as evenly as possible. Use your ruler or tape measure to transfer the cut line all the way across each leg.
For the cleanest result, measure from the same reference point on both legs, usually the crotch seam or waistband. Do not just eyeball one leg and assume the second will magically cooperate. Fabric enjoys proving people wrong.
4. Cut one leg first
Cut slowly along the marked line on the first leg. Then fold the pants in half and use that newly cut leg as a template for the second one. This helps keep both sides even and reduces the chance of ending up with one leg that says “weekend” and one that says “abstract art.”
5. Try them on again before finishing
Yes, again. This is the checkpoint that saves many DIY disasters. Put the unfinished shorts on and see how the length looks while standing and sitting. Check the rise, the leg opening, and the mirror from front, side, and back. If they still feel too long, trim a little more. If they feel perfect, stop touching the scissors.
6. Choose your edge finish
Now decide what kind of shorts you want to wear.
Option A: Frayed denim shorts
This is the fastest route and works especially well for jeans. After cutting, you can leave the edge raw or add one line of stitching slightly above the cut line to control the fray. Wash and dry the shorts afterward to encourage a natural-looking fringe. If you want a more distressed look, gently loosen threads with a seam ripper.
Option B: Clean double-fold hem
This is the best choice for chinos, linen pants, lightweight cotton, or anyone who wants the shorts to look polished. Turn the shorts inside out, fold the raw edge up by 1/2 inch, press it with an iron, then fold again by another 1/2 inch. Pin in place and sew around the leg opening with a straight stitch.
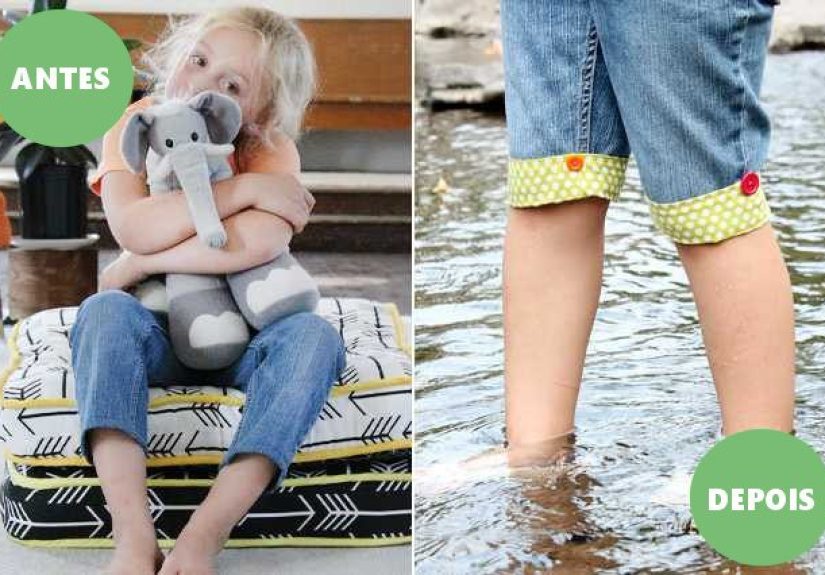
Option C: Cuffed shorts
If you like a casual-but-finished look, make a deeper hem and fold the edge outward once after sewing. This works nicely on twill, denim, and jogger-style fabrics. Just make sure both cuffs match in width unless your goal is “I got dressed during mild turbulence.”
Option D: No-sew hem
If you do not sew, use hem tape for a temporary solution. Fold the edge, press it, apply the tape, and iron again according to the product directions. It is quick and beginner-friendly, though usually less durable than stitching.
Fabric-Specific Tips That Make a Big Difference
Denim
Denim is the classic choice for DIY shorts. It holds shape well, looks good with either a frayed or stitched edge, and tends to forgive small imperfections. Because denim is often a twill weave, the threads fray in a recognizable, attractive way. Stretch denim, however, can behave differently, so sew slowly over bulky seams and use the right needle if you are stitching.
Chinos and cotton twill
These fabrics usually look better with a hem than a raw edge. Fraying can happen, but instead of “cool and casual,” it may read more “my laundry basket lost control.” Pressing the folds before sewing is especially important here for a crisp finish.
Linen
Linen makes wonderful summer shorts, but it shifts easily and wrinkles fast. Mark carefully, press thoroughly, and expect a relaxed look. That is not a flaw. That is linen doing linen things.
Stretch pants or leggings-style fabric
These can curl at the edge and distort while cutting. Use lots of pins or clips, cut slowly, and consider a narrow hem with a stretch stitch if you are sewing. A raw hem may roll instead of hanging cleanly.
How to Make DIY Shorts Look Better Than “Just Cut”
The difference between homemade shorts and good homemade shorts usually comes down to finishing details.
- Press the hem before sewing and after sewing
- Match the thread color to the fabric for a cleaner look
- Trim loose threads after washing
- Add a small side slit if the leg opening feels tight
- Use bias binding inside the hem if you want a neat interior finish
- Decorate with patches, trim, embroidery, or contrast stitching if the shorts need personality
If you want the shorts to feel custom rather than improvised, pressing is your best friend. It sets the fold, stabilizes the edge, and makes sewing dramatically easier. An iron may not be glamorous, but it is one of the hardest-working heroes in DIY clothing.
Common Mistakes to Avoid
Cutting too short too soon
This is the number-one mistake. People get excited, cut at the final desired length, then realize they forgot to account for the hem. Suddenly the shorts are much shorter than planned, and everyone is learning a life lesson together.
Ignoring the shape of the leg
Pants are not always cut perfectly straight. If you slice across without considering how the leg tapers, the shorts can flare oddly or pull at the thighs. This is especially common with skinny jeans.
Skipping the try-on stage
Flat fabric lies. Bodies move. Try the shorts on before you sew the final hem.
Using dull scissors
A jagged cut is harder to hem, harder to fray evenly, and harder to love.
Forgetting the wash test
A raw denim edge often changes after laundering. If you want frayed shorts, wash them before deciding whether to trim more fringe or reinforce the hem with stitching.
Style Ideas for Your New Shorts
- Classic cutoff jeans: frayed edge, broken-in feel, goes with everything
- Tailored chino shorts: clean hem, belt loops, polished casual style
- Cuffed utility shorts: slightly longer inseam, roomy fit, practical pockets
- Lounge shorts: soft knit pants transformed into comfy summer staples
- Decorated denim shorts: patches, lace, trim, embroidery, or contrast hems
The beauty of this project is that the same basic method can produce very different results. One pair can become beach shorts. Another can become polished weekend shorts. Another can become “yard work, but make it fashion-adjacent.”
Extra Experience: What You Learn After Turning More Than One Pair of Pants Into Shorts
After the first successful pair, most people feel invincible. They start looking around the closet with fresh ambition. Old jeans? Potential. Stained chinos? Potential. Lounge pants that somehow became too warm the second the weather changed? Also potential. That first win teaches a few lessons that no measuring tape can fully explain.
The biggest one is that the fit above the knee matters more than people expect. A pair of pants can seem perfect when full length, then turn awkward once shortened. Sometimes the thighs suddenly feel tight. Sometimes the leg opening sticks out at the side seams. Sometimes the shorts look great standing up but weird the moment you sit down. That is why experienced DIYers almost always cut long, try on, then cut again. The second pass is where the good judgment lives.
Another real-world lesson is that fabric has opinions. Denim behaves one way, linen behaves another, and stretchy pants may act like they are cooperating right up until the moment the scissors touch them. Heavier denim often looks better after a wash because the raw edge softens and the fray settles in. Lightweight cotton tends to reveal every wobble, which means pressing and pinning become more important than you thought they would be. In other words, the pants are not being difficult. They are just very committed to their fabric identity.
People also discover that hemming is less scary than it sounds. A lot of beginners assume sewing a hem requires advanced skill, a perfect machine, and the steady hands of a heart surgeon. In reality, a basic straight stitch and a pressed fold can go a very long way. Even hand sewing can look neat when the stitches are small and the thread color blends in. The secret is patience, not wizardry.
There is also a funny emotional side to this project. Turning pants into shorts often feels more satisfying than buying shorts, because the result is personalized. You choose the length. You choose the finish. You choose whether the vibe is polished, rugged, playful, or “I made these because I could.” That small creative control makes the garment feel more like yours.
And then there is the practical lesson nearly everyone learns once: do not cut while the pants are bunched, twisted, or hanging off the edge of a table. It sounds obvious until you are halfway through one leg and realize the fabric shifted. A flat surface solves more problems than fancy tools do.
By the time someone has converted two or three pairs, they usually stop thinking of this as a desperate last-chance fix and start seeing it as a real clothing strategy. That is the moment when the project becomes more than an upcycle. It becomes a useful skill. And useful skills are always in style.
Final Thoughts
Learning how to turn pants into shorts is one of the most practical wardrobe DIY skills you can have. It is budget-friendly, customizable, and simple enough for beginners while still leaving room for more advanced finishing techniques. Whether you want distressed cutoffs, crisp hemmed shorts, or easy lounge shorts, the basic formula stays the same: choose the right pants, mark carefully, cut conservatively, try on before finishing, and let the fabric tell you what kind of edge it wants.
Do it once with care, and you may never look at an old pair of pants the same way again. They are not worn out. They are just waiting for their summer plot twist.


