Table of Contents >> Show >> Hide
If you’re someone who loves the fusion of sleek design and functionality, you’re likely already familiar with the wonders of IKEA’s Kallax series. Known for its versatility and clean lines, Kallax is one of IKEA’s most popular storage solutions. But what if you could take this basic, simple piece and turn it into a stunning Mid-Century Modern console? Well, you can! With just a few easy tweaks and some creativity, you can transform your Kallax unit into a statement piece that will elevate any room. Let’s dive into this DIY Ikea hack and explore how you can bring a Mid-Century Modern flair to your living space.
Why Choose a Mid-Century Modern Style?
Mid-Century Modern (MCM) style is timeless, characterized by clean lines, functional design, and an emphasis on simplicity. It’s the perfect blend of retro charm and contemporary elegance. The best part? This style works in just about any room of your home. Whether you’re looking to add a sophisticated touch to your living room, bedroom, or hallway, a Mid-Century Modern console can fit seamlessly into your space.
The iconic furniture pieces of the Mid-Century Modern era often featured tapered wooden legs, minimalist design, and a mix of rich materials like wood, metal, and glass. This style can sometimes be pricey, but with the magic of IKEA hacks, you can achieve the look for a fraction of the cost by modifying a Kallax unit!
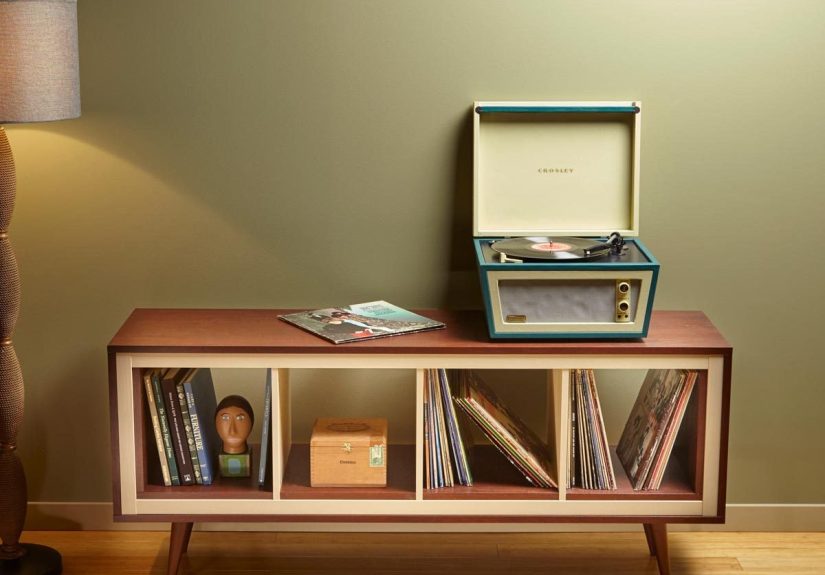
Step 1: Selecting Your Kallax Unit
The first step in creating your Mid-Century Modern console is selecting the right Kallax unit. IKEA offers several sizes, ranging from the 2×2 to 5×5 versions. For a console, the 2×4 or 4×4 models are ideal. These sizes are just right for a low-profile console that provides ample storage without dominating the space.
Once you’ve chosen your Kallax unit, you’ll want to make sure the colors and finish match your vision. Kallax comes in various finishes, from the classic white and black to natural wood-effect veneers. For the Mid-Century Modern aesthetic, we recommend opting for the wood veneer option or painting the unit in a wood tone to give it that retro feel.
Step 2: Upgrading the Legs
The next step in this IKEA hack is to add some Mid-Century Modern flair to the legs. The beauty of MCM design lies in the emphasis on legs that are both functional and stylish. Tapered wooden legs are a staple of this style and can completely transform the look of your Kallax unit.
You can easily find MCM-style legs online or at local hardware stores. Make sure to select legs that are compatible with the Kallax unit’s weight and size. A good height for these legs is around 6-8 inches, giving the console a nice, low profile.
To attach the legs, you’ll need some basic tools: a drill, screws, and a wood filler. If you’re using pre-made legs with hardware, you should be able to simply screw them in. If not, you can easily make custom brackets or use furniture leg adapters, which are available at many hardware stores. The legs should be positioned in each corner of the Kallax unit for stability and balance.
Step 3: Painting and Finishing the Kallax
Now that you’ve added the legs, it’s time to focus on the finish. The classic Mid-Century Modern look incorporates natural wood tones or rich dark hues like walnut, teak, or mahogany. If you have a Kallax unit with a light wood veneer, you can enhance it by sanding it lightly and applying a rich wood stain to achieve a deeper color.
For those who prefer a painted finish, choose a high-quality furniture paint in a matte or satin finish. Colors like mustard yellow, forest green, or deep navy blue are great options for Mid-Century Modern styling. Make sure to apply multiple thin coats, allowing each coat to dry fully before applying the next. If you’re using a wood stain, use a clean cloth to apply it, and wipe off any excess to ensure an even finish.
Step 4: Customizing the Storage Space
The Kallax unit’s open storage is one of its best features, but to truly nail the Mid-Century Modern look, consider adding some custom touches inside. One option is to install sliding doors or fabric panels in place of open cubbies for a more refined look. Choose a fabric or wood paneling that matches your overall design, and make sure it complements the color palette of your Kallax unit.
Another option is to add baskets or boxes to some of the open spaces for concealed storage. Choose simple, clean-lined storage options that don’t distract from the beauty of the Kallax itself. For example, woven baskets in neutral tones or elegant metal containers can blend seamlessly into the design.
Step 5: Final Touches
To finish off your Mid-Century Modern console, you’ll want to add a few stylish accessories. Think sleek metal lamps, vintage-inspired art pieces, and geometric decor items. These elements will help tie the look together and give the console its unique personality. Consider adding a potted plant, some books, or a bowl for keys and other small items. Just remember, the goal is to keep things minimal while ensuring the piece feels inviting and functional.
Conclusion
By following these simple steps, you can easily transform a basic IKEA Kallax unit into a stunning Mid-Century Modern console. This DIY hack allows you to enjoy the timeless style of MCM design without breaking the bank. With some creative updates like adding tapered legs, a fresh coat of paint, and custom storage solutions, your Kallax will look as though it came straight from a high-end design showroom. The beauty of this project lies in its simplicity, and the results are a functional, stylish addition to any home.
Not only will this Ikea hack add personality to your space, but it will also give you the satisfaction of having created something with your own hands. The Mid-Century Modern aesthetic is here to stay, and with this Kallax hack, you’ll have a one-of-a-kind piece that will impress anyone who walks into your home.
Experience with Mid-Century Modern Consoles: A DIY Adventure
When I first decided to give the Kallax unit a Mid-Century Modern makeover, I was initially skeptical about how well IKEA’s simple, boxy design would blend with the iconic elegance of the MCM style. But as soon as I started, I realized that the possibilities were endless. The first stepadding the tapered wooden legswas incredibly easy but made such a difference in the overall look. The Kallax suddenly went from a simple storage unit to a sleek, modern console table that looked perfect in my living room.
The hardest part of the project was choosing the right paint color. I wanted something that would complement the natural wood grain of the Kallax while still making a bold statement. After much deliberation, I went with a deep walnut stain, which brought out the beauty of the wood while giving the console an upscale look. It was a bit of trial and error, but the end result was worth every step.
One tip I would give to anyone attempting this hack is to be patient with the painting process. I found that applying multiple thin coats was much more effective than trying to cover everything in one go. It also helped to let each coat dry completely before adding another to avoid streaks or uneven coverage. I also learned the hard way that using a good-quality furniture paint is key to getting a smooth, professional-looking finish.
Overall, this DIY project was not only affordable but also incredibly rewarding. The Kallax Mid-Century Modern console has become a focal point of my living room, and it never fails to impress guests. I love that I was able to take a piece of mass-produced furniture and turn it into something unique and personalized. It’s a testament to the power of creative thinking and DIY spirit!