
Table of Contents >> Show >> Hide
- What Is Plastic Gear Repair?
- Common Types of Plastic Gears
- Why Plastic Gears Break
- Know the Plastic Before You Repair It
- Should You Repair or Replace the Plastic Gear?
- Tools and Materials for Plastic Gear Repair
- Step-by-Step Plastic Gear Repair
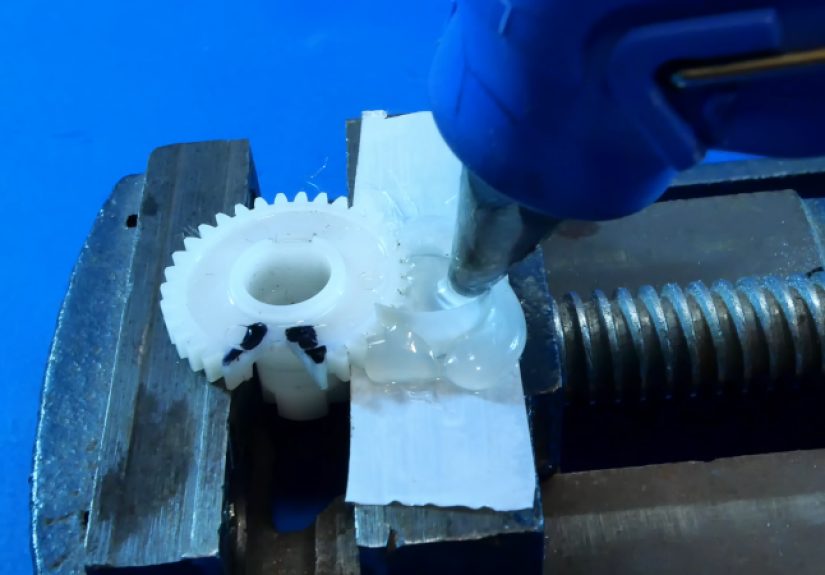
- Using Adhesives on Plastic Gears
- When 3D Printing a Replacement Gear Makes Sense
- Plastic Gear Lubrication Matters
- Preventing Future Plastic Gear Damage
- Specific Examples of Plastic Gear Repair
- Common Mistakes in Plastic Gear Repair
- Extra Experience: Practical Lessons from Plastic Gear Repair
- Conclusion
Plastic gear repair sounds like one of those tiny workshop problems that should take five minutes and one heroic blob of glue. Then reality arrives wearing safety glasses: the gear is cracked, the tooth is missing, the shaft hole is oval, and the machine makes a sound like a squirrel trapped in a coffee grinder. The good news? Many plastic gear problems can be diagnosed, improved, or repaired if the gear is used in a light-duty application. The even better news? Knowing when not to repair a plastic gear can save you from repeating the same repair every three days like a very boring magic trick.
This guide explains how plastic gears fail, which repairs actually work, which ones belong in the “nice try” drawer, and how to make a repaired or replaced gear last longer. Whether you are dealing with a toy, printer, small appliance, hobby gearbox, RC car, office machine, or household mechanism, the same basic rule applies: a plastic gear is not just a round thing with teeth. It is a precision part that lives under load, friction, heat, and alignment stress. Treat it well, and it will quietly do its job. Treat it badly, and it will chew itself into modern art.
What Is Plastic Gear Repair?
Plastic gear repair is the process of restoring a damaged gear so it can transmit motion again with acceptable smoothness, strength, and alignment. Depending on the damage, repair may involve cleaning, reinforcing a cracked hub, rebuilding a small chipped tooth, correcting shaft fit, replacing worn bushings, lubricating the gear train, or installing a new gear made from the correct plastic material.
The most important phrase here is “acceptable smoothness.” A repaired plastic gear does not need to look like it just walked out of a precision molding factory, but it must mesh correctly with the mating gear. If the repaired tooth is too tall, too wide, or off-center, it can jam. If it is too weak, it will break. If the gear bore no longer grips the shaft, the motor may spin while the gear sits there pretending to participate.
Common Types of Plastic Gears
Before grabbing glue, identify what kind of gear you are working with. Different gear shapes fail in different ways, and each one has its own repair challenges.
Spur Gears
Spur gears have straight teeth and are common in toys, printers, small appliances, hobby gearboxes, and simple mechanical drives. They are usually the easiest to inspect and replace. A single broken tooth on a spur gear may sometimes be rebuilt for a low-load repair, but repeated tooth damage usually means the gear is overloaded or misaligned.
Helical Gears
Helical gears have angled teeth that run more smoothly and quietly than spur gears. They can carry more load, but they also create side thrust. Repairing individual helical teeth is harder because the tooth geometry is more complex. If a helical plastic gear is cracked or stripped, replacement is often the smarter choice.
Worm Gears
Worm gear systems use a screw-like worm to drive a gear at a right angle. They are common in actuators, appliances, automotive mechanisms, and small reduction drives. Plastic worm gears can be quiet and efficient in the right application, but they are sensitive to heat, lubrication, and material compatibility. A worn worm gear usually needs replacement rather than cosmetic repair.
Planetary Gears
Planetary gearsets pack several gears into a compact space. They are found in power tools, small motors, robotics, and compact gearboxes. If one plastic planet gear fails, inspect the entire set. Replacing only the broken gear may not solve the real problem if the carrier, ring gear, or lubrication has also worn down.
Why Plastic Gears Break
Plastic gears usually fail for one of five reasons: overload, poor alignment, wear, heat, or chemical attack. Sometimes they fail because of all five, which is the mechanical version of “everyone had a bad day.”
Overload and Shock
A sudden jam can snap teeth or split the hub. This happens in paper feeders, toys, mixers, window mechanisms, hobby gearboxes, and any system where the motor keeps pushing after the output has stopped. Plastic is tough, but it does not enjoy being used as a fuse unless it was designed that way.
Cracked Hub
The hub is the raised center section around the shaft. A press-fit gear can crack when forced onto an oversized shaft, exposed to age-related brittleness, or stressed by repeated torque. A cracked hub often causes slipping even if all the teeth look fine.
Worn Teeth
Rounded or thinned teeth happen when gears run dry, run dirty, run misaligned, or carry too much load. Once the tooth profile is badly worn, the gear may skip under load. A dab of adhesive will not restore the original involute geometry, no matter how motivational the packaging sounds.
Wrong Lubricant
Some lubricants can attack certain plastics or attract dust that turns into grinding paste. Plastic gears often need a plastic-safe grease, commonly a silicone, synthetic, or specialty gear grease depending on the material and operating conditions. Using random oil from the back of a garage shelf is a bold strategy, but not always a wise one.
Heat and Aging
Small gearboxes can build heat from friction, tight meshing, high speed, or lack of lubrication. Heat softens some plastics and accelerates wear. Over time, plastic can also become brittle, especially in warm environments or near chemicals.
Know the Plastic Before You Repair It
Plastic gear repair depends heavily on material. The most common gear plastics include acetal, nylon, polycarbonate, ABS, PBT, and sometimes high-performance plastics such as PPS or PEEK in demanding applications. Each material has different strength, friction, temperature resistance, and bonding behavior.
Acetal or POM
Acetal, also known as POM and often associated with Delrin-type materials, is widely used for gears because it is stiff, dimensionally stable, low-friction, and wear-resistant. It machines well and performs beautifully in many small mechanisms. The catch? It is difficult to glue because of its low surface energy. Repairs on acetal often require surface preparation, special primers, or mechanical reinforcement.
Nylon
Nylon is tough, wear-resistant, and common in gears that need impact resistance. It can absorb moisture, which may slightly affect dimensions. Nylon can also be tricky to bond, although some specialty adhesives are designed for it. If a nylon gear is swollen, warped, or heavily worn, replacement is usually better than patching.
ABS and Polycarbonate
ABS and polycarbonate are easier to bond than acetal or nylon, though they are not always the best materials for high-wear gears. These plastics are more common in housings, toy mechanisms, and light-duty parts. A small crack or chip may respond well to adhesive repair if the load is low.
Should You Repair or Replace the Plastic Gear?
Here is the honest answer: if the gear is part of a safety-critical device, high-torque system, vehicle mechanism, medical equipment, garage door system, or anything where failure could hurt someone, replace it with the correct part. A repaired gear is not the place to audition for bravery.
Repair makes the most sense when the part is unavailable, the load is light, the machine is non-critical, and the damage is limited. For example, a cracked gear in a toy, a missing tooth in a display mechanism, or a loose gear in a hobby project may be worth repairing. A shredded gear in a high-speed power tool is politely telling you it wants retirement.
Tools and Materials for Plastic Gear Repair
A clean repair starts with the right supplies. You may need isopropyl alcohol for cleaning, small brushes, fine sandpaper, a hobby file, calipers, a magnifier, clamps, a plastic-safe adhesive, two-part epoxy, cyanoacrylate with primer, replacement shaft collars, small drill bits, and plastic-safe grease. For more advanced repairs, a 3D printer, lathe, or access to replacement stock gears may be useful.
Avoid using excessive heat unless you know the plastic type. Melting plastic can distort the gear and release unpleasant fumes. Also avoid aggressive solvents unless confirmed safe for the material. The goal is repair, not turning the part into a sad puddle.
Step-by-Step Plastic Gear Repair
Step 1: Remove and Inspect the Gear
Take the gear out carefully and note its orientation. Photograph the gear train before disassembly. Tiny washers, spacers, and clips love to vanish into alternate dimensions, so place parts in order as you remove them.
Inspect the gear teeth, hub, bore, keyway, set screw area, and mating gear. Look for white stress marks, cracks, missing teeth, uneven wear, melted areas, or plastic dust. Plastic dust inside a gearbox is not “bonus seasoning.” It is evidence of wear.
Step 2: Find the Real Cause
A broken gear is often a symptom, not the original problem. Check whether the shaft is bent, bearings are worn, the mating gear is damaged, the gearbox is dirty, or the mechanism is jammed. If you repair the gear but leave the jam in place, the gear will fail again and possibly judge you while doing it.
Step 3: Clean the Surface
Clean the gear with mild soap and water or isopropyl alcohol if compatible with the plastic. Remove grease completely from the repair area. Adhesives do not bond well to oil, dust, or old lubricant. Let the part dry fully before bonding.
Step 4: Repair a Cracked Hub
A cracked hub is one of the more repairable failures. For light-duty gears, you can bond the crack with an adhesive suitable for the plastic, then reinforce the hub. A small metal collar, sleeve, or clamp around the hub can help prevent the crack from reopening. The reinforcement must not interfere with nearby gears or housing clearance.
If the gear slips on the shaft, inspect the bore. A rounded bore may need a sleeve, bushing, set screw modification, or replacement gear. Glue alone is rarely enough for a torque-loaded shaft connection unless the load is very small.
Step 5: Rebuild a Small Missing Tooth
For a low-load spur gear, a small missing tooth can sometimes be rebuilt with a tough two-part epoxy or plastic repair compound. Use the mating gear, a mold, or careful filing to shape the repair after curing. The repaired tooth must match the original tooth height and spacing as closely as possible.
This repair is best for slow, light-duty mechanisms. It is not ideal for high-speed, high-torque, or constantly loaded gears. A rebuilt tooth can work well enough to rescue a discontinued part, but it should not be expected to perform like a molded gear under demanding conditions.
Step 6: Fix a Loose Gear on a Shaft
If the gear spins freely on a shaft when it should not, check the original fastening method. Some gears are press-fit, some use a D-shaped shaft, some use splines, and some use a set screw. Repair options include adding a shaft collar, replacing the gear with the correct bore, using a compatible retaining compound, or carefully adding a mechanical pin in non-critical hobby applications.
Do not simply drown the shaft in glue and hope for the best. Adhesive works best when the joint design supports it. A gear shaft joint needs torque resistance, alignment, and concentricity. If the gear is glued off-center, it will wobble like a shopping cart wheel with emotional baggage.
Step 7: Reassemble and Test Slowly
After the repair cures, reassemble the mechanism by hand first. Rotate the gear train slowly. Feel for tight spots, clicking, binding, or skipping. If everything turns smoothly, apply power briefly at low load. Watch and listen. A healthy plastic gear train should sound smooth, not crunchy.
Using Adhesives on Plastic Gears
Adhesives can be useful, but they are not magic. Cyanoacrylate, epoxy, acrylic adhesive, polyurethane adhesive, and plastic welding products all behave differently. The best adhesive depends on the plastic type, load, temperature, surface preparation, and joint design.
Hard-to-bond plastics such as acetal, polyethylene, polypropylene, and some nylons may need a primer or special adhesive system. Roughening the surface can help some bonds, but it will not solve every material problem. For a gear tooth, adhesive strength is only part of the story. The repair must also resist impact, shear, fatigue, and wear.
When 3D Printing a Replacement Gear Makes Sense
3D printing can be a practical way to replace a discontinued plastic gear, especially in hobby, prototype, or light-duty applications. The key is accuracy. You need the correct number of teeth, module or diametral pitch, pressure angle, bore size, face width, and hub geometry. Guessing these dimensions is how gears become decorative buttons.
Common 3D printing materials such as PLA may work for temporary or low-load use, but they can soften with heat and wear quickly. PETG, nylon, polycarbonate, or engineering-grade filaments may perform better depending on the machine and printer capability. Resin printing can capture fine tooth detail, but resin parts may be brittle unless the right material is chosen.
Plastic Gear Lubrication Matters
Many plastic gear failures begin with poor lubrication. Some plastic gears are designed to run dry, especially when paired with the right material combination. Others need a thin film of compatible grease to reduce friction, noise, wear, and heat.
Use only lubricants labeled as plastic-safe or recommended for the gear material. Avoid heavy application. Too much grease can create drag, trap dirt, and increase heat. A thin, even film is often enough. If the old grease has hardened into waxy crumbs, clean it out before applying fresh lubricant.
Preventing Future Plastic Gear Damage
Keep the Gear Train Clean
Dirt and grit accelerate wear. In small gearboxes, even a tiny amount of debris can damage teeth. Clean housings, covers, and nearby moving parts before reassembly.
Check Alignment
Gears must mesh at the correct center distance. If shafts are loose or bushings are worn, the gears may ride too shallow or too deep. Poor alignment creates noise, heat, and tooth damage.
Do Not Overload the Mechanism
If the machine jams repeatedly, find out why. A stronger gear may only move the failure to a more expensive part. Sometimes the plastic gear is intentionally the weak link, protecting the motor or gearbox.
Use the Right Replacement Material
If you replace a plastic gear, match the material and design as closely as possible. Acetal, nylon, and other engineering plastics are chosen for specific reasons such as stiffness, wear resistance, quiet operation, or chemical resistance.
Specific Examples of Plastic Gear Repair
Printer Feed Gear
A printer feed gear that skips may have worn teeth or a cracked hub. First check for paper debris, dried grease, and roller resistance. If the gear hub is cracked, a reinforced repair may work temporarily. If the teeth are worn, replacement is usually the better fix because paper feed timing depends on consistent tooth engagement.
Toy Gearbox
Toy gears are often lightweight plastic spur gears. A missing tooth can sometimes be rebuilt with epoxy for a fun repair project. However, if the toy motor stalls easily or the gearbox is packed with lint, repair the cause before blaming the gear. Toys are small, but they are surprisingly talented at collecting carpet fuzz.
Small Appliance Gear
In a mixer, food processor, or actuator, plastic gears may be designed to fail before the motor burns out. If the gear is stripped, inspect the driven mechanism for jams. Replacing the gear without solving the overload may lead to another failure.
RC Car Gear
RC gears see shock loads, dirt, and speed. Rebuilding teeth is rarely durable. For RC vehicles, replacement gears and correct mesh adjustment are usually the best path. Gear mesh that is too tight creates heat; too loose causes skipping and tooth damage.
Common Mistakes in Plastic Gear Repair
The first mistake is using the wrong adhesive. Not every “plastic glue” works on every plastic. The second mistake is ignoring alignment. A perfectly repaired gear will fail quickly if the shaft is crooked. The third mistake is over-lubricating. A gearbox does not need to look like it fell into a tub of frosting.
Another common mistake is repairing only the most visible damage. If one gear tooth is gone, the mating gear may also be damaged. If the hub cracked, the shaft may be too large or the gear may have been forced on. If a worm gear is worn, the worm itself may be rough or contaminated.
Extra Experience: Practical Lessons from Plastic Gear Repair
One of the biggest lessons in plastic gear repair is that the smallest parts often demand the most patience. A large broken bracket may be ugly but straightforward. A tiny plastic gear, on the other hand, can turn into a miniature engineering exam. The tooth shape, bore fit, and shaft alignment all matter. If one of them is wrong, the mechanism may run for five seconds and then make a noise that says, “Please reconsider your choices.”
In real repairs, cleaning is usually more important than people expect. Old grease, dust, pet hair, paper fibers, and plastic shavings can hide inside the gearbox. Many beginners replace or patch the gear but forget to clean the housing. Then the fresh gear immediately runs through the same abrasive mess that damaged the old one. A toothbrush, cotton swabs, and patient cleaning can do more for gear life than a dramatic amount of adhesive.
Another useful habit is to test the system manually before applying power. Turn the gears by hand and feel for resistance. A gear train should rotate with a predictable rhythm. If it tightens once per revolution, one gear may be eccentric, a tooth may be too tall, or a shaft may be bent. If it clicks at the same point, inspect that tooth. If it binds only after the screws are tightened, the housing may be squeezing the shafts out of alignment.
For cracked hubs, mechanical reinforcement often beats glue alone. A thin metal collar around the hub can convert a fragile repair into a much stronger one. The trick is clearance. Many gearboxes have very little extra room. Before adding a collar, sleeve, washer, or clamp, dry-fit the gear and rotate everything slowly. A reinforcement that rubs against the housing can create more trouble than the original crack.
For missing teeth, expectations should stay realistic. Rebuilding one tooth on a slow display mechanism may work nicely. Rebuilding three teeth on a loaded drive gear usually does not. A gear tooth is not just a bump; it has a designed curve that shares load smoothly with the mating gear. A hand-shaped epoxy tooth can be good enough for occasional motion, but it may wear quickly under constant load.
Replacement is often the professional repair. That may sound less exciting, but it is true. If a standard gear can be matched by tooth count, pitch, pressure angle, bore, face width, and hub dimensions, replacement saves time and improves reliability. When an exact part is unavailable, machining or 3D printing may be useful, but the replacement still needs correct geometry. A gear that is “close enough” may run loudly, wear quickly, or damage the mating part.
Finally, plastic gear repair teaches a humble truth: the broken gear is rarely the whole story. Look for the jam, the dry bearing, the warped housing, the tight shaft, the wrong grease, or the overloaded mechanism. Fix the system, not just the tooth. That is how a repair goes from “temporary miracle” to “quietly working again,” which is the highest compliment any plastic gear can receive.
Conclusion
Plastic gear repair can be simple, satisfying, and surprisingly technical. The best repair begins with diagnosis: identify the material, inspect the damage, find the cause, and decide whether repair or replacement makes sense. Light-duty cracks, loose hubs, and small chips may be repairable with proper cleaning, compatible adhesive, careful shaping, and reinforcement. Worn teeth, high-load failures, heat damage, and safety-related mechanisms usually call for replacement.
The secret is not using more glue. The secret is understanding how the gear works. A plastic gear must stay round, centered, clean, lubricated, and properly meshed. Give it those conditions, and it may keep spinning quietly for years. Ignore them, and it will return to the scene of the crime with another broken tooth and a very smug attitude.
Note: This article is intended for general educational and light-duty repair guidance. For safety-critical equipment, high-load machinery, or parts where failure could cause injury or major damage, replace the gear with the correct manufacturer-approved component.


