
Table of Contents >> Show >> Hide
- Why a Sewing Machine Base Makes Such a Good Side Table
- Choosing the Right Base: What to Look For Before You Fall in Love
- Planning the Look: Pick Your “Top” Personality
- How the Transformation Works: The Big Steps (Without the Fuss)
- Attaching the Tabletop: Make It Secure (and Let Wood Be Wood)
- Style Ideas: Where This Table Looks Best
- Common Pitfalls (and How to Avoid Them)
- Is This Project Worth It?
- of Real-World Experiences People Share After Making One
- Conclusion
Somewhere in a garage, thrift store, or “I swear I’ll fix it someday” corner of a basement, there’s a cast-iron sewing machine base
quietly waiting for its second act. Maybe it once powered a treadle sewing machineback when “wireless” meant “no electricity.”
Or maybe it’s a stand that lost its cabinet years ago and has been awkwardly holding nothing ever since.
Either way, turning a vintage sewing machine base into a side table is one of those upcycled furniture projects that lands right in the
sweet spot: it looks expensive, it feels personal, and it’s sturdy enough to survive real life (aka a plant, a coffee mug, and that one friend
who sets their phone down like they’re dropping an anchor).
This guide walks through the idea from both the design side and the practical sidehow to get a stable, good-looking
sewing machine base side table that fits your home and doesn’t wobble like a baby deer on roller skates.
Why a Sewing Machine Base Makes Such a Good Side Table
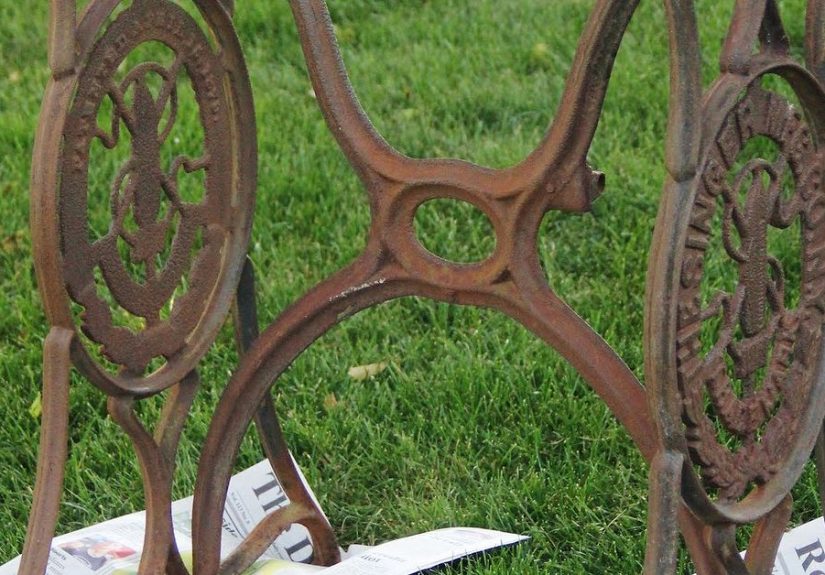
A cast-iron sewing machine base brings instant character. The scrollwork. The crank wheel. The iconic treadle pedal. The fact that it can
weigh approximately the same as a small refrigerator. It reads as vintage, industrial, farmhouse, and “I know what I’m doing” all at once.
Plus, repurposing it keeps a beautiful piece of craftsmanship out of the landfill and turns it into functional decor.
The design magic: contrast
The look works because it’s a built-in contrast: ornate iron below, clean tabletop above. You can lean rustic with a reclaimed plank top,
go modern with a crisp slab and matte black base, or go glam with a polished stone top and a deep, inky paint finish.
The practicality: it’s already a base (and it’s already tough)
Many vintage bases were engineered to handle vibration, repeated foot pressure, and daily use. As a side table foundation, they’re
overqualifiedin the best way.
Choosing the Right Base: What to Look For Before You Fall in Love
Shopping for an antique sewing machine stand is a little like adopting a dog: you want charm, but you also want a solid temperament.
Here’s what matters most before you commit to a specific base.
-
Stability and symmetry: Set it on a flat surface and press down on opposite corners. If it rocks, check whether it’s bent,
missing feet, or just uneven (the last one is usually fixable). -
Structural condition: Cosmetic rust is normal. Cracks in cast iron are not your friend. Hairline cracks around bolt points and
joints are red flags. -
Moving parts: The pedal and wheel don’t have to function perfectly, but they shouldn’t be dangerously loose. If they move,
that’s a bonus for charm (and for stress-relieving foot-fidgeting while you sit on the couch). -
Mounting points: Look for existing holes or brackets where the old cabinet or top once attached. Those mounting points can
make attaching your new tabletop much easier. - Height: Many treadle bases are around side-table height, but not all are equal. Measure before you plan a specific use next to a sofa or bed.
A classic example is an old Singer-style treadle base (often the most recognizable), but plenty of other vintage manufacturers made
bases with equally gorgeous cast-iron designs. The goal isn’t a logoit’s a stable frame you actually want to see every day.
Planning the Look: Pick Your “Top” Personality
The tabletop is where you can steer the style. A sewing machine base can swing wildly depending on what you put above it.
Option 1: Reclaimed wood for cozy character
Think weathered boards, old barn wood, or a salvaged plank. This is the “farmhouse side table” lane, especially if you leave saw marks
or knots visible. It pairs well with a base that’s been brushed down but still shows a bit of age.
Option 2: Live-edge slab for a statement piece
A live-edge top (walnut, maple, oakwhatever fits your budget) gives you an instant conversation starter. The curvy natural edge balances
the ornate ironwork, and it looks custom even if the project is pretty straightforward.
Option 3: Smooth stained wood for a cleaner, modern vibe
If you want the base to be the star, keep the top simple: a clean rectangle or oval, softened corners, a satin finish.
This leans “industrial-modern,” especially with a black or charcoal base.
Option 4: Glass or stone for “vintage meets glam”
A thick glass top or a stone remnant (marble, quartz) can make the base feel like a boutique find. If you go this route, pay extra attention
to how the top is supported and protected (bumpers, pads, and a secure seating surface matter).
How the Transformation Works: The Big Steps (Without the Fuss)
You don’t need to be a full-time furniture flipper to pull off a repurposed sewing machine base side table. You do need a plan.
Here’s the practical flow most successful builds follow.
Step 1: Disassemble and document
If the base still has a cabinet or machine attached, remove those pieces carefully. Take a few quick photos as you go so you remember how
brackets and bolts were oriented. Even if you’re not reassembling anything, photos help you keep track of hardware and mounting points.
Step 2: Degrease first (before you sand your soul away)
Old metal bases often have decades of grime: dust, oil, residue, and mystery goo that has never once apologized. Degreasing matters because
paint and primer don’t like sticking to grease. Clean thoroughly, rinse if needed, and let it dry completely.
Step 3: Remove rust and loose paint strategically
You don’t have to grind it down to shiny bare metal everywhere. Focus on what’s loose, flaky, or actively rusting. A wire brush, steel wool,
sanding, and rust treatment options can all play a role depending on the condition. The goal is a sound surface you can prime and paint
without trapping active rust under a pretty coat.
Step 4: Prime like you mean it
Primer is the unglamorous hero of metal refinishing. It helps paint bond and reduces the odds of rust creeping back through your finish.
If you have rust spots, treat them appropriately and use a primer designed for metal.
Step 5: Paint for durability, not just vibes
A lot of people love spray paint for intricate iron details because it reaches curves and cutouts easily. Others prefer brushing on a direct-to-metal
coating for thickness and toughness. Either can work if the prep is solid. Use multiple light coats rather than one heavy coat that drips like a sad candle.
Step 6: Add leveling and floor protection
This is the “grown-up” step people skipand then regret. Felt pads, adjustable levelers, or protective feet help with stability and protect floors.
Cast iron is not gentle. It does not tiptoe. It stomps.
Attaching the Tabletop: Make It Secure (and Let Wood Be Wood)
A common mistake is attaching a solid wood top too rigidly. Wood expands and contracts with seasonal humidity changes. If you lock it down
in a way that doesn’t allow movement, you risk splitting, warping, or loosening fasteners over time.
Smart attachment methods that respect wood movement
- Figure-eight fasteners: Popular for tables because they pivot slightly as the top moves. They’re especially handy when you can mount them to rails or brackets.
- Z-clips / tabletop clips: These slide in a groove and allow movement while holding the top tight.
- Slotted holes with washers: If your metal base already has mounting holes, you can sometimes adapt by using slots or slightly oversized holes plus washers to allow small shifts.
If you’re using a glass top, the approach changes: you typically don’t “fasten” glass the same way. Instead, you create a stable support surface and use
appropriate bumpers or pads to keep it from sliding. For stone, you may need a dedicated support substrate depending on thickness and weight.
Style Ideas: Where This Table Looks Best
Next to a sofa as a functional accent
If your living room needs something with personality (and you’re tired of side tables that look like they came from the “Beige Rectangle Collection”),
a treadle base side table adds visual interest without taking up a lot of space.
As a bedside table with a story
Pair it with a simple lamp and one good book stack. The ornate base does the heavy lifting. If you want extra practicality, choose a top
size that fits a lamp, phone, and water glass without feeling crowded.
In an entryway as a “drop zone” mini console
Some sewing machine bases are wide enough to work as narrow consoles. Add a slightly longer top and you’ve got a place for keys, mail,
and the kind of decorative bowl that makes people think you have your life together.
Common Pitfalls (and How to Avoid Them)
Pitfall 1: Painting over grease or active rust
This is how you get peeling, bubbling, and heartbreak. Clean thoroughly and remove loose rust before priming.
Pitfall 2: Choosing a tabletop that overwhelms the base
If the top is too thick, too wide, or visually heavy, the base can start to look like it’s wearing someone else’s jacket. Aim for a balanced proportion:
enough overhang to look intentional, not so much that it feels top-heavy.
Pitfall 3: Ignoring wobble
If the table wobbles now, it will wobble more later. Fix it at the base level: feet, levelers, and a truly flat top attachment surface.
Pitfall 4: Over-distressing
A little age is charming. A table that looks like it lost a bar fight is… a specific aesthetic. If you love the original patina, preserve it
thoughtfully. If you want a clean finish, commit to solid prep and paint.
Is This Project Worth It?
If you love unique furniture, yes. A sewing machine base side table is the kind of piece people ask about. It can be budget-friendly if you
source the base cheaply and keep the top simple. It can also become a “forever piece” if you choose quality materials and finish it well.
The deeper win is that it’s practical art: you’re taking a beautiful mechanical relic and giving it a new job in your homeone that doesn’t
require thread tension adjustments or a user manual from 1912.
of Real-World Experiences People Share After Making One
When people talk about turning a sewing machine base into a beautiful side table, the most common theme isn’t paint color or wood species.
It’s the surprise factorhow quickly the project goes from “random old metal thing” to “the best-looking table in the room.”
One of the most shared experiences is the moment of revelation that happens right after the first deep clean. The base comes home dusty,
maybe a little rusty, and definitely unimpressive at first glance. But once it’s degreased and you can actually see the ironwork details,
it suddenly feels less like junk and more like a rescued artifact. People often say they didn’t realize how elegant the curves and logos were
until the grime was gone. The “before” looks like a yard sale problem; the “after cleaning” looks like a vintage store treasure.
Another common lesson: the top matters more than you think. Makers often start with the base as the main character and treat the top like
an afterthoughtuntil they test a few options. A thin piece of plywood can make the base look oddly cheap. A thicker, well-finished wood top
instantly makes the whole thing feel intentional. People who try multiple stain samples usually end up happier, because the base’s undertone
(warm iron, cool black, bronzy patina) can fight with the wrong wood color. The best outcomes tend to come from choosing a top that either
cleanly contrasts (light oak + black base) or harmonizes (walnut + dark base).
There’s also a very specific, very universal experience with treadle bases: the pedal becomes a fidget toy. Even when the table is done and sitting
quietly next to a sofa, someoneoften the person who said they wouldn’t touch itstarts gently rocking the treadle with their foot while
talking. It’s weirdly calming. Several DIYers joke that they didn’t build a side table; they built a “living room anxiety management device.”
People also learn (sometimes the hard way) that leveling is not optional. Old cast iron can sit unevenly on modern floors, and not every base was
perfectly straight even when it was new. Those who add adjustable feet or levelers early tend to rave about it later. Those who skip it usually
end up doing it after the first spilled drinkor after hearing the table click-tap every time someone sets a mug down.
Finally, many people describe a kind of unexpected pride with this project. Because it’s not just “DIY furniture”it’s a transformation with history.
The base is heavy, real, and old. When it becomes a side table, it’s still those things, but now it’s useful again. And that feels good in a way
flat-pack furniture can’t quite compete with. You don’t just end up with a table; you end up with a story that lives in your living room.
Conclusion
A sewing machine base becomes a beautiful side table when you treat it like what it is: a piece of durable engineering with design potential.
Focus on stability, clean and prep the metal properly, choose a tabletop that fits your style, and attach it in a way that respects how materials behave.
Do that, and you’ll get a one-of-a-kind upcycled side table that looks curated, not cobbled together.


