
Table of Contents >> Show >> Hide
- Why Plastic Is So Tricky to Paint
- Step 1: Identify the Plastic Before You Do Anything Else
- Step 2: Wash Off Dirt, Oil, Chalky Residue, and Mystery Gunk
- Step 3: Let the Plastic Dry Completely
- Step 4: Remove Hardware and Protect the Parts You Are Not Painting
- Step 5: Repair Damage Before You Start Sanding
- Step 6: Scuff-Sand the Surface to Kill the Shine
- Step 7: Remove Every Speck of Sanding Dust
- Step 8: Use an Adhesion Promoter or Plastic Primer When the Surface Demands It
- Step 9: Spot-Test Before You Commit to the Whole Project
- Step 10: Prime Evenly and Let the Surface Cure Properly
- Common Mistakes That Ruin Plastic Paint Prep
- Final Thoughts
- Real-World Experience: What Actually Happens When You Prep Plastic
Painting plastic sounds easy right up until your fresh coat starts peeling like a bad sunburn. The problem usually is not the paint color, your brush, or your luck. It is the prep. Plastic is smooth, sometimes oily, and often annoyingly resistant to anything that tries to cling to it. That means if you want a finish that looks good and stays put, surface preparation is the whole game.
The good news is that learning how to prepare plastic for painting is not complicated. You do not need a secret handshake, a professional spray booth, or a paintbrush blessed by the DIY gods. You just need a smart process. Whether you are updating patio furniture, reviving plastic storage bins, repainting a toy chest, or freshening up home décor, these 10 steps will help you build a durable paint-ready surface.
This guide walks through the most practical, beginner-friendly approach to plastic paint prep, including cleaning, sanding, priming, and solving the common problems that make plastic projects fail before they even begin.
Why Plastic Is So Tricky to Paint
Before jumping into the steps, it helps to know why plastic is such a diva. Many plastic surfaces are glossy, flexible, or made with additives that resist moisture, stains, and everyday wear. Great for lawn chairs. Less great for paint adhesion. Some plastics, especially certain polyethylene and polypropylene products, are considered low-surface-energy materials. In plain English, paint has a harder time gripping them.
That is why proper prep matters so much. If you clean away grime, dull the shine, remove dust, and use a compatible plastic primer or adhesion promoter when needed, you give your topcoat a real chance to bond instead of just sitting there looking pretty until the first scratch.
Step 1: Identify the Plastic Before You Do Anything Else
The first step in preparing plastic for painting is figuring out what kind of plastic you are working with. Check the underside or back of the item for a recycling code or material marking such as PP, PE, PVC, ABS, or PS. This is not just trivia for people who alphabetize screws. It helps you choose the right prep method and paint system.
For example, rigid décor pieces and molded household items are often easier to paint than waxy storage totes or children’s outdoor toys made from slippery polyethylene. If the item feels slick even after cleaning, assume it may need extra help from a bonding primer, plastic primer, or adhesion promoter. When in doubt, do a test spot on a hidden area. That tiny patch can save you from coating the whole project in regret.
Step 2: Wash Off Dirt, Oil, Chalky Residue, and Mystery Gunk
Paint hates contamination. Dust, grease, skin oils, furniture polish, sunscreen, cooking residue, and outdoor grime all interfere with bonding. Start by washing the plastic thoroughly with warm water and mild dish soap. Use a sponge or soft cloth for smooth pieces and a nylon brush for textured surfaces or grooves.
If the item has lived outside, give it extra attention. Patio chairs, planters, and storage boxes often collect chalky oxidation, mildew, and airborne grime. Those leftovers can turn your beautiful new paint job into a flaky science experiment. After washing, rinse the piece well so no soap film remains.
Helpful example
If you are repainting a plastic outdoor chair, clean the seat edges, armrests, and underside carefully. Those spots collect body oils and dirt faster than flat surfaces, and paint failure often starts there first.
Step 3: Let the Plastic Dry Completely
This sounds obvious, but plenty of paint jobs die young because moisture gets trapped in seams, screw holes, or textured areas. After washing, dry the piece with a lint-free cloth and let it air-dry fully. If needed, give it extra time in a warm, ventilated area.
Drying matters because water can dilute primers, interfere with adhesion, and leave a blotchy finish. On textured plastic, use compressed air or a dry brush to chase moisture out of recesses. The goal is a clean, dry surface before you move on to sanding or chemical prep.
Step 4: Remove Hardware and Protect the Parts You Are Not Painting
If the plastic item has wheels, metal screws, rubber feet, fabric sections, or clear inserts, remove them if possible. If not, mask them carefully with painter’s tape and paper. This step keeps your project looking intentional instead of accidentally frosted.
It also makes the prep more effective. You can clean, sand, and prime the actual plastic without bumping into hardware or missing edges. For things like plastic drawer fronts, storage bins with handles, or decorative bins with labels, masking now saves cleanup later.
Step 5: Repair Damage Before You Start Sanding
Preparation is not just about getting the plastic clean. It is also about getting it smooth and sound. Inspect the item for cracks, gouges, peeling old paint, or rough factory seams. Scrape away any loose coating. If the plastic has minor damage, use a filler that is rated for the material and the project type, then let it cure fully before sanding.
If the item is badly cracked or constantly flexes, be realistic. Paint cannot solve structural problems. A flimsy plastic bin that bends every time you pick it up may not hold a pristine painted finish for long. Prep can improve adhesion, but it cannot turn unstable plastic into cast iron.
Step 6: Scuff-Sand the Surface to Kill the Shine
This is where the magic starts. Most plastic surfaces are too smooth for paint to grip well, so scuff-sanding gives them tooth. Use a fine to medium grit sandpaper, usually around 180 to 220 grit for general plastic prep. Sand lightly and evenly. You are not trying to carve your initials into the planter. You are simply dulling the gloss and creating a subtle texture.
Focus on glossy areas, molded edges, and any place that feels especially slick. For curved pieces, sanding pads or flexible sanding sponges help you stay even. On previously painted plastic, feather rough edges so the old finish blends smoothly into the bare areas.
Important note
Some paints designed specifically for plastic say sanding is optional. Even then, a light scuff often improves the result, especially on well-used items, weathered surfaces, or pieces with inconsistent sheen. If you skip sanding, do it because the product label clearly says you can, not because you are feeling optimistic on a Tuesday.
Step 7: Remove Every Speck of Sanding Dust
Once you sand, clean again. Dust left on the surface becomes a tiny sabotage team under your primer. Wipe the piece with a clean microfiber cloth, vacuum it with a soft brush attachment, or use a tack cloth if the paint system allows it. Many DIYers also follow with a wipe-down using isopropyl alcohol or a compatible cleaner to remove the last traces of dust and residue.
This is one of those boring steps that separates a smooth finish from a gritty, peel-prone mess. If you run your hand over the plastic and it still feels dusty, keep cleaning. Paint should bond to the surface itself, not to a layer of powdery leftovers from your sanding session.
Step 8: Use an Adhesion Promoter or Plastic Primer When the Surface Demands It
Not every plastic project needs the same prep system. Some spray paints for plastic are formulated to bond directly to many common plastics. Others perform better over a plastic primer. On difficult plastics, especially slick or low-surface-energy ones, an adhesion promoter can make a major difference.
Here is the simplest way to think about it:
Use a plastic-specific paint alone if the label says it bonds directly to your type of plastic and the surface is in good condition.
Use a plastic primer if you want a more uniform base, are switching to a very different color, or need extra insurance on a worn or glossy piece.
Use an adhesion promoter when the plastic is especially slick, hard to bond to, or known for peeling problems.
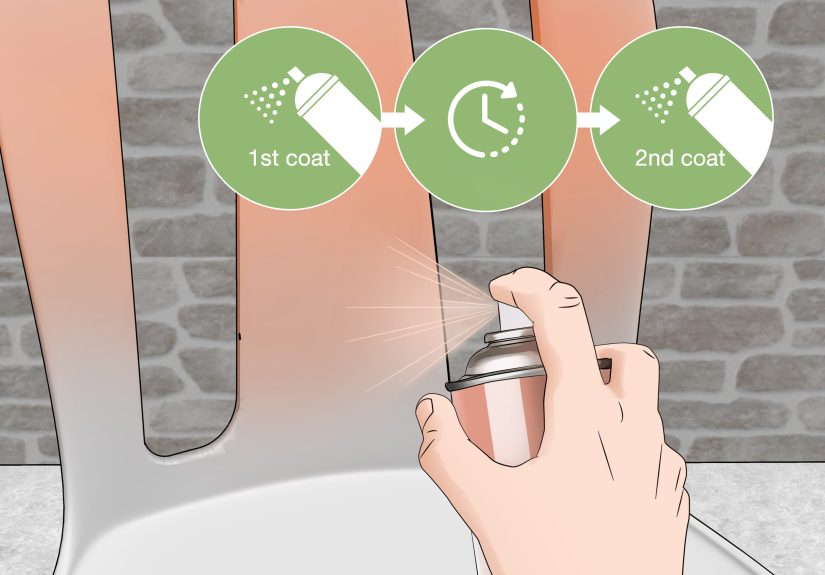
This step is especially important for items like plastic storage containers, resin furniture, and automotive-style trim pieces. If the label recommends a certain recoat window, follow it closely. Paint chemistry is not the place to freestyle.
Step 9: Spot-Test Before You Commit to the Whole Project
Before priming or painting the entire piece, test your prep and product combination on a hidden section. Choose the underside, back edge, or inner lip. Apply the primer or first coat exactly the way you plan to do the full project. Let it dry, then check for lifting, fisheyes, poor coverage, or weak adhesion.
This step is small, but it is wildly useful. A hidden test patch can reveal whether the cleaner left residue, whether the plastic needs more sanding, or whether the chosen primer is incompatible. It is much easier to rethink your system after a two-inch test than after you have painted an entire toy box and named it “The Peeling Disaster.”
Step 10: Prime Evenly and Let the Surface Cure Properly
Once the surface is clean, dull, dust-free, and tested, apply your primer if your system calls for it. Use light, even coats. Spray products usually work especially well on plastic because they reduce brush marks and reach textured or curved areas more easily. If you are brushing primer on, avoid overworking it.
Then let it dry and cure according to the product instructions. Not “until it sort of feels fine.” Not “until dinner is ready.” Proper cure time matters. Some surfaces are dry to the touch quickly but not ready for recoating or use. If the primer dries rough, a very light sanding with fine grit paper can smooth it before paint, followed by another careful dust removal.
At this point, your plastic is fully prepared for painting. The surface is clean, stable, slightly textured, and chemically ready to accept a topcoat. That is the difference between paint that lasts and paint that flakes off the first time someone drags the chair across the patio.
Common Mistakes That Ruin Plastic Paint Prep
Even good paint can fail if the prep is sloppy. The most common mistakes include skipping the wash step, sanding too aggressively, leaving dust behind, choosing the wrong primer, painting over damp plastic, or ignoring the product label. Another big mistake is assuming all plastics behave the same way. They do not. A PVC accent piece and a polyethylene storage tote are not identical, no matter how much they both enjoy living in your garage.
Another trouble spot is rushing between coats. Plastic surfaces reward patience. If the primer or prep coat has not cured properly, the finish may wrinkle, scratch easily, or peel around edges and corners. The fix is not more paint. The fix is better prep and proper timing.
Final Thoughts
If you want paint to stick to plastic, the secret is not luck and it is definitely not dumping on thicker coats. The secret is preparation. Clean the surface well, remove gloss, clear away dust, choose the right bonding product, and respect drying time. Those simple habits make almost any plastic paint project look better and last longer.
So yes, you absolutely can paint plastic successfully. You just cannot treat it like wood, drywall, or your cousin’s hand-me-down coffee table. Plastic wants a little extra respect before it agrees to cooperate. Give it that, and your project has a much better chance of turning out smooth, durable, and refreshingly peel-free.
Real-World Experience: What Actually Happens When You Prep Plastic
One of the biggest lessons people learn from painting plastic is that the prep never feels dramatic while you are doing it. Washing a storage bin is not exciting. Lightly sanding a planter is not the kind of task that makes you feel like a TV makeover star. But the results are dramatic later. The projects that hold up for months or years are usually the ones where someone slowed down during prep instead of rushing to the color coat.
A good example is outdoor plastic furniture. A chair can look clean from ten feet away and still be coated in sunscreen residue, pollen, and the kind of mystery grime that only patio season can create. If you paint over that, the finish might look fine for a day or two, then start scratching off at the armrests and front edge of the seat. But if you wash it thoroughly, let it dry, scuff the shine, remove the dust, and use a proper primer or paint system, the result looks smoother and stays bonded longer. The difference is not subtle.
Another common experience happens with plastic storage totes and toy bins. These are often made from slick material that seems to reject paint on principle. Many people think they failed because they used the wrong color or sprayed too lightly, when the real issue was surface energy and inadequate prep. Testing a hidden spot first can save the whole project. Sometimes that tiny test patch tells you that the surface needs more scuffing, an adhesion promoter, or a different product entirely.
Texture also teaches people a fast lesson. Smooth plastic is easier to prep evenly, while textured plastic can trap cleaner, water, sanding dust, and lint. On these surfaces, the best results usually come from patience: scrub the grooves, rinse well, dry longer than you think necessary, and spray in thin coats instead of trying to drown the texture in paint. Thick coats on textured plastic tend to pool on the high spots and miss the recesses, which makes the finish look uneven and wear badly.
There is also a practical truth that comes from experience: the edges always tell on you. Corners, rims, handles, and undersides are where prep shortcuts show up first. If those areas were not cleaned or sanded properly, that is where peeling starts. People often blame the paint, but the real culprit is usually the two minutes they skipped around the edges because the project “looked ready.” Plastic has a funny way of exposing optimism.
Over time, experienced DIYers get less obsessed with painting fast and more interested in building a stable surface. They know that plastic painting is really surface preparation with a color reward at the end. Once you understand that, the process gets easier. You stop fighting the material and start working with it. And that is when painted plastic goes from looking homemade in the bad way to homemade in the “wait, you did that yourself?” way.


