Table of Contents >> Show >> Hide
- Why a Bunk Bed Makes a Surprisingly Great Guest Bed
- Pick Your Path: 3 Smart Ways to Convert a Bunk Bed
- Before You Touch a Paintbrush: Safety and Structural Reality Check
- Tools and Materials That Make This Project Way Easier
- Step-by-Step: Turn the Lower Bunk Into a Real Guest Bed
- Step 1: Disassemble (at least partially) so you can prep properly
- Step 2: Clean like you’re about to cook on it
- Step 3: Sand for adhesion, not for punishment
- Step 4: Repair and reinforce
- Step 5: Prime (especially if you want the paint to stay put)
- Step 6: Paint with a furniture-friendly product
- Step 7: Upgrade the mattress support
- Step 8: Reassemble and de-squeak
- Make It Look Grown-Up: Design Tweaks That Change Everything
- Guest-Ready Comfort: What to Add So People Sleep Well
- If You Want the Daybed Look: How to Add a Back Rest (Without Overcomplicating It)
- Common Mistakes (So You Don’t Learn Them the Hard Way)
- Quick Example: A Practical “Weekend Conversion” Plan
- Experiences From the Workshop: What I Learned Turning a Bunk Bed Into a Guest Bed (About )
- Conclusion
Every house has that piece of furniture: the one that’s sturdy, sentimental, and just a tiny bit… “summer camp.”
If your old bunk bed is giving “childhood sleepover” when you’re aiming for “boutique guest suite,” you’re not alone.
The good news: a bunk bed makeover is one of the most satisfying DIY upgrades you can do, because you’re starting with a frame that’s usually built like a tank.
With smart safety checks, a fresh finish, and a few design tricks, you can turn an old bunk bed into an inviting guest bed that adults will actually be excited to sleep on.
This guide walks you through the most practical conversion options (from simple to show-off), the prep steps that keep paint from peeling like a sunburn,
and the styling moves that make the final result look intentionalnot like you “just removed the ladder and hoped for the best.”
Why a Bunk Bed Makes a Surprisingly Great Guest Bed
Bunk beds are designed to handle movement, climbing, and years of “don’t jump on the bed!” negotiations. That’s a great foundation for a guest bed.
The trick is to adjust the proportions and details so it reads as grown-up: lower profile, cleaner lines, quieter finish, better mattress support,
and thoughtful bedside function.
What guests care about (even if they’re too polite to say it)
- Comfort: a supportive mattress, no squeaks, no wobbles.
- Ease: a place to set a phone and water, easy-to-reach outlet, decent lighting.
- Cleanliness: fresh bedding, no mysterious dust bunnies under the bed.
- Privacy vibe: the room feels finishedlike you planned for them.
Pick Your Path: 3 Smart Ways to Convert a Bunk Bed
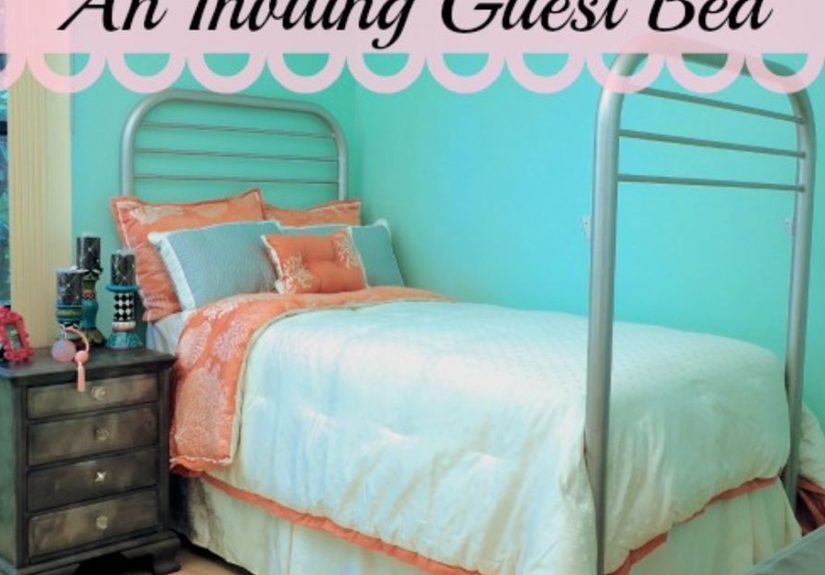
Option 1: The “Low Drama” Conversion (Remove the Top Bunk)
If your bunk bed is stacked and you don’t need two sleeping levels, this is the cleanest route. You remove the upper bunk,
keep the lower bed frame, and upgrade it like a standard guest bed. You can often reuse the upper components as wall shelving,
a headboard feature, or even a bench framemore on that later.
Option 2: The Daybed Look (Add a Back + Arms)
This is the “wow, where did you buy that?” approach. You turn the bed into a daybed-style guest bed by adding a taller back
(and optional short arms) so it can double as a sofa in a multipurpose room. Great for home office/guest room combos.
Option 3: The Two-Twin Split (If Your Bunk Is Designed to Separate)
Many bunks are built to convert into two twin beds. If that’s your case, you can use one as the guest bed and repurpose the other
elsewhere (kid room, vacation rental, or as a “backup bed” for big holidays). This option can be faster because you’re not inventing new structure
you’re rearranging what already exists.
Before You Touch a Paintbrush: Safety and Structural Reality Check
DIY is fun. Emergency hardware-store runs are… character-building. Start with these checks so your guest bed is safe, solid, and squeak-resistant.
1) Confirm the bed is still structurally sound
- Inspect side rails, posts, and slats for cracks, warping, or soft spots.
- Tighten every bolt/screw. Replace missing hardware with matching size/grade fasteners.
- Wiggle test: push side-to-side at the head and foot. If it racks, plan to add corner braces or a center support.
2) Decide whether the top bunk stays (and be honest about who will use it)
If you’re converting for adult guests, most people prefer a standard-height bed. Keeping a top bunk can feel cramped and isn’t always necessary.
If you do keep an upper sleeping surface for kids or overflow guests, make sure guardrails and ladder access are appropriate and secure.
3) If the bed is older, treat paint prep like it matters (because it does)
If the bed (or your home) dates to the era when “lead paint” was not a scary phrase, take precautions before sanding.
Contain dust, keep kids/pets away, and clean thoroughly. When in doubt, use lead-safe practicesyour lungs will thank you.
Tools and Materials That Make This Project Way Easier
You can do a bunk bed makeover with basic tools, but a few upgrades reduce frustration dramatically.
Tools
- Drill/driver + bits, screwdriver set, Allen keys (most bunks love Allen keys)
- Orbital sander (or sanding block), sandpaper (120 and 220 grit)
- Vacuum + tack cloth or microfiber cloth
- Measuring tape, square, clamps (helpful for adding supports)
- Paint supplies: angled brush, foam roller, tray, drop cloth
Materials
- Degreaser or mild cleaner (for fingerprints, grime, and “mystery stickiness”)
- Wood filler (for dents and old screw holes), caulk for small seams (optional)
- Bonding primer (especially if the finish is glossy, sealed, or laminate-like)
- Durable paint suitable for furniture (cabinet/trim enamel or furniture paint)
- New slats or a bunkie board (optional but often worth it)
- Felt pads for legs, new hardware if needed
Step-by-Step: Turn the Lower Bunk Into a Real Guest Bed
Step 1: Disassemble (at least partially) so you can prep properly
Take photos as you gofuture you will appreciate the “how did this go back together?” insurance policy.
Remove the ladder, guardrails, and the upper bunk components if you’re going with Option 1.
Even if you’re keeping the lower bed intact, removing side panels and slats makes sanding and painting cleaner.
Step 2: Clean like you’re about to cook on it
Paint hates grease, lotion, and life residue. Wash everything, especially hand-touch zones: ladder rails, side rails, and posts.
Let it dry completely. If you skip this step, your paint may “fisheye” or peel later, and that’s not the kind of texture anyone wants.
Step 3: Sand for adhesion, not for punishment
You usually don’t need to sand down to bare wood. The goal is to scuff the surface so primer and paint can grip.
Start with 120 grit for glossy finishes and move to 220 grit for smoothing.
Vacuum dust and wipe down thoroughly. Dust is sneakyit will land in your fresh paint like it paid rent.
Step 4: Repair and reinforce
- Fill dents, gouges, and old holes with wood filler; sand smooth once dry.
- If the bed has any wobble, add corner braces inside the frame where they won’t show.
- Consider a center rail or extra legs if the frame spans a long distance and you want hotel-level sturdiness.
Step 5: Prime (especially if you want the paint to stay put)
A bonding primer is your best friend for old finishes, sealed wood, or anything with shine.
Prime in thin, even coats. Let it dry fully. Rushing primer is like putting on socks with wet feettechnically possible, emotionally damaging.
Step 6: Paint with a furniture-friendly product
For a guest bed, durability matters. Choose a hard-wearing finish (often labeled for cabinets/trim or furniture).
Apply two thin coats rather than one thick coat. Lightly sand between coats (220 grit) if needed for a smoother finish.
Let it cure according to the paint instructionsdry-to-touch is not the same as “ready for luggage, dog paws, and weekend guests.”
Step 7: Upgrade the mattress support
This is where your bunk bed becomes a true guest bed. Old slats can be too spaced out or slightly bowed.
Options:
- New slats: add more slats with tighter spacing for better support.
- Bunkie board: a thin platform that evens out support under the mattress.
- Quality foundation system: if the frame allows, use a low-profile foundation for extra stability.
Step 8: Reassemble and de-squeak
Reassemble with care. Tighten fasteners evenly. Add felt pads under legs.
If you hear squeaks, check connection points and add washers where metal meets wood.
A tiny adjustment now prevents your guests from thinking your house is haunted by a polite, rhythmic mouse.
Make It Look Grown-Up: Design Tweaks That Change Everything
Choose a finish that reads “intentional”
- Soft white or warm cream: clean, classic, and easy to style.
- Moody color (navy, deep green, charcoal): cozy and boutique-hotel-like.
- Natural wood + sealed matte topcoat: calm, modern, and less “painted kids furniture.”
Add a headboard vibe (even if you don’t add a literal headboard)
If you removed the top bunk, you may have tall posts that feel “unfinished.” Easy fixes:
- Mount a pair of plug-in wall sconces above the bed.
- Create a simple wood slat panel behind the bed.
- Use a large piece of art centered over the pillow line.
Use “daybed styling” tricks to make it look like a sofa by day
If your guest bed sits in an office or flex space, style it like a daybed:
tuck bedding neatly, use a fitted coverlet, and stack pillows like you mean it.
Designers often recommend layered pillows (vary sizes/shapes) and a bolster for that polished look.
Guest-Ready Comfort: What to Add So People Sleep Well
Mattress basics that matter
Most bunk bed frames use a twin mattress, which can be wonderfully guest-friendly if it’s supportive.
If your budget allows, upgrade the mattress or add a high-quality topper. Don’t forget a mattress protector.
Hotel-level bedding in normal-people steps
- Crisp sheets + a breathable blanket + a fluffy duvet or comforter
- Two sleeping pillows (medium support) + a decorative pillow or two
- A throw at the foot of the bed for texture and temperature control
The “I thought of everything” bedside setup
- Small nightstand or C-table
- Lamp or sconce, plus a phone-charging option
- Water glass or carafe
- Extra blanket in a basket
- Luggage rack or a clear spot for a suitcase
If You Want the Daybed Look: How to Add a Back Rest (Without Overcomplicating It)
Want your converted bunk to function as seating? Build a “back” using existing bunk parts or a simple panel:
- Measure height: aim for a back that sits 8–14 inches above the mattress surface for comfortable lounging.
- Reinforce attachment: use sturdy brackets into posts or frame rails (hidden from view).
- Keep it clean-lined: a simple slat back looks intentional and modern.
- Finish to match: same paint sheen, same hardware tone.
This turns your guest bed into a daytime hangout spot, which is ideal if your “guest room” is also your work-from-home zone.
Common Mistakes (So You Don’t Learn Them the Hard Way)
- Skipping primer: paint can chip faster on glossy or sealed surfaces.
- Painting before repairs: filler and sanding after paint is a heartbreak loop.
- Not letting paint cure: your beautiful finish will dent under a suitcase wheel.
- Ignoring mattress support: even great bedding can’t fix saggy slats.
- Forgetting function: guests need a light switch they can find at night. Preferably without a scavenger hunt.
Quick Example: A Practical “Weekend Conversion” Plan
Here’s a realistic timeline that works for many DIYers:
Day 1
- Disassemble, clean, inspect, tighten hardware
- Sand + fill dents/holes
- Prime (late afternoon/evening)
Day 2
- First paint coat (morning)
- Second coat (afternoon)
- Reassemble (evening if paint is dry-to-handle)
Then give it a few days to fully cure before heavy use. Meanwhile, style the room, wash linens, and set up bedside essentials.
Experiences From the Workshop: What I Learned Turning a Bunk Bed Into a Guest Bed (About )
The first time I tackled a bunk bed makeover, I assumed the hard part would be the painting. Plot twist: the hard part was the
decision-making. A bunk bed has a lot of “parts,” and every part tries to convince you it’s important. The ladder says,
“Don’t throw me away, I’m iconic!” The guardrail whispers, “I could be a shelf.” The top bunk frame just sits there like a smug
rectangle, waiting for you to admit you don’t have a plan.
What helped was treating the project like a mini renovation: first, define the purpose. In my case, I wanted an inviting guest bed
that could also serve as a reading nook the rest of the year. That single decision made everything easier. I removed the top bunk,
kept the lower frame, and used one of the longer rail pieces to create a simple backrest so it could style like a daybed.
Suddenly, the bed looked intentionallike it belonged in a grown-up space with coffee and books, not in a room that still smelled like
watermelon lip balm.
The second surprise was how much cleaning mattered. I thought, “It doesn’t look dirty.” Then I wiped it with cleaner and watched a
grayish film appear on my cloth like a spooky magic trick. Once it was truly clean, sanding took half the time and the primer went on smoothly.
I also learned that sanding isn’t about brute force; it’s about consistency. A quick scuff everywhere beats aggressive sanding in a few spots.
You want the surface to feel evenly dull and smoothnot like a woodworking audition.
My favorite lesson was about “quiet upgrades.” Nobody walks into a room and says, “Ah yes, excellent felt pads.”
But everyone notices when a bed doesn’t wobble. Adding a couple of discreet corner braces and tightening the frame evenly transformed the feel.
It went from “temporary furniture” to “real bed.” The same goes for slats. Updating the slats (or adding a bunkie board) made the mattress feel
dramatically betterlike upgrading a chair by tightening the screws. It doesn’t sound glamorous, but your guests will sleep like they’re
on purpose-built furniture rather than a charming upcycle experiment.
Finally, styling is where the magic happens. I used a simple coverlet, layered pillows in different sizes, and added a throw that looked cozy but
also functioned as an extra blanket. Then I placed a small table with a lamp and a phone charger, and I swear the room exhaled.
It didn’t just look betterit felt welcoming. That’s when I realized the goal isn’t to hide the fact it used to be a bunk bed.
The goal is to make it feel like the best possible version of itself: sturdy, comfortable, and genuinely ready for company.
Conclusion
When you turn an old bunk bed into an inviting guest bed, you’re doing more than upgrading furnitureyou’re upgrading how your home
welcomes people. Start with the safest, simplest conversion path, focus on prep and support, and then style it like you’d want to arrive there
after a long day of travel. The end result can look polished, feel sturdy, and function beautifully in a guest room or any flex space.
And the best part? You get to retire the “kids furniture” vibe without sending a perfectly good frame to the landfill. Your guests win, your
home wins, and your bunk bed gets its grown-up glow-up.