
Table of Contents >> Show >> Hide
- Why storage is a productivity tool (not just a design flex)
- Before you add storage: the 15-minute “desk detox”
- 21 home office storage ideas that actually earn their keep
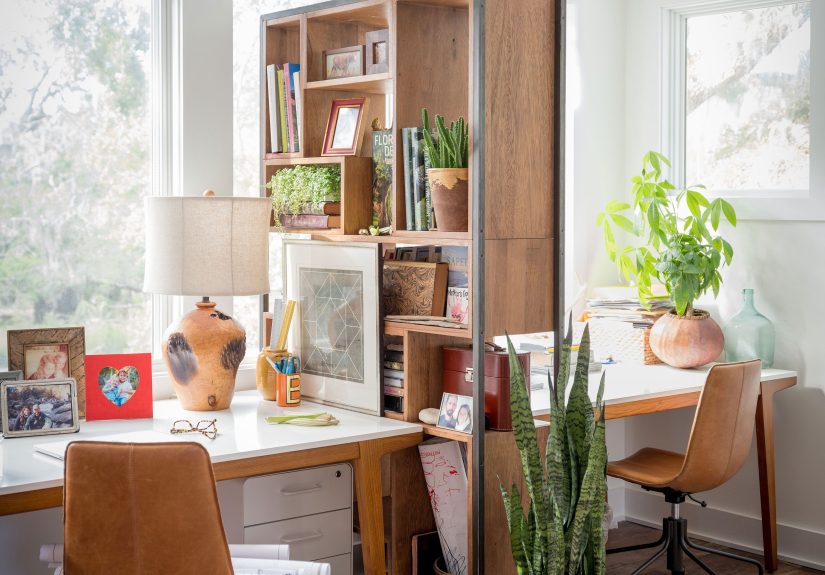
- 1) Install floating shelves to get clutter off the desk
- 2) Add a pegboard or wall grid for vertical micro-storage
- 3) Use wall-mounted file organizers for “active” papers
- 4) Create an inbox/outbox tray system (yes, like a real office)
- 5) Drop modular drawer dividers into every “junk drawer”
- 6) Add a rolling file cabinet under the desk
- 7) Build a dedicated printer station
- 8) Hide cables with a three-part cable management setup
- 9) Keep “ugly supplies” behind closed doors
- 10) Use open baskets for grab-and-go categories
- 11) Try a cube organizer with labeled bins
- 12) Repurpose a sideboard/credenza as an “office pantry”
- 13) Put the back of your door to work
- 14) Add an under-desk drawer (or clamp-on drawer) for daily essentials
- 15) Use a desk riser with compartments
- 16) Store reference books verticallyand curate them
- 17) Set up a 3-tier paper system: Action, Reference, Archive
- 18) Create a charging station with one rule: devices charge here, always
- 19) Use “project boxes” to keep multi-step work contained
- 20) Turn a closet into a compact office with built-in storage
- 21) If you can, go modular with wall cabinets or built-ins
- Quick setup guide: make your storage system stick
- Conclusion
- Real-world storage lessons from working at home (the “experience” part)
If your “home office” currently looks like a paper tornado dated your charging cables and then moved in rent-free,
you’re not alone. The good news: you don’t need a bigger roomyou need better home office storage.
When everything has a home, your brain stops playing hide-and-seek with staplers and starts doing the thing you’re
paid to do: think.
Below are 21 practical, good-looking home office storage ideas that help you clear visual clutter,
speed up your workflow, and build a workspace that feels calmeven if your inbox is not.
Why storage is a productivity tool (not just a design flex)
Clutter isn’t only “messy.” It’s friction. Every loose paper pile is a tiny decision waiting to happen.
Every cable snarl is a mini problem you solve again tomorrow. Smart storage reduces the number of decisions you
have to make before you can start real work.
The goal isn’t to own fewer things (nice, but optional). The goal is to make what you do own easier to
find, faster to put away, and less distracting to look at. Think in terms of:
- Reach: What do you need hourly, daily, weekly, rarely?
- Visibility: What should be seen (inspiring), and what should be hidden (chaos goblins)?
- Flow: Where do papers, devices, and supplies land when they enter the room?
Before you add storage: the 15-minute “desk detox”
Buying bins for clutter is like buying a bigger suitcase for “souvenirs” you don’t remember purchasing. Start
with a fast reset so your storage system isn’t forced to babysit junk.
- Set a timer for 15 minutes. Speed beats perfection.
- Make four quick piles: Keep, Trash/Recycle, Donate, “Elsewhere.”
- Sort papers into three folders: Action, To File, To Scan/Shred.
- Reduce duplicates: Keep one good stapler, not a stapler family reunion.
- Reset your “daily kit”: The few items that must live within arm’s reach.
Now you’re organizing what mattersnot building an elaborate storage museum for random pens that don’t work.
21 home office storage ideas that actually earn their keep
1) Install floating shelves to get clutter off the desk
Wall shelves turn “air” into storage. Place them above or beside your desk for books, reference binders, and a
couple of baskets for supplies. Keep the lower shelf for everyday items; higher shelves are for backstock or décor.
2) Add a pegboard or wall grid for vertical micro-storage
Pegboards are perfect for small tools: scissors, sticky notes, headphones, and cords. Use hooks, cups, and mini
shelves so small items stop migrating into drawers like they’re planning an escape.
3) Use wall-mounted file organizers for “active” papers
If you handle paperwork, a wall file system keeps today’s documents visible without consuming desk space. Label
slots for “Action,” “Waiting,” and “Filed” to keep paper from becoming a blanket over your keyboard.
4) Create an inbox/outbox tray system (yes, like a real office)
Two trays solve the “where do I put this?” problem instantly. One tray catches incoming mail and papers; the other
holds items ready to mail, scan, or file. It’s simpleand simplicity is undefeated.
5) Drop modular drawer dividers into every “junk drawer”
Drawer dividers stop tiny items from forming a tangled ecosystem. Group by category: writing tools, tech, mailing,
and “small but important.” Bonus: you’ll stop buying pens because you “can’t find any.”
6) Add a rolling file cabinet under the desk
Mobile file cabinets store paperwork and supplies while keeping the floor plan flexible. Roll it out when you’re
working, tuck it away when you need space, and enjoy the magic of not stacking papers in geometric towers.
7) Build a dedicated printer station
Printers attract clutter like a magnet attracts… well, metal. Give yours a small cart, cabinet, or shelf with
paper, ink, and a labeled bin for “to scan.” The goal: printer stuff stays with the printer.
8) Hide cables with a three-part cable management setup
Use an under-desk tray for power strips, cable clips to route cords, and a small cable box (or covered container)
to hide the “electric spaghetti.” Your feet will thank you, and your video calls will look less like a tech crime scene.
9) Keep “ugly supplies” behind closed doors
Closed storagecabinets, credenzas, drawersreduces visual noise. If seeing office supplies makes you feel like
you’re living inside a supply closet, hide them. A calm view supports focused work.
10) Use open baskets for grab-and-go categories
Open bins are fast. Assign baskets to categories like “notebooks,” “mailing,” or “camera gear.” If your work changes
weekly, baskets adapt better than rigid systems.
11) Try a cube organizer with labeled bins
Cube shelves are a classic because they scale. Mix open cubes (display + daily items) with fabric bins (hide the
chaos). This is especially helpful for craft-heavy or teaching-heavy work.
12) Repurpose a sideboard/credenza as an “office pantry”
A low cabinet provides wide storage for paper, devices, and reference material. The top can be a printer zone, a
charging station, or a staging area for projectswithout invading your desk.
13) Put the back of your door to work
Over-the-door racks and organizers are perfect for headphones, cords, notebooks, and light supplies. It’s
storage that doesn’t eat square footagelike free real estate, but less paperwork.
14) Add an under-desk drawer (or clamp-on drawer) for daily essentials
If your desk has no drawers, add one. Store the few items you reach for constantlypens, sticky notes, a timer,
lip balm, the tiny adapter that disappears when you need it most.
15) Use a desk riser with compartments
A monitor stand/riser can create a shallow “parking spot” for notebooks and a few supplies. The extra height also
makes the desk feel bigger and more structured.
16) Store reference books verticallyand curate them
Keep only the references you use. Stand them upright with bookends, and move seldom-used materials to a higher
shelf. Your office doesn’t need to prove you once liked a topic in 2017.
17) Set up a 3-tier paper system: Action, Reference, Archive
Paper isn’t evil; unmanaged paper is. Keep “Action” within arm’s reach, “Reference” in a labeled file drawer or
box, and “Archive” somewhere less convenient (because you should almost never need it).
18) Create a charging station with one rule: devices charge here, always
Assign a single shelf or tray to charging: phone, tablet, headphones, power bank. Label cables and keep a spare
charger there. This stops the nightly scavenger hunt for “the good cord.”
19) Use “project boxes” to keep multi-step work contained
For each client, class, or big task, use a magazine file, lidded bin, or folder box. Everything for that project
lives together. When you switch tasks, you switch boxeslike a productivity costume change.
20) Turn a closet into a compact office with built-in storage
A closet office works because it’s naturally contained. Add a shelf above the desk for supplies and a vertical
organizer for papers. When you’re done, close the doors and instantly “leave the office.”
21) If you can, go modular with wall cabinets or built-ins
Modular cabinet systems (or built-ins) are the long-term win: they hide clutter, use full wall height, and can be
customized with drawers, shelves, and doors. If you’re in your home office daily, this is often the upgrade that
pays you back in sanity.
Quick setup guide: make your storage system stick
- Keep daily items within one arm’s reach. If you have to stand up for a pen, your system will fail.
- Label like a friendly control freak. Labels reduce decision fatigue and prevent “mystery bins.”
- Don’t overbuy containers. Start with what you have; upgrade only after the system proves itself.
- Schedule a weekly 10-minute reset. A small reset beats a quarterly meltdown.
Conclusion
The best home office storage isn’t the fanciestit’s the one you’ll actually use on a Tuesday when your calendar is
rude and your coffee is trying its best. Start with one pain point (papers, cables, or supplies), pick two or three
ideas from the list, and build outward. A clear desk won’t solve every problem, but it will remove the ones that
should never have been problems in the first placelike losing a stapler in your own home.
Real-world storage lessons from working at home (the “experience” part)
The first time I tried to “organize” a home office, I did what many people do: I bought containers. Lots of them.
Beautiful containers, toothe kind that look like they belong in a catalog where nobody has ever eaten crackers
near a keyboard. Then reality arrived. The containers didn’t fix anything because I hadn’t decided what my space
needed to do. They just gave my clutter a nicer outfit.
The biggest shift came when I started noticing patterns in my day. For example: papers entered my office from
exactly two placesmail and meetings. So instead of creating a “paper filing system” for the entire universe, I
set up a simple landing zone: an inbox tray for anything new, and three labeled folders (“Action,” “To File,”
“To Scan/Shred”). That tiny workflow change eliminated the “paper pile” problem because papers no longer needed
to audition for a role as desk décor.
Next was cable chaos. I used to keep chargers wherever they happened to be when a device dieddesk, couch, kitchen,
bedroom. This meant I spent a weird amount of time unplugging things and walking around with a charger like a
lasso. Setting up one charging station felt almost silly… until it wasn’t. One power strip, one spot, and a few
cable clips turned “Where’s my charger?” into “Oh right, where chargers live.” It’s not glamorous, but it’s a
daily win.
The most unexpectedly helpful trick was “project containment.” Any task that lasted more than a day got its own
bin or magazine filenotes, printouts, receipts, sticky reminders, and the one adapter required for that project
because life loves a plot twist. When I needed to switch focus, I didn’t have to clear the desk completely; I just
closed the project box. That made it easier to stop work at a reasonable hour, toobecause the mess wasn’t staring
at me from across the room like an unfinished conversation.
If you take only one lesson from all this, let it be this: storage works best when it follows your habits, not
when it tries to fight them. Put the “daily kit” within reach, hide what distracts you, and make “putting it away”
the easiest option. Your future selfthe one trying to start work on a Mondaywill be absurdly grateful.


