
Table of Contents >> Show >> Hide
- Before You Buy Anything: Declutter in 20 Minutes (Seriously)
- 30 Kitchen Storage Ideas to Declutter on a Budget
- 1) Use Shelf Risers to Double Cabinet Space
- 2) Add Under-Shelf Baskets for Instant Vertical Storage
- 3) Corral Like with Like Using Bins (One Category per Bin)
- 4) Label What You Want to Stay Organized
- 5) Install Tension Rods Under the Sink to Hang Spray Bottles
- 6) Add a Lazy Susan Where Things Disappear (Corners, Deep Shelves)
- 7) Store Lids Vertically (So They Stop Avalancheing)
- 8) Use Drawer Dividers to Stop the Utensil “Soup”
- 9) Create a “Cooking Zone” Drawer Near the Stove
- 10) Add a Magnetic Strip for Knives (or Metal Tools)
- 11) Hang Measuring Cups and Tools on S-Hooks
- 12) Add Pull-Out Bins or “Slide Trays” in Deep Cabinets
- 13) Use the Inside of Cabinet Doors for Storage
- 14) Mount a Rail for Utensils (Counter Space, Reclaimed)
- 15) Add a Pegboard for Flexible Wall Storage
- 16) Try a Pot Rack or Simple Pot Rail
- 17) Create a “Coffee Station” on a Tray
- 18) Use a Two-Tier Counter Caddy (Instead of Spreading Out)
- 19) Store Cutting Boards Upright
- 20) Add Hooks Under Cabinets for Mugs (If You Have Clearance)
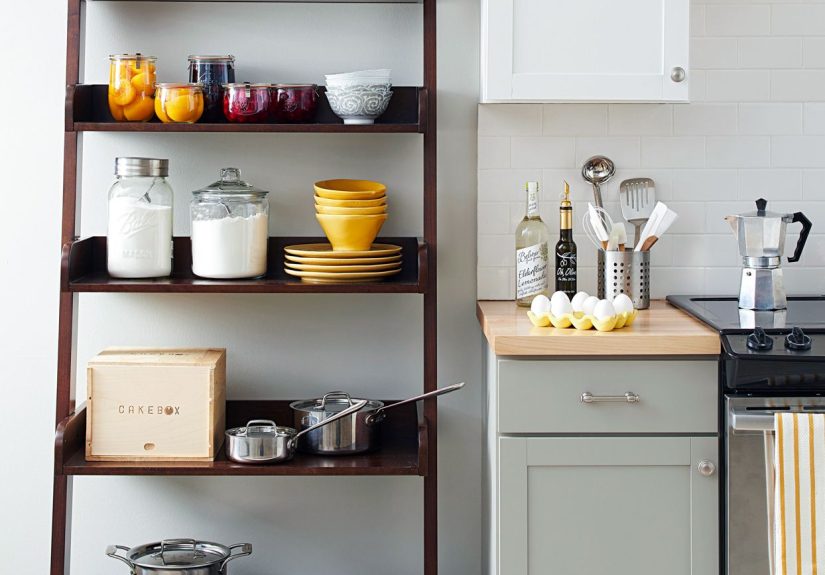
- 21) Decant Pantry Staples into Clear Containers (Selective, Not Everything)
- 22) Use a Snack Bin System (One for Grab-and-Go, One for Backstock)
- 23) Add Can Risers or Tiered Shelves
- 24) File Baking Sheets and Muffin Tins Vertically
- 25) Use a Door-Mounted Pantry Rack (Narrow Spaces Count!)
- 26) Create a “First-In, First-Out” Shelf for Expiring Items
- 27) Use Stackable Bins in the Fridge to Stop the Produce Pileup
- 28) Add a Rolling Cart as a Mobile Pantry
- 29) Turn the “Awkward Gap” Into Storage
- 30) Use a “Drop Zone” Bowl for the Random Stuff (So It Doesn’t Spread)
- Where to Get Cheap Organizers (Without Falling Into a Shopping Spiral)
- Common Mistakes That Make Clutter Come Back
- A Simple Maintenance Routine (So You Stay Decluttered)
- Bonus: Real-World Budget Decluttering Experiences (Add-On)
- Conclusion
If your kitchen has a “junk drawer” (singular) that somehow reproduced into three junk drawers, you’re not alone. Kitchens collect clutter the way socks collect lint: quietly, constantly, and with an attitude. The good news? You don’t need a full remodelor a celebrity organizer shouting “zones!”to get your space back.
This guide is packed with budget kitchen storage ideas that work in real homes: rentals, small kitchens, big-family kitchens, and “I swear I had a spatula five minutes ago” kitchens. You’ll find cheap kitchen organization tricks, small DIY upgrades, and smart ways to use vertical space so your counters can breathe again.
Before You Buy Anything: Declutter in 20 Minutes (Seriously)
Budget tip: the cheapest organizer is the one you don’t have to buy because you stopped storing stuff you don’t use. Do this quick reset first:
- Pick one hotspot (one drawer, one cabinet, or the counter near the coffee maker).
- Pull everything out and wipe the space.
- Sort into four piles: Use weekly, use monthly, rarely use, and “why do we own this?”
- Choose homes based on frequency (daily items at eye level; rarely used higher or lower).
- Set a tiny rule: one-in/one-out for gadgets for the next 30 days.
Now you’re ready to organize without accidentally creating a perfectly labeled cabinet full of things you don’t even like.
30 Kitchen Storage Ideas to Declutter on a Budget
1) Use Shelf Risers to Double Cabinet Space
Add an inexpensive shelf riser to stack plates, bowls, or mugs in upper cabinets. It’s the easiest “extra shelf” you’ll ever installno tools, no commitment, no regrets.
Budget move: Repurpose a sturdy cooling rack or small wire shelf as a DIY riser.
2) Add Under-Shelf Baskets for Instant Vertical Storage
Clip-on under-shelf baskets slide onto existing shelves and create a new layer for napkins, snack bags, dish towels, or lunchbox gearperfect for “thin stuff that gets lost.”
3) Corral Like with Like Using Bins (One Category per Bin)
Bins turn messy cabinets into simple “pull-out categories” (baking, breakfast, pasta, snacks). Clear bins are great for visibility; opaque bins look calmer if your labels do the heavy lifting.
Budget move: Shoebox-size bins are often cheaper and surprisingly perfect for pantry packets and spice refills.
4) Label What You Want to Stay Organized
Labels aren’t just cutethey’re preventive medicine. They stop the “miscellaneous creep” where everything becomes “temporary” storage until the end of time.
Budget move: Painter’s tape + a marker works. Upgrade later if you feel fancy.
5) Install Tension Rods Under the Sink to Hang Spray Bottles
A tension rod turns the under-sink cabinet into a hanging zone for cleaners, freeing the floor area for bins or a small caddy. It’s especially helpful around plumbing because it keeps things off the bottom.
6) Add a Lazy Susan Where Things Disappear (Corners, Deep Shelves)
Turntables prevent the “lost salsa jar phenomenon.” Use them for oils, sauces, vitamins, baking extracts, or coffee syrups. Spin, grab, done.
7) Store Lids Vertically (So They Stop Avalancheing)
Pot lids and food-container lids behave like they’re training for a chaotic stunt show. File them vertically using a rack, a dish-drying rack, or tension rods.
Budget move: A basic dish rack inside a cabinet can separate lids, trays, and cutting boards.
8) Use Drawer Dividers to Stop the Utensil “Soup”
Dividers create lanes for cooking tools, measuring spoons, and random mystery clips. Expandable dividers are ideal when you’re not ready to commit to a permanent layout.
9) Create a “Cooking Zone” Drawer Near the Stove
Put your most-used tools (tongs, spatula, thermometer, hot pads) closest to where you cook. Good kitchen organization on a budget is mostly about placement, not products.
10) Add a Magnetic Strip for Knives (or Metal Tools)
Magnetic strips free up drawer space and keep knives accessible. You can also store metal measuring spoons or small stainless tools.
Safety note: Mount securely and keep away from little kids’ reach.
11) Hang Measuring Cups and Tools on S-Hooks
S-hooks on a rod or rail make small tools easy to grab and stop them from becoming drawer clutter. It’s a tiny change with big “where has this been all my life?” energy.
12) Add Pull-Out Bins or “Slide Trays” in Deep Cabinets
Deep base cabinets hide everything behind everything. Even a simple sliding tray or a sturdy bin you can pull out makes items reachable without crawling into the cabinet like a raccoon.
13) Use the Inside of Cabinet Doors for Storage
Mount slim racks, hooks, or a small caddy inside cabinet doors for measuring spoons, wraps (foil/plastic), or cleaning cloths.
Budget move: Adhesive hooks can hold lightweight items if you don’t want to drill.
14) Mount a Rail for Utensils (Counter Space, Reclaimed)
A wall rail with hooks stores frequently used tools and clears the counter. It also makes your kitchen look like you know what you’re doingeven if dinner is cereal.
15) Add a Pegboard for Flexible Wall Storage
Pegboards are customizable: hang pots, pans, strainers, measuring cups, or small baskets. This is especially helpful in small kitchens where cabinet space is limited.
16) Try a Pot Rack or Simple Pot Rail
Hanging cookware frees cabinet space and keeps heavy items accessible. If a full rack feels like a commitment, start with a pot rail and a few hooks.
17) Create a “Coffee Station” on a Tray
Group coffee/tea supplies on a tray: sweeteners, mugs, filters, pods, and spoons. When everything has a home, your morning routine stops eating your whole counter.
18) Use a Two-Tier Counter Caddy (Instead of Spreading Out)
A small two-tier stand keeps oils, salt, pepper, and often-used spices organized vertically. It’s the opposite of countertop sprawl.
19) Store Cutting Boards Upright
Vertical storage keeps boards dry, easy to grab, and not buried. Use a file organizer, a bakeware rack, or a simple divider.
20) Add Hooks Under Cabinets for Mugs (If You Have Clearance)
Under-cabinet mug hooks can reclaim shelf space and make mugs easy to reach. Measure first so you don’t accidentally create a head-bonk hazard.
21) Decant Pantry Staples into Clear Containers (Selective, Not Everything)
Decanting can make pantry storage more efficient and reduce half-open bags. Focus on high-mess, high-use items: flour, sugar, rice, pasta, oats.
Budget move: Start with reused jars (salsa jars, pickle jars) and uniform labels to make them look intentional.
22) Use a Snack Bin System (One for Grab-and-Go, One for Backstock)
This solves the “we have snacks but also somehow don’t have snacks” problem. Keep a front bin for current snacks and a second bin for extras.
23) Add Can Risers or Tiered Shelves
Tiered shelves make canned goods visible in rows. This prevents duplicate buying and the dreaded discovery of “three cans of chickpeas from 2019.”
24) File Baking Sheets and Muffin Tins Vertically
Vertical dividers stop bakeware stacks from becoming a noisy game of Jenga. Use a bakeware rack or an inexpensive organizer in a base cabinet.
25) Use a Door-Mounted Pantry Rack (Narrow Spaces Count!)
If you have a pantry door (or even a cabinet door with room), add a slim rack for spices, packets, or small jars. It’s a space you already ownuse it.
26) Create a “First-In, First-Out” Shelf for Expiring Items
Put near-expiration foods in one visible bin or shelf. It’s a simple system that cuts waste and makes meal planning easier.
27) Use Stackable Bins in the Fridge to Stop the Produce Pileup
Fridge bins create zones (cheese, lunch meat, yogurt, produce). They also make it easy to pull out a whole category instead of excavating it.
Budget move: One or two bins can make a big differencestart small.
28) Add a Rolling Cart as a Mobile Pantry
A narrow rolling cart can hold snacks, small appliances, or pantry items. It’s great for rentals because it adds storage without permanent changes.
29) Turn the “Awkward Gap” Into Storage
That skinny space between the fridge and wall? It can fit a slim rolling organizer for cans, bottles, or wraps. Measure and choose a cart that rolls smoothly.
30) Use a “Drop Zone” Bowl for the Random Stuff (So It Doesn’t Spread)
Mail, keys, rubber bands, takeout sauceskitchens attract them all. A single bowl or small bin creates controlled chaos. It’s not perfect, but it’s contained, and that’s the point.
Where to Get Cheap Organizers (Without Falling Into a Shopping Spiral)
- Dollar stores: Bins, hooks, small caddies, tension rods, labels, and basic containers.
- Thrift stores: Baskets, trays, jars, wire racks, magazine holders (amazing for wraps and boards).
- Big-box sales + discount aisles: Over-the-door racks, shelf risers, drawer organizers.
- Repurpose what you have: Shoeboxes, jars, gift boxes, and dish racks can become instant organizers.
Common Mistakes That Make Clutter Come Back
- Buying organizers before decluttering: You’ll just create a prettier version of the same mess.
- Storing “maybe” items in prime space: Daily items should live where your hands naturally reach.
- Over-decanting: It looks great, but it’s not necessary for everything. Start with messy staples.
- No maintenance plan: A 5-minute weekly reset beats a 5-hour panic clean.
A Simple Maintenance Routine (So You Stay Decluttered)
Try this low-effort loop:
- Daily (2 minutes): Clear counters back to “homes,” toss trash, return stray items.
- Weekly (10 minutes): Reset one drawer/cabinet and wipe one shelf.
- Monthly (15 minutes): Pantry check: move near-expiration items to your “use first” bin.
Bonus: Real-World Budget Decluttering Experiences (Add-On)
Below are a few realistic “kitchen storage journeys” that mirror what many households run into. They’re not fairy-tale transformationsjust practical, budget-friendly wins that stick.
Experience #1: The Drawer That Ate the Kitchen
A common starting point is the infamous “everything drawer.” It begins innocently: scissors, a pen, maybe a measuring spoon that wandered off. Then it expands into batteries, ketchup packets, a tiny screwdriver, three lighters (nobody smokes), and a mystery key that seems emotionally important.
The budget fix usually works best in three steps: First, dump the drawer completely and throw away obvious trash (old receipts, dried rubber bands, broken takeout chopsticks). Second, split what’s left into micro-categories: tools, food-related small items, paper, and “belongs elsewhere.” Third, use cheap dividersrepurposed boxes, small bins, or even folded cardboardto give each category a lane.
The secret sauce is adding one tiny “catch-all cup” inside the drawer for the truly random bits. That keeps chaos contained without pretending you’re a robot who never misplaces anything. Most people find that once the drawer has structure, they stop shoving larger items into it, because it’s finally doing its job.
Experience #2: Under-the-Sink Chaos (Featuring Plumbing Obstacles)
Under-sink cabinets are tricky because plumbing steals prime storage space and leaks can ruin supplies. A realistic budget setup often includes: a tension rod to hang spray bottles, a shallow bin for sponges and microfiber cloths, and one small “backup” bin for dishwasher pods or trash bags.
What makes this setup work is leaving a small open area under the pipes so you can spot drips early. It also helps to store items in washable plastic bins (not cardboard) so cleanup is painless. People who try to stack loose items directly on the cabinet floor usually end up with a clutter pancake they dread touching. Bins turn it into “pull out, grab, return” instead of “dig, sigh, give up.”
Experience #3: The Pantry That Looked Full but Felt Empty
Many pantries feel crowded, yet weeknight cooking still feels hard. Why? Because items are scattered: pasta is on three shelves, snacks are mixed with baking, and spices are hiding behind cereal. A budget pantry reset typically starts with grouping by purposebreakfast, snacks, dinner staples, bakingand assigning each group a bin or shelf zone.
Instead of decanting everything (which can become a weekend-long hobby), the most effective approach is selective: decant flour/sugar/rice if bags spill, but keep boxes and cans as-is. Tiered risers help cans and small jars stay visible; a lazy Susan in a corner keeps oils and sauces from vanishing. Finally, a “use-first” bin at eye level reduces waste and helps meal planning. In many households, this simple visibility upgrade cuts duplicate purchases because you can actually see what you already own.
Experience #4: The Countertop That Became a Storage Unit
When cabinets are packed, counters become the fallback. The trick isn’t “own less” overnightit’s giving countertop essentials a defined footprint. A tray-based coffee station keeps morning items together, and a small two-tier caddy can hold oils and seasonings vertically instead of spreading them out. For small kitchens, wall rails or pegboards handle frequently used tools without stealing prep space.
The pattern that shows up again and again: when your most-used items have a home that’s easy to return them to, clutter stops multiplying. You’re not fighting your habitsyou’re building storage around them.
Conclusion
Decluttering your kitchen on a budget isn’t about buying a thousand matching containers. It’s about making your space work smarter: using vertical room, creating simple zones, and choosing a few low-cost tools that solve daily frustrations. Start with one problem area, pick three ideas from this list, and you’ll feel the difference fastwithout blowing your grocery budget on organizers.


