
Table of Contents >> Show >> Hide
- Why Vertical = Better for Herbs (Not Just Instagram)
- Before You Build: 7 Rules for Happier Vertical Herbs
- The 9 DIY Vertical Gardens
- 1) Rope-Suspended Shelf with Terra-Cotta Pots
- 2) Upcycled Ammunition Boxes (or Metal Tool Boxes) on Chains
- 3) Pantry-Door Spice Rack Turned Herb Wall
- 4) Hanging File Organizer Garden
- 5) Over-the-Door Shoe Organizer Living Wall
- 6) Pipe-and-Metal Trough Planters (Industrial Wall Tiers)
- 7) Freestanding Gutter Planter Frame (No Wall Required)
- 8) Paint-Can Herb Wall (Cute, Colorful, Surprisingly Practical)
- 9) Leaning Trellis + Bucket Planters (The “Herb Ladder”)
- How to Keep a Vertical Herb Garden Thriving
- Conclusion: Your Herbs Want a Promotion
- Field Notes: of Real-World Experience (So You Don’t Learn the Hard Way)
If your “herb garden” currently consists of a sad grocery-store basil plant practicing its last breaths on a windowsill,
you’re in the right place. A DIY vertical herb garden takes the same square footage as a welcome mat and turns it into
a tiny flavor factory. You get fresher meals, fewer countertop battles, and the smug satisfaction of saying,
“Oh, that? I grew it.”
Below are nine DIY vertical garden ideas that actually make herbs betternot just prettier. Each one includes
smart placement tips, watering realities, and which herbs behave nicely (and which herbs need a time-out).
Why Vertical = Better for Herbs (Not Just Instagram)
Herbs are simple plants with strong opinions: they want light, drainage, and consistent (but not soggy) moisture.
Vertical gardens help because they:
- Maximize light: You can position herbs closer to sun instead of shading each other in a crowded pot.
- Improve airflow: Less mildew, fewer “why is my basil fuzzing?” moments.
- Save space: Perfect for patios, balconies, renters, and anyone whose yard is “a chair and optimism.”
- Make harvesting easy: If it’s at eye level, you’ll actually use it. Out of sight = dried oregano forever.
Before You Build: 7 Rules for Happier Vertical Herbs
-
Chase 6+ hours of sun when possible. Most culinary herbs prefer bright light. If your space is shadier,
choose tolerant herbs (mint, parsley, chives, cilantro) and save sun-lovers (basil, thyme, rosemary) for the brightest spot. -
Drainage is non-negotiable. Vertical planters look cuteuntil water pools and roots rot. Every pocket, pot,
can, or trough should have a way for excess water to escape. -
Use lightweight, well-draining potting mix. Avoid digging up yard soil. A quality container mix drains better,
weighs less, and keeps roots oxygenated. -
Plan for weightthen add more. Wet soil is heavy. Wet soil plus mature herbs plus “oops I overwatered”
is heavier. Mount into studs or use heavy-duty anchors rated above your total load. -
Watering changes in vertical setups. Top tiers dry faster; lower tiers may get extra runoff. Build in
saucers, trays, drip lines, or a watering routine that accounts for gravity’s personality. -
Group herbs by thirst. Basil and mint like more moisture. Rosemary, thyme, oregano want it drier.
Mixing them in the same pocket is how you start herb counseling. -
Make it reachable. If you need a step ladder to snip thyme, you’ll stop snipping thyme. Put frequently used
herbs where your scissors can casually wander.
The 9 DIY Vertical Gardens
1) Rope-Suspended Shelf with Terra-Cotta Pots
Best for: Sunny patios, balconies, kitchen corners with big-window energy.
This is the “I’m handy, but I also like clean lines” option: a wooden shelf (or a couple) hung with rope, holding pots
through circular cutouts.
- Materials: 1–2 pine boards, drill + hole saw, rope, ceiling hooks or wall brackets, terra-cotta pots, sandpaper.
- Build notes: Measure pot rims first. Drill holes slightly smaller than the rim so pots don’t fall through.
- Herb picks: Basil, thyme, oregano, sage, chives.
- Cut and sand the boards. (Splinters are not a seasoning.)
- Mark pot spacing and drill holes.
- Thread rope through corner holes, knot underneath, and level the shelf.
- Hang into studs/joists or use anchors rated for the full wet load.
- Set pots in place and water over a tray or waterproof mat.
Pro tip: Put a removable tray beneath the lowest shelf indoors to catch drips. Your landlord will thank you.
2) Upcycled Ammunition Boxes (or Metal Tool Boxes) on Chains
Best for: Industrial vibe fans, porch rails, sturdy fence posts.
Repurposed metal boxes make rugged herb planters. The key is making them plant-friendly with drainage and liners.
- Materials: Metal boxes, drill + metal bit, chain, S-hooks, mounting hardware, coco liner or landscape fabric.
- Herb picks: Rosemary, thyme, oregano (they like a bit drier and handle wind well).
- Drill drainage holes along the bottom (several small holes beat one big sad hole).
- Line the box to prevent soil washout.
- Attach chain with bolts/washers; hang from a secure beam or fence supports.
- Fill with potting mix, plant, and water slowly to test drainage.
Pro tip: Metal heats up fast in full sun. If summers are intense, add afternoon shade or choose heat-tolerant herbs.
3) Pantry-Door Spice Rack Turned Herb Wall
Best for: Small spaces, renters, anyone with a neglected wall begging for purpose.
A narrow spice rack becomes a vertical herb shelf for small pots. It’s basically a condo building for basil.
- Materials: Wooden spice rack, small pots with drainage, screws/anchors, optional waterproof liner for each shelf.
- Herb picks: Parsley, cilantro, chives, thyme (compact growers work best).
- Sand and seal the rack (especially if it’ll live outdoors).
- Mount into studs or use heavy-duty anchors.
- Place pots on saucers or add a slim tray liner per shelf to catch drips.
- Arrange herbs by light needs: sun lovers on top, shade-tolerant herbs lower down.
Pro tip: Label pots. “Mystery herb” is fun until your mint gate-crashes your pasta sauce.
4) Hanging File Organizer Garden
Best for: Patio fences, balcony rails, garage walls that need redemption.
Those metal or mesh wall file organizers (meant for paper) make surprisingly sturdy herb planters when lined.
It’s office suppliesfinallydoing something joyful.
- Materials: Wall file organizer, coco liner or landscape fabric, zip ties, wall anchors, potting mix.
- Herb picks: Mint (contained!), parsley, cilantro, chives, basil in a deeper pocket.
- Line each pocket and secure the liner with zip ties or clips.
- Mount the organizer securely (wet soil adds serious weight).
- Fill pockets two-thirds full, add plants, top off soil, then water slowly.
- Check for runoff and add a drip tray or gravel strip below if needed.
Pro tip: Mix in perlite for extra drainagevertical pockets can compact over time.
5) Over-the-Door Shoe Organizer Living Wall
Best for: Beginners, indoor herb gardens, “I want herbs but I own exactly zero power tools.”
A canvas shoe organizer is the gateway project to vertical gardening. It’s inexpensive, scalable, and oddly satisfying.
Just respect drainage, or you’ll invent indoor rain.
- Materials: Canvas shoe organizer, hooks, plastic tray or waterproof mat, potting mix, seedlings.
- Herb picks: Basil (smaller varieties), parsley, cilantro, chives, thyme, oregano; mint if you promise to contain it.
- Hang the organizer where it can get strong light (window, patio door, bright porch).
- Test pockets with water to see how they drain and whether they leak through seams.
- Add potting mix and plants; don’t overpackroots need air.
- Water slowly. If water pours out fast, let it soak, then water again.
Pro tip: Put the entire organizer over a boot tray indoors. That’s not being paranoidthat’s being wise.
6) Pipe-and-Metal Trough Planters (Industrial Wall Tiers)
Best for: Outdoor walls, sturdy fences, anyone who loves “farmhouse-industrial” without the influencer budget.
Mount metal troughs (or wide gutters) to a frame made of galvanized pipes or brackets. You get long planting rows
that work beautifully for cut-and-come-again herbs.
- Materials: Metal trough planters or wide gutters, mounting brackets, screws/anchors, optional drip irrigation line.
- Herb picks: Basil, cilantro, parsley, dill, chives; add thyme on an end where it can stay slightly drier.
- Plan tiers so each row still gets light (stagger or leave enough vertical space).
- Drill drainage holes along each trough bottom.
- Mount brackets into studs or heavy-duty anchors rated for the full load.
- Fill with potting mix and plant in clusters for easy harvesting.
Pro tip: If your top row dries fast, run a simple drip line along the back edge and water evenly.
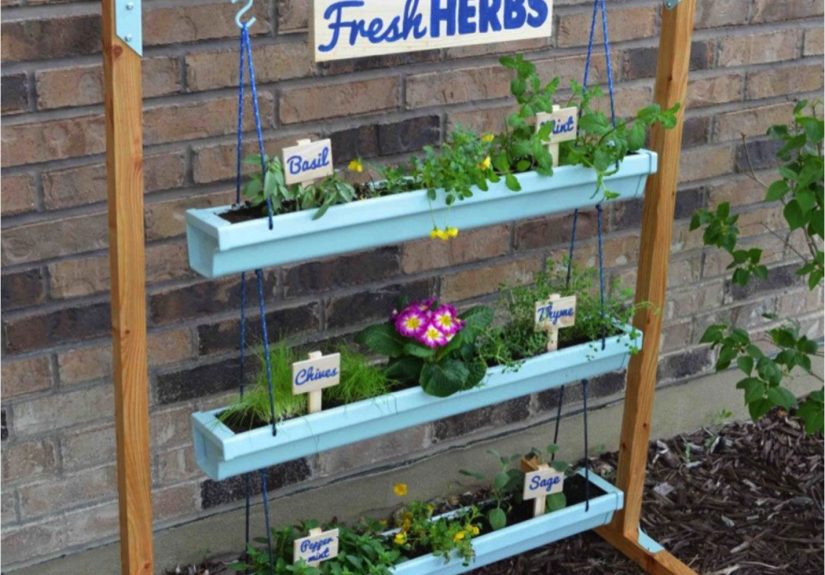
7) Freestanding Gutter Planter Frame (No Wall Required)
Best for: Renters, patios without drill-friendly walls, and people who rearrange furniture for fun.
This is a vertical garden you can move: gutters stacked on a simple wooden A-frame or ladder-style stand.
It’s lightweight compared to full boxes and perfect for shallow-rooted herbs.
- Materials: Vinyl gutters + end caps, wood for frame, screws, drill, optional casters.
- Herb picks: Chives, thyme, oregano, trailing rosemary (small), parsley in a deeper gutter section.
- Build a stable frame (think “won’t wobble in a breeze”).
- Cap gutters and drill drainage holes.
- Attach gutters level (or with a slight tilt toward drainage points).
- Fill, plant, and test-water to make sure runoff doesn’t soak the frame.
Pro tip: Put thirstier herbs on the bottom tiers where they’ll catch a little extra runoff.
8) Paint-Can Herb Wall (Cute, Colorful, Surprisingly Practical)
Best for: Small porches, fences, and anyone who thinks gardening should be fun (it should).
Cleaned paint cans become planters when you add drainage, a liner, and sensible mounting. The best part?
You can color-code herbs like a chaotic kitchen rainbow.
- Materials: Clean, empty paint cans (or similar metal cans), primer/paint (optional), screws, dock cleats or sturdy hooks.
- Herb picks: Thyme, oregano, chives, compact basil, parsley.
- Clean cans thoroughly and drill drainage holes.
- Optional: prime/paint the exterior (avoid painting the inside where soil touches).
- Mount cleats/hooks into studs or a sturdy fence rail.
- Line cans, fill with potting mix, plant, and water carefully.
Pro tip: Leave space between cans for airflow. Packed tight looks tidy, but herbs prefer breathing room.
9) Leaning Trellis + Bucket Planters (The “Herb Ladder”)
Best for: Patios, decks, and anyone who wants vertical gardening without committing to wall drilling.
A leaning trellis supports small buckets or pails hung with S-hooks. It’s flexible, portable, and easy to expand.
Also: it looks like you know what you’re doing, which is half the fun.
- Materials: Trellis (wood or metal), small buckets/pails, S-hooks, drill for drainage, optional liner.
- Herb picks: Basil (one bucket), parsley, cilantro, mint (its own bucket), sage, thyme.
- Drill drainage holes in buckets.
- Lean and secure the trellis so it can’t slide (use brackets if needed).
- Hang buckets with S-hooks and stagger heights for light access.
- Plant by water needs and rotate buckets weekly for even growth.
Pro tip: Put the heaviest buckets on the lowest hooks for stabilityand your toes’ continued happiness.
How to Keep a Vertical Herb Garden Thriving
Water smarter (because gravity is relentless)
- Top dries fast: Check upper pockets first, especially in heat or wind.
- Bottom can stay wetter: If lower tiers look soggy, reduce watering volume and add drainage holes.
- Try the “two-pass” water: Water lightly, wait 3–5 minutes, then water again. Dry potting mix can repel water at first.
Feed lightly, harvest often
Most herbs don’t want heavy fertilizer. A gentle, periodic feeding (or compost top-dress) and consistent harvesting
keeps plants bushy. Pinch basil above a leaf pair, snip chives like a haircut, and treat mint like it owes you rent.
Choose herbs that match your setup
- Sunny, drier tiers: Thyme, oregano, rosemary, sage.
- Bright, evenly moist tiers: Basil, parsley, cilantro, dill.
- Partial shade: Mint, chives, parsley, cilantro.
Conclusion: Your Herbs Want a Promotion
A vertical herb garden is the easiest way to get more flavor from less spacewhether you’re hanging pockets on a door,
stacking gutters on a frame, or building a slick shelf system that makes your kitchen look like a cooking show set.
Start with one project that fits your light and your lifestyle, plant a few reliable herbs, and you’ll be snipping
fresh garnishes before your next grocery run.
Field Notes: of Real-World Experience (So You Don’t Learn the Hard Way)
People love the idea of vertical herb gardens because they look tidy and “organized,” which is hilarious because the
second you add water, soil, and living plants, everything becomes a tiny ecosystem with opinions. Here are the lessons
DIYers commonly share after the first weekwhen the project stops being “a craft” and starts being “a garden.”
First: watering is always different than you expect. The top row dries out like it’s trying to set a
world record, while the bottom row quietly stays damp because it’s catching runoff. The quick fix is to water slowly
and deliberately, tier by tier, instead of blasting the whole thing like a car wash. If you can add a drip tray,
boot tray, or a gravel strip under the garden, do it. Most “vertical garden disasters” are really “water management
surprises” wearing a trench coat.
Second: weight is not theoretical. Dry soil feels harmless. Wet soil in a wall planter is a different
creatureespecially after a rainstorm. DIYers learn to mount into studs, use hardware rated above the load, and avoid
flimsy hooks that came free with something else. If you’re hanging anything heavy, aim for overkill. No one has ever
regretted “too sturdy,” but plenty of people have regretted “it seemed fine.”
Third: herb personalities matter. Mint is the classic example: it grows fast, it spreads, and it will
happily take over a shared container. In vertical gardens, the best “mint strategy” is containmentits own pocket,
its own pot, its own bucketso it can be productive without becoming a leafy tyrant. Meanwhile, Mediterranean herbs
(rosemary, thyme, oregano) prefer drier roots, so they do better in faster-draining pockets or the top tiers where
water doesn’t linger.
Fourth: small containers demand frequent check-ins. Vertical systems often use smaller pockets or
narrow troughs, which means less soil volume. Less soil dries faster and holds fewer nutrients. DIYers who succeed
treat this like a routine: quick moisture checks, occasional light feeding, and a little pruning to keep plants bushy.
The upside is that herbs respond quicklypinch basil regularly and it turns into a leafy shrub instead of a lanky
teenager reaching for sunlight.
Finally: the best vertical gardens are designed for use, not just looks. The “perfect” arrangement on
day one often changes after you cook a few meals. You’ll notice which herbs you grab daily (basil, chives, parsley),
which ones you use occasionally (sage, thyme), and which ones you forget exist until you’re cleaning. The smartest
tweak is simple: move your daily herbs to the easiest-to-reach spots. A vertical garden that gets harvested is a
vertical garden that thrives.
Build one, adjust it, and don’t worry if your first version isn’t flawless. Gardening is basically the art of making
small improvements while plants do their thing. Your job is to give them light, drainage, and a decent home. Their job
is to make your dinner taste better.


