
Table of Contents >> Show >> Hide
- Why Exhaust Pipe Damage Happens in the First Place
- Before You Patch Anything, Figure Out What You Are Actually Fixing
- Method 1: Patch the Exhaust Pipe With Repair Tape or Bandage
- Method 2: Use Exhaust Repair Epoxy, Putty, or Sealer
- Method 3: Use a Clamp-and-Sleeve Repair Kit
- Which Patch Method Is Best?
- When You Should Skip the Patch and Replace the Part
- How Long Does an Exhaust Pipe Patch Last?
- Helpful Tips for a Better Patch
- Final Thoughts
- Real-World Experience: What People Learn After Actually Patching an Exhaust Pipe
If your car suddenly sounds like it is auditioning for a low-budget street-racing movie, there is a decent chance your exhaust pipe has developed a leak. The good news is that a small hole, crack, or split in the right part of the exhaust system can sometimes be patched long enough to quiet the noise, reduce fumes, and buy you time before a full repair. The less-fun news is that not every exhaust problem should be patched, and some “quick fixes” last about as long as a New Year’s resolution.
This guide breaks down three practical ways to patch an exhaust pipe: repair tape or bandage, exhaust repair epoxy or sealer, and clamp-based patch kits or sleeves. You will also learn when a patch makes sense, when it does not, and how to tell whether you are dealing with a tiny nuisance or a bigger problem that deserves professional attention.
Why Exhaust Pipe Damage Happens in the First Place
Exhaust systems live a rough life. They deal with heat, moisture, road salt, vibration, road debris, and the kind of grime that would make a pressure washer blush. Over time, that combination can cause corrosion, weak spots, loose connections, or small cracks. A leak may show up as a louder exhaust note, a ticking or hissing sound, a rattling pipe, bad smells, or visible rust around a seam or hole.
Small damage on a tailpipe or mid-pipe is often what people mean when they search for how to patch an exhaust pipe. That is very different from a failed exhaust manifold, a damaged catalytic converter, or a severely rotted muffler hanging by pure optimism. Those problems usually need replacement, not a heroic roll of tape and a pep talk.
Before You Patch Anything, Figure Out What You Are Actually Fixing
A patch works best when the damage is:
- A small hole, pinhole, crack, or seam leak
- Located on a solid section of pipe or muffler shell
- Surrounded by metal that still has decent strength
- Far enough from major components that the area is accessible
A patch is a poor choice when the pipe is badly rusted, the metal crumbles when touched, the leak is near a flange or manifold, or the part is already separating. If the pipe is sagging, dragging, or cracking in multiple places, replacement is usually the smarter and safer move.
Also, do not ignore strong exhaust odor in the cabin, a check engine light, or serious performance issues. Those clues can point to a more important exhaust problem than a simple pipe leak.
Method 1: Patch the Exhaust Pipe With Repair Tape or Bandage
Best for
Small holes, small cracks, and localized leaks on otherwise solid metal.
How it works
Exhaust repair tape or bandage is usually a heat-resistant wrap designed to go around the damaged area. Once installed and heated through normal exhaust temperature, it hardens and forms a seal. Think of it as a cast for your exhaust pipe, except noisier and much dirtier.
Why people like it
This is one of the easiest patch methods for beginners. It is widely available, does not usually require advanced tools, and works well for small leaks that have not turned the surrounding metal into crunchy brown lace.
Basic approach
Start with a cool exhaust system. Clean the damaged area as thoroughly as possible so the wrap can grip the surface rather than a layer of rust flakes and road goo. Then wrap the tape or bandage tightly around the leak, extending beyond the damaged spot so the repair has enough support. Some products are activated by moisture, while others cure with heat, so following the product directions matters.
Pros
- Simple and widely available
- Good for small leaks and odd-shaped spots
- Usually faster than replacing a section of pipe
Cons
- Not ideal for large splits or metal that is badly corroded
- Can fail early if the surface is dirty or weak
- Usually considered a temporary or medium-term repair, not a forever solution
If the damaged area looks like it has been marinating in winter road salt for ten years, tape may stick for a while, but it will not perform miracles. Exhaust repair tape is a patch, not a resurrection.
Method 2: Use Exhaust Repair Epoxy, Putty, or Sealer
Best for
Seam leaks, pinholes, small cracks, and small gaps at pipe connections.
How it works
Exhaust repair compounds are usually thick, heat-resistant sealers or paste-like products designed for exhaust temperatures. They are applied directly over the leak or into a seam, then allowed to cure. Some are better for sealing joints, while others are meant to fill small holes or reinforce a damaged area before a wrap or clamp goes on top.
Why this method works well
If your leak is not a dramatic tear but more of a creeping seam failure, exhaust sealer can be surprisingly effective. It is especially useful where exhaust sections meet and tiny gaps allow noise and fumes to escape.
Basic approach
As with any patch, the surface needs to be cool and as clean as possible. Loose rust, grease, and moisture are the enemies of adhesion. Once the area is prepped, apply the sealer over the problem spot or along the leaking seam, making sure it covers slightly beyond the visible damage. Some repairs benefit from a mesh, patch sheet, or wrap on top of the sealer for extra support.
Pros
- Excellent for seams and connection points
- Can fill small imperfections better than tape alone
- Useful as part of a layered repair
Cons
- Not strong enough for large holes or major structural damage
- Surface prep is critical
- Cure time and heat cycling matter, so patience is part of the job
This is the patch method for people who want their repair to look a little less “I found this in a parking lot” and a little more intentional. Still, it is only as good as the metal underneath it.
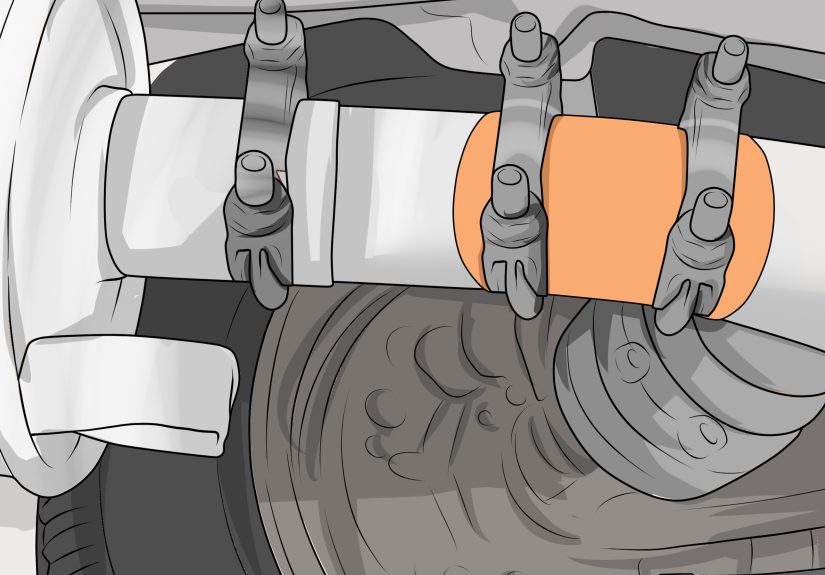
Method 3: Use a Clamp-and-Sleeve Repair Kit
Best for
Longer cracks, damaged straight sections, weak joints, and places where the pipe needs mechanical support as well as sealing.
How it works
A clamp-based repair usually combines a metal sleeve, patch material, or gasket with one or more clamps. Instead of relying only on adhesive or heat curing, it physically compresses the repair around the damaged section. This makes it a better choice when the pipe needs reinforcement, not just a cover-up.
Why it stands out
Compared with tape or sealer alone, a clamp-and-sleeve repair can handle a little more abuse. Vibration is constant in an exhaust system, so having a repair that physically grips the pipe can be a major advantage.
Basic approach
After cleaning the pipe, position the sleeve or patch over the damaged section and secure it with the appropriate clamp hardware. The fit matters. A clamp that is too loose will leak, while one that is the wrong size can distort the repair or fail to seal. On some vehicles, clamp-style repairs are a good bridge between a tiny patch and a full pipe replacement.
Pros
- Adds structural support
- Works well on straight pipe sections
- Can last longer than wrap-only repairs in the right situation
Cons
- Less effective on bends or awkward shapes
- Requires correct sizing
- Still not a cure for severe rust or widespread failure
If repair tape is a bandage and sealer is caulk with attitude, a clamp-and-sleeve kit is the “let us at least give this thing some backbone” option.
Which Patch Method Is Best?
There is no universal winner because the right fix depends on the size, location, and condition of the damage.
- Choose repair tape or bandage for a small hole or crack on solid metal.
- Choose exhaust sealer or putty for seam leaks, small gaps, or as part of a layered repair.
- Choose a clamp-and-sleeve kit when the pipe needs support and the damaged section is straight enough for a mechanical patch.
In the real world, some of the most durable temporary repairs combine methods. For example, a small seam leak might get exhaust sealer first and then a wrap or clamp for reinforcement. That is not cheating. That is strategy.
When You Should Skip the Patch and Replace the Part
DIY patching makes sense only when the exhaust system still has a solid foundation. You should lean toward replacement when:
- The metal around the leak is thin, brittle, or deeply corroded
- The damaged section is close to the manifold or catalytic converter
- The pipe has multiple holes or long splits
- The muffler shell is rotted through in several places
- The exhaust is hanging, rattling badly, or separating at a joint
- You notice strong exhaust fumes inside the cabin
A patch can save money, but replacing a failing section is usually the better long-term choice when the damage is advanced. There is a point where trying to keep patching an old exhaust pipe becomes a hobby instead of a repair plan.
How Long Does an Exhaust Pipe Patch Last?
That depends on the method, the condition of the pipe, the climate, and whether the car sees daily driving or occasional use. A well-done patch on solid metal may last much longer than expected. A patch on rotten metal may fail before you finish feeling proud of yourself.
Temperature cycles, moisture, vibration, and road salt are the main enemies. In general, you should think of any exhaust pipe patch as a practical repair that buys time, not as a guaranteed lifetime solution. Check it regularly, especially after the first few drives.
Helpful Tips for a Better Patch
- Let the exhaust cool completely before touching anything.
- Clean the surface well. Most patch failures start with poor prep.
- Cover beyond the visible hole so the repair has a stronger hold.
- Do not patch a part that is already falling apart.
- Recheck the repair after driving because vibration can expose weak spots.
- If fumes enter the cabin, stop treating it like a minor annoyance and get the system inspected.
Final Thoughts
Knowing three ways to patch an exhaust pipe can save you money, reduce noise, and keep a small problem from becoming a much bigger one. Repair tape or bandage is great for simple surface leaks. Exhaust sealer or putty works well for seams and small gaps. Clamp-and-sleeve kits offer more support when the pipe needs a tougher temporary fix.
The key is honesty. If the damage is minor and the surrounding metal is sound, a patch can absolutely make sense. If the pipe is rotted, loose, or failing in multiple places, replacement is the adult decision, even if your wallet briefly disagrees.
In other words, patch what is patchable, replace what is toast, and never trust an exhaust pipe that looks like it has been through three winters, two potholes, and one emotional breakdown.
Real-World Experience: What People Learn After Actually Patching an Exhaust Pipe
Here is the part many how-to articles skip: the actual experience of patching an exhaust pipe is usually less about mechanical genius and more about patience, surface prep, and managing expectations. On paper, the job sounds simple. In reality, the hardest part is often getting under the car, finding the exact leak, and realizing the hole you saw from one angle is really part of a bigger rust problem. That is a humbling moment.
A common experience is this: the car starts getting louder over a week or two, but the driver keeps turning up the radio like that will solve it. Then one morning the exhaust note goes from “slightly grumpy” to “full marching band in a metal trash can.” That is when most people begin inspecting the tailpipe, the muffler, and the area just ahead of it. Often the damage turns out to be a small rust hole on a section that still feels solid. That is the best-case scenario for a patch.
People who get the best results usually say the same thing: cleaning the area matters more than they expected. A patch thrown over flaky rust tends to fail quickly. A patch applied to a solid, brushed-off surface has a much better chance. That is why experienced DIYers rarely rush straight to the patch material. They spend time removing loose scale and making sure the repair has something real to hold onto.
Another real-world lesson is that different patch styles feel different once installed. Wrap-style repairs are popular because they are fast and beginner-friendly, but they can feel a little temporary, because, well, they are. Sealer-based repairs can look cleaner, especially on seams, but they test your patience because you need to let them cure properly. Clamp repairs often feel the most secure, mostly because metal hardware gives people psychological comfort. If it has bolts, it must be serious, right? Sometimes yes. Sometimes it is just louder hardware.
One more consistent lesson: a successful patch often buys time rather than solving the problem forever. That is not failure. That is the job. A good patch can quiet the car, reduce leakage, and stretch the life of the exhaust system until replacement is more convenient. The disappointment usually comes when people expect a tiny repair to permanently save a pipe that is rusting in three other spots they have not noticed yet.
So the most useful experience-based advice is simple. Be realistic. If the metal is solid, a patch can work surprisingly well. If the pipe is crumbling, skip the fantasy and plan for replacement. The smartest DIYers are not the ones who patch everything. They are the ones who know when a patch is enough and when it is time to stop negotiating with a dying exhaust system.


