
Table of Contents >> Show >> Hide
- Why a Picket Fence Still Works (And Isn’t Just a Movie Prop)
- Plan Like a Pro: Layout, Style, and Materials
- Tools and Materials Checklist
- Step-by-Step: How to Build a DIY Picket Fence
- Finishing: Paint, Stain, and Make It Last
- Common DIY Picket Fence Mistakes (And How to Avoid Them)
- DIY Picket Fence FAQ
- DIY Picket Fence Experience Notes (500+ Words)
- Conclusion: Your Fence, Your Craftsmanship
A picket fence is basically your home’s way of saying, “Hi, I’m friendly,” while also saying, “Please don’t park your bike in my hydrangeas.”
It’s classic curb appeal with a side of boundary-settinglike a warm handshake that gently redirects people away from your flower beds.
The best part? You can build a DIY picket fence yourself with weekend-level tools, a little patience, and a healthy respect for straight lines.
This guide walks you through planning, measuring, setting posts, installing rails, attaching pickets, and finishing like you meant it.
You’ll get real-world tips, common mistakes to avoid, and a few laughs to keep morale up when you’re on hole #7 and questioning your life choices.
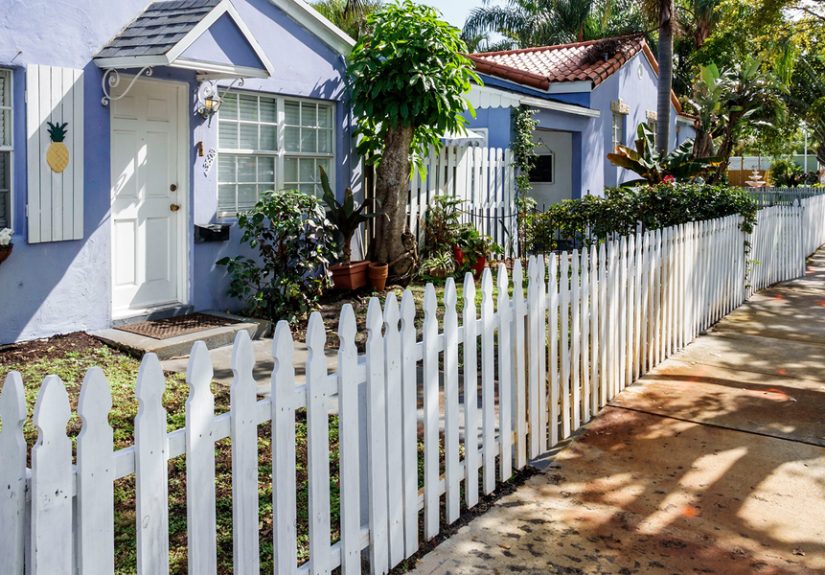
Why a Picket Fence Still Works (And Isn’t Just a Movie Prop)
A wood picket fence is one of the rare home upgrades that can be both practical and charming without trying too hard.
It defines property lines, helps guide foot traffic, protects gardens, and adds that “buttoned-up” look to a front yard.
Unlike a tall privacy fence, a traditional picket design stays visually opengreat for neighborhood vibes and for not accidentally blocking your own view.
Quick reality check before you dig
- Rules vary. Many areas limit front yard fence height (often around 3–4 feet), and corners may have visibility requirements.
- Permits happen. Some cities require permits above certain heights or in certain zones.
- HOAs exist. And they may have feelings about picket spacing, colors, and whether “eggshell white” is “too rebellious.”
Plan Like a Pro: Layout, Style, and Materials
1) Choose your picket fence style
The look is mostly determined by picket shape and spacing. Popular tops include dog-ear, pointed, gothic, and flat-top.
If you’re aiming for classic curb appeal, you’ll usually see evenly spaced vertical pickets with the tops aligned.
Want a little extra flair? Add a cap rail or a slightly arched linejust know curves take more measuring (and measuring takes snacks).
2) Pick the right wood (or alternative)
For a DIY picket fence, wood is common because it’s easy to cut, easy to fasten, and easy to repair later.
Cedar is naturally rot-resistant and takes stain beautifully. Pressure-treated lumber is budget-friendly and durable, especially for posts and ground-contact parts.
Redwood is great where available, but typically pricier. Composite and vinyl picket systems can reduce maintenance, but they trade away some of that real-wood charm.
3) Plan your fence height and post spacing
Most picket fences in front yards land around 3 to 4 feet tall. Post spacing for wood fences is commonly up to 8 feet on center,
but many DIYers choose slightly tighter spacing for stiffness and easier rail installationespecially on windy sites.
Pro tip: Sketch your fence line, then do a “yard walk” with stakes. If something feels off (a tree, a slope, a gate location), fix it on paper firstpaper is cheaper than re-digging.
Tools and Materials Checklist
Tools
- Measuring tape (long), string line, stakes
- Post hole digger or power auger
- 4-foot level (and a smaller one helps)
- Circular saw or miter saw
- Drill/driver, exterior-rated screws or galvanized nails
- Shovel, tamper, and a wheelbarrow (your new best friend)
Materials
- Fence posts (commonly 4×4 wood posts)
- Rails/stringers (often 2x4s)
- Pickets (pre-made or cut to size)
- Gravel for drainage at the bottom of post holes
- Concrete mix (optional but common for stability)
- Exterior primer/paint or stain/sealer
- Gate hardware if adding a gate (hinges, latch, screws)
Step-by-Step: How to Build a DIY Picket Fence
Step 1: Call before you dig (seriously)
Before you dig any post holes, get underground utilities marked.
This is not the fun part, but it’s the difference between “new fence weekend” and “unplanned neighborhood fireworks.”
Schedule utility locating ahead of time and keep your fence line markings visible.
Step 2: Mark the fence line and locate posts
Set stakes at corners and run a tight string line to mark the fence run. This string line is your truth-teller.
Measure and mark post locations along the string. If you’re using 8-foot spacing, check your total run length and adjust spacing slightly
so the end sections aren’t awkwardly tiny. Small math now prevents big regret later.
Step 3: Dig post holes to the right depth
A common rule is to set posts roughly one-third of the post length in the ground, but climate matters.
In frost-prone areas, you generally want the bottom of the hole below the frost line to reduce heaving.
Hole diameter is typically several inches wider than the post (room for adjustment, gravel, and concrete).
- Add gravel: A few inches at the bottom helps drainage and reduces standing water around the post base.
- Mind your grade: If your yard slopes, decide now whether you’ll “step” the fence or follow the contour with longer rails.
Step 4: Set posts plumb and solid
Place the post, check it for plumb on two sides, and brace it with temporary boards.
If using concrete, pour around the post after alignment. Many builders keep the top of concrete slightly below grade
and finish with soil on top, helping water shed away from the post.
Let the concrete cure as directed before hanging railspatience here saves a lot of leaning-fence sadness later.
Pro tip: Keep your string line slightly offset from the posts so you can still use it for alignment without getting tangled in braces and wet concrete.
Step 5: Install rails (the backbone)
Once posts are set, attach horizontal rails between them. For many fences, a good guideline is one rail for about every two feet of fence height:
a 4-foot fence often uses two rails (top and bottom), while a 6-foot fence often uses three.
Pre-drill to reduce splitting, especially near board ends, and use exterior-rated fasteners.
Step 6: Attach pickets with consistent spacing
Start at a post and set your first picket perfectly plumb. This first one is the “pace car” for everything that follows.
Use a spacer block (wood offcut works great) to keep gaps consistent. Check plumb periodicallywood is sneaky and will drift.
- Fasteners: Exterior-rated screws reduce loosening over time; galvanized or stainless helps prevent rust streaks.
- Spacing: Leave a consistent gap that looks good and accounts for wood movement from humidity.
- Bottom clearance: Keep pickets slightly off the soil to reduce rot and splashing moisture.
Step 7: Build and hang a gate (optional, but magical)
A gate turns a fence from “decorative boundary” into “functional entrance.”
Use sturdier posts for the gate opening if possible, because gates add leverage and love to sag over time.
Build a rectangular gate frame with a diagonal brace to prevent drooping, then attach pickets to match the fence.
Install hinges, check swing clearance, and add a latch that feels satisfyingbecause you deserve that little click of victory.
Finishing: Paint, Stain, and Make It Last
Paint vs. stain
A bright white picket fence is iconic, but paint isn’t the only option. Solid stains can provide color while letting wood grain subtly show.
Semi-transparent stains look natural but may require more frequent maintenance, depending on sun exposure.
If you’re using pressure-treated wood, follow product guidance for drying time before finishing so coatings adhere properly.
Make finishing easier (and better)
- Seal end cuts: Cut ends are vulnerable to moisturetreat them with an appropriate end-cut preservative where recommended.
- Prime smart: If painting, primer plus quality exterior paint will outlast cheap shortcuts.
- Think water: The enemy is moisture trapped in the wrong placesleave clearance, encourage drainage, and avoid dirt contact.
Common DIY Picket Fence Mistakes (And How to Avoid Them)
“My fence waves like a parade flag”
Usually a string-line problem. Keep the line tight, reference it constantly, and don’t assume your eyes are better than geometry.
Also check posts before rails go onsmall post errors become large picket errors.
“My posts moved while curing”
Bracing matters. Use angled braces, check plumb again after you add concrete, then check again before you walk away.
Wet concrete is basically a prankster until it sets.
“My gate sags”
Gates need strong posts, square framing, and a diagonal brace. Use quality hinges and re-check alignment after a few swings.
If it drags, fix it early before it “wears in” (translation: before it digs a trench).
DIY Picket Fence FAQ
How deep should fence posts be for a picket fence?
Depth depends on soil and climate, but many DIY builds use a depth around one-third of the post length, with deeper holes in frost zones.
When in doubt, follow local guidance and aim for stability rather than “good enough.”
Should I set fence posts in concrete?
Concrete is common for stability, especially for gates and wind-exposed areas. Some builders prefer gravel-only in certain soils to reduce trapped moisture.
The “best” choice often depends on your local conditions and how long you want the fence to last.
What’s the best spacing for pickets?
Spacing is partly aesthetic and partly practical. Many picket fences use small, consistent gaps. Use a spacer block to keep it uniform and let wood breathe.
DIY Picket Fence Experience Notes (500+ Words)
You can read all the instructions in the world, but the fence-building experience has a few universal truthsshared by DIYers everywhere,
usually while leaning on a shovel and staring into the middle distance. Here are the lessons that tend to show up on every project,
no matter how confident you felt at the hardware store.
The first hole is a liar
The first post hole always makes you think, “This isn’t so bad!” That’s because the first hole is fresh, your back is optimistic,
and the ground hasn’t yet revealed its collection of buried surprises. By hole number four, you’ll meet your yard’s secret geology:
a rock that appears to be the fossilized remains of a small planet. The pro move is to pace yourself. Dig a few holes, then set a few posts.
Alternating tasks keeps you from turning into a human question mark.
Your string line is your therapist
DIYers often say the string line feels “annoying” until they ignore it and end up with a fence that gently meanders like a scenic river.
Keep it tight, keep it referenced, and don’t eyeball “close enough” unless you enjoy explaining to friends that the wavy shape is “artistic.”
The string line also helps you spot small layout issues earlylike the moment you realize your gate plan places the latch exactly where
a shrub currently lives and refuses to move.
Buy extra pickets (because you will)
Even if you’re careful, pickets crack, warp, or arrive with a personality you didn’t request. Many DIYers swear by buying extras so you can
pick the straightest boards for the most visible sections and reserve slightly imperfect ones for less prominent spots.
It also reduces “emergency store runs,” which are never just one item. You go in for three pickets and come out with a new drill bit set,
a bag of beef jerky, and a sudden curiosity about patio umbrellas.
Concrete math is emotional math
Estimating concrete is tricky because hole diameter changes with soil, and soil changes with every foot you dig. Many DIYers learn the hard way
that “just enough concrete” is a myth. If you’re using bagged mix, having extra is less painful than stopping mid-row because you’re short.
Also: water. Too much water can weaken the mix and make it slumpy; too little makes it stubborn. Follow bag directions and mix like you mean it.
And once concrete is in play, commit. Nothing builds character like trying to scrape partially set concrete off a post while it laughs at you.
Gates demand humility
A fence run can look perfect and still leave you battling a gate that insists on sagging like it’s sleepy. DIYers frequently report that
gate hardware and bracing deserve more attention than they initially planned. Stronger posts at the gate, solid framing, and a diagonal brace
are the difference between “nice entry” and “door that slowly becomes a shovel.” If you want the gate to work smoothly, build it square,
hang it carefully, then test it repeatedly before you declare victory. Gates are persuasive; they will convince you they’re fineright up until
the day after you paint.
The finishing step is where fences become “finished”
A fence can be structurally solid and still look unfinished if the top edges are rough, the spacing isn’t consistent, or the finish is rushed.
DIYers who love their final result tend to slow down at the end: they touch up cut ends, confirm pickets are plumb, and apply finish thoughtfully.
The funny part is that the last 10% of effort often makes 50% of the visual difference. So when you’re tired and tempted to slap on paint like
you’re icing a cake in a hurricanetake a breath, do it right, and enjoy the payoff.
Conclusion: Your Fence, Your Craftsmanship
Building a DIY picket fence isn’t complicated, but it is precise. If you focus on planning, straight layout lines, solid post setting,
and consistent picket spacing, you’ll end up with a fence that looks professional and lasts.
Take your time on the steps that matter (posts, rails, gate), finish it to handle weather, and you’ll have that classic “welcome home” feel
every time you pull into the driveway.


