
Table of Contents >> Show >> Hide
- What Counts as a “Random Abstract Drawing”?
- Quick Supply List (Use What You Already Have)
- Method 1: The Dice-and-Grid “Chance Map” (Fast, Bold, Beginner-Friendly)
- Method 2: Automatic Line Harvest + Pattern Fill (Relaxing, Surprising, Very “Abstract”)
- How to Make Random Abstract Drawings Look “Good” (Without Killing the Fun)
- 10 Quick Prompts to Keep Your Sketchbook Rolling
- of Real-World Practice Notes: What You’ll Notice When You Try This
- Conclusion
If “abstract art” makes you think of a museum wall label that says Untitled #47 and a price tag that could fund a small space programgood news.
You can make random abstract drawings at home with regular supplies, zero “talent,” and exactly the amount of seriousness you feel like bringing.
Randomness is a shortcut to freedom: it helps you stop policing every line, and it replaces “What should I draw?” with “Cool, the dice chose chaos today.”
Artists (and art teachers who’ve seen it all) use chance and quick exercises to loosen up, explore line/shape/color, and stumble into compositions they
never would’ve planned.
What Counts as a “Random Abstract Drawing”?
It’s a drawing where the subject isn’t the point. Instead, you’re building an image with the basic ingredients of artline, shape, color, value, texture,
and space. “Random” means you add some kind of chance system (dice, timers, prompts, shuffled cards, your non-dominant hand, or not looking at the page)
so your brain can’t micromanage every decision like an overcaffeinated project manager.
Quick Supply List (Use What You Already Have)
- Paper: sketch paper, drawing paper, or mixed-media paper (thicker is nicer if you’ll add markers or watery color)
- One dark tool: pen, fineliner, marker, or a sharp pencil
- One “texture” tool: brush pen, crayon, charcoal, colored pencil, or highlighter
- Optional color: 2–4 markers, colored pencils, or a small watercolor set
- Extras: ruler (optional), coins/dice, timer (your phone), and a scrap sheet for testing marks
Method 1: The Dice-and-Grid “Chance Map” (Fast, Bold, Beginner-Friendly)
This method is perfect if you want a finished-looking abstract drawing without staring at a blank page like it owes you money.
You’ll build a composition cell-by-cell using a simple chance system. The grid keeps things organized; the dice keep things surprising.
Step 1: Make a Simple Framework (1 minute)
- Draw a border about 1/2 inch inside the page.
- Create a loose grid: 3×3, 4×4, or even a few uneven “map” sections. (Uneven looks fancy. Highly recommended.)
- Pick a focal zone: lightly circle one cell/area where you’ll push contrast later.
Step 2: Set Up Your Dice Prompts (2 minutes)
Use one die (or a random-number app). Assign each number to a line, shape, and action. Here’s a ready-to-go setup:
| Roll | Line Type | Shape | Action / Texture |
|---|---|---|---|
| 1 | Long straight lines | Circle / oval | Solid fill |
| 2 | Curved “C” lines | Triangle | Hatching |
| 3 | Zigzags | Rectangle | Dots / stipple |
| 4 | Spirals | Organic blob | Crosshatch |
| 5 | Broken/dashed lines | Half-shape (cut off) | Scribble texture |
| 6 | Thick-to-thin strokes | Overlapping shapes | Leave negative space |
Color option: If you want color, limit yourself to 2–4 colors. To randomize, roll once per section:
1–2 = color A, 3–4 = color B, 5 = color C, 6 = leave it black-and-white.
Step 3: Fill the Grid with Timed Mini-Decisions (10–20 minutes)
- Set a timer for 45–90 seconds per cell.
- For each cell, roll for a line type, a shape, and an action/texture.
- Draw it quickly. No erasing. If you “mess up,” congratulationsyou just introduced personality.
- Repeat until the grid is filled, but vary density: some cells busy, some calm.
Step 4: Make It Feel Intentional (3 minutes)
- Repeat one motif across the page (same dot texture, same spiral, same shape outline).
- Boost contrast in your focal zone: darker fills, thicker lines, or tighter patterns.
- Unify edges: add a few lines that cross from one cell into the next so the drawing feels connected.
Example: A Real Roll Sequence
Let’s say you roll: Line 3 (zigzags), Shape 1 (oval), Action 4 (crosshatch).
In that cell, you might draw a big oval, fill it with crosshatching, and then add zigzags behind it as “energy lines.”
Do that 16 times with different rolls, and you get a piece that looks designedeven though the dice did half the work.
Common Fixes (Because Randomness Can Be Rude)
- If it looks too chaotic: add 2–3 “quiet” cells with lots of white space, or use one color to glaze over a busy area.
- If it looks too boring: introduce one surprise texture (thick marker blocks, bold black shapes, or a neon accent).
- If composition feels off: draw a new border and “crop” the best area. Cropping is the art equivalent of a great haircut.
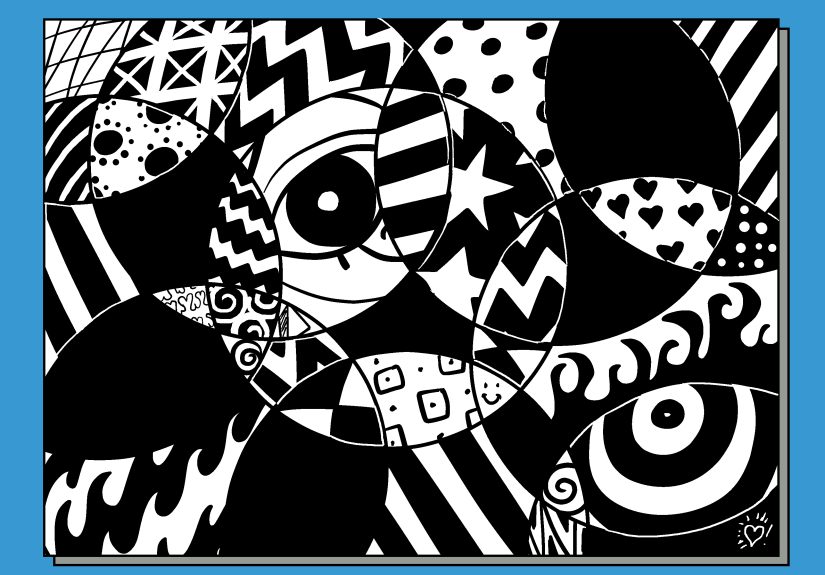
Method 2: Automatic Line Harvest + Pattern Fill (Relaxing, Surprising, Very “Abstract”)
This method combines two powerful ideas: automatism (letting your hand move without overthinking)
and pattern-based filling (structured marks that create rhythm and cohesion). It’s how you turn a messy scribble
into something that looks like it belongs on a book cover.
Step 1: Make an Automatic Line Drawing (2 minutes)
- Put your pen on the page.
- Set a timer for 30–60 seconds.
- Draw without planning. Options:
- No-look contour style: look at something nearby (your hand, a mug, a plant) but don’t look at the paper as you draw.
- Non-dominant hand: draw with your “wrong” hand to bypass perfection mode.
- Eyes-on-paper, brain-off: continuous line scribble, loops, sudden anglesjust keep moving.
- Stop when the timer ends, even if you’re mid-loop. Drama is allowed.
Step 2: “Harvest” Shapes from the Scribble (3–5 minutes)
- Rotate the page in 90-degree turns. Each rotation will reveal new shapes.
- With a darker pen or marker, trace 5–10 enclosed shapes you like (they can overlap).
- Add a few straight lines to create contrast against the organic scribble.
Step 3: Fill Shapes with Simple Pattern Families (10–15 minutes)
Patterns make random marks feel cohesive. Choose three “pattern families” and repeat them across different shapes:
- Dot family: stipple, clustered dots, dot gradients
- Line family: parallel lines, wavy lines, hatching, broken lines
- Curve family: S-curves, scallops, loops, spirals
Keep the rule simple: one pattern per shape, and switch patterns only when you move to a new shape.
That rule alone makes the drawing look “planned,” even though it started as a freestyle scribble.
Step 4: Add Value and “Depth” (Optional, 3 minutes)
- Pick one side of the page as the “shadow” side and darken patterns there.
- Add a light wash of one color behind 2–3 shapes (if your paper can handle it).
- Leave some shapes completely blank to create strong negative space.
Mini Example: Turning a Scribble into a Composition
Imagine your automatic line looks like tangled earbuds. You trace 7 enclosed shapes, then fill:
two shapes with dots, two with parallel lines, two with scallops, and one solid black.
That single solid-black shape becomes a focal point, and the repeated patterns create rhythm.
The result reads as intentional abstract drawingeven though it began as “accidental spaghetti.”
How to Make Random Abstract Drawings Look “Good” (Without Killing the Fun)
Use the 3-Part Balance Rule
- One loud thing: a bold black area, a bright color block, or the densest pattern
- One medium thing: repeated shapes or mid-tone textures that support the focal point
- One quiet thing: open space, light lines, or minimal marks to let the drawing breathe
Limit Your Ingredients
The fastest way to make abstract art feel cohesive is to limit variables: 2–4 colors, 3 patterns, 1–2 line weights.
You’re not restricting creativityyou’re giving it a strong frame so it can do a backflip safely.
Repeat, Then Break the Pattern Once
Repetition creates unity. Breaking it once creates a focal point. For example: repeat circles across the page,
then suddenly add one rectangle. Your viewer’s eye will go, “Hey. What’s that rectangle doing here?” in a good way.
10 Quick Prompts to Keep Your Sketchbook Rolling
- Use only curved lines for 2 minutes, then only straight lines for 1 minute.
- Fill three shapes with patterns, leave three shapes blank, and make one shape solid black.
- Pick two colors and treat everything else as “illegal.”
- Draw with a marker, then add pencil shading on top.
- Make a composition using only triangles and dots.
- Create a “map” of a fictional place using line textures for different “terrain.”
- Use a timer: 60 seconds of marks, 30 seconds of refining, stop.
- Draw with your non-dominant hand and embrace the wobbles.
- Start with a scribble, then carve out negative space with white (eraser or white gel pen).
- Make one corner extremely detailed and let the rest fade out.
of Real-World Practice Notes: What You’ll Notice When You Try This
The first time you try random abstract drawing, you’ll probably feel two emotions in quick succession:
(1) freedom, and (2) mild suspicion that you’re “doing it wrong.” That second feeling is normalyour brain is used to art having a
“correct answer,” like a math problem with better lighting. Random methods remove the usual safety net (“I’ll just draw a flower”),
which can feel weird at first, but it’s also the entire point.
With the dice-and-grid method, most people notice how quickly the page fills up. A blank sheet is intimidating; a page with eight
finished sections is encouraging. Around the halfway mark, you start seeing accidental themesmaybe you rolled a lot of curves,
or you keep placing shapes in the upper right. That’s when the drawing stops feeling like a pile of separate choices and starts
feeling like a style. It’s also when you discover the secret benefit of randomness: it doesn’t erase your preferences, it reveals them.
Even when the dice pick the prompts, you’ll still choose how bold the lines are, how tight the patterns get, and where the visual “weight” lands.
With the automatic-line method, you’ll likely have a moment of laughter (or at least a smirk) when you look down and see what your hand did.
The scribble can look like a knot, a storm, or a tiny panic attack in ink. But once you rotate the page and start tracing enclosed shapes,
the chaos suddenly offers gifts: unexpected silhouettes, interesting overlaps, and natural pathways for your eye to travel. Filling shapes with
simple patterns is the turning point. The patterns don’t just decoratethey organize. It’s like giving your drawing a dress code.
A practical tip you’ll learn fast: the “pretty” part often happens at the end, not the beginning. The beginning is messy on purpose.
That can be uncomfortable if you’re used to trying to make every step look good. Random abstract drawing teaches a better habit:
stay curious long enough for the piece to transform. If you don’t love the drawing at minute five, keep going to minute twelve.
Add one bold dark value. Repeat one pattern in three separate spots. Leave a clean patch of negative space. Small changes create big shifts.
Finally, you’ll notice these methods are weirdly reliable for mood. They’re not magic, but they’re absorbingtimers, patterns, and simple rules
pull your attention into the present. You finish with something tangible (and often surprisingly frame-worthy), plus a sketchbook page that proves
you don’t need a perfect idea to start. You just need a system, a pen, and the willingness to let chance be your slightly chaotic co-artist.
Conclusion
Random abstract drawing is one of the easiest ways to create art consistentlybecause it replaces pressure with process.
Try the Dice-and-Grid Chance Map when you want a quick, structured result, and use Automatic Line Harvest + Pattern Fill
when you want a more organic, meditative surprise. Either way, you’ll build confidence with line, shape, texture, and compositionwithout needing
a “big idea” first.


