
Table of Contents >> Show >> Hide
- Why a Garden Hose Wreath Works So Well for Summer
- Supplies You’ll Need
- How to Make a Cheerful Garden Hose Wreath
- Design Ideas That Scream “Summer!” (In a Friendly Way)
- Make It Outdoor-Ready: Heat, Sun, and Rain Tips
- Hanging and Styling: Make Your Front Door Look Like Summer Lives There
- Budget Breakdown: Cute Doesn’t Have to Be Costly
- Common Mistakes (and How to Avoid Them)
- FAQ: Quick Answers for Smooth Crafting
- Conclusion: Your Door CalledIt Wants Summer
- Experiences & “What You’ll Notice in Real Life” (The Extra )
Summer has a vibe. It’s lemonade-on-the-porch, flip-flops-by-the-door, “why is the sun auditioning for a spotlight?” energy.
And if your front door looks like it missed the memo, a cheerful garden hose wreath is the kind of sunny upgrade that says,
“Yes, I own sunscreen. No, I will not be using it responsibly.”
This wreath is equal parts DIY summer wreath and “I refuse to throw away that old hose because it has memories.”
(Memories of kinks. So many kinks.) The best part? A hose wreath is naturally sturdy, wonderfully quirky, and easy to personalize
from bright florals to coastal shells to a full-blown patriotic party on a circle.
Why a Garden Hose Wreath Works So Well for Summer
A classic floral wreath is pretty, but summer weather can be… dramatic. Heat, humidity, sudden rain, direct sunyour front porch is basically an outdoor
reality show. A garden hose wreath holds up better than many delicate materials because the base is built for outdoor life.
You’re starting with something designed to live outside, get wet, and keep going.
It’s the perfect mix of practical and playful
- Durable base: The hose keeps its shape and doesn’t crumble like some natural vines over time.
- Upcycled and budget-friendly: Use a retired hose (or a leftover length) and dress it up with affordable accents.
- Instant summer story: A hose wreath screams “garden season,” even if your “garden” is one heroic basil plant.
- Customizable: Bright ribbons, faux flowers, mini garden tools, shell clusters, citrus picksgo wild.
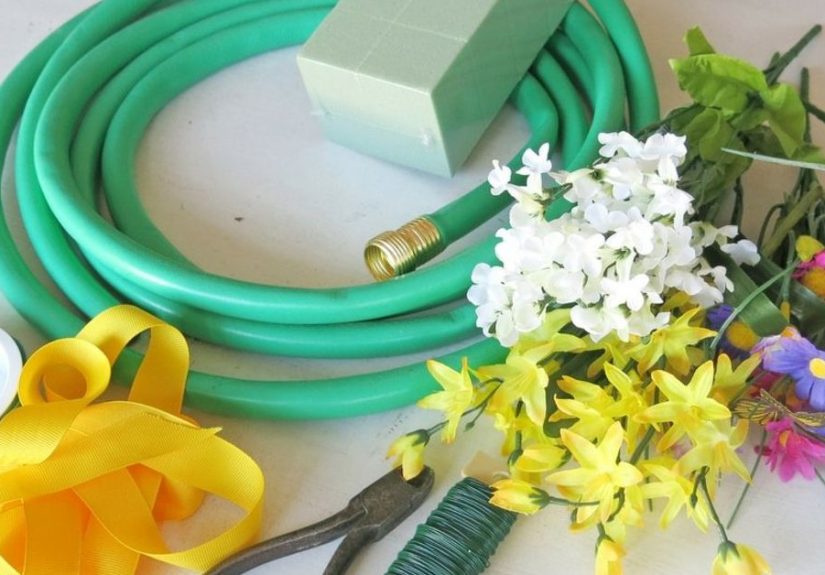
Supplies You’ll Need
You can make this as simple or as extra as you want. The “simple” version looks charming. The “extra” version looks like a craft store
exploded in the best possible way.
Core supplies
- Garden hose: 6–12 feet is usually plenty depending on thickness and how full you want the ring.
- Zip ties: The unsung heroes of DIY. Grab a packsmall and medium sizes are handy.
- Wire cutters or sturdy scissors: For trimming zip ties and (if needed) cutting hose.
- Ribbon: Wired ribbon is easiest for big bows, but any ribbon works.
- Decor accents: Faux flowers, greenery, small garden tools, faux lemons, miniature watering can, etc.
- Optional wreath form: Helpful if your hose is very long, very stiff, or you want a perfectly round shape.
Nice-to-have extras
- Floral wire: Great for securing stems or heavier pieces.
- Hot glue gun: Use for lightweight accents (avoid relying on glue alone in extreme heat).
- UV protectant spray / floral sealant: Helps reduce fading and weather wear.
- Battery fairy lights: If you want a “glows at dusk” moment.
- Door hanger or wreath hook: Protects your door and keeps things stable.
How to Make a Cheerful Garden Hose Wreath
This is the part where we turn “old hose” into “front-door personality.” The basic build is fast. The decorating is where you can take your time
and make it feel like your summer.
Step 1: Warm up the hose (optional, but helpful)
If your hose is stiff or has a strong kink identity, let it sit in the sun for 10–20 minutes. Warm hose bends more easily and fights you less.
(We love a cooperative craft supply.)
Step 2: Form the base circle
- Coil the hose into a circle the size you wantmost people aim for about 14–18 inches across.
- Overlap the ends slightly or tuck one end under the coil so it looks intentional.
- Secure with 2–4 zip ties spaced evenly around the circle (top, bottom, and sides).
Step 3: Decide where your “feature cluster” will live
Most hose wreaths look best with a focal areausually at the bottom-right or bottom-leftwhere the bow and florals gather like they’re at a
summer picnic. Pick your spot now so you’re not redecorating mid-zip-tie.
Step 4: Add ribbon and bow
Attach a bow with zip ties or floral wire. If you want extra security, run a zip tie through the bow’s center and around the hose.
Trim the tie tail and rotate the “lock” to the back so it’s hidden.
Step 5: Build your decorative cluster
Start with bigger pieces (greenery, large blooms, a small sign), then layer smaller accents (mini flowers, picks, berries, lemons, shells).
Use a mix of zip ties and floral wire for anything with weight. Hot glue can help finish details, but don’t make it your only support
if your door gets direct sun.
Step 6: Add a hanging loop
Create a loop on the back with ribbon, wire, or a strong zip tie. Make sure it’s centered and testedhold the wreath up and see if it hangs level.
A slightly off-center loop can turn your cheerful wreath into a confused necklace.
Design Ideas That Scream “Summer!” (In a Friendly Way)
The fun of a DIY garden hose wreath is that it can match your porch personality. Here are a few ideas that feel bright,
seasonal, and totally display-worthy.
1) Citrus Pop (a.k.a. “Lemonade Stand Chic”)
- Yellow-and-white ribbon + faux lemon picks + bright greenery
- Add a small “Hello Sunshine” sign for instant summer energy
- Optional: tuck in faux lavender for a fresh color contrast
2) Garden Shed Charm
- Mini garden tools (trowel, rake, shovel) wired onto the cluster
- Work gloves tied on as part of the decor (cute and thematic)
- A tiny watering can accent = chef’s kiss
3) Coastal Cool
- Navy ribbon + natural raffia + a few faux succulents
- Shell cluster or driftwood-style sign (keep it light so it hangs well)
- Bonus points for a little starfish accent (tastefully, not “souvenir shop”)
4) Patriotic Party
- Red/white/blue bow + small flags or star picks
- Keep the base hose neutral (green or black works) to let the accents shine
- Perfect for Memorial Day through Labor Day without feeling stuck on one holiday
5) Tropical “Vacation Mode”
- Faux palm fronds + bright tropical blooms
- Big bow in coral, aqua, or hot pink
- Optional: battery fairy lights for night porch drama (the good kind)
Make It Outdoor-Ready: Heat, Sun, and Rain Tips
If your wreath will live outdoors, you’ll want it to survive the elements with dignity. The hose base helps a lot, but your ribbon and florals
need a little strategy.
Choose materials that don’t melt, fade, or flop
- Faux florals: Look for “UV resistant” or outdoor-rated pieces when possible.
- Wired ribbon: Holds shape better, especially in humidity.
- Mechanical fasteners: Zip ties and floral wire beat glue when temperatures climb.
Use a UV protectant spray (especially for sunny doors)
A light coat of UV protectant or floral sealant can help reduce fading and weather wear. It’s not a magic force field,
but it’s a smart layer of insuranceespecially if your wreath faces strong afternoon sun.
Keep “heavy” decor close to the hose
If you attach heavier items (like chunky signs or metal tools), keep them anchored tightly and close to the base so they don’t pull forward.
Think “balanced earrings,” not “wrecking ball necklace.”
Hanging and Styling: Make Your Front Door Look Like Summer Lives There
A summer front door decor moment isn’t just about the wreathit’s the whole scene. Here’s how to make it look intentional,
even if you assembled it while listening to a podcast about people who have their lives together.
Quick styling wins
- Match one color: Pull one wreath color into your doormat, porch pot, or pillow for cohesion.
- Use height: Pair with a tall plant (real or faux) near the door for that “welcome home” frame.
- Keep the door hardware in mind: If you have a big handle or knocker, hang the wreath slightly higher.
Where else can you use a hose wreath?
- Garden shed doors (obviously)
- Patio fence sections
- Garage side doors
- Outdoor party backdrops
- Inside on a pantry door for “summer kitchen” vibes
Budget Breakdown: Cute Doesn’t Have to Be Costly
One reason this craft is so popular: you can build a great-looking upcycled garden hose craft without spending a fortune.
If you already have the hose, the rest is mostly accents.
- Super budget: Hose + zip ties + one bow + a few dollar-store florals
- Mid-range: Add higher-quality faux stems, wired ribbon, and a small sign
- Glow-up edition: Outdoor-rated florals, UV spray, layered ribbons, and battery lights
Tip: If you’re decorating on a budget, spend on the bow (it’s the first thing people notice) and keep the rest simple and balanced.
Common Mistakes (and How to Avoid Them)
Mistake 1: Making it too heavy on one side
Fix it by shifting the bow slightly toward center, or adding a small balancing element opposite the cluster (like a sprig of greenery).
Mistake 2: Relying on hot glue alone
Glue is great for finishing touches, but heat can soften it. Use zip ties or floral wire for anything that matters structurally.
Mistake 3: Cutting the hose too early
Form your circle first, then decide if you need to trim. It’s much easier to tuck extra length behind decor than to “un-cut” a hose.
Mistake 4: Forgetting the back side
You don’t need it to be runway-ready, but do rotate zip tie locks to the back and trim ends neatly. Your future self will thank you
when you’re rehanging it next season.
FAQ: Quick Answers for Smooth Crafting
Can I use a brand-new hose?
You canbut if you do, consider using a shorter length or a hose you already planned to retire. The charm is in the upcycle.
What size should it be?
For most front doors, 14–18 inches across looks balanced. Bigger doors can handle larger wreaths, especially if you add bold ribbon tails.
Will it damage my door?
Use a proper wreath hanger or an over-the-door hook to avoid scratches. If you’re worried, add a felt pad where it touches the door.
How do I store it?
Store it in a cool, dry place out of direct sun. A large plastic bin or wreath storage bag helps keep ribbon from getting crushed.
Conclusion: Your Door CalledIt Wants Summer
A cheerful garden hose wreath is one of those crafts that hits the sweet spot: easy build, big visual payoff, and lots of room
for personality. It can be whimsical, classy, beachy, patriotic, floral-forward, or “I definitely own gardening gloves” themed.
And because the hose base is naturally tough, it’s a smart choice for outdoor wreath ideas that need to survive real weather.
Make it once, tweak it each year, and let your front door do what it was born to do: welcome people with a little charm and a lot of summer energy.
Now go forth and zip-tie with confidence.
Experiences & “What You’ll Notice in Real Life” (The Extra )
If you’ve ever finished a DIY project, stepped back proudly, and then immediately spotted the one thing that’s slightly crookedwelcome to the
universal crafting experience. A garden hose wreath is especially good at teaching “small adjustments = big improvements,” mostly because the base is
so bold that tiny tweaks are easy to see.
One thing many people notice right away: the bow makes or breaks the vibe. The hose base is playful, but the bow is the personality.
A crisp striped bow says “summer picnic.” A big tropical bow says “I should be near a pool.” A simple burlap bow says “garden shed chic.”
The funny part is that you can keep the same hose base and swap bows seasonally, and it feels like you made a whole new wreathwithout doing a whole
new wreath. That’s the kind of efficiency we love.
Another real-life observation: sun exposure is a sneaky little thief. You might hang your wreath and think, “Perfect!”
Then weeks later, one ribbon tail looks slightly lighter, or a bright flower looks a bit tired. This is why outdoor decorating is part art, part
science. If your door gets strong afternoon sun, you’ll usually have a better long-term look by choosing higher-quality faux florals, using a UV
protectant spray, and leaning into colors that fade gracefully (greens, creams, softer yellows) rather than neon tones that show wear faster.
You’ll also notice that weight distribution matters more than you expect. A small metal sign or a cluster of mini garden tools is
adorableuntil the wreath tilts forward like it’s trying to eavesdrop. The practical fix is simple: attach heavier pieces close to the hose and use
wire or zip ties as your main support. If you must add something heavy, balance it with a smaller element opposite the cluster or move your hanging
loop a fraction to compensate. It’s basically the wreath version of adjusting a picture frame that insists on leaning.
People often discover that imperfections actually help. The hose base has natural curves and sometimes a little “memory” from how it
was stored. Once you add florals and ribbon, that slight organic shape can look charming and relaxedvery summer, very “I didn’t overthink this,” even
if you absolutely did. And if you used a hose with a fun color, it becomes a built-in design element that feels intentional (and honestly, a little
sassy).
Finally, there’s the “guest reaction” experience. A traditional wreath gets polite compliments. A garden hose wreath gets comments like,
“Okay, that is SO cutewhere did you get it?” which is your moment to casually say, “Oh, I made it,” as if you didn’t spend 20 minutes debating
between two shades of ribbon like it was a high-stakes design summit. This is why these wreaths are so fun: they’re unexpected, they’re friendly,
and they make your home feel lived-in and welcomingwithout requiring you to become a person who irons napkins.


