
Table of Contents >> Show >> Hide
- Why This Classic Dinner Roll Recipe Works
- Ingredients for Classic Dinner Rolls
- How to Make Classic Dinner Rolls
- How to Tell If the Dough Is Ready
- Common Mistakes to Avoid
- Make-Ahead, Storage, and Reheating Tips
- Serving Ideas for Classic Dinner Rolls
- Classic Dinner Roll Recipe FAQs
- Kitchen Experiences: What Classic Dinner Rolls Teach You After a Few Batches
- Final Thoughts
- SEO Tags
There are fancy breads, there are crusty artisan loaves, and then there are classic dinner rolls: the buttery, fluffy, golden little legends that quietly steal the spotlight from everything else on the table. You can serve roast chicken, glazed ham, soup, stew, or the world’s most dramatic holiday spread, and somehow everyone still ends up reaching for the rolls first. That is not an accident. A great classic dinner roll recipe hits a very specific sweet spot: soft but not squishy, rich but not heavy, and sturdy enough to hold a swipe of butter without collapsing like it just heard bad news.
This version is built for home bakers who want dependable results without needing a bakery degree, a sourdough starter named Gregory, or a spiritual relationship with their stand mixer. The dough is enriched with milk, butter, egg, and a touch of sugar, which gives the rolls their tender crumb, beautiful color, and subtle sweetness. The method is straightforward, the flavor is timeless, and the final texture lands exactly where you want it: light, pillowy, and gloriously pull-apart.
If you’ve been hunting for an easy homemade dinner roll recipe that tastes classic, looks impressive, and doesn’t require theatrical suffering, this is the one to bookmark. Let’s make the breadbasket the main character.
Why This Classic Dinner Roll Recipe Works
A classic dinner roll is all about balance. Too much flour and you get dry little hockey pucks. Too little structure and the rolls spread into pale, confused blobs. This recipe works because it keeps the dough soft, slightly tacky, and well enriched, which creates a fluffy interior and a tender crust.
Milk adds richness and softness. Butter brings flavor and keeps the crumb delicate. Egg helps with color and structure. Sugar feeds the yeast and adds just enough sweetness to make the rolls taste warm and nostalgic without turning them into dessert. Flour does the heavy lifting, while salt keeps the flavor from falling flat. In other words, everybody has a job, and thankfully no one is freeloading.
The shaping method matters too. By dividing the dough evenly and placing the pieces close together in a baking dish, the rolls rise upward and into one another. That gives you the classic pull-apart look with soft sides and glossy golden tops.
Ingredients for Classic Dinner Rolls
For the dough
- 1 cup whole milk, warmed until lukewarm
- 1/2 cup warm water
- 2 1/4 teaspoons active dry yeast or instant yeast
- 1/4 cup granulated sugar
- 1 large egg
- 1/4 cup unsalted butter, softened
- 1 teaspoon fine salt
- 3 3/4 to 4 cups all-purpose flour
For finishing
- 2 tablespoons melted butter
- Flaky salt, optional
The ingredient list is intentionally classic. No specialty flour, no mystery powders, and no instructions that begin with “harvest moon.” You can use all-purpose flour for a soft, familiar texture. Bread flour also works if you want a slightly chewier roll with a bit more structure.
How to Make Classic Dinner Rolls
1. Bloom the yeast
In a large mixing bowl, combine the warm milk, warm water, yeast, and 1 tablespoon of the sugar. Let it sit for 5 to 10 minutes until it looks foamy on top. If nothing happens, your yeast may be expired or your liquid may have been too hot or too cold. Annoying, yes. Better to find out now than after you’ve kneaded for ten minutes and started emotionally investing in the dough.
2. Build the dough
Add the remaining sugar, egg, softened butter, salt, and 3 3/4 cups of flour. Mix until a shaggy dough forms. If it looks very sticky, add the remaining flour a little at a time. The goal is a soft dough that clings slightly to your hands but is still manageable. You are making dinner rolls, not drywall paste.
3. Knead until smooth
Knead by hand for 8 to 10 minutes, or with a stand mixer and dough hook for about 6 to 8 minutes. The dough should become smooth, elastic, and springy. If you poke it gently, it should bounce back like it has plans later.
4. First rise
Place the dough in a lightly greased bowl, cover it, and let it rise in a warm spot for 60 to 90 minutes, or until doubled in size. Depending on your kitchen, this may happen quickly or take its sweet time. Dough is not always punctual, but it is usually honest.
5. Shape the rolls
Punch down the dough gently and turn it out onto a lightly floured surface. Divide it into 15 equal pieces for medium rolls or 12 pieces for larger ones. Shape each piece into a smooth ball by pulling the edges underneath and pinching them at the bottom. Arrange the dough balls in a buttered 9×13-inch baking dish.
6. Second rise
Cover the pan loosely and let the shaped rolls rise for 30 to 45 minutes, until puffy and crowding one another. They do not need to double dramatically here. You want them airy and soft, not overproofed and exhausted.
7. Bake until golden
Bake in a preheated 350°F oven for 20 to 22 minutes, or until the tops are lightly golden brown. If your oven runs hot and the tops color too quickly, lay a loose piece of foil over the pan during the last few minutes.
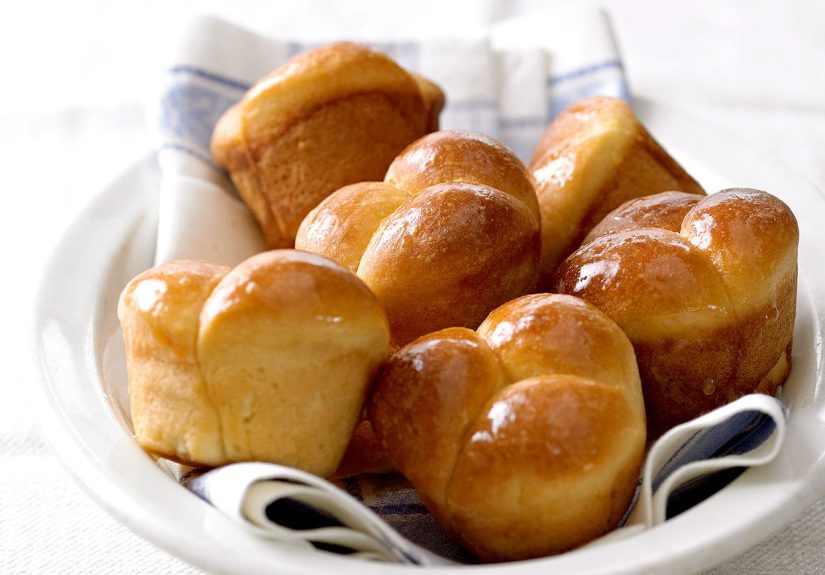
8. Brush with butter
As soon as the rolls come out of the oven, brush the tops with melted butter. This gives them shine, extra flavor, and that irresistible “someone definitely knows what they’re doing” finish.
How to Tell If the Dough Is Ready
This is where many bakers overthink things. A classic dinner roll dough should feel soft, supple, and slightly tacky, but not wet. During the first rise, it should roughly double in size. During the second rise, the shaped rolls should look puffy and nearly touching. If you gently press the dough and the indentation slowly springs back, you’re in good shape.
If the dough snaps back instantly, it probably needs more time. If it collapses or feels fragile, it may have gone a little too far. Not ideal, but also not the end of civilization. Bread has a generous personality and can often recover well enough to still earn applause at dinner.
Common Mistakes to Avoid
Using liquid that is too hot
Warm is good. Scalding is sabotage. If the liquid feels hot instead of comfortably warm, let it cool before adding the yeast.
Adding too much flour
This is the fastest route to dry rolls. The dough should be soft. Resist the urge to keep adding flour until it feels like modeling clay.
Not kneading enough
Kneading develops gluten, which gives the rolls structure. Under-kneaded dough often bakes up dense instead of fluffy.
Rushing the rise
Yeast dough needs time. A chilly kitchen will slow everything down, so be patient. Dinner rolls respond poorly to being bossed around.
Overbaking
Even a few extra minutes can take rolls from soft and buttery to dry and forgettable. Pull them when the tops are golden and the centers are cooked through.
Make-Ahead, Storage, and Reheating Tips
One reason classic dinner rolls are so beloved is that they fit real life. You can make the dough ahead, refrigerate it overnight, then shape and bake the next day. You can also shape the rolls, place them in the pan, and chill them overnight before the second rise. Let them sit at room temperature until puffy before baking.
Baked rolls keep well for a couple of days at room temperature in an airtight container. To reheat, wrap them in foil and warm them in a 300°F oven until soft and heated through. They also freeze beautifully. Just cool them completely, wrap tightly, and freeze for up to a month. Rewarm before serving and brush with a little more butter if you want them to taste freshly baked.
Serving Ideas for Classic Dinner Rolls
These rolls are wonderfully versatile. Serve them with roast turkey, pot roast, chili, chicken noodle soup, or a holiday ham. Split leftovers and use them for mini sandwiches with turkey and cranberry sauce, ham and Swiss, or scrambled eggs and cheese the next morning.
They also make an excellent excuse to put salted butter, whipped honey butter, garlic butter, or jam on the table. And if one roll quietly disappears while you’re “testing” them in the kitchen, that is simply quality control.
Classic Dinner Roll Recipe FAQs
Can I make these without a stand mixer?
Yes. A stand mixer is convenient, but hand-kneading works very well. In fact, it can help you understand the dough better because you feel it changing under your hands.
Can I use bread flour instead of all-purpose flour?
Absolutely. Bread flour gives the rolls a bit more chew and structure, while all-purpose flour keeps them especially tender.
Can I make these sweeter?
You can, but keep it modest. These are classic dinner rolls, not dessert buns in disguise. A little extra sugar is fine, but too much can change the texture.
Why didn’t my rolls rise?
The usual suspects are old yeast, liquid that was too hot, a room that was too cold, or too much flour in the dough. Yeast is simple, but it is not especially forgiving when mistreated.
Kitchen Experiences: What Classic Dinner Rolls Teach You After a Few Batches
The experience of making a classic dinner roll recipe is part technique, part observation, and part tiny leap of faith. On paper, the process looks almost boring: mix, knead, rise, shape, rise again, bake. But in a real kitchen, the dough has personality. One day it rises like it’s trying to win a medal; another day it moves more slowly, as if it would prefer a blanket and a few encouraging compliments. The first lesson most people learn is that dough does not care about your schedule. It cares about temperature, hydration, and whether you panicked and dumped in another half-cup of flour for no reason.
There is also a very specific kind of joy that comes from touching well-made dough. Early on, it feels rough and sticky, almost like it might not become anything at all. Then kneading changes it. It turns smooth, stretchy, and alive. That moment teaches patience better than most self-help books. You stop trying to force the dough into behaving and start noticing what it needs. A little more time. A warmer corner. Less flour. Gentler shaping. Bread has a sneaky way of making people more observant.
Then comes the visual reward. During the first rise, you peek under the towel and realize the dough has doubled into a soft, rounded cloud. It feels oddly triumphant, even though technically the yeast did most of the work. Shaping the rolls is another experience altogether. At first, they may come out slightly uneven, like a cast of adorable but chaotic cousins. But once they bake together in the pan, brushed with butter and glowing on top, even the oddballs look charming.
One of the most memorable experiences with classic dinner rolls happens at the table. People rarely react to them politely. They do not say, “Yes, this bread item is acceptable.” They reach. Immediately. Someone tears one open while it’s still steaming. Someone else asks if there are extras. Another person claims they are “just having one” and then mysteriously ends up with three. Rolls create a kind of edible optimism. Suddenly everyone believes there is still room for carbs, dessert, and maybe another carb for emotional support.
And the leftovers, if you are lucky enough to have any, create their own small traditions. A reheated roll with butter and jam the next morning feels luxurious in a way that is completely out of proportion to how simple it is. A split roll stuffed with leftover turkey or ham becomes the sort of sandwich that makes you question why sliced bread gets all the attention. Over time, the experience of making classic dinner rolls becomes less about following a recipe exactly and more about building kitchen instincts. You learn what properly proofed dough looks like. You learn when a golden top is done, not dry. You learn that the smell of butter and yeast drifting through the house is one of the best forms of domestic bragging. And perhaps most importantly, you learn that some recipes earn their “classic” status honestly.
Final Thoughts
A great classic dinner roll recipe is never just about bread. It is about comfort, ritual, and that glorious moment when something homemade lands on the table and makes the whole meal feel more generous. These rolls are soft, buttery, beautifully simple, and dependable enough for weeknights yet special enough for holidays. Once you make them successfully, they tend to become one of those recipes that follows you for years.
So the next time you want a side dish that brings warmth, nostalgia, and a suspicious number of requests for seconds, skip the store-bought bag and bake a pan of these instead. Your kitchen will smell amazing, your dinner will look better, and your butter dish will finally feel appreciated.


