
Table of Contents >> Show >> Hide
- What Makes a Backyard Koi Pond “Modern”?
- Start With the Right Budget Mindset
- Choose the Best Location Before You Dig
- Plan the Pond Size, Depth, and Shape
- Materials You Actually Need
- Filtration: The Heart of a Healthy Koi Pond
- Step-by-Step: How to Build a DIY Modern Backyard Koi Pond
- Budget-Friendly Modern Design Ideas
- How Many Koi Can You Keep?
- Maintenance Without Losing Your Weekends
- Common Budget Mistakes to Avoid
- of Real-World Experience: Lessons From Building a Budget Koi Pond
- Conclusion
A backyard koi pond sounds expensive, doesn’t it? Like something that requires a landscape architect, a tiny stone bridge, and at least one person named “Greg” who charges by the eyebrow raise. But here’s the good news: building a DIY modern backyard koi pond on a budget is absolutely possible when you plan smart, spend where it matters, and avoid the classic beginner mistake of digging a random hole and hoping fish appreciate your enthusiasm.
A modern koi pond does not have to be huge or flashy. In fact, the best budget-friendly designs usually look clean, calm, and intentional. Think simple geometric lines, dark water, smooth stone edging, a compact waterfall, low-voltage lighting, and healthy koi gliding around like they own the deed to your property. The trick is to combine practical pond construction with modern backyard stylewithout buying every shiny pond gadget on the internet.
This guide walks you through planning, materials, design ideas, filtration, stocking, maintenance, and real-world budget lessons so you can build a pond that looks high-end but does not require selling your grill, your patio chairs, and your emotional stability.
What Makes a Backyard Koi Pond “Modern”?
A modern backyard koi pond is usually defined by simplicity. Instead of a wild, over-rocked water feature that looks like a boulder truck crashed into your lawn, modern pond design uses clean shapes, controlled planting, balanced materials, and open water. The result feels peaceful, not chaotic.
Common modern koi pond features include rectangular or oval layouts, black or charcoal edging, concrete pavers, smooth river rock, raised borders, minimal aquatic plants, and subtle lighting. A small spillway or short waterfall can add movement without turning your backyard into a theme park ride.
Modern also means functional. Koi are living fish, not waterproof decorations. They need depth, oxygen, filtration, stable water quality, and protection from predators. A pond can be beautiful, but if it has poor circulation, shallow water, and no filter, it becomes a fancy soup bowl with regrets.
Start With the Right Budget Mindset
Building a koi pond on a budget does not mean buying the cheapest version of everything. It means knowing where to save and where not to gamble. You can save money on decorative stone, edging, plants, seating, and some DIY labor. You should not cut corners on the liner, underlayment, pump, filter, electrical safety, or water testing.
For a modest DIY koi pond, many homeowners aim for a starter pond around 1,000 gallons. That size is often large enough for a small number of koi, easier to stabilize than a tiny pond, and still realistic for a backyard project. A common example is about 6 feet by 8 feet by 3 feet deep, depending on shape and slope. Larger is usually better for koi, but larger also means more liner, more digging, stronger filtration, and more water to manage.
Sample Budget Range
A budget DIY koi pond can often be planned in tiers:
- Basic budget build: $700–$1,500 for a small pond with liner, underlayment, pump, filter, tubing, and simple edging.
- Better long-term build: $1,500–$3,500 with stronger filtration, skimmer, UV clarifier, better stonework, and improved electrical setup.
- Premium DIY build: $3,500+ with bottom drain, external filtration, formal hardscaping, lighting, and custom water features.
The “budget” sweet spot is not the cheapest pond. It is the pond that works properly the first time, because rebuilding a failed pond is where wallets go to cry.
Choose the Best Location Before You Dig
Location affects nearly everything: algae, maintenance, temperature, visibility, safety, and how often you actually enjoy the pond. Place the pond where you can see it from your patio, kitchen window, or favorite outdoor chair. A pond hidden behind the shed may technically exist, but so does your old treadmill.
Avoid low spots where stormwater runs into the pond. Runoff can carry fertilizer, pesticides, soil, grass clippings, and other pollutants into the water. That can trigger algae blooms and stress fish. A slightly raised edge or surrounding paver border helps keep dirty runoff out.
Partial sun is ideal. Too much sun can encourage algae and warm the water excessively in summer. Too much shade can drop leaves into the pond and make water lilies less happy. Aim for morning sun and afternoon shade if possible.
Before digging, call 811 in the United States to mark underground utilities. Also check local codes, HOA rules, and safety requirements. Some areas may require fencing or other protection for deeper ponds.
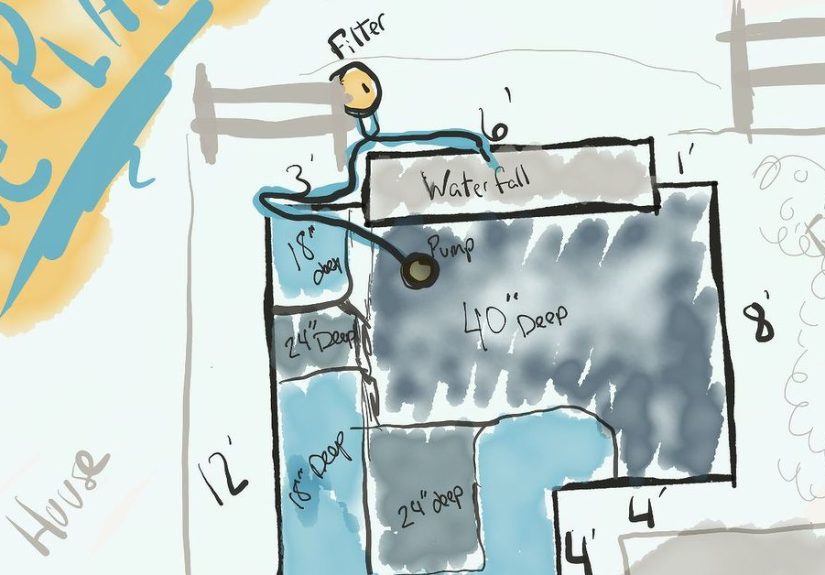
Plan the Pond Size, Depth, and Shape
Koi need more room than goldfish. They grow, produce waste, and thrive in stable water. A tiny decorative pond may look cute, but it can become difficult to keep healthy for koi. If your budget or yard can only support a very small pond, consider goldfish instead of koi.
For koi, a practical minimum depth is often around 3 feet, especially in mild climates. In colder regions, deeper water may be necessary to give koi a stable area below the freezing zone. Deeper ponds also help buffer temperature swings and give fish somewhere to retreat from predators.
Modern Shape Ideas
For a clean modern look, choose one of these layouts:
- Rectangle: Great beside a patio or deck; easy to edge with pavers.
- L-shape: Works well around seating areas or garden corners.
- Soft oval: More natural but still simple and elegant.
- Raised formal pond: Stylish, easier to sit beside, and less muddy-looking.
Keep the design simple. Every extra curve increases liner waste, edging complexity, and places where debris can collect. Koi do not care whether the pond is shaped like a kidney bean. Your shovel, however, has opinions.
Materials You Actually Need
A budget pond does not need every accessory, but it does need the essentials. Start with a durable pond liner, underlayment, pump, filtration system, tubing, stone or paver edging, and a safe electrical supply. Optional upgrades include a skimmer, UV clarifier, aerator, lighting, aquatic plants, and a small waterfall.
Use a Quality Liner
The liner is one place where cheap choices can become expensive disasters. EPDM rubber liner is popular because it is flexible, durable, and better suited for long-term pond use than many thin plastic liners. A 45-mil EPDM liner is a common choice for DIY ponds.
Always use underlayment beneath the liner. Underlayment helps protect against roots, rocks, and soil pressure. For extra budget protection, some DIY builders add a layer of sand or repurposed carpet under proper pond underlayment, but never rely on random scraps alone if sharp rocks or roots are present.
How to Estimate Liner Size
Use this simple formula:
Liner length = pond length + twice the maximum depth + 2 feet overlap
Liner width = pond width + twice the maximum depth + 2 feet overlap
For example, a pond that is 8 feet long, 6 feet wide, and 3 feet deep needs approximately:
Length: 8 + 6 + 2 = 16 feet
Width: 6 + 6 + 2 = 14 feet
So you would need at least a 16-by-14-foot liner. Buying slightly larger is safer than discovering your liner is short after you have already dug a backyard crater.
Filtration: The Heart of a Healthy Koi Pond
If the liner is the pond’s skin, filtration is the pond’s internal organ system. Koi produce waste, and that waste turns into ammonia. Beneficial bacteria convert ammonia into less harmful compounds, but they need a proper biological filter to live in. Good filtration also removes debris before it decomposes.
A solid koi pond filtration system usually includes three parts:
- Mechanical filtration: Captures leaves, fish waste, and floating debris.
- Biological filtration: Supports beneficial bacteria that process fish waste.
- UV clarification: Helps control green water algae by exposing water to ultraviolet light.
For a budget build, a pump-fed pressurized filter with UV can work for a smaller pond if it is correctly sized and cleaned regularly. For a more serious koi pond, especially above 1,500–2,000 gallons, consider a skimmer, bottom drain, external pump, and larger biological filter. It costs more upfront but reduces maintenance headaches.
Pump Sizing
A common rule is to circulate the pond’s water about once every one to two hours. For a 1,000-gallon pond, that means a pump around 500–1,000 gallons per hour after accounting for head height, tubing length, and filter resistance. Waterfalls require additional pump strength because lifting water takes power.
Do not buy a pump based only on the number printed on the box. Check the flow rate at the actual height your pump must push water. A pump that looks strong at zero feet of lift may become a sad little fountain cough at the top of a waterfall.
Step-by-Step: How to Build a DIY Modern Backyard Koi Pond
Step 1: Mark the Layout
Use a garden hose, rope, or marking paint to outline the pond. For a modern look, use straight edges or gentle curves. Stand back and view it from your patio and windows. Adjust before digging, because soil is much easier to move in your imagination than in real life.
Step 2: Dig in Levels
Dig the pond with shelves if you plan to use marginal plants, but keep shelves limited if predators such as herons are common in your area. A shallow shelf can become a convenient fishing platform for birds. The main koi area should be deeper and open.
Slope the sides slightly instead of making unstable vertical walls. Remove sharp stones, roots, and debris. Tamp the soil firmly so it does not shift later.
Step 3: Install Underlayment and Liner
Lay down underlayment across the entire hole. Then place the liner carefully, working it into corners and folds. Let the liner relax in the sun before installation if possible; warm liner is easier to shape. Avoid stretching it tightly. It should settle naturally as the pond fills.
Step 4: Add Pump, Filter, and Tubing
Place the pump where it can move water efficiently, but make sure it remains accessible for cleaning. Run tubing to the filter and waterfall or return outlet. Hide tubing in a shallow trench or behind edging for a clean modern look.
Use a GFCI-protected outdoor outlet for pond equipment. Water and electricity are not a casual friendship. Hire a licensed electrician when needed.
Step 5: Fill and Edge the Pond
Start filling the pond slowly. As water enters, adjust folds in the liner. Once filled, trim excess liner but leave enough overlap to secure under stone or pavers. Use flat pavers, smooth coping stones, or concrete caps for a modern border.
Step 6: Start the Filter and Cycle the Pond
Run the pump and filter before adding koi. A new pond needs time to develop beneficial bacteria. Use water conditioner if filling with chlorinated municipal water. Test ammonia, nitrite, nitrate, pH, and temperature. Add fish slowly only after water conditions are stable.
Budget-Friendly Modern Design Ideas
Modern style does not require expensive materials. The secret is restraint. Use fewer materials, repeat them consistently, and avoid clutter.
Use Concrete Pavers as Pond Coping
Large rectangular pavers instantly create a clean modern edge. They are often cheaper than custom-cut stone and easier to install. Dark gray, charcoal, or light concrete pavers pair well with black pond liner and green landscaping.
Add a Simple Spillway
A small waterfall or spillway improves oxygenation and creates relaxing sound. Keep it simple: a flat stone spillway, a short stream, or a stainless-style blade feature. You do not need a giant waterfall unless your design goal is “luxury resort lobby.”
Choose Plants Carefully
Aquatic plants can help shade water, soften edges, and support a balanced pond environment. Use marginal plants in containers for easier control. Avoid invasive species and check local guidance before buying aquatic plants. Native or regionally appropriate plants are usually safer choices.
Use Lighting Strategically
Low-voltage lighting can make a budget pond look custom. Place lights to highlight water movement, stone edges, or nearby plants. Do not overdo it. A pond should glow, not look like an airport runway.
How Many Koi Can You Keep?
Stock lightly, especially at first. Many pond problems come from too many fish and too little filtration. A conservative beginner target is a few koi in about 1,000 gallons, depending on filtration strength and future fish size. Remember, koi grow. A cute small koi can become a large waste-producing torpedo with fins.
Do not add all fish at once. Introduce them gradually so the biological filter can adjust. Test water frequently after adding new koi. If ammonia or nitrite rises, stop feeding temporarily, improve aeration, and correct the issue before adding more fish.
Maintenance Without Losing Your Weekends
A well-designed pond is much easier to maintain than a rushed one. Skim leaves, clean mechanical filters, check pump flow, and test water regularly. During warm months, koi eat more and produce more waste, so filtration demand increases.
Basic maintenance includes:
- Testing water weekly in the beginning.
- Cleaning skimmer baskets and filter pads as needed.
- Removing leaves before they sink and decay.
- Trimming dead plant material.
- Checking pump and waterfall flow.
- Performing partial water changes when needed.
Avoid washing biological filter media with chlorinated tap water, which can harm beneficial bacteria. Rinse media in pond water when cleaning is necessary.
Common Budget Mistakes to Avoid
Making the Pond Too Small
Small ponds may cost less upfront, but they are harder to stabilize. Temperature and water chemistry can swing quickly. If you want koi, build as large and deep as your budget and space reasonably allow.
Skipping Underlayment
Skipping underlayment is like wearing expensive shoes with no socks on a gravel road. Maybe nothing bad happens immediately, but why invite pain?
Buying an Undersized Filter
Manufacturers often rate filters under ideal conditions. Koi ponds are not ideal conditions. Choose filtration with room to spare, especially if you plan to add more fish later.
Putting Rocks All Over the Bottom
Rocks on the bottom can trap waste and make cleaning harder. They may look natural at first, but over time debris collects between them. For koi ponds, a cleaner bottom is often easier to maintain.
Ignoring Shade and Runoff
Too much sun can fuel algae. Too much runoff can introduce nutrients and pollutants. Good location planning prevents many problems before they start.
of Real-World Experience: Lessons From Building a Budget Koi Pond
The biggest lesson from building a DIY modern backyard koi pond on a budget is that the pond you plan on paper and the pond your yard allows are not always the same pond. Soil has a personality. Roots appear exactly where you hoped they would not. Rocks hide underground like unpaid actors waiting for their dramatic entrance. So the first experience-based tip is simple: leave flexibility in your plan. Mark your layout, but be ready to shift a foot left or make one side slightly narrower if the site demands it.
The second lesson is that digging is the part everyone underestimates. Watching a video makes it look like a weekend project. In real life, digging a 3-foot-deep pond means moving a surprising amount of soil. Even a small pond creates a mountain of dirt. Before you start, decide where that soil will go. You can use it to build a raised berm for a waterfall, level a garden bed, or create a planting mound. Do not wait until there is a dirt volcano in your yard and your neighbor starts giving you suspicious looks.
Another practical experience: dry-fit everything before final installation. Set the pump, filter, tubing, skimmer, waterfall box, edging stones, and lighting in place before locking anything down. This helps you catch annoying problems early, such as tubing that is too short, a filter that is difficult to access, or a waterfall that splashes outside the pond. Splash loss may look harmless, but over several hours it can drop the water level and make you think the pond has a leak.
When working on a budget, it is tempting to spend money on visible items first. Beautiful stone, lights, and plants are exciting. Filter pads and plumbing fittings are not. But the boring items are usually the ones that decide whether the pond succeeds. A reliable pump, quality liner, strong underlayment, and oversized filtration do more for your koi than decorative lanterns ever will. Buy the fish-supporting equipment first, then beautify the edges as your budget allows.
One of the best budget design tricks is to keep the pond edge clean and simple. Instead of buying many types of rock, choose one main edging material and repeat it. For example, use charcoal pavers around the pond, black mulch behind them, and three types of plants at most. Repetition looks intentional and modern. Too many materials can make even an expensive pond look like a clearance aisle had a landscaping accident.
Finally, patience saves money. Let the pond cycle before adding koi. Add fish slowly. Test water often. Wait before buying more plants, more fish, or more gadgets. The pond will tell you what it needs if you observe it. Clear water, active fish, steady pump flow, and manageable algae are signs you are on the right track. A budget koi pond is not about doing everything cheaply; it is about doing the important things wisely and improving the rest over time.
Conclusion
A DIY modern backyard koi pond on a budget is a realistic project when you combine smart design with fish-first planning. Focus on a durable liner, proper depth, reliable filtration, safe electrical work, and a clean modern layout. Save money by doing labor yourself, simplifying the shape, using affordable pavers, choosing plants carefully, and avoiding unnecessary accessories.
The perfect koi pond is not the biggest or most expensive one. It is the one that stays healthy, looks beautiful, fits your backyard, and gives you a peaceful place to sit after a long day. Build it thoughtfully, stock it slowly, and your backyard can become the kind of calm, shimmering escape that makes people say, “Wow, you built this?” And yes, you may absolutely pretend it was easy.


