
Table of Contents >> Show >> Hide
- Why Make DIY Prescription Bottle Covers?
- Safety Rules Before You Start
- Best Materials for DIY Prescription Bottle Covers
- How to Make DIY Prescription Bottle Covers: 12 Simple Steps
- Step 1: Choose the right bottle
- Step 2: Decide on your cover style
- Step 3: Measure the bottle carefully
- Step 4: Mark the label-safe zone
- Step 5: Cut your material
- Step 6: Test the fit before decorating
- Step 7: Add a closure or stretch element
- Step 8: Decorate the outside
- Step 9: Keep the cap area clear
- Step 10: Do a readability check
- Step 11: Assign a design purpose
- Step 12: Store it correctly
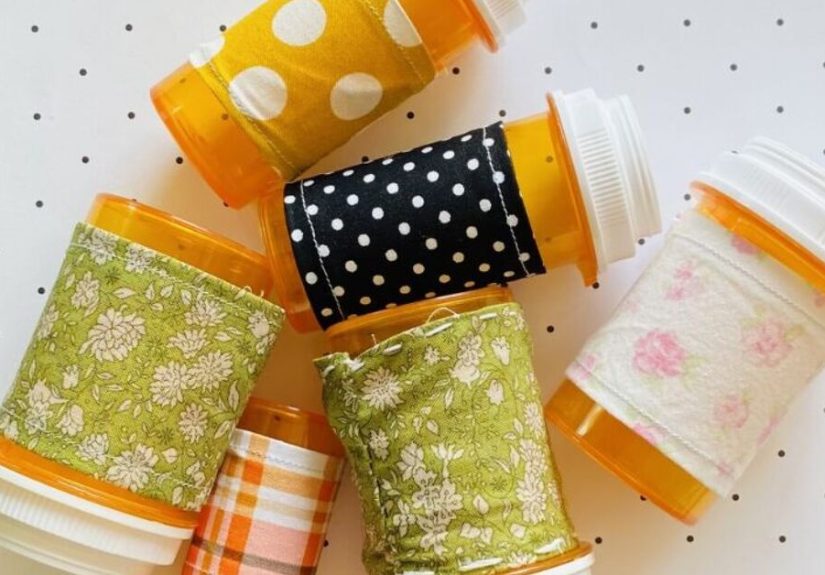
- Easy Design Ideas That Actually Look Good
- Mistakes to Avoid
- Can You Reuse Empty Prescription Bottles Too?
- What the Experience of Making DIY Prescription Bottle Covers Is Really Like
- Final Thoughts
If your medicine cabinet looks like a sea of orange plastic, you are not alone. Prescription bottles are practical, stackable, and about as visually thrilling as a parking ticket. That is exactly why DIY prescription bottle covers have become such a clever little project. They let you dress up the outside of the bottle, make it easier to spot whose bottle is whose, and add a bit of personality to something that usually screams “pharmacy run” instead of “cute and organized.”
But here is the important part: a good prescription bottle cover should add style without creating confusion. The goal is not to turn your medication into a mystery object wrapped in crafting ambition. The goal is to make the bottle prettier, easier to recognize, and still safe to use. That means keeping the original bottle, keeping the child-resistant cap functional, and keeping the pharmacy label readable. In other words, craft like a grown-up with glitter in one hand and common sense in the other.
This guide walks you through what DIY prescription bottle covers are, why people make them, the safest design rules to follow, and several easy ways to create your own. Whether you love fabric, scrapbook paper, vinyl, crochet, or a classic “I found washi tape in a drawer and now I am unstoppable” approach, there is a project here for you.
Why Make DIY Prescription Bottle Covers?
At first glance, prescription bottle covers sound like a tiny craft for very tiny bottles. That is true, but they can also be surprisingly useful. A well-made cover can help separate daily medications from as-needed medications, make bottles look less clinical on a nightstand, and help identify family members’ bottles at a glance when multiple safe-storage containers are used in one home.
They also fit into the larger trend of practical upcycling. Many people reuse empty prescription bottles for storage after personal information is removed and the medicine is no longer inside. Others keep current medications in the original bottle but slip on a removable sleeve or decorative band. The second option is the sweet spot for most people because it keeps the manufacturer or pharmacy container intact while still letting you personalize the outside.
And yes, there is a purely emotional reason too. Medical routines can feel repetitive, stressful, and annoyingly beige. Adding a small, cheerful detail to a daily routine can make the experience feel more human. A floral sleeve, a neutral linen wrap, or a color-coded top band is not going to change your whole life, but it might make taking care of yourself feel a little less sterile and a little more intentional.
Safety Rules Before You Start
Before we get crafty, let us talk about the non-glamorous hero of this story: safety. Prescription bottles are designed to protect the medication inside, provide label instructions, and help prevent accidental access by children. Your DIY cover should work around those features, not against them.
1. Keep the medicine in the original bottle
Do not transfer prescription medication into random jars, tins, pouches, or unlabeled containers just because they look prettier. The original bottle contains the official label, dosage instructions, expiration details, pharmacy information, and other important identifiers.
2. Do not block the label
A good cover should be removable, partial, or designed with a clear “label window.” You should still be able to read the patient name, medication name, dosage, directions, and any warnings without peeling off half a craft project like you are opening a suspicious gift.
3. Do not interfere with the cap
Never glue fabric, ribbon, beads, or bulky trim around the child-resistant lid or the neck of the bottle in a way that prevents the cap from locking or opening properly. Cute is nice. A fully working safety cap is nicer.
4. Choose easy-to-clean materials
Prescription bottles are handled often, so use materials that can handle fingerprints, minor spills, and normal wear. Fabric sleeves should be washable or replaceable. Paper wraps should be sealed if used on empty bottles for storage, but for active prescriptions, removable sleeves are usually smarter than permanent adhesive wraps.
5. Avoid heat, moisture, and bathroom storage
Even the prettiest bottle cover cannot save medication from a steamy bathroom shelf. If the medicine requires room-temperature, dry storage, keep it that way. Your project should decorate the bottle, not encourage bad storage habits.
Best Materials for DIY Prescription Bottle Covers
The best material depends on whether you want a removable cover, a light decorative accent, or a fully transformed container for non-medication reuse. For active prescriptions, removable is best.
- Felt: soft, easy to cut, and beginner-friendly for slip-on sleeves.
- Cotton fabric: great for simple sewn wraps, ties, or mini cozies.
- Elastic cord or ribbon: useful for removable bands and tag-style labels.
- Washi tape: perfect for quick color coding, though best used sparingly so it does not cover important information.
- Adhesive vinyl: ideal for small icons, names, or decorative accents.
- Scrapbook paper: lovely for empty bottle upcycling, especially with decoupage techniques.
- Crochet yarn: charming for handmade bottle sleeves if you enjoy fiber crafts.
- Clear laminate or plastic sleeves: useful when you want a protective wrap with a visible label window.
How to Make DIY Prescription Bottle Covers: 12 Simple Steps
Step 1: Choose the right bottle
Pick a prescription bottle that is currently in use and still has its original cap and label in good condition, or use an empty, cleaned bottle for decorative storage if the prescription is no longer active.
Step 2: Decide on your cover style
Choose a fabric sleeve, felt wrap, crochet cozy, vinyl decal, or simple decorative band. If the bottle contains active medication, removable sleeves and partial wraps are usually the safest option.
Step 3: Measure the bottle carefully
Measure the height of the bottle body, not including the cap. Then measure the circumference around the center. Leave space so the cover stops short of the label area or includes a cutout window.
Step 4: Mark the label-safe zone
Before cutting anything, identify which parts of the pharmacy label must remain visible. If needed, lightly mark your pattern so the finished cover leaves a front-facing window.
Step 5: Cut your material
Cut felt, fabric, vinyl, or paper according to your measurements. Add a little overlap if you are making a wrap with Velcro, snaps, or a tie closure.
Step 6: Test the fit before decorating
Wrap the material around the bottle and make sure it sits below the cap and does not slide over the label. This is the moment to fix the size, not after hot glue enters the chat like an overconfident intern.
Step 7: Add a closure or stretch element
For removable covers, sew a seam, attach a small strip of Velcro, or create a snug tube that slides on and off. Elastic-backed bands also work well for fast bottle changes.
Step 8: Decorate the outside
Add small embellishments such as stitched initials, iron-on shapes, mini patches, vinyl icons, or ribbon trim. Keep decorations flat and lightweight so the bottle still fits in a lockbox, drawer, or organizer.
Step 9: Keep the cap area clear
Double-check that nothing rubs against the child-resistant cap, especially if you added trim near the top edge. The bottle should still open and close exactly as intended.
Step 10: Do a readability check
Hold the bottle in normal lighting and confirm that the prescription label is still easy to read. If not, trim the cover, widen the window, or switch to a shorter design.
Step 11: Assign a design purpose
Make your design useful. You might use blue covers for evening medications, floral sleeves for travel toiletries made from empty bottles, or simple monochrome bands for a tidy medicine box. The prettier your system, the more likely you are to keep using it.
Step 12: Store it correctly
Once the cover is on, store the bottle in a cool, dry, child-safe place according to the medication instructions. The project is finished only when style and storage are both doing their jobs.
Easy Design Ideas That Actually Look Good
Minimalist linen sleeve
A neutral fabric sleeve with a tiny stitched tab looks clean, modern, and not overly crafty. This is ideal if you want something subtle on a bedside organizer or in a family medicine lockbox.
Color-coded felt bands
Instead of covering the whole bottle, wrap a colored felt band around the lower half or use a narrow removable cuff. It is simple, practical, and much less likely to interfere with labels.
Seasonal bottle cozies
If you enjoy changing décor throughout the year, make holiday-themed sleeves for empty bottles used as storage. Think tiny sweater-style winter covers, floral spring wraps, or Halloween potion-bottle looks for decor only.
Crochet mini cozies
Fiber crafters can make little slip-on cozies with a short open section for the label. Use cotton yarn for a neater texture and less fuzz than bulky acrylic yarn.
Vinyl icon system
For a modern and organized look, add small removable vinyl icons such as a sun, moon, heart, leaf, or star. This works especially well if multiple bottles are stored together and you want quick visual cues without wrapping the entire container.
Mistakes to Avoid
The biggest DIY mistake is treating a prescription bottle like a blank canvas and forgetting that it is still a medical container. A full glued-on paper wrap that covers the label may look adorable for twelve minutes and become annoying for the next six refills. Another problem is adding beads, tassels, thick trim, or oversized bows that make the bottle hard to grip, hard to stack, or impossible to fit into a safe storage box.
Also avoid using strong permanent glue on active prescription bottles unless the adhesive is limited to a small removable accessory. Many people are better off creating sleeves, bands, tags, or outer holders rather than altering the bottle itself. If the medicine changes, the dosage changes, or the pharmacy issues a new label, your design should not become a tiny administrative crisis.
Can You Reuse Empty Prescription Bottles Too?
Yes, empty prescription bottles are popular for small-item storage once all personal information is removed or covered and the bottle is thoroughly cleaned if appropriate. They can hold buttons, beads, bobby pins, travel sewing kits, matches for camping, tiny office supplies, or emergency cash. This is where decoupage, painted finishes, scrapbook paper wraps, and more decorative permanent designs really shine.
That said, it is smart to avoid reusing old prescription bottles for anything edible or anything that might confuse children. If you repurpose them, label the new contents clearly. A bottle should never become a guessing game. Life is already weird enough.
What the Experience of Making DIY Prescription Bottle Covers Is Really Like
One of the most interesting things about DIY prescription bottle covers is how quickly a “small craft” turns into a project about routine, visibility, and everyday comfort. People often start for aesthetic reasons. They want to make a bottle less clinical, less bright orange, or less obvious on a countertop. But once they begin testing materials and living with the finished cover, they usually notice something else: the best designs are the ones that make daily life easier, not just prettier.
For example, a full bottle wrap may look polished in a photo, but in real use, many people prefer a partial sleeve or lower-half band because it leaves the label visible and makes refills less annoying. That sounds like a small detail until you are tired, trying to read a dosage at night, and realize your super-cute fabric masterpiece is acting like a curtain over the information you actually need. This is why practical crafters often become accidental design critics. They start caring about windows, closures, washable fabrics, and fast identification.
Another common experience is discovering that texture matters more than expected. A smooth vinyl accent may be easy to wipe down, while a fuzzy yarn cozy feels charming but collects lint in the kind of determined way only yarn can. Felt is easy to cut and forgiving for beginners, but it can look a little handmade in the “school craft day” sense unless the edges are clean and the colors are intentional. Cotton fabric tends to give the most balanced result: soft, tidy, and easy to customize without turning the bottle into a holiday ornament that got lost on its way to the tree.
Color coding also ends up being more useful than many people predict. Even a narrow removable band can make a big difference when several bottles are stored together. A blue band for one person, a green band for another, and a neutral sleeve for non-daily items can reduce mix-ups and create a calmer system overall. The visual simplicity matters. People are more likely to maintain a routine when the system is obvious at a glance.
Then there is the emotional side. DIY prescription bottle covers may seem like a tiny craft, but they often become part of a gentler self-care routine. A bottle that looks intentional instead of institutional can feel less intimidating on a nightstand or desk. That matters more than some people expect. It does not erase the reason the bottle exists, of course, but it can soften the mood around it. In that sense, the best experience is not really about decorating plastic. It is about turning an ordinary object into something that feels organized, personal, and a little less bleak on an average Tuesday morning.
Final Thoughts
DIY prescription bottle covers are one of those rare crafts that can be both practical and charming when done thoughtfully. The trick is to respect the bottle’s real job while improving the way it looks and functions in your space. Keep the original container, protect label visibility, leave the cap alone, and choose materials that make sense for daily use. Once those basics are in place, you can have fun with color, texture, seasonal style, or a minimalist look that makes your storage system feel less cluttered and more intentional.
So yes, go ahead and give those little orange bottles a makeover. Just make sure your craft project does not outsmart the prescription. That is a terrible contest for everyone involved.


