
Table of Contents >> Show >> Hide
- Why Properly Tied Fenders Matter
- How to Tie Fenders on a Boat: 13 Steps
- Step 1: Choose the right fender size for your boat
- Step 2: Pick the correct type of fender
- Step 3: Attach a proper fender line
- Step 4: Decide which side of the boat needs protection
- Step 5: Protect the widest point of the hull first
- Step 6: Set the height to match the dock
- Step 7: Use the right knot for the attachment point
- Step 8: Tie to strong points, not weak ones
- Step 9: Keep enough fenders on board
- Step 10: Space fenders for the actual docking scenario
- Step 11: Adjust for wind, current, and wave action
- Step 12: Keep hands, feet, and heroics out of the gap
- Step 13: Remove, stow, and reset after docking or departure
- Common Mistakes to Avoid
- Practical Examples of Fender Setup
- Dockside Lessons: of Real-World Experience
- Conclusion
Docking has a funny way of turning calm, confident adults into people who suddenly forget how hands work. One minute you are gliding toward the pier like a hero in a boating commercial. The next, someone is yelling “Starboard!” while another person is holding a line like it is a confused garden snake. That is exactly why fenders matter. They are the soft, squishy peacekeepers between your boat and a very hard dock.
If you want to protect your hull, avoid ugly dock rash, and look a lot more composed when you pull in, learning how to tie fenders on a boat is one of the smartest skills you can pick up. The good news is that it is not complicated. The better news is that once you know the basic setup, you can adjust it for almost any docking situation, from a floating dock at a quiet marina to a fixed pier with pilings and a crosswind that seems personally offended by your existence.
This guide walks through 13 practical steps for tying boat fenders the right way. Along the way, you will learn where to hang them, which knots make life easier, how high to set them, and what common mistakes make fenders about as useful as a marshmallow seatbelt.
Why Properly Tied Fenders Matter
Boat fenders are not just accessories you toss over the side because everyone else does. They are part of your docking system. A properly tied fender absorbs pressure between your hull and a dock, piling, seawall, or even another boat during rafting. A poorly tied fender, on the other hand, rides too high, slips too low, rolls out of place, or vanishes exactly when the hull makes contact. In other words, bad fender setup is a great way to learn what gelcoat repair costs.
When you tie fenders correctly, you get three big benefits. First, you protect the widest and most vulnerable parts of the hull. Second, you make docking less stressful because the boat has a cushion if the approach is not perfect. Third, you buy yourself time. Good fenders let you secure your lines without feeling like the boat is about to kiss concrete in front of an audience.
How to Tie Fenders on a Boat: 13 Steps
Step 1: Choose the right fender size for your boat
Before you tie anything, make sure the fenders are appropriate for the boat. Tiny fenders on a heavy boat are like bringing oven mitts to a boxing match. They will not do enough. As a practical rule, bigger boats need larger-diameter fenders and often more of them. If your boat has high freeboard, extra beam, or more weight than average, size up instead of trying to get by with the bare minimum.
For example, a small runabout may do fine with compact cylindrical fenders, while a 28-foot cruiser often needs beefier fenders that create more stand-off distance from the dock. When boaters under-size fenders, they usually notice it only after the hull makes contact. That is not ideal feedback.
Step 2: Pick the correct type of fender
Most recreational boaters use cylindrical fenders, and for good reason: they are versatile, easy to store, and work well for everyday docking. Round fenders can be great for certain boats and situations, while flat or specialty fenders can help in tight slips or unusual hull shapes. Two-eye fenders can be rigged vertically or horizontally, which makes them handy around pilings. Center-rope tube fenders are simple to adjust and fast to deploy.
If you mostly dock alongside floating piers, a standard cylindrical fender setup is usually perfect. If you deal with pilings a lot, horizontal protection may make more sense in a few positions. Think about the docking environment, not just the catalog photo.
Step 3: Attach a proper fender line
Some fenders come ready to use, but many require you to add your own line. If the line is too thin, it can be harder to handle and may chafe the fender eye more quickly over time. Use a sturdy marine line that feels comfortable in the hand and suits the size of the fender.
For a fender with an eye at one end, tie the line securely so it forms a dependable attachment that will not cinch into a nightmare later. A bowline is an excellent choice because it creates a strong fixed loop and is easier to untie after load than many other knots. Once the line is attached to the fender itself, you usually leave that part alone and adjust only the upper end when docking.
Step 4: Decide which side of the boat needs protection
This sounds obvious, but people skip it when things get busy. Before approaching the dock, decide whether you are landing port side or starboard side. Rig fenders on that side first. If wind, current, or a tricky marina layout could push you unexpectedly the other way, keep at least one spare fender ready on the opposite side too.
Backing into a slip is a good example. You may think only one side matters, but a gust can change the whole conversation. Having both sides at least partially ready is a smart move when conditions are unpredictable.
Step 5: Protect the widest point of the hull first
If you do only one thing right, do this. The first fender should usually go at or near the boat’s beam, which is the widest part of the hull and often the first point to make contact. That is your primary impact zone. After that, add coverage forward and aft depending on the dock layout and how the boat is likely to move once lines are secured.
On many boats, a three-point setup works beautifully: one fender near the beam, one forward, and one aft. Longer boats often need additional fenders to fill the gaps.
Step 6: Set the height to match the dock
A fender in the wrong place is just decorative boating furniture. The center of the fender should line up with the point where the hull could meet the dock, piling, or finger pier. With floating docks, that often means the fender hangs just above the waterline or where the dock edge meets the hull. With fixed docks, tides and changing water levels matter more, so take a moment to look at the structure before committing.
Here is a useful habit: pre-mark your fender lines for common heights. That way, when you approach your home slip or a familiar marina, you can set the fenders quickly without eyeballing everything from scratch.
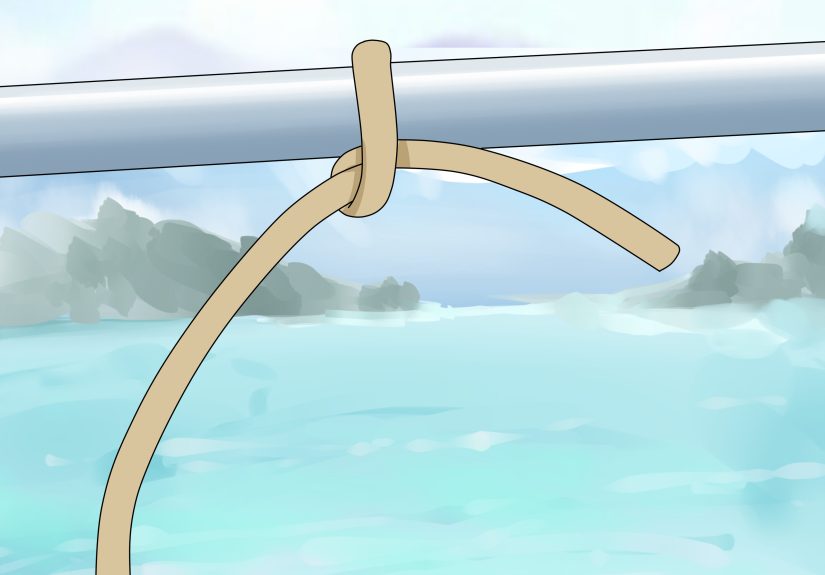
Step 7: Use the right knot for the attachment point
The best knot depends on where the fender line is being secured. If you are tying to a rail or stanchion, a clove hitch is a favorite because it is fast, adjustable, and easy to slide into position. If you are tying to a cleat, use a cleat hitch. If you need extra holding power around a post or piling, a round turn with two half hitches can be a great option.
The trick is to match the knot to the hardware. Do not force one knot to do every job. Good seamanship is often just smart laziness: use the setup that works cleanly and comes off without drama later.
Step 8: Tie to strong points, not weak ones
Not every convenient-looking piece of hardware is a good fender attachment point. Tie to solid rails, stanchion bases, cleats, deck eyes, or other strong fittings. Avoid flimsy spots that can bend, pull loose, or place awkward leverage on the rail. On boats with lifelines and stanchions, lower and stronger attachment points are usually better than high, springy ones.
One common mistake is tying a fender where it looks tidy instead of where it works best. Your boat does not care about tidy if the hull is grinding on a piling.
Step 9: Keep enough fenders on board
Two fenders may work for a very small boat in calm conditions, but most boaters are happier carrying more. For many recreational boats, two to four fenders per side covers everyday docking, and one extra “roving fender” is a great insurance policy. That spare fender can be moved by hand to a problem corner as you approach or when rafting to another boat.
The keyword here is preparedness. Docking is not the time to discover your third fender is still in the garage next to the leaf blower and last summer’s folding chairs.
Step 10: Space fenders for the actual docking scenario
Equal spacing looks organized, but strategic spacing works better. If there is a sharp dock corner, protect that area. If a piling sits exactly where the aft quarter will swing, set a fender there. If you are rafting to another boat, you may want more horizontal coverage between the hulls. Let the docking geometry decide the setup.
For example, imagine a center-console coming alongside a fixed dock with one exposed corner. In that case, one fender at the beam and one positioned right where that corner would touch may be more useful than three evenly spaced fenders that miss the danger spot.
Step 11: Adjust for wind, current, and wave action
Boats rarely sit still just because you politely asked them to. Wind, current, wakes, and surge all change how the hull moves against the dock. In active conditions, use more fenders, not fewer, and consider whether one should be rigged horizontally to deal with pilings or uneven contact points. A boat that rises and falls with waves may need broader coverage than one resting in flat water.
This is also where line tension matters. Once the boat is secured, check whether the fenders are actually taking the load where you expected. If they are floating above the contact area or trapped too low, fix them immediately.
Step 12: Keep hands, feet, and heroics out of the gap
A fender is designed to take pressure. Your knee is not. Never use your body to fend off a dock or another boat, and never ask a crew member to do it either. If a gap is closing, deploy a roving fender or use a boat hook if appropriate, but do not try to stop several thousand pounds of boat with your arms. That is how calm afternoons become emergency room stories.
This step is less about knot tying and more about good judgment, which is often the most important gear on board.
Step 13: Remove, stow, and reset after docking or departure
Once you are tied up, look at the whole arrangement. Are the fenders still at the correct height? Are any twisted, pinched, or dragging in the water? After departure, bring them in and stow them properly instead of cruising around with them still hanging out like laundry on vacation. Fenders work best when they are clean, accessible, and ready for the next landing.
Good docking habits are repetitive on purpose. Reset the lines neatly, coil them, and make sure the fenders can be redeployed quickly. Future-you will be grateful, even if present-you would rather go straight for the sandwich cooler.
Common Mistakes to Avoid
The biggest mistake is waiting too long. Fenders should be rigged before you approach the dock, not while the boat is drifting sideways and everyone is suddenly speaking in uppercase. Another frequent problem is hanging fenders too high. A fender that protects the air instead of the hull is not helping. Boaters also make life harder by using the wrong knot, tying to weak attachment points, or assuming the dock’s bumpers will do all the work.
Another classic error is using too few fenders in rough conditions. Calm water is forgiving. Windy afternoons and busy marinas are not. When in doubt, rig one more.
Practical Examples of Fender Setup
Alongside a floating dock
Use three cylindrical fenders on the docking side: one at the beam, one forward, and one aft. Set them so the middle of each fender aligns with the dock edge. A clove hitch on a rail or stanchion works well for quick adjustment.
Alongside a fixed dock with tidal change
Check the dock height before committing. You may need to hang the fenders slightly higher than usual at high tide or lower at low tide. Recheck after the boat is secured because the hull can settle into a different position than expected.
Rafting to another boat
Use plenty of fenders between the two boats and think more about coverage than perfect symmetry. If the hull shapes differ, move the fenders until they support the actual contact points. This is not the moment to be stingy.
Dockside Lessons: of Real-World Experience
The first time I watched an experienced skipper set fenders, I expected something dramatic. Maybe a sailor’s flourish. Maybe a knot tied in one motion while squinting into the sun. What I got instead was a master class in calm, boring preparation. He rigged the side we would use, checked the dock height, moved one fender forward because of a nasty corner, and then quietly said, “Now we can make a mediocre approach and still look competent.” That line has stuck with me because it captures the whole point of fenders. They are not there to make perfect boat handling unnecessary. They are there to give normal human beings a margin for error.
Over time, the biggest lesson I have seen is that the best boaters are rarely the flashiest. They are the ones who prepare early. They do not wait until the dock is three seconds away to start hunting for lines under a seat cushion. They do not toss out one lonely fender and hope for the best. They think ahead. If there is wind, they rig extra protection. If the dock is unfamiliar, they study where the boat will touch first. If a piling looks like it has been winning arguments with hulls for twenty years, they give it a wider berth and an extra fender.
I have also learned that fender height is where many smart people get humbled. A perfectly tied knot does not matter if the fender is six inches too high. Boats move. Docks float, or they do not. Tides change. Wakes roll through. That is why experienced boaters keep adjusting until the fender is actually protecting the contact point instead of just looking official. The eye test matters. Step back and look. Is the fender where the boat will meet the dock, or where you wish it would?
Another real-world truth is that spare fenders earn their keep. A roving fender has saved plenty of docking situations, especially when wind swings the bow or the stern slides into an awkward angle. It is the boating version of carrying an umbrella. Bring it, and maybe you will not need it. Forget it, and the sky will notice.
Finally, there is the human side of all this. Good fender work lowers stress on board. Crew members stop panicking. Approaches feel slower. Communication improves. Instead of shouting contradictory instructions while the dock gets larger, everyone has a plan. That alone is worth the effort. The right fender setup protects more than gelcoat. It protects the mood, the confidence of newer boaters, and your chances of ending the day with a story about a nice landing instead of an expensive crunch.
So yes, learn the knots. Practice the setup. Mark your lines. Carry more fenders than your optimistic side thinks you need. Because in boating, a little soft vinyl hanging in the right place can make the difference between “smooth arrival” and “well, that sounded costly.”
Conclusion
If you want a cleaner, safer, less stressful docking routine, learning how to tie fenders on a boat is a skill worth mastering. Start with the right size fenders, place them at the likely points of contact, match the height to the dock, and use simple, reliable knots that you can tie and untie without a wrestling match. Most importantly, rig early. By the time your boat reaches the dock, the fenders should already be working for you.
A good fender setup will not replace careful boat handling, but it will absolutely make you look smarter, calmer, and far more prepared. And on the water, that is a very nice combination.


