
Table of Contents >> Show >> Hide
- The One Task Is Simple: Clean Your Gardening Tools Before Storing Them
- Why Dirty Tools Cause Bigger Problems Than Most Gardeners Realize
- How to Clean Garden Tools Before You Put Them Away
- What About Power Tools and Lawn Equipment?
- The Biggest Mistakes Gardeners Make
- Why This One Habit Pays Off Every Year
- A Practical Example: Five Minutes Now or Fifty Dollars Later
- Experiences Gardeners Often Share After Learning This Lesson the Hard Way
- Conclusion
At the end of the season, gardeners do a lot of dramatic things. We yank tomato vines, mourn basil that gave up on life, and pretend we will absolutely remember where we put the bulb planter next spring. But before you toss your trowel into the shed and walk away like the credits are rolling, there is one task you really should not skip: cleaning and maintaining your gardening tools before storage.
Yes, cleaning sounds about as glamorous as watching mulch decompose in real time. But this one job can save money, prevent rust, reduce the spread of plant disease, and make next season easier from day one. A shovel put away dirty is a shovel quietly plotting against your future self. A pair of pruners stored with sap and moisture still on the blades is basically a tiny science experiment with handles.
If you want your gardening tools to last longer, work better, and avoid turning into a rusty collection of regrets, this is the moment to give them a proper send-off. Here is why it matters, what to do, and how a simple end-of-season routine can make spring gardening feel a whole lot less chaotic.
The One Task Is Simple: Clean Your Gardening Tools Before Storing Them
When people hear “clean your garden tools,” they often picture a quick rinse and a heroic belief that rainwater probably counts as sanitation. It does not. Proper garden tool maintenance means removing dirt and sap, drying everything thoroughly, disinfecting when needed, sharpening blades, and applying oil before storage.
That may sound like a few tasks disguised as one task wearing a fake mustache, but it is really one maintenance routine with one goal: don’t store tools in the same condition they were in after a season of hard use.
This matters because soil and plant residue are not harmless souvenirs. They can hold moisture, encourage rust, and even carry plant pathogens from one season to the next. If you have ever pruned a diseased tomato, trimmed a sick shrub, or divided plants that were not looking their best, your tools may be carrying more than dirt. They may be carrying tomorrow’s gardening problem.
Why Dirty Tools Cause Bigger Problems Than Most Gardeners Realize
1. Dirt Holds Moisture, and Moisture Invites Rust
A shovel with caked-on soil is not “earthy.” It is damp metal in slow motion. Once moisture sits on a blade or around a pivot point, rust is never far behind. Rust weakens metal, makes tools harder to use, and shortens their life. A rusty hoe drags. Rusty pruners stick. A rusty trowel feels like it has retired emotionally before you have.
2. Plant Debris Can Spread Disease
Garden tools can move bacteria, fungi, and viruses from one plant to another. That is especially true for cutting tools like pruners, loppers, and knives. If you worked on roses with black spot, tomatoes with blight, or fruit trees with cankers, skipping tool sanitation is like mailing pathogens a VIP pass to next season’s garden.
3. Dull Blades Make Gardening Harder
Sharp tools are not just satisfying. They are safer and more effective. A dull pruner crushes stems instead of making a clean cut. A dull shovel makes digging feel like a personal argument with the ground. When blades are sharp, you use less force, get cleaner cuts, and put less stress on both the plant and your wrists.
4. Wood Handles Dry Out and Crack
Wooden handles take a beating from sun, rain, sweat, and general neglect. If they dry out too much, they splinter or crack. A little sanding and oil can keep them smooth and sturdy, which is a lot better than discovering in April that your rake handle now resembles driftwood.
How to Clean Garden Tools Before You Put Them Away
The good news is that this routine does not require a workshop worthy of a television makeover show. A bucket, a stiff brush, a rag, a file, and a little oil go a long way.
Step 1: Remove Soil, Sap, and Garden Gunk
Start with the obvious mess. Use a stiff brush, putty knife, or wire brush to remove caked-on soil from shovels, hoes, spades, hand trowels, and forks. For sticky sap on pruners or loppers, warm soapy water can help loosen the mess. Some gardeners also use steel wool or sandpaper on light rust.
This is the stage where you stop pretending the blade is “naturally brown.” No, that is last July still clinging to your spade.
Step 2: Wash the Tools
Once the loose debris is off, wash tools with warm, soapy water. You do not need spa music for this part, but you do need to be thorough. Get into the joints, blade edges, and any grooves where soil or sap likes to hide.
For power equipment, follow the manufacturer’s instructions before cleaning. Remove grass clippings and debris from mower decks and trimmer guards, and make sure everything is safe to handle before doing maintenance.
Step 3: Dry Everything Completely
This step is not optional. Dry each tool thoroughly with a towel and allow it to air dry if needed. Putting away a damp tool is the gardening equivalent of washing a cast-iron pan and then storing it underwater. Moisture is what turns a simple cleanup into a rust factory.
Step 4: Disinfect When It Matters Most
If your tools touched diseased plants, now is the time to disinfect them. Rubbing alcohol is a popular option because it is convenient and evaporates quickly. Some gardeners also use hydrogen peroxide or a diluted bleach solution. If you use bleach, be aware that it can be corrosive to metal, especially on sharp cutting tools, so rinse and dry thoroughly afterward.
Not every shovel needs a dramatic disinfecting ceremony after every single use, but pruners, knives, and other cutting tools should be sanitized regularly, especially when moving from plant to plant or working with anything infected.
Step 5: Sharpen Blades
Now that your tools are clean, sharpening actually works better. A file can restore the edge on hoes, spades, and shovels. Pruners may need a whetstone or a sharpening tool suited to their blade shape. Work carefully, wear gloves, and sharpen in the original bevel direction rather than improvising like you are on a survival show.
If you are not comfortable sharpening larger blades or power equipment, there is no shame in letting a professional handle it. Spring is a much nicer season when your mower blade is balanced and your pruning saw is not trying to freestyle.
Step 6: Oil Metal Parts and Moving Joints
After cleaning and drying, wipe metal surfaces with a light coat of oil to help prevent rust. Pay attention to pivot points and moving joints on hand pruners, shears, and loppers. A light coating is enough. You are protecting the tool, not marinating it.
A classic trick is to keep a bucket of sand or kitty litter lightly moistened with oil. After cleaning, you can dip larger metal tools into the mixture to coat the blade and help scrub off remaining debris. It is simple, effective, and oddly satisfying.
Step 7: Condition Wooden Handles
If your tools have wooden handles, inspect them for splinters, rough patches, or cracks. Sand rough spots lightly, then wipe the wood with linseed oil to help prevent drying and cracking. This is one of those small tasks that makes a huge difference over time.
Also, handle oily rags carefully and store or dispose of them properly. They are not decorative. They are not harmless. They definitely should not be wadded up and forgotten in a corner.
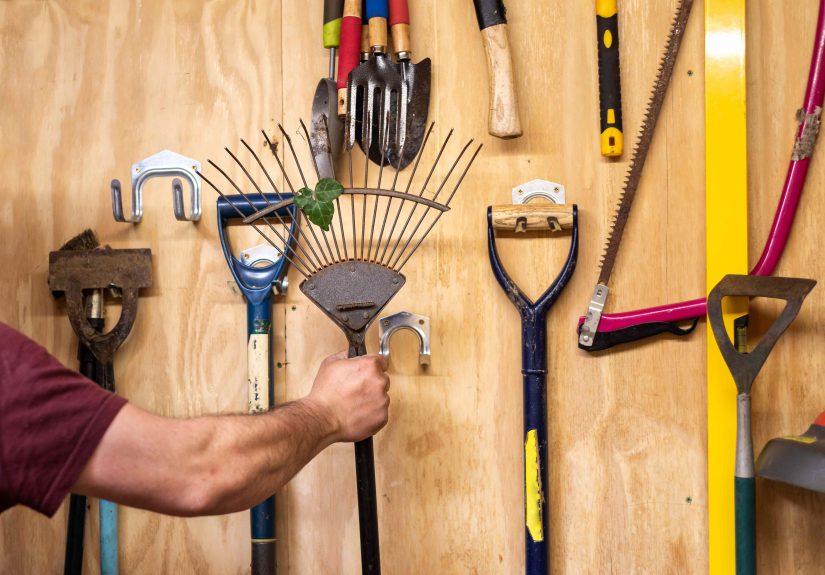
Step 8: Store Tools the Right Way
Once everything is clean, dry, sharp, and lightly oiled, store tools in a dry place. Hanging them on a wall or pegboard is better than leaving them on a damp floor where moisture can creep back in. Keep hoses drained and coiled neatly. Store small hand tools together so you do not spend half of April looking for one pruner that somehow joined witness protection.
What About Power Tools and Lawn Equipment?
Hand tools deserve love, but larger equipment needs attention too. End-of-season garden tool storage should include mower decks, trimmers, and any other machines you used heavily. Remove grass buildup, inspect blades, check for worn parts, and follow the owner’s manual for winterizing steps.
For lawn mowers, stale fuel can become a problem during storage. Many extension experts recommend handling fuel thoughtfully at the end of the season rather than letting gas sit indefinitely. If you are unsure about the right procedure for your equipment, this is the time to check the manual instead of relying on confident guesses from that one neighbor who “fixes engines sometimes.”
The Biggest Mistakes Gardeners Make
Skipping the Job Entirely
This is the classic error. Tools get tossed into the garage after the final cleanup, and the gardener promises to deal with them “later.” Later becomes spring. Spring becomes frustration. Frustration becomes shopping for a replacement you did not need.
Putting Away Tools While They Are Still Wet
If you remember only one thing, remember this: dry tools before storage. Even clean tools can rust if they are stored damp.
Ignoring Diseased Plant Contact
Pruning an infected branch and then moving on without disinfecting the blade is an easy way to spread trouble around the landscape. Clean tools matter. Clean cutting tools matter even more.
Forgetting the Handles
Gardeners often baby the metal and ignore the wood. Then one day a splintered handle introduces itself at high speed. Not ideal.
Assuming Spring You Will Be More Organized
Spring You is enthusiastic, optimistic, and busy. Do not hand that version of yourself a pile of rusty nonsense.
Why This One Habit Pays Off Every Year
Good garden tool maintenance is not just about preserving objects. It improves the whole rhythm of gardening. Clean pruners make better cuts. Sharp shovels dig faster. Oiled tools move smoothly. Well-stored equipment is easier to find, safer to use, and less likely to fail when you finally get a perfect weekend to work outside.
There is also a psychological benefit here. Opening the shed in spring and seeing tools that are ready to go feels fantastic. It gives you momentum. It makes the first day of planting or pruning feel like a fresh start instead of a rescue mission.
And let’s be honest: gardening already includes enough uncertainty. Weather changes. Pests arrive uninvited. Seed packets tell lies about spacing. Tool care is one of the few parts you can actually control.
A Practical Example: Five Minutes Now or Fifty Dollars Later
Imagine two gardeners at the end of fall. One scrapes the mud off the shovel, wipes down the pruners, dries them, oils the metal, and hangs everything in a dry shed. The other drops the same tools in a damp corner and calls it seasonal closure.
By spring, Gardener One starts digging immediately. Gardener Two finds rust on the shovel, sticky pruner joints, and a cracked wooden handle. One has a smooth start. The other has errands.
That is why this one task matters so much. It is not fussy. It is efficient. A short maintenance session now can save repair time, replacement costs, and a whole lot of preventable annoyance later.
Experiences Gardeners Often Share After Learning This Lesson the Hard Way
Ask a few longtime gardeners about tool care, and you will hear the same confession in different forms: “I did not think it mattered until it absolutely did.” The lesson usually arrives with a rusty pruner, a stiff pair of loppers, or a shovel that suddenly seems to have the digging power of a butter knife.
One common experience is the spring surprise. A gardener opens the shed on the first warm weekend of the year, feeling hopeful and maybe a little smug, only to discover that last fall’s muddy trowel is now orange with rust and the hand pruners are frozen shut. Instead of planting peas or trimming roses, the day gets rerouted into emergency cleanup, hardware store browsing, and muttering. It is not the most magical beginning to the season.
Another experience comes from gardeners who battled plant disease one year and then unknowingly helped it come back the next. Maybe they pruned infected tomato plants, cut back damaged perennials, or worked through a patch of shrubs with fungal issues. Without cleaning and disinfecting the blades well, those tools quietly carried trouble around the yard. Many gardeners only become serious about sanitation after seeing disease spread in a way that seemed mysterious at the time and painfully obvious later.
Then there are the gardeners who learn to appreciate sharp tools the moment they finally use them properly. A sharpened hoe glides. A sharpened spade bites into soil instead of bouncing off it like a disappointed spoon. Clean pruners make neat cuts that feel almost elegant. People often do not realize how much extra effort dull tools demand until they compare them side by side with well-maintained ones.
Wooden handles tell their own story. Plenty of gardeners remember grabbing an old rake or shovel and feeling rough splinters, loose heads, or hairline cracks that appeared after a season of weather exposure and zero maintenance. A little sanding and oil would have taken only minutes, but once the handle dries out badly, the repair gets more complicated and replacement becomes more likely.
Experienced gardeners also talk about the satisfaction factor. Cleaning tools at the end of the season feels small in the moment, but it creates a sense of closure. The beds are tucked in, the hoses are drained, the tools are ready, and the shed no longer looks like a crime scene involving compost. That tidy finish makes spring feel easier before it even begins.
Over time, many gardeners develop a simple ritual: brush, wash, dry, sharpen, oil, hang. Maybe it happens on the last mild weekend of fall. Maybe it happens with coffee, old gloves, and a radio in the garage. It stops feeling like a chore and starts feeling like part of gardening itself. And that is probably the best experience of all: realizing that taking care of your tools is really another way of taking care of your garden.
Conclusion
So before you put your gardening tools away for the season, do this one task: give them a real cleaning and maintenance session. Remove the dirt. Wash off the sap. Dry them thoroughly. Disinfect when needed. Sharpen the edges. Oil the metal. Condition the wood. Store everything somewhere dry.
It is a simple routine with outsized rewards. Your tools last longer, your plants stay healthier, your work gets easier, and your future self gets to start spring with something rare and beautiful: a plan that actually worked.
Because in gardening, some chores are optional. This one is not.


