Table of Contents >> Show >> Hide
- Why Homeowners Love Decomposed Granite
- Tools and Materials You May Need
- How to Install Decomposed Granite in 14 Easy Steps
- Step 1: Decide Exactly How the Space Will Be Used
- Step 2: Mark the Layout Clearly
- Step 3: Calculate Materials Before You Touch a Shovel
- Step 4: Clear the Area Completely
- Step 5: Excavate to the Proper Depth
- Step 6: Grade for Drainage
- Step 7: Compact the Subgrade
- Step 8: Install Edging
- Step 9: Add the Base Layer
- Step 10: Compact the Base Thoroughly
- Step 11: Decide Whether to Use Landscape Fabric or a Stabilizer
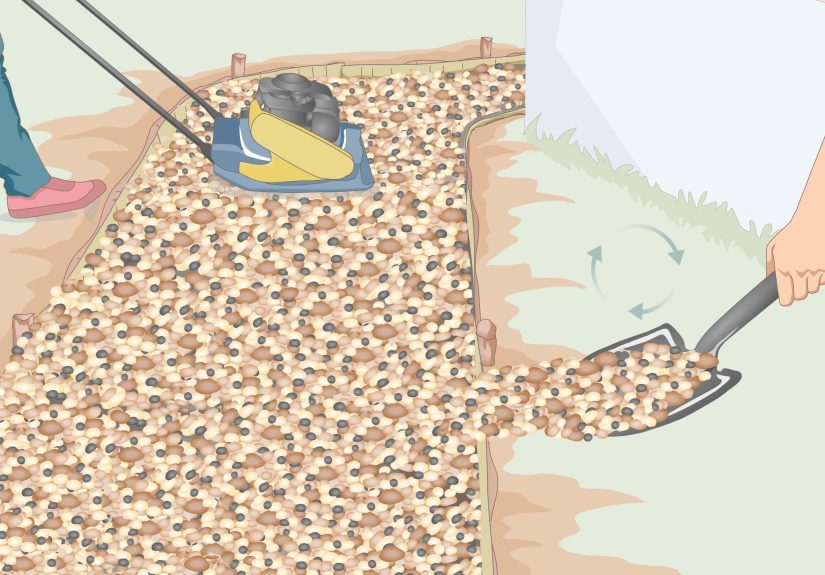
- Step 12: Spread the Decomposed Granite in Lifts
- Step 13: Lightly Moisten and Compact the Surface
- Step 14: Finish, Inspect, and Top Off Where Needed
- Common Mistakes That Can Ruin a DG Installation
- How to Maintain Decomposed Granite After Installation
- Is Decomposed Granite Right for Your Project?
- Real-World Experiences and Lessons From Installing Decomposed Granite
- Conclusion
Decomposed granite has a funny talent: it can make a backyard look like it belongs in a glossy landscape magazine without forcing your wallet to cry in the driveway. It is natural-looking, versatile, and often easier to install than formal pavers or poured concrete. That said, “easy” does not mean “dump it on the ground and hope for the best.” That strategy usually ends with ruts, weeds, wandering gravel, and a path that looks like it lost an argument with gravity.
If you want a decomposed granite surface that feels firm underfoot, drains well, and still looks good after more than two weekends of use, installation matters. The good news is that the process is straightforward when you break it into manageable pieces. In this guide, you will learn how to install decomposed granite step by step, which tools help most, what mistakes to avoid, and how to keep the finished surface looking clean instead of chaotic.
Whether you are building a garden path, patio, sitting area, or casual walkway, this method will help you create a surface that looks intentional instead of accidental. Put on your work gloves, bring water, and prepare to become the kind of person who suddenly has opinions about edging.
Why Homeowners Love Decomposed Granite
Before getting into the 14 steps, it helps to know why decomposed granite is such a popular landscaping material. DG is crushed and weathered granite made up of small particles and fines. Installed correctly, it creates a natural, compactable surface that works especially well for paths, patios, and low-key outdoor gathering spaces.
It is popular because it offers a nice balance between beauty and practicality. It looks softer and more organic than concrete, usually costs less than premium hardscape options, and can fit a wide range of styles, from desert modern to cottage garden to “I just want the mud gone.” It also tends to blend beautifully with drought-tolerant landscaping, native plants, boulders, and simple steel or stone edging.
Still, decomposed granite is not magic. Loose DG can migrate, erode, or wear unevenly if the base is weak or the surface is placed too thickly all at once. Stabilized DG can help in some situations, especially where you want a firmer, less dusty finish. Choosing the right approach starts with understanding your site.
Tools and Materials You May Need
Most DIY installations use a fairly standard set of tools and materials: measuring tape, stakes, string or marking paint, a shovel, rake, wheelbarrow, hand tamper or plate compactor, edging, base material, decomposed granite, and a hose with a gentle spray. Landscape fabric is optional, depending on your soil conditions and weed pressure. For larger areas, renting a plate compactor is usually worth every penny because your arms deserve rights too.
How to Install Decomposed Granite in 14 Easy Steps
-
Step 1: Decide Exactly How the Space Will Be Used
Start with the end in mind. Is this a decorative garden path, a patio for chairs and a fire pit, or a walkway that gets constant foot traffic? A casual side-yard path can tolerate a simpler build than a surface that supports dining furniture, bicycles, or frequent guests. The intended use affects your excavation depth, base thickness, and whether stabilized DG is worth the upgrade.
-
Step 2: Mark the Layout Clearly
Use stakes and string, a garden hose, or marking paint to outline the space. Straight lines are simple, but curves can look more natural and inviting. Check widths before you dig. A path that looks charming on paper can feel annoyingly narrow in real life, especially if two people need to pass comfortably. This is also the time to think about transitions where the DG will meet grass, mulch, pavers, or a doorway.
-
Step 3: Calculate Materials Before You Touch a Shovel
Measure the square footage so you can estimate how much base material and decomposed granite to order. Many installers use a compacted base and a separate DG surface layer, so calculate both. Ordering too little means project delays; ordering too much means you suddenly own a decorative mountain. Add a little extra for touch-ups and future maintenance, especially if the project is larger than a tiny garden path.
-
Step 4: Clear the Area Completely
Remove weeds, turf, roots, rocks, sticks, and any debris that could interfere with grading. Do not install over soft organic material and hope it sorts itself out later. It will not. If the area has active weed growth, remove as much of the root material as possible. A clean work area gives you a more even subgrade and reduces the chance of future bumps, sink spots, and surprise plant rebellions.
-
Step 5: Excavate to the Proper Depth
For many pedestrian projects, excavation often ends up around 4 to 6 inches total, depending on the thickness of the base and the DG layer you plan to install. The goal is to create enough room for a stable build, not just a cosmetic topping. Shallow excavation is one of the most common reasons a DG surface fails early. If the space will handle heavier loads, deeper prep may be necessary.
-
Step 6: Grade for Drainage
Once excavated, shape the area so water has somewhere to go. You do not need dramatic angles that make patio chairs feel seasick, but you do want a gentle slope that prevents puddling. Drainage is especially important near foundations, gates, and low spots where water tends to collect. Decomposed granite performs best when water can move through and away from the surface instead of sitting around plotting erosion.
-
Step 7: Compact the Subgrade
Before any base material goes down, compact the exposed soil. This step is easy to underestimate and annoying to redo later. A loose subgrade can settle unevenly, which means the finished surface may dip, shift, or crack in spirit if not in form. For a small project, a hand tamper can work. For anything larger, a plate compactor speeds things up and produces a more consistent result.
-
Step 8: Install Edging
Edging is what keeps decomposed granite from slowly escaping into the lawn like it has somewhere better to be. Metal, stone, brick, redwood, or other sturdy edging materials can work, as long as they are secured well and set to the correct finished height. Proper edge restraint helps maintain clean lines, keeps the material contained during compaction, and improves the long-term appearance of the project.
-
Step 9: Add the Base Layer
Spread a compactable base such as crushed stone or road base. For many walkway and patio projects, a compacted base in the range of roughly 2 to 4 inches is common. This layer provides structure, helps lock the whole system together, and supports drainage. Skip the base, and your DG surface may look smooth for about five minutes before traffic, weather, and time start rearranging it.
-
Step 10: Compact the Base Thoroughly
Compact the base before moving on. If you need a thicker base, install it in lifts rather than dumping the whole depth in one go. Compaction is not glamorous, but it is what separates a professional-looking surface from a crunchy sandbox. Walk the area and look for soft spots, wobble, or uneven grade. Fix those now. Future-you will be deeply grateful and considerably less sweaty.
-
Step 11: Decide Whether to Use Landscape Fabric or a Stabilizer
This is where your site conditions matter. In some installations, landscape fabric is used to help suppress weeds and separate soil from the aggregate layers. In others, a stabilizing binder is preferred to help resist shifting, erosion, and dust. On flat decorative paths, standard DG may be enough. On busier paths or mildly sloped areas, stabilized DG can deliver a firmer, cleaner finish. The right choice depends on traffic, drainage, maintenance goals, and local climate.
-
Step 12: Spread the Decomposed Granite in Lifts
Now comes the part people picture when they imagine installing DG. Spread the decomposed granite evenly over the compacted base. For best results, do not place the whole finished thickness in a single fluffy layer. Install it in manageable lifts so it can compact evenly. A final compacted DG depth of around 2 to 3 inches is common for many pathways and patios, but adjust for your project and product.
-
Step 13: Lightly Moisten and Compact the Surface
After spreading each lift, lightly water the surface so the fines settle and the material compacts more effectively. The key word here is lightly. You want damp, not muddy. Then compact the DG thoroughly. Repeat the process until you reach the desired finished grade. This step helps create a tighter, more stable surface and can improve the overall appearance by bringing the texture together in a cleaner, more intentional way.
-
Step 14: Finish, Inspect, and Top Off Where Needed
Rake the surface smooth, check the edges, and walk the entire area. Look for low spots, uneven transitions, or places where material pulled away from the edging during compaction. Add a little more DG where needed, moisten lightly, and compact again. Once the surface is even, neat, and comfortable underfoot, you are done. Congratulations: you have installed decomposed granite without accidentally inventing a rock beach.
Common Mistakes That Can Ruin a DG Installation
The biggest mistakes are usually not dramatic; they are subtle shortcuts. Failing to excavate deeply enough, skipping the compacted base, ignoring drainage, or placing DG too thickly in one lift can all shorten the life of the surface. Weak edging is another common problem. If the edges are not restrained properly, the field of DG can begin to spread and flatten over time, which makes the whole project look tired and unfinished.
Another issue is using decomposed granite in places where it is not the best fit. Steeper slopes can be tricky because loose DG is more likely to migrate or erode. In those cases, a stabilizer, a different hardscape material, or a redesigned route may be smarter than forcing DG into a job it does not want.
How to Maintain Decomposed Granite After Installation
A good DG installation is relatively low-maintenance, but not no-maintenance. Those are different creatures. Sweep or blow off leaves and debris regularly so organic matter does not build up on the surface. Rake lightly if small areas become uneven. Pull weeds early, especially around the edges. Top up thin spots as needed, then moisten and recompact the repair so it blends in.
After heavy rain, inspect the surface for washouts, edge erosion, or low areas. If the installation is stabilized, follow the manufacturer’s maintenance guidance for patching or refreshing the surface. With standard DG, occasional touch-ups are normal. Think of it as routine grooming rather than a full lifestyle crisis.
Is Decomposed Granite Right for Your Project?
Decomposed granite is a strong option when you want a natural-looking surface, solid drainage performance, and a more relaxed style than formal paving. It works well for garden pathways, patios, seating areas, side yards, and trails. It may be less ideal for very steep slopes, places with aggressive runoff, or projects that require an ultra-rigid finish with almost no movement over time.
The sweet spot for DG is the homeowner who wants a surface that looks elegant but not fussy, feels practical but not industrial, and can be installed with careful DIY effort. If that sounds like your project, decomposed granite can be a beautiful answer.
Real-World Experiences and Lessons From Installing Decomposed Granite
One of the most useful things about decomposed granite is that it teaches you very quickly whether you respect prep work. Many first-time installers fall in love with the finished look and underestimate the invisible structure underneath. Then they discover a hard truth of landscaping: the part nobody compliments is often the part doing all the work. The base, the edging, the grading, and the compaction are what make the pretty surface possible.
A common homeowner experience goes something like this: the first section feels easy, so confidence rises. Maybe a little too much. The next thought is usually, “Do I really need to compact this again?” The answer, almost always, is yes. People who rush the compaction step often notice footprints, soft patches, or an uneven look once the area starts getting real use. People who take their time with the base and surface lifts usually end up bragging about the result to neighbors within forty-eight hours. This is science.
Another real-world lesson is that edging matters more than most people expect. Without a solid border, DG slowly wanders. It does not leave in a dramatic way. It just starts showing up where it does not belong: in the lawn, in nearby mulch, along stepping stones, in the dog’s favorite corner, and somehow inside the house. A well-installed edge makes the whole project look sharper and keeps maintenance from becoming a recurring side quest.
Drainage is another big one. On paper, a site can seem flat enough. In practice, water always has opinions. Homeowners often realize after the first rainstorm whether they shaped the grade correctly. A beautifully compacted patio that collects standing water is not a relaxing retreat; it is a shallow geological disappointment. The people happiest with their DG installations are usually the ones who checked water flow before the final finish and adjusted low spots early.
There is also the matter of choosing between standard and stabilized decomposed granite. Some people love the softer, looser feel of regular DG in a garden path because it looks casual and natural. Others quickly decide they want more firmness, less dust, and better resistance to wear, especially in high-traffic areas or where strollers, wheelbarrows, or patio furniture are involved. That is not a failure of the material. It is simply the reality that one yard’s dreamy pathway is another yard’s daily shortcut.
Maintenance surprises people in both directions. Some expect constant upkeep and are relieved to find that a well-installed DG surface only needs occasional raking, debris removal, and small touch-ups. Others assume it will behave like concrete and are mildly offended when a little topping off becomes necessary after weather or use. The happiest owners tend to treat decomposed granite like a living landscape element rather than a permanent slab. It holds up well, but it still appreciates a little attention.
Perhaps the best thing people say after finishing a DG project is that the space finally feels finished. A muddy side yard becomes a clean walkway. An awkward patch of bare soil becomes a seating area. A random path through the garden suddenly looks designed. That transformation is why decomposed granite remains so appealing. It offers structure without stiffness, charm without excessive formality, and a DIY process that is genuinely achievable when done carefully. In other words, it is one of the rare home projects that can be both practical and a little bit magical.
Conclusion
If you want an outdoor surface that looks natural, feels inviting, and does not require a contractor convoy just to get started, decomposed granite is a smart choice. The key is not rushing the installation. Mark the area carefully, excavate to the right depth, control drainage, build a compacted base, contain the edges, and install the DG in lifts. Do that, and your finished path or patio will look far better and last far longer.
In short, decomposed granite rewards patience. It is forgiving enough for a determined DIYer, but it still respects craftsmanship. Install it the right way, and your yard gets a beautiful upgrade. Install it the lazy way, and your rake will become your new part-time manager.


