Table of Contents >> Show >> Hide
- What Is a Geometric Kids Art Table?
- Why the Fab Furniture Flippin' Contest Theme Works So Well
- Design Inspiration: Bright, Useful, and Built for Real Kids
- Materials and Tools for a Geometric Kids Art Table
- Step-by-Step: How to Create the Geometric Tabletop
- Storage Ideas That Make the Table More Useful
- Safety Tips for Kids Furniture and Art Supplies
- SEO-Friendly Styling Ideas for a Modern Playroom
- Common Mistakes to Avoid
- Budget-Friendly Ways to Recreate the Look
- Experience Section: Lessons From Building and Using a Geometric Kids Art Table
- Conclusion
A kids art table is not just a small table with crayons nearby. Done well, it becomes a tiny headquarters for big ideas: paper-roll murals, sticker negotiations, glitter diplomacy, marker experiments, and the occasional “I made you a dinosaur that is also a sandwich” masterpiece. The Geometeric Kids Art Table – September Fab Furniture Flippin’ Contest concept blends three things that DIY lovers adore: useful furniture, bold geometric design, and the sweet satisfaction of building something custom without paying boutique-store prices.
This project was inspired by the world of furniture flipping, where old or basic furniture gets a second life through clever building, sanding, painting, staining, and styling. In the September Fab Furniture Flippin’ Contest, the theme centered on geometry, making a children’s art table the perfect canvas. A tabletop covered in triangles, angles, color blocks, and clean painter’s-tape lines feels playful without becoming chaotic. In other words, it says, “Yes, this is for kids,” but not “A box of markers exploded in the living room and we have accepted defeat.”
Whether you are a parent, grandparent, teacher, blogger, or weekend DIY warrior with sawdust in your coffee, a geometric kids art table is a practical and charming project. It creates a dedicated art station, keeps supplies organized, encourages creativity, and adds personality to a playroom, bedroom, homeschool area, or family room. Even better, the design can be adapted to your skill level: build from lumber, flip a thrifted table, repaint an IKEA-style kids table, or refresh a hand-me-down piece that has seen better snack-covered days.
What Is a Geometric Kids Art Table?
A geometric kids art table is a child-sized activity table designed for drawing, painting, crafting, coloring, and creative play, finished with a geometric pattern. The pattern usually includes triangles, rectangles, diamonds, stripes, or irregular polygon shapes created with painter’s tape. The beauty of this style is that it does not require a fine-art degree. If you can place tape on a tabletop and paint inside the lines, you are already dangerously close to looking like a design genius.
The most successful kids art tables combine form and function. A large flat surface gives children room to work. Storage cubbies or shelves hold crayons, paper, washable markers, glue sticks, safety scissors, coloring books, and craft supplies. A built-in paper roll adds bonus points because children love pulling fresh paper across the table like they are preparing blueprints for a very serious cookie factory.
The geometric finish makes the table visually exciting while hiding small imperfections. This matters because kids furniture lives a dramatic life. It will meet juice cups, sticky fingers, rogue stickers, dried glue, and at least one crayon that was “definitely not me.” A colorful geometric pattern helps the table age gracefully and keeps it looking intentional, even after real-life use begins.
Why the Fab Furniture Flippin’ Contest Theme Works So Well
The Fab Furniture Flippin’ Contest was built around creative furniture makeovers, monthly themes, and sponsored challenges. For a geometry-themed month, a kids art table makes perfect sense. Geometry is already part of childhood learning: circles, squares, triangles, rectangles, patterns, symmetry, and spatial thinking. Putting those shapes directly onto the furniture turns the table into both a design feature and a subtle learning tool.
September is also a natural time for this type of project. Back-to-school season brings fresh routines, new supplies, and renewed interest in organized learning spaces. A kids craft table can become a homework warm-up zone, a preschool art center, or a quiet corner for after-school decompression. Not every child wants to talk about their day immediately, but give them markers and paper and suddenly the whole story appears in rainbow scribbles.
The contest-style approach also encourages makers to push beyond plain paint. Instead of simply brushing a table white and calling it a day, the geometric theme invites color blocking, pattern planning, contrasting finishes, and playful details. It turns a practical build into a statement piece.
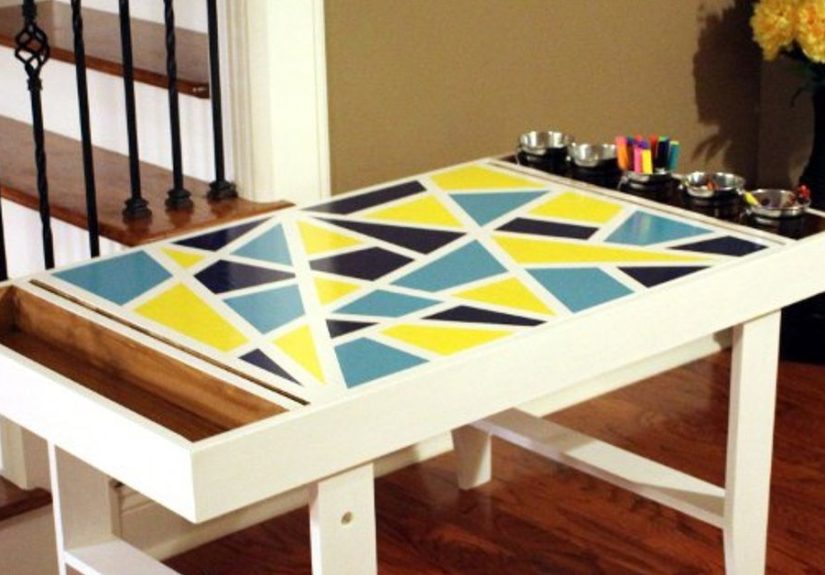
Design Inspiration: Bright, Useful, and Built for Real Kids
The strongest inspiration for this project is a handmade children’s art table with a white base, stained storage areas, colorful geometric tabletop accents, and an optional paper roll. The original build used a long rectangular shape, child-friendly proportions, storage cubbies, and a finish designed to feel cheerful rather than overly precious. That matters because children need spaces where they feel invited to create, not warned to “please do not touch the beautiful furniture.”
A good art table should say yes. Yes, you can draw here. Yes, the markers belong here. Yes, your paper has a place. Yes, we can clean this surface. Yes, creativity is welcome, even when creativity looks suspiciously like six orange circles and a blue worm wearing boots.
Key Features to Consider
When planning your own DIY kids art table, focus on the features that make daily use easier. A wide tabletop gives kids space to spread out. Rounded or softened edges make the piece more child-friendly. Open cubbies allow quick access to supplies. A paper-roll holder turns the table into a continuous drawing station. A durable topcoat helps protect the painted finish from markers, water, and repeated wiping.
Size also matters. A table that is too tall can make children hunch their shoulders, while one that is too low can feel cramped. Ideally, children should sit with feet supported, knees comfortably bent, and arms resting naturally on the tabletop. If the table is meant for toddlers, keep it low and simple. If it is meant to grow with preschool and early elementary kids, build slightly larger and pair it with appropriately sized chairs or stools.
Materials and Tools for a Geometric Kids Art Table
The exact material list depends on whether you are building from scratch or flipping an existing piece. For a full build, common materials include pine boards, plywood, wood glue, pocket-hole screws, wood filler, sandpaper, primer or bonding prep, furniture paint, acrylic craft paint, painter’s tape, stain, and a clear protective topcoat. For a makeover, you may only need cleaner, sandpaper, primer, paint, tape, and sealer.
Useful tools include a drill, sander, saw, measuring tape, clamps, paintbrushes, foam rollers, and a level. Pocket-hole joinery is popular for DIY furniture because it creates strong hidden connections, but beginners can also start with a pre-made table and focus on the finishing process. There is no shame in skipping the lumber aisle if your current relationship with power tools is “polite but distant.”
Paint and Finish Choices
For kids furniture, durability is not optional. A children’s art table must survive wiping, bumping, coloring, and the mysterious sticky substance that appears even when no snacks were served. Water-based furniture paints are popular because they dry relatively quickly, clean up with water, and come in a wide range of colors. Milk paint, acrylic craft paint, and furniture enamel can all work, depending on the surface and prep.
A clear topcoat is especially helpful on the tabletop. High-use surfaces benefit from multiple thin coats rather than one thick coat. Thin coats cure more evenly and reduce brush marks. Gloss, satin, and flat sheens each create a different look. Gloss is easy to wipe but shows imperfections more readily. Satin is a reliable middle ground. Flat or dead-flat finishes look modern but may need extra care depending on the product.
Step-by-Step: How to Create the Geometric Tabletop
The geometric tabletop is the star of the project, and it is easier than it looks. The trick is to let the tape do the heavy lifting. Start with a fully painted and dry base coat. White is a popular background because bright colors pop against it, but navy, pale gray, blush, sage green, or natural wood can also look beautiful.
Step 1: Prep the Surface
Clean the table thoroughly. If it is raw wood, sand it smooth and remove all dust. If it is previously finished, scuff-sand the surface so paint can grip. Fill dents or screw holes with wood filler, let it dry, and sand again. Do not rush this stage. Paint is honest; it will reveal every bump you hoped it would politely ignore.
Step 2: Apply the Base Color
Brush or roll on your base coat in thin layers. Let each coat dry according to the paint manufacturer’s instructions. Two coats are usually enough for solid coverage, though white paint may need a third coat depending on the surface. Lightly sanding between coats can create a smoother finish.
Step 3: Tape the Geometric Pattern
Use painter’s tape to outline the border of the tabletop. Then run long diagonal strips from edge to edge. Add shorter pieces to divide the space into triangles and irregular shapes. Do not overthink it. The best geometric patterns often look balanced but not perfectly predictable. Aim for a mix of large, medium, and small sections so the design feels energetic.
Press the tape edges firmly to reduce paint bleed. For extra-crisp lines, brush a thin layer of the base color over the tape edges before adding the accent colors. This seals tiny gaps and helps keep the colored paint where it belongs. It is a small trick with a big payoff, like finding an extra cookie in the box.
Step 4: Add Accent Colors
Choose three to five colors that work well together. For a cheerful kids table, try turquoise, coral, yellow, blue, and orange. For a softer modern look, try sage, clay, cream, dusty blue, and mustard. For a rainbow-inspired art room, go bold but keep some white space so the design can breathe.
Paint each taped-off section carefully. Do not overload the brush, as excess paint can seep under the tape. Two light coats are better than one heavy coat. Remove the tape while the final coat is slightly wet or just dry to the touch, depending on the paint type. Pull slowly at an angle for cleaner edges.
Step 5: Seal the Tabletop
Once the paint is fully dry, protect it with a clear topcoat. Apply multiple thin coats, allowing proper drying time between layers. A kids art table is a high-use surface, so sealing is the difference between “adorable handmade heirloom” and “why is there purple marker permanently living here now?”
Storage Ideas That Make the Table More Useful
A beautiful tabletop is nice, but storage is what keeps a kids art area from becoming a craft-supply avalanche. Open cubbies are excellent because children can see what they have and learn to put items back. Small bins or baskets can separate crayons, markers, stamps, stickers, glue, and paper scraps.
If the table has side shelves, assign categories. One cubby can hold blank paper, another can hold coloring books, and another can hold washable supplies. Keep messy materials like paint, glitter, and permanent markers out of everyday reach unless an adult is supervising. Glitter, as every parent eventually learns, is less of a craft supply and more of a long-term household tenant.
A paper roll is one of the best upgrades. Install a wooden dowel through two side supports or mount a roll holder under one end of the table. Children can pull the paper across the tabletop, draw, tear off the sheet, and begin again. It reduces loose-paper clutter and makes spontaneous art easier.
Safety Tips for Kids Furniture and Art Supplies
Because this table is for children, safety should be built into the project from the beginning. Sand sharp edges and corners until they feel smooth. Countersink screws or cover them so no metal edges are exposed. Make sure the table sits level and does not wobble. If the design includes tall storage, nearby shelving, or wall-mounted accessories, secure larger pieces properly to prevent tipping hazards.
Choose child-appropriate art supplies. Look for washable markers, crayons, and paints labeled for children. Art materials with recognized non-toxic certification are a safer choice for young makers. Avoid adult-grade solvents, specialty finishes, or caution-labeled materials in a child’s everyday art station.
Let paint and topcoats cure fully before turning the table over to kids. Dry to the touch is not always the same as fully cured. A finish may feel dry but still be soft underneath, making it easier to scratch or dent. Give the table extra curing time before serious use. The crayons can wait. They will be dramatic about it, but they can wait.
SEO-Friendly Styling Ideas for a Modern Playroom
If this project will be featured on a blog, photographed for social media, or used in a home decor article, style it with intention. Place the geometric kids art table near natural light. Add a small chair or stool, a roll of kraft paper, a cup of crayons, and a few finished drawings. Keep the scene real but not messy. One charming scribble says creativity; seventeen uncapped markers say emergency.
For a modern playroom, pair the table with neutral walls and bright accents. For a Montessori-inspired area, keep supplies low and accessible. For a homeschool room, add labeled bins and rotate materials weekly. For a shared family space, use colors that connect with the rest of the room so the table feels integrated rather than randomly dropped from a craft-store spaceship.
Common Mistakes to Avoid
The first mistake is skipping prep. Sanding and cleaning may not be glamorous, but they are the foundation of a durable finish. The second mistake is using too much paint. Thick coats can peel, bubble, or leave ridges along tape lines. The third mistake is forgetting scale. A table that looks cute online may be too tall, too wide, or too awkward for your child’s actual size.
Another common issue is choosing colors without testing them together. Paint small samples on scrap wood or cardboard before committing. Colors that look perfect on a screen may behave differently under warm indoor light. Finally, do not forget the topcoat. A geometric tabletop without protection is basically a dare to every marker in the house.
Budget-Friendly Ways to Recreate the Look
You do not need a large budget to make a geometric kids art table. Start with a thrifted coffee table, an old kids desk, a small dining table with shortened legs, or a basic flat-pack children’s table. Sand it, paint it, tape a geometric design, and seal it. The transformation can be dramatic even when the starting piece is deeply unimpressive.
Use leftover paint from other home projects to create the pattern. Mix custom colors from small craft paints. Replace expensive storage baskets with dollar-store bins or repurposed containers. If you cannot add a built-in paper roll, place a tabletop paper holder nearby. The goal is not to create a museum piece. The goal is to create a creative zone that kids actually use.
Experience Section: Lessons From Building and Using a Geometric Kids Art Table
The most important experience from a project like Geometeric Kids Art Table – September Fab Furniture Flippin’ Contest is that children respond quickly to spaces made specifically for them. A child-sized art table feels different from a kitchen counter or adult desk. It gives kids ownership. They know where the paper lives, where the crayons go, and where their projects can happen without asking for permission every five minutes. That sense of independence can make art time smoother for everyone.
Another lesson is that the geometric design is surprisingly forgiving. At first, taping the tabletop may feel intimidating. You may wonder whether the angles are balanced or whether one triangle looks like it got lost on the way to math class. But once the colors go on and the tape comes off, the whole design usually comes together. The irregularity is part of the charm. Unlike stripes or checkerboards, geometric patterns do not demand perfect measurement. They reward playful composition.
Durability is where experience becomes very practical. Kids do not use furniture gently because kids are not tiny museum curators. They lean, press, tap, spill, slide paper around, and sometimes test whether a crayon can also be used as a percussion instrument. A good topcoat makes cleanup easier and protects the design underneath. After using a table like this, many DIYers learn that finishing is not the boring final step. It is the bodyguard of the entire project.
Storage also changes the way the table functions. Without storage, art supplies migrate. Markers end up under the couch. Glue sticks disappear into the same mysterious dimension that eats socks. With cubbies or bins, supplies have a home. Children can help clean up because the system is visible and simple. The best storage setup is not complicated. It should be obvious enough that a tired adult and an enthusiastic preschooler can both understand it.
One of the sweetest experiences is watching how a dedicated table encourages process art. Children may not care about making a perfect finished product. They care about exploring color, movement, texture, and story. A geometric art table supports that exploration by making materials accessible and the surface inviting. The table becomes a place for experiments: long paper roads, sticker cities, hand-drawn maps, birthday cards, pretend menus, and abstract works that may or may not be “a dragon in the rain.”
There is also a design lesson for adults: playful furniture does not have to look messy. The geometric pattern gives the table energy, but the clean lines keep it stylish. That makes it easier to place in a shared room where adults still care about decor. A white base with colorful accents can feel fresh and modern. A natural wood base with muted geometric shapes can feel warm and Scandinavian-inspired. A bold rainbow tabletop can turn the art corner into the happiest spot in the house.
Finally, this project teaches patience. Sanding takes time. Paint needs to dry. Topcoat needs to cure. Tape lines require a steady hand. But the finished table is worth the wait because it becomes more than furniture. It becomes a memory-making station. Years later, the table may have tiny dents, faint marker shadows, and a few scratches, but those marks tell the story of actual use. A perfect table is nice. A table covered in years of creativity is better.
Conclusion
The Geometeric Kids Art Table – September Fab Furniture Flippin’ Contest idea proves that practical children’s furniture can still be stylish, affordable, and deeply personal. With smart prep, durable paint, a sealed tabletop, thoughtful storage, and a bold geometric pattern, a simple table becomes a creative command center for young artists. It supports drawing, painting, coloring, storytelling, early learning, and independent play while adding a cheerful design moment to the room.
Whether you build from scratch or flip a secondhand table, the project is flexible enough for beginners and rewarding enough for experienced DIYers. Keep the proportions child-friendly, choose safe materials, protect the finish, and let the pattern bring the personality. The result is a table that invites kids to create, gives supplies a home, and reminds adults that sometimes the best furniture projects are the ones that end with crayons on the table and a proud little artist saying, “Look what I made.”
Note: The title keeps the requested spelling “Geometeric” for exact-match publishing needs, while the article uses the standard spelling “geometric” naturally for readability and SEO clarity.