
Table of Contents >> Show >> Hide
- Before You Touch a Screw: Safety, Tools, and Setup
- Identify Your PS2 Model: Fat vs. Slim
- Part 1: How to Disassemble a “Fat” PlayStation 2
- Step 1: Prep and position
- Step 2: Remove the bottom screw covers (a.k.a. the “secret doors”)
- Step 3: Remove the case screws
- Step 4: Separate the top and bottom shells
- Step 5: Note the front assembly (power/eject area)
- Step 6: Remove the optical drive assembly (when applicable)
- Step 7: Fan access and cleaning (or replacement)
- Step 8: Power supply caution (read twice)
- Step 9: Motherboard access (optional, advanced)
- Part 2: How to Disassemble a PlayStation 2 Slimline
- Step 1: Unplug and flip the console
- Step 2: Remove rubber feet / screw covers
- Step 3: Remove the base screws
- Step 4: Separate the shells
- Step 5: Watch for small connections (IR sensor / clock battery on some models)
- Step 6: Remove the optical drive
- Step 7: Fan removal (if needed)
- Step 8: Motherboard access (optional)
- Common Gotchas (So You Don’t Invent New Words)
- Cleaning While You’re In There (The Whole Point for Many People)
- Reassembly Checklist (Reverse Order… with a brain)
- Quick FAQs
- Experience Notes (About of “What It’s Actually Like”)
- Conclusion
The PlayStation 2 is basically the cockroach of consoles: it survives decades, questionable ventilation,
and at least one household move where it rode in a cardboard box labeled “Cables???” and still boots up
like it’s 2004. But eventually, dust builds up, fans get noisy, disc drives get moody, and you start wondering
if your PS2 is coughingor just judging you.
This guide walks you through a careful, step-by-step PS2 disassembly, with notes for both the original
“fat” PS2 and the slimmer PS2 Slimline. We’ll keep it practical, a little funny, and very focused on not
turning your console into a “parts-only” listing.
Before You Touch a Screw: Safety, Tools, and Setup
Safety first (because electricity does not care about nostalgia)
- Unplug everything: power cable, AV cable, controllers, memory cards, network adapter, and any accessories.
- Let it sit for a bit after unplugging (especially a fat PS2). Power supplies can hold residual charge.
- Work on a clean, dry surface with good lighting.
- If you’re a teen: it’s smart to do this with an adult nearbymostly because tiny screws love to disappear.
Tools you’ll actually use
- Small Phillips screwdriver (a #1 is commonly useful)
- Smaller Phillips screwdriver (for internal screws)
- Plastic spudger or guitar pick (for gentle prying)
- Tweezers (helpful for ribbon cables and small connectors)
- Small container or magnetic tray (to keep screws organized)
- Optional but nice: anti-static wrist strap
Organization tip (the difference between “repair” and “regret”)
Use a piece of paper and draw a quick “map” of your PS2. As you remove screws, tape them down near the drawing
or label piles in a tray. PS2 screws come in multiple lengths, and mixing them up is a classic way to crack plastic
or end up with a “mystery screw” at the end.
Identify Your PS2 Model: Fat vs. Slim
Flip your PS2 over and look for the model number on the label. It usually starts with SCPH-
followed by numbers (for example, SCPH-50001 or SCPH-70012). The disassembly flow differs depending on whether you have:
- Fat PS2: larger, heavier, typically with an internal power supply and expansion bay on many models.
- PS2 Slimline: thinner, external power brick, and a top-loading disc lid.
If you’re not sure which you have: if your console could double as a tiny footrest, it’s probably the fat model.
Part 1: How to Disassemble a “Fat” PlayStation 2
These steps are designed to be broadly accurate across common fat revisions. Minor internal layouts can vary,
but the overall approach stays consistent: remove the shell, then work inward carefully.
Step 1: Prep and position
- Power down fully and unplug all cables.
- Place the console upside down on a soft cloth to avoid scratching the top shell.
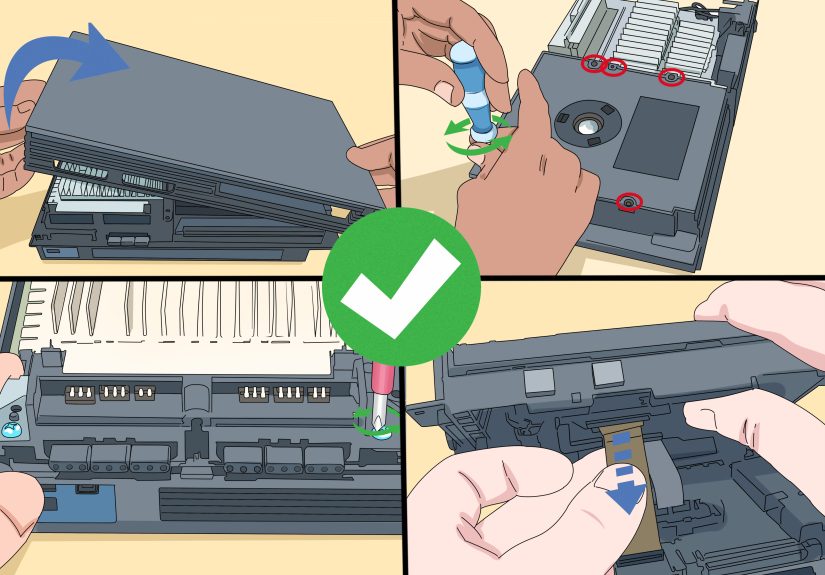
Step 2: Remove the bottom screw covers (a.k.a. the “secret doors”)
On many fat PS2 models, the outer shell screws are hidden under small plastic caps and/or rubber feet on the bottom.
Use a plastic spudger or a small flat tool to lift these covers gently.
- Work slowlyold plastic can be brittle.
- Keep the covers together so they can go back exactly where they came from.
Step 3: Remove the case screws
Once the covers are off, remove the screws securing the bottom shell. Put them in a labeled group.
(If you’re following a screw-map system, you’re already winning.)
Step 4: Separate the top and bottom shells
- Flip the console right-side up.
- Lift the top shell slowly. If it resists, don’t force itdouble-check for missed screws.
- Watch for any front-panel button assemblies or ribbon connections depending on revision.
Step 5: Note the front assembly (power/eject area)
The front area often has small plastic structures and sometimes ribbon cables. If you need deeper access
(like to the disc drive or fan), you may have to remove or shift the front assembly. The key rule: if you see a ribbon cable,
treat it like it’s made of dry leaves and dreams.
Step 6: Remove the optical drive assembly (when applicable)
In many fat PS2 layouts, the disc drive sits prominently near the top once the shell is off. It’s typically secured by screws
and connected to the motherboard with ribbon cables.
- Before pulling any ribbon cable, look for a locking flap or connector latch. Many ribbon sockets have a small hinged bar that flips up.
- Pull ribbons straight and gentlyno twisting.
Step 7: Fan access and cleaning (or replacement)
Once you’re inside, you’ll usually be able to access the fan and heatsink area. If your PS2 sounds like it’s attempting liftoff,
the fan probably needs cleaning at minimum.
- Disconnect the fan cable by pulling the connector straight up or straight out (depending on connector type).
- Remove fan screws and lift the fan out carefully.
- Clean dust using compressed air (short bursts) or a soft brush. Hold the fan blades in place when blowing air so it doesn’t overspin.
Step 8: Power supply caution (read twice)
Many fat PS2 models have an internal power supply board. You generally do not need to remove it
just to clean dust or access the disc drive. If you do go near it, avoid touching solder points and components.
When in doubt, don’t handle the power supply boardfocus on cleaning accessible areas and reassemble safely.
Step 9: Motherboard access (optional, advanced)
If your goal is deep cleaning, thermal work, or component replacement, you’ll eventually reach the metal shielding and motherboard.
This involves more screws, careful cable management, and increased risk of damage if rushed.
For most people doing maintenance: stop at “shell off + fan/vents + disc drive area” unless you have a specific repair goal.
Part 2: How to Disassemble a PlayStation 2 Slimline
The Slimline is lighter, more compact, and generally easier to openbut it uses more ribbon cables and tight routing.
Translation: fewer heavy parts, more “don’t yank that.”
Step 1: Unplug and flip the console
- Unplug the power brick, AV cables, controllers, and memory cards.
- Flip the Slim upside down on a soft cloth.
Step 2: Remove rubber feet / screw covers
Many Slim models hide screws under rubber feet or small covers on the underside. Gently peel or lift them with a spudger.
Step 3: Remove the base screws
Remove the screws revealed on the bottom. Keep them together and labeled.
Step 4: Separate the shells
- Turn the console right-side up.
- Lift the top shell carefully. If it snags, stop and check for missed screws or a stubborn clip.
Step 5: Watch for small connections (IR sensor / clock battery on some models)
Some Slimline teardowns note an IR sensor ribbon and a small clock battery connection depending on revision.
If you see a small ribbon or plug, disconnect it gently rather than tugging the shell away.
Step 6: Remove the optical drive
The Slim’s optical drive is often secured with a small set of screws. After removing them:
- Lift the optical drive gently.
- Look underneath for a flex cable and peel/undo it carefully only after releasing any connector latch.
- Set the drive aside in a safe spot (preferably not the edge of your desk where gravity is practicing its stand-up routine).
Step 7: Fan removal (if needed)
The Slim’s fan is usually accessible once the top is off and the drive is moved. Disconnect the fan cable,
remove the fan screws, and lift it out.
Step 8: Motherboard access (optional)
Like the fat model, going deeper means more screws, shields, and delicate cable routing. If your goal is just cleaning,
you can often stop after you’ve cleared dust from the fan, vents, and the disc area.
Common Gotchas (So You Don’t Invent New Words)
1) Ribbon cable latches are sneaky
Many connectors have a tiny hinged latch that flips up to release the ribbon. If you pull without releasing the latch,
you can tear the ribbon or rip the connector off the board. Use a spudger, lift gently, and never force it.
2) Screw lengths matter
A longer screw in the wrong place can punch into plastic or press on a board. Label screws by section and
keep them grouped.
3) Plastic clips age like milk, not wine
If a clip doesn’t want to open, don’t “win” by force. Re-check screw locations and pry gently along seams.
Old PS2 shells can get brittle.
Cleaning While You’re In There (The Whole Point for Many People)
- Dust removal: Use compressed air in short bursts and a soft brush. Keep the nozzle at a safe distance.
- Fan blades: Hold blades still while cleaning so they don’t overspin.
- General wipe-down: Use a dry microfiber cloth on plastic surfaces.
- Isopropyl alcohol (optional): A small amount on a swab can clean grime on non-sensitive areas, but avoid soaking parts.
- Laser lens caution: Avoid touching the lens unless you’re following a careful cleaning method and know what you’re doing.
Reassembly Checklist (Reverse Order… with a brain)
- Reconnect ribbon cables straight and fully seated (and lock the latch if there is one).
- Confirm fan cable is connected before closing up.
- Do a quick visual scan: no loose screws, no pinched wires, no “extra” parts.
- Close the shell gentlyif it won’t sit flush, something inside is misaligned.
- Test boot before fully buttoning everything up (when possible).
Quick FAQs
Will disassembling my PS2 erase saves?
Not by itself. Saves are stored on the memory card (and sometimes on a hard drive setup, if you have one).
Still, remove memory cards before opening the console and keep them safe.
Do I need special tools?
Most PS2 disassembly work is done with Phillips screwdrivers and simple prying tools. An electronics toolkit is convenient,
but you don’t need a whole repair lab unless you’re going deep into board-level work.
What if a screw won’t turn?
Stop and reset. Use the correct bit size, press down firmly, and turn slowly. Stripped screws are a time-tax you don’t want to pay.
Experience Notes (About of “What It’s Actually Like”)
The first time you open a PlayStation 2, you expect it to feel like a dramatic movie moment: the camera zooms in,
the screws spin out like magic, and the console reveals its secrets in a perfectly organized layout.
What actually happens is you remove a rubber foot, it flings itself across the room like it just got drafted into the NFL,
and then you realize you don’t have a good place to put the screws. So let’s talk real-world experience.
The biggest “aha” moment for most people is learning that PS2 disassembly is less about strength and more about patience.
If you’re pulling hard, you’re probably doing it wrong. When a shell won’t lift, the culprit is almost always a missed screw
or a clip that’s still engaged. The PS2 is basically a puzzle box that only opens when you stop trying to wrestle it.
The second reality check is ribbon cables. They look harmlesslike little flat noodlesbut they are the console’s
emotional support system. A tiny latch might be the only thing keeping a ribbon in place, and the latch can be so subtle
that you’ll swear it’s part of the connector body. The best habit you can build is to pause every time you see a cable:
find where it plugs in, look for a latch, and only then disconnect it. If you treat every ribbon cable like it’s fragile glass,
you’ll avoid most disasters.
Cleaning is also more satisfying than you’d think. A PS2 that’s been sitting for years can hold an impressive amount of dust,
especially around vents and the fan area. When you blow that out (carefully), the console often runs quieter and cooler.
It’s not a guaranteed miracle cure for disc read problems, but it’s the kind of maintenance that makes you feel like a responsible adult
even if you immediately celebrate by playing a game where you drive a motorcycle off a rooftop.
One small but powerful trick: take pictures as you go. Seriously. Your phone is the world’s best “how did this cable route again?”
machine. Snap a photo before unplugging anything, especially in the Slimline where cable routing is tight and specific.
Also, photograph screw locations if you’re not using a labeled tray. Reassembly is where confidence goes to get humbled,
and photos are how you avoid reassembling your PS2 with one screw left over and a suspicious sense of doom.
Finally, accept that you’ll probably spend five minutes looking for a screw you “set right here” and another ten minutes
debating whether that tiny plastic cover was originally on the left or the right. That’s normal. That’s the hobby.
The win is when you plug it back in, the fan sounds calmer, the disc spins up without complaining, and your PS2 returns
to doing what it does best: making you feel like time travel is real.
Conclusion
Disassembling a PlayStation 2 isn’t hardbut it is detailed. The best results come from working slowly, organizing screws,
treating ribbon cables gently, and stopping the second something feels forced. Whether you’re cleaning out years of dust,
diagnosing a noisy fan, or prepping for a deeper repair, a careful teardown can give your PS2 a second (or third) life.


