
Table of Contents >> Show >> Hide
- What You’re Actually Drawing (Hint: Not “A Person”)
- Step 1: Start With Gesture (30–90 Seconds)
- Step 2: Block In a Simple Stick Figure + Landmarks
- Step 3: Turn the Stick Figure Into a 3D Mannequin
- Step 4: Refine the Figure (Clean Lines, Better Proportions, Simple Anatomy)
- Common Beginner Problems (and Fixes That Actually Work)
- A Simple 10-Minute Daily Practice Plan
- Wrap-Up: Your 4-Step Cheat Sheet
- Experience Notes: What It Feels Like to Learn This (The Honest Version)
Drawing people can feel like trying to fold a fitted sheet: somehow it’s always lumpy, your angles are haunted,
and the hands look like tiny starfish that regret their life choices. The good news: you don’t need “talent,”
a decade of anatomy textbooks, or a mystical pencil blessed by Renaissance ghosts.
You need a simple processone that artists and instructors keep circling back to because it works:
gesture → structure → forms → refinement. In other words: capture the motion, map the skeleton,
build the body like a 3D mannequin, then polish it until it looks convincingly human (or delightfully stylized).
This guide breaks it into four beginner-friendly steps, plus practical checks, examples, and a
repeatable practice routine so your figures stop looking like they’re made of uncooked spaghetti.
What You’re Actually Drawing (Hint: Not “A Person”)
When beginners say “I can’t draw people,” they usually mean “I can’t control proportion,
pose, and 3D form at the same time.” That’s like juggling while riding a bike while reading a menu.
So we separate the job into smaller jobs:
- Gesture: the movement and energy of the pose (the “story” of the body).
- Structure: simple stick/landmark placement so everything lands where it should.
- Construction: turning that structure into basic 3D shapes (a buildable mannequin).
- Refinement: clarifying edges, proportions, overlaps, and simple anatomy.
If you do these in order, your drawings improve faster because you’re solving one problem at a time
and you’ll have a clear “next move” instead of staring at the page like it owes you money.
Step 1: Start With Gesture (30–90 Seconds)
Gesture is the heartbeat of figure drawing. Before you worry about ribs, elbows, or whether your character
has the correct number of vertebrae (spoiler: it’s more than three), lock in the pose’s flow.
1A) Find the Line of Action
The line of action is an imaginary swoosh that describes the main direction of the poselike the spine’s
“mood.” In a relaxed standing pose it may be subtle; in a jump it’s dramatic. Lightly sketch that swoosh first.
It’s your roadmap.
1B) Place the Big Direction Lines
Add two simple guide lines:
- Shoulder line (tilt tells you balance and attitude)
- Hip/pelvis line (tilt tells you weight shift and stance)
Most natural poses have shoulders and hips tilting in opposite directionsthis “counter-tilt” is a cheat code for
making a figure feel alive.
1C) Keep It Loose on Purpose
In gesture, accuracy isn’t the goalclarity is. Use light, fast strokes and avoid outlining the whole body.
You’re capturing motion and rhythm, not cutting the figure out with scissors.
Beginner win: If your gesture looks energetic, you’re already ahead. You can build bad anatomy on top
of great gesture and still end up with a fun drawing. Build great anatomy on top of a stiff gesture and you get…
a very accurate mannequin waiting for a bus.
Step 2: Block In a Simple Stick Figure + Landmarks
Now we give the gesture a skeletonsimple, readable, and correct enough to support everything else.
Think of this as placing the “hinges” and “connectors.”
2A) Use Head Units (Without Becoming a Robot)
A classic beginner measurement is the head unit. An average adult is often described around
7–7.5 heads tall, while more “heroic” or fashion proportions lean closer to 8 heads.
You don’t have to measure perfectlyuse it as a quick reality check.
2B) Mark the Big Landmarks First
- Head: an oval/egg with a centerline showing where it’s facing.
- Ribcage area: where the chest mass will sit (not individual ribs).
- Pelvis: the “bucket” the legs attach tocritical for balance.
- Joints: shoulders, elbows, wrists, hips, knees, ankles.
2C) Keep Limb Lengths Consistent
You don’t need perfect anatomy to avoid the most common beginner problem: “one arm is a noodle, the other is a
breadstick.” Here are simple comparisons:
- Upper arm and forearm are often similar in length (varies by pose and foreshortening).
- Hands are roughly face-sized in many canons (again: a guide, not a law).
- Knees usually sit around the halfway-ish mark between pelvis and feet in a standing pose (varies with style).
Step 3: Turn the Stick Figure Into a 3D Mannequin
This is where “basic human figures” start looking like actual bodies instead of diagram homework.
You’re going to build the figure out of simple forms you can rotate in space:
boxes, cylinders, spheres, and wedges.
3A) Build the Three Main Masses
- Head: egg or box with a centerline (direction matters more than details).
- Ribcage: a barrel/box form. Add a centerline down the front to show twist.
- Pelvis: a tilted box/bucket. It’s the “base” for the legs.
Connect ribcage and pelvis with a simple “spine tube” or gesture curve. If the torso is twisting, make sure the
ribcage and pelvis centerlines point in slightly different directions.
3B) Attach Limbs as Cylinders (With Clear Joints)
For arms and legs, use cylinders or boxy tubes. The key is to show where forms overlap and bend:
- Elbows and knees are hingesshow the angle clearly.
- Thighs and upper arms have more mass than forearms and lower legs.
- Add a simple wedge for feet and a mitten/block for hands (details later).
3C) Add Cross-Contours (Optional, Powerful)
Cross-contour lines (curves wrapping around a form) quickly communicate 3D. A few light wraps around the ribcage
or thigh can make your mannequin feel solid instead of flat.
Why mannequinization works: It gives you a buildable figure you can correct. If an arm is too long,
you can shorten the cylinder. If hips are too narrow, widen the pelvis box. Details are hard to fix; forms are easy.
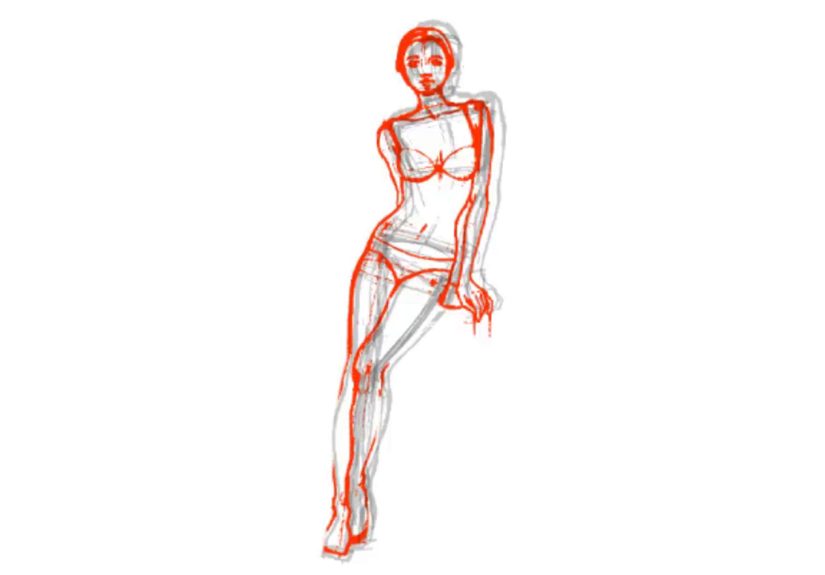
Step 4: Refine the Figure (Clean Lines, Better Proportions, Simple Anatomy)
Refinement is where you turn “training wheels mannequin” into a figure that looks intentional.
You’re not adding every musclejust the information that makes the body believable.
4A) Clarify the Silhouette
The silhouette is the outline shape the figure makes against the background. A clear silhouette makes a pose readable,
even in a simple sketch. If two limbs merge into one blob, separate them by adjusting overlap or spacing.
4B) Use Overlaps to Show Depth
Overlaps are your best friend:
- The upper arm overlaps the forearm at the elbow.
- The ribcage overlaps the abdomen depending on angle.
- The thigh overlaps the lower leg at the knee.
Even a cartoon figure looks more 3D when overlaps are clear.
4C) Add “Big Anatomy,” Not “Textbook Anatomy”
Focus on major masses:
- Deltoid (shoulder cap)
- Chest mass (simple plane, not individual ribs)
- Obliques/waist (side planes that connect ribcage and pelvis)
- Glutes/hip mass (helps the pelvis feel real)
- Thigh and calf (basic taper and curve)
4D) Do Two Fast Checks Before You “Finish”
-
Angle check: Compare angles of shoulders, hips, knees, and feet. If one knee points left and the foot points right,
your figure may be doing an unplanned yoga pose. -
Proportion check: Re-count head units quickly or compare limb lengths. Small fixes now save you from
repainting the entire universe later.
Common Beginner Problems (and Fixes That Actually Work)
Problem: The pose looks stiff
Fix: Push the gesture line first. Exaggerate the tilt of shoulders vs. hips slightly. Add a subtle curve to the spine.
Stiffness often comes from straight verticals everywhere.
Problem: Tiny hands and feet
Fix: Block hands as mittens and feet as wedges early. If you wait until the end, you’ll “run out of space”
and your character will look like they’re wearing invisible Barbie shoes.
Problem: Arms don’t attach convincingly
Fix: Remember the shoulder is a joint area, not a dot. Indicate the shoulder mass (deltoid) overlapping the upper arm.
This makes arms feel connected instead of taped on.
Problem: The torso is a weird tube
Fix: Separate the torso into ribcage and pelvis with different tilts. Most bodies are not one
uniform sausagethough your sketchbook may disagree at first.
A Simple 10-Minute Daily Practice Plan
Consistency beats marathon sessions. Here’s a routine that builds the exact skills you need for basic human figures:
Minute 1–3: Gesture Sprints
- 3–6 poses at 20–60 seconds each
- Only line of action + shoulder/hip lines + simple limb direction
Minute 4–7: Stick Figure + Landmarks
- 1–2 poses at 2 minutes each
- Head unit estimate, joints placed, pelvis clearly indicated
Minute 8–10: Mannequin Construction
- 1 pose built with ribcage/pelvis boxes + cylinders
- Add a couple overlaps and cross-contours
After a week, you’ll notice something satisfying: your “first attempt” will start looking like something you’d
actually show another human without apologizing first.
Wrap-Up: Your 4-Step Cheat Sheet
- Gesture: capture the flow and action fast.
- Stick + landmarks: place head, pelvis, joints, and basic proportions.
- Mannequin: build 3D forms (ribcage, pelvis, cylinders) you can correct.
- Refine: clean silhouette, overlaps, and big anatomythen do quick proportion checks.
If you repeat this process often, your figures won’t just improvethey’ll become easier and faster to draw.
That’s the real secret: the goal isn’t one perfect drawing. It’s a repeatable method you can trust.
Experience Notes: What It Feels Like to Learn This (The Honest Version)
The first time I tried to “draw a person,” I went straight for the outlinebecause that’s what it looks like artists do
in sped-up videos. Two minutes later I had a stiff shape with random bumps, a neck like a broom handle,
and arms that appeared to be escaping the torso under witness protection.
What changed everything wasn’t a magic anatomy trick. It was realizing that the early stage of a figure drawing is
supposed to look messy. Gesture drawings are not meant to be pretty; they’re meant to be useful.
Once I gave myself permission to draw “ugly” for the first minute, my poses got dramatically betterbecause I was finally
capturing movement instead of tracing a silhouette that didn’t understand gravity.
I also learned the hard way that the pelvis is the boss of the legs. When I skipped it, my figures looked like they were
balancing on invisible marbles. The moment I started drawing the pelvis as a simple tilted boxnothing fancymy standing poses
stopped wobbling. It’s almost unfair how much stability you get from one rectangle.
Then came the “mannequin era,” where my sketchbook was full of people made of barrels and pool noodles.
At first I felt ridiculous. But here’s the surprise: those noodle-people were fixable. If the arm was too long,
I shortened a cylinder. If the torso felt stiff, I rotated the ribcage box and reconnected it to the pelvis with a curve.
I wasn’t guessing anymoreI was building.
My favorite breakthrough was a tiny habit: doing two quick checks before “finishing.” One check for angles
(shoulders, hips, knees), and one check for proportions (head units or limb comparisons). It took maybe fifteen seconds,
but it saved me from spending ten minutes polishing a drawing that was quietly broken underneath.
The emotional side is real, too. Some days everything clicks and your figure looks alive. Other days your character
looks like they were assembled by a well-meaning raccoon. The trick is to treat those bad pages like training data:
they’re not failures; they’re mileage. If you keep the four steps consistent, improvement shows up in a sneaky way:
your “warm-up” drawings start looking like your old “best” drawings.
And yeshands still misbehave. But now, instead of panicking, I block them as mittens early, keep them proportional,
and add details only if the drawing earns it. Sometimes the best hand is the one you don’t overthink.
(If anyone asks, it’s a stylistic choice. Say it confidently.)
If you’re learning right now: stick with the process. Draw fast, stay loose early, build simple forms, and refine last.
In a month, you won’t just draw better peopleyou’ll understand why they look better. That’s when figure drawing becomes fun.


