
Table of Contents >> Show >> Hide
- Why Drilling Through Tile Is Tricky
- Before You Start: What to Check First
- Choosing the Best Drill Bit for Tile
- How to Drill Through Tile (Step-by-Step for Small Holes)
- Step 1: Measure Twice, Mark Once, Then Measure Again Because Tile Is Unforgiving
- Step 2: Apply Painter’s Tape
- Step 3: Set the Drill to Rotary Mode (No Hammer)
- Step 4: Start Slow and Create a Dimple
- Step 5: Increase Speed Gradually
- Step 6: Keep the Bit Cool
- Step 7: Ease Up at Breakthrough
- Step 8: Clean the Hole and Install the Hardware
- How to Drill a Large Hole in Tile (For Pipes and Valves)
- Common Mistakes That Crack Tile Fast
- Pro Tips for Cleaner Results
- Quick FAQ: How to Drill Through Tile
- Real-World Experiences: What Actually Happens When You Drill Through Tile (And What I Learned)
- Conclusion
Drilling through tile feels a little like trying to pierce a potato chip made of glass: one wrong move and suddenly you’re pricing replacement tile, rethinking your life choices, and pretending that crack was “part of the design.” The good news? You can drill through tile cleanly and safely if you use the right bit, the right speed, and a little patience.
This guide walks you through exactly how to drill through tile without cracking it, whether you’re mounting a towel bar, installing a shower shelf, or making a larger hole for plumbing. We’ll cover ceramic tile, porcelain tile, glass tile, and the tools and techniques that help you get clean results on the first try.
Why Drilling Through Tile Is Tricky
Tile is hard, slick, and brittle all at once. That combination is what makes it beautiful on your walls and floorsand annoying when a drill bit starts skating across the glaze like it’s auditioning for the Olympics.
The main problems people run into are:
- Bit slippage (walking): The smooth glazed surface makes it easy for the bit to drift.
- Cracking/chipping: Too much pressure, too much speed, or the wrong bit can fracture the tile.
- Overheating: Tile drilling creates heat fast, especially with porcelain and glass.
- Breakthrough damage: The drill can lunge forward when it punches through the tile.
The fix is not “muscle through it harder.” The fix is control.
Before You Start: What to Check First
1) Identify the Tile Type
The best drill bit for ceramic tile is not always the best bit for porcelain tile or glass. Ceramic is usually easier to drill, while porcelain is denser and tougher. Glass tile can chip easily and needs extra care. Natural stone tile (marble, granite, travertine) can also require diamond bits and cooling.
2) Know What’s Behind the Tile
Before drilling into a tiled wall, check for studs, plumbing pipes, and electrical wiring. Turn off power and water if you’re drilling in an area where hidden utilities may be present (especially bathrooms and kitchens). This step is less glamorous than buying a new bit, but also much less expensive than hitting a pipe.
3) Gather the Right Tools
Here’s a practical tool list for most tile drilling jobs:
- Variable-speed drill (use rotary mode, not hammer mode while drilling tile)
- Carbide-tipped tile bit (great for many ceramic tile jobs and small holes)
- Diamond-tipped bit or diamond hole saw (best for porcelain, glass, stone, and larger holes)
- Painter’s tape or masking tape
- Marker or pencil
- Spray bottle with water (or another cooling method recommended by the bit maker)
- Safety glasses, dust mask, and gloves
- Vacuum or cleanup cloth
- Wall anchors/screws for the fixture
Choosing the Best Drill Bit for Tile
This is where most tile projects are won or lost. If you choose the wrong bit, even perfect technique won’t save you.
For Small Holes (Towel Bars, Hooks, Anchors)
- Ceramic tile: Carbide-tipped glass/tile bits often work well.
- Porcelain tile: Diamond-tipped bits usually perform better and last longer.
- Glass tile: Diamond-tipped bits are generally the safer choice.
For Large Holes (Pipes, Shower Valves, Fixtures)
- Use a hole saw (ideally diamond-grit for dense tile).
- A hole saw cuts the perimeter, which helps create cleaner round openings than trying to “freestyle” a large hole with a standard bit.
Carbide vs. Diamond: Which Should You Use?
A simple rule: carbide for many basic ceramic jobs, diamond for hard stuff and cleaner performance. If you’re drilling porcelain tile and you’re unsure, start with a diamond bit. Your future self (and your tile) will thank you.
How to Drill Through Tile (Step-by-Step for Small Holes)
Step 1: Measure Twice, Mark Once, Then Measure Again Because Tile Is Unforgiving
Mark the exact drilling point. If you’re mounting hardware with two brackets (like a towel bar), use a level so the final install doesn’t look like it gave up halfway.
Try to place holes toward the center of the tile when possible. Tile edges and corners are more prone to cracking.
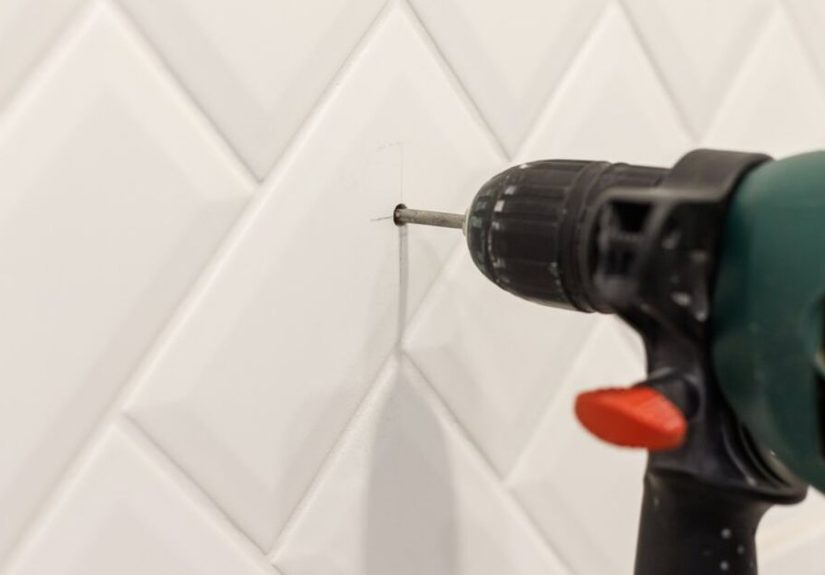
Step 2: Apply Painter’s Tape
Place painter’s tape over the drill location (many DIYers use an “X” pattern or a small square). Then mark the hole position on the tape. The tape adds grip, helps reduce wandering, and can lower the odds of surface scratches.
Step 3: Set the Drill to Rotary Mode (No Hammer)
If your drill has a hammer setting, turn it off before you touch the tile. Hammer action can crack or chip tile. Once you’re through the tile and drilling into masonry behind it (if that’s your setup), you may switch tools/bits/settings as appropriate for the substrate.
Step 4: Start Slow and Create a Dimple
Begin at a low speed with light pressure. Your goal is to create a shallow starter dimple so the bit stops skating. Let the bit do the work. Pushing harder does not make tile strongerit just makes replacement shopping more likely.
Step 5: Increase Speed Gradually
Once the bit has a good bite, increase to a moderate speed while maintaining steady pressure. Don’t run full blast. Excess heat can damage the bit and increase the chance of cracks.
Step 6: Keep the Bit Cool
Pause periodically and cool the bit with water (or follow the drill-bit manufacturer’s recommended cooling method). For porcelain and glass, cooling matters a lot. A quick spray also helps control dust.
Step 7: Ease Up at Breakthrough
The moment the bit is about to break through the back of the tile, reduce pressure. This is when drills like to suddenly lunge forward. If you’re drilling into drywall or backer board behind the tile, many installers switch to a more appropriate bit once the tile layer is complete.
Step 8: Clean the Hole and Install the Hardware
Remove tape, vacuum or wipe away dust, and insert anchors if needed. Tap anchors gently and keep them flush. Then install the screws and fixture.
How to Drill a Large Hole in Tile (For Pipes and Valves)
Large holes are where people get nervousand honestly, fair. A big hole saw on glossy tile can feel dramatic. Here’s the calm version.
Use a Diamond Hole Saw
For porcelain, glass, and many stone tiles, a diamond hole saw is usually the best option. Some hole saw systems include a pilot/starter bit or guide; others rely on technique and a template.
How to Do It Cleanly
- Mark the center of the hole.
- Apply a small piece of tape (enough to mark and reduce slipping).
- Start the drill slowly and let the saw establish a groove.
- Keep the bit rotating before the hole saw teeth fully bite into the tile.
- Stop every so often to cool the bit and clear dust/slurry.
- Use even pressure until the cut is nearly complete.
- Ease up at the end to prevent chipping or a sudden plunge.
If you’re drilling loose tile before installation, support it underneath (for example, on a suitable sacrificial backing or a stable support surface) to reduce vibration and help prevent cracking.
Common Mistakes That Crack Tile Fast
Using the Wrong Bit
A standard all-purpose twist bit is not the move for tile. Tile needs carbide- or diamond-tipped bits designed for the material.
Using Hammer Mode on Tile
Repeating because it matters: hammer action and brittle tile are not friends.
Drilling Too Fast
High speed creates heat. Heat dulls bits and increases crack risk. Slow and steady is not just a motivational poster hereit’s the actual method.
Too Much Pressure
If you’re leaning on the drill like you’re trying to win a tug-of-war, back off. Steady pressure beats aggressive pressure.
Skipping Cooling
Porcelain and glass can heat up quickly. A quick cooldown pause can extend bit life and improve the cut.
Drilling Too Close to the Edge
Tile edges are weaker. If possible, shift your hardware location toward the center area of the tile for safer drilling.
Drilling Into Grout “Because It Looks Easier”
Sometimes people try to drill grout instead of tile to avoid cracking. In reality, grout can crumble, and poorly placed holes may still transfer stress to surrounding tile. If the fixture layout allows a tile-center location, that’s usually the better choice.
Pro Tips for Cleaner Results
- Match bit size to anchor size: Don’t guess. Check the anchor package.
- Use a depth stop or tape flag: Wrap tape around the bit to mark depth so you don’t drill too far.
- Protect surfaces below: Tape up plastic or use a dust-catching tape “shelf” below the hole.
- Test on spare tile first: If you have an extra tile, do a practice hole to dial in speed and pressure.
- Replace dull bits: A tired bit causes heat, wandering, and bad language.
Quick FAQ: How to Drill Through Tile
Can I use a regular drill bit on tile?
Not recommended. Use a tile-appropriate carbide or diamond bit. Regular bits are usually meant for wood, metal, or plastic and can slip or overheat on tile.
Do I need water when drilling tile?
Often yesespecially for porcelain, glass, and diamond hole saw work. Cooling helps reduce heat buildup and can improve bit life and cut quality. Follow the bit manufacturer’s instructions.
Should I drill tile before or after installation?
It depends on the project. Many mounting holes are drilled after installation. Some plumbing cutouts are often drilled before installation, which can be easier for larger holes if the tile is properly supported.
What if the bit keeps slipping?
Use painter’s tape, start at low speed, and create a shallow dimple first. Some installers also use a guide/template or a specialized “no-skate” style bit.
Real-World Experiences: What Actually Happens When You Drill Through Tile (And What I Learned)
The first time I drilled through tile, I treated the drill like a race car. Fast trigger, big confidence, zero strategy. The bit skated across the glossy tile, left a nice scratch, and I instantly became a much humbler person. That experience taught me the single biggest lesson in tile drilling: speed feels powerful, but control is what wins.
On a later bathroom project, I had to mount a towel bar on ceramic wall tile. I used painter’s tape, marked carefully, started slow, and let the bit create a tiny dimple before increasing speed. That one small change made the whole process feel different. Instead of fighting the surface, I felt the bit settle in and track straight. The hole looked clean, the anchor fit correctly, and the towel bar ended up level (which was a personal best).
Porcelain was a different story. It looked similar, so I assumed it would behave the same. It did not. The carbide bit that worked fine on ceramic struggled, heated up quickly, and progress slowed to a crawl. Switching to a diamond bit made a huge difference. It still took patience, but the cut was cleaner and more predictable. That project taught me another useful truth: “tile” is not one material in practice. Ceramic, porcelain, and glass each have their own personality.
I also learned the hard way about breakthrough pressure. On one hole, I kept steady pressure too long and the drill punched forward right as it cleared the tile. It didn’t crack the face, but it nicked the area behind and reminded me to ease up near the end. Now I always slow down when I feel resistance change. It’s a small habit that saves a lot of frustration.
For larger holes, a diamond hole saw felt intimidating the first time. Once I got used to starting slowly and cooling the bit often, it became much more manageable. The process is slower than people expect, but that’s actually a good sign. If tile drilling feels aggressive, something is probably offwrong bit, too much pressure, too much speed, or not enough cooling.
The most useful habit I keep now is testing on a spare tile whenever possible. A quick practice hole tells you how the bit starts, how much pressure the tile wants, and how often you need to cool it. It turns guesswork into muscle memory. And honestly, it’s much nicer to make mistakes on a leftover tile than on the one centered under your brand-new shower valve.
So if you’re nervous about drilling through tile, that’s normal. The job rewards patience more than strength. Go slow, use the right bit, cool the work, and don’t rush the finish. You’ll get a clean holeand keep your tile (and dignity) intact.
Conclusion
Drilling through tile is absolutely a DIY-friendly job when you prepare properly. The keys are simple: identify the tile type, choose the correct carbide or diamond bit, use rotary mode, start slow, cool the bit, and ease up at breakthrough. Whether you’re installing a hook or cutting a larger plumbing opening, the safest method is always the same: controlled drilling, not brute force.
If you remember just one thing, make it this: the right bit and the right speed matter more than raw drill power. Tile rewards patienceand punishes overconfidence. (Ask me how I know.)


