
Table of Contents >> Show >> Hide
- What Does “Make the Screen Go Black” Mean in PowerPoint?
- Why Use a Black Screen During a PowerPoint Presentation?
- How to Make a Computer Screen Go Black With PowerPoint: 9 Steps
- Step 1: Open Your PowerPoint Presentation
- Step 2: Start the Slide Show
- Step 3: Confirm the Audience Can See the Slide Show
- Step 4: Press B to Make the Screen Go Black
- Step 5: Use the Period Key as an Alternative Shortcut
- Step 6: Press B or Period Again to Return to Your Slide
- Step 7: Try the Presenter View Screen Icon
- Step 8: Use W or Comma if You Need a White Screen Instead
- Step 9: Practice Before the Real Presentation
- How to Add a Permanent Black Slide in PowerPoint
- When Should You Use a Black Screen?
- What to Do If the PowerPoint Black Screen Shortcut Does Not Work
- Black Screen vs. Turning Off the Display
- Extra Tips for Using the Black Screen Like a Pro
- Experience Notes: What Presenters Learn After Using the Black Screen Feature
- Conclusion
- SEO Tags
There are times in a presentation when your best slide is no slide at all. Maybe you want the audience to stop reading ahead. Maybe someone asks a thoughtful question and you want every eye back on the conversation. Or maybe you need to walk in front of the projector without becoming a human pie chart. Good news: PowerPoint has a built-in trick that lets you make the screen go black instantly during a slide show.
The easiest way to make a computer screen go black with PowerPoint is to start your slide show and press the B key or the period key. Press the same key again to return to the exact slide you were showing. It is simple, fast, and surprisingly powerful when used at the right moment.
This guide explains how to black out a PowerPoint presentation in 9 practical steps, how to bring your slide back, when to use a black screen instead of a white screen, and how to troubleshoot common issues when the shortcut does not behave as expected.
What Does “Make the Screen Go Black” Mean in PowerPoint?
In PowerPoint, making the screen go black does not turn off your monitor, shut down your laptop, or magically erase your presentation. It simply displays a blank black screen over your current slide while the slide show continues running in the background.
Think of it as a curtain. Your slide is still there, waiting politely backstage, but the audience sees only black. When you press the shortcut again, the curtain lifts and your presentation returns to the same spot. This is different from closing the slide show, switching apps, or physically turning off a projector.
Why Use a Black Screen During a PowerPoint Presentation?
A black screen is useful because slides are attention magnets. Even when you are saying something important, people often keep reading, comparing bullet points, or staring at a chart like it owes them money. Blanking the screen helps you reset the room.
Common reasons to black out the screen include:
- To focus attention on the speaker: Use it during stories, explanations, or transitions.
- To pause visual overload: A blank screen gives the audience a mental breather.
- To manage questions: During Q&A, a black screen keeps people from being distracted by old content.
- To hide upcoming information: If your next slide reveals an answer, chart, or surprise, blanking the screen can preserve the moment.
- To handle room logistics: You can adjust equipment, speak to a panel, or move across the room without a glowing slide behind you.
How to Make a Computer Screen Go Black With PowerPoint: 9 Steps
Step 1: Open Your PowerPoint Presentation
Start by opening the PowerPoint file you plan to present. You can use a standard .pptx presentation, a training deck, a lecture slide show, or a business pitch. The black screen feature works during an active slide show, not while you are editing slides in Normal View.
Before presenting, quickly check your slides for media, animations, and transitions. If your deck is very large or has heavy video files, test it once before the real presentation. A black screen shortcut is reliable, but your overall presentation should still be ready for showtime.
Step 2: Start the Slide Show
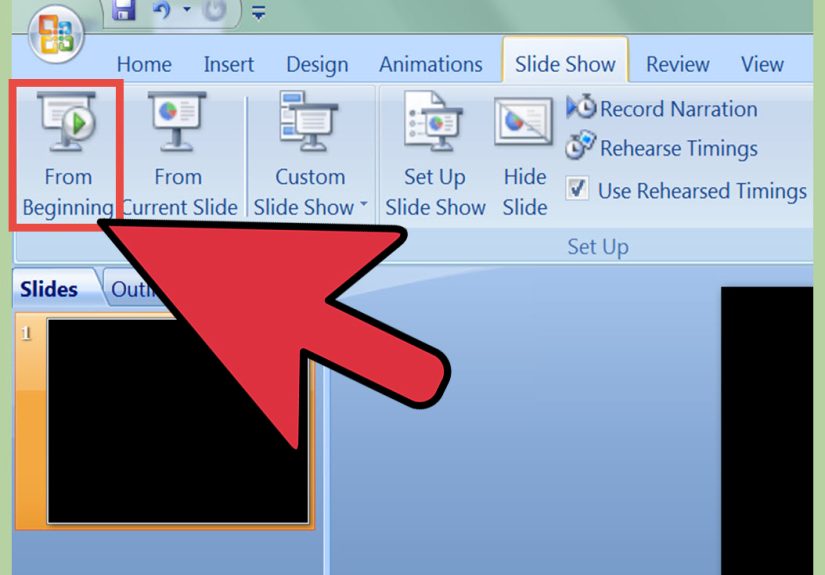
To use the black screen shortcut, you need to be in Slide Show mode. On Windows, you can press F5 to start from the beginning or Shift + F5 to start from the current slide. You can also click the Slide Show tab and choose From Beginning or From Current Slide.
On Mac, you can start a presentation using PowerPoint’s slide show controls from the ribbon, or use the available keyboard shortcuts for your version. The important point is simple: the slide must be actively presenting, not sitting in edit mode.
Step 3: Confirm the Audience Can See the Slide Show
If you are using a projector, external monitor, Zoom, Microsoft Teams, or a classroom display, confirm that the correct screen is being shared or projected. This matters because the black screen appears on the slide show output. If you are sharing the wrong window, your audience may see your desktop, your notes, or your browser tabs instead. Nobody needs to know how many coffee shops you searched before the meeting.
For dual-monitor setups, PowerPoint may show Presenter View on your screen and the full slide show on the audience screen. This is usually ideal. Just make sure the audience-facing display is the one you intend to black out.
Step 4: Press B to Make the Screen Go Black
While the slide show is running, press the B key on your keyboard. The presentation screen should instantly turn black. Your current slide is not deleted, skipped, or changed. It is simply hidden behind a blank black display.
This is the most direct method and the one many presenters rely on. The letter B is easy to remember because it stands for “black.” It also stands for “brilliant little shortcut you will now use forever,” but Microsoft probably would not put that in the manual.
Step 5: Use the Period Key as an Alternative Shortcut
If the B key is inconvenient or does not respond, press the period key instead. In PowerPoint Slide Show mode, B and period perform the same basic black-screen function.
This is especially handy if you are using a compact keyboard, a clicker with programmable buttons, or a setup where one key is easier to reach than the other. Some presenters prefer the period key because it feels like a pause button: the sentence stops, the screen stops, and the audience looks up.
Step 6: Press B or Period Again to Return to Your Slide
To bring the slide back, press B again or press the period key again. PowerPoint returns to the slide you were showing before the screen went black. You do not need to restart the presentation or hunt through your deck like a detective searching for slide 37.
This toggle behavior is what makes the feature so useful. You can black out the screen for ten seconds, answer a question, make a point, then return to the same slide without breaking the flow.
Step 7: Try the Presenter View Screen Icon
If you are using Presenter View, PowerPoint also offers on-screen controls. Presenter View typically shows your current slide, next slide, speaker notes, timer, and navigation tools. One of those controls can temporarily make the audience screen black.
This method is helpful for presenters who prefer clicking controls instead of using keyboard shortcuts. It is also useful when your keyboard is not nearby, such as when you are presenting from a lectern, touchscreen, or remote display setup.
Step 8: Use W or Comma if You Need a White Screen Instead
PowerPoint also lets you show a blank white screen. During the slide show, press W or the comma key to turn the display white. Press the same key again to return to your presentation.
So when should you use black versus white? A black screen usually works best in darker rooms because it feels calm and less glaring. A white screen may work better in bright rooms or when you want to use the projected surface like a quick whiteboard. Just be careful: a sudden white screen in a dark room can feel like the audience has been personally flash-banged by office software.
Step 9: Practice Before the Real Presentation
Do a quick rehearsal before using the black screen feature in front of an audience. Start the slide show, press B, return to the slide, try the period key, and test the white screen shortcut if you plan to use it.
If you are presenting online, test your screen-sharing setup too. In video meetings, the audience sees whatever window or screen you choose to share. If you share Presenter View by mistake, your viewers may see your notes instead of the polished slide show. That is not always a disaster, but it can be awkward if your notes say things like “pause dramatically” or “do not panic here.”
How to Add a Permanent Black Slide in PowerPoint
The shortcut method is temporary. If you want a planned black screen at a specific moment in your deck, create an actual black slide.
To create a black slide:
- Go to the place in your deck where you want the pause.
- Click Home, then choose New Slide.
- Select a blank layout.
- Right-click the slide and choose Format Background.
- Choose Solid fill.
- Select black as the background color.
- Close the formatting pane and test the slide show.
A permanent black slide is useful when you want a deliberate transition, a dramatic pause, a speaker-only section, or a break between major topics. The keyboard shortcut is better for spontaneous moments. Both methods have their place.
When Should You Use a Black Screen?
The best presenters do not use slides as wallpaper. They use them as support. A black screen is helpful when you want the audience to listen, reflect, discuss, or look at you instead of staring at the slide.
For example, imagine you are presenting quarterly sales results. After showing a complex chart, you might press B and say, “Here is the real takeaway.” Now the audience is not squinting at tiny labels. They are listening to your interpretation.
In a classroom, a teacher might black out the screen before asking students to predict an answer. In a workshop, a facilitator might use it during group discussion. In a keynote, a speaker might use it before telling a personal story. In each case, the black screen works like a visual reset button.
What to Do If the PowerPoint Black Screen Shortcut Does Not Work
If pressing B does nothing, do not panic. The issue is usually simple.
Make sure you are in Slide Show mode
The black screen shortcut works while delivering the presentation. If you are editing the deck, pressing B simply types the letter “b” somewhere, which is not exactly the dramatic speaking moment you had in mind.
Click the slide show first
Keyboard focus matters. If your mouse recently clicked another window, PowerPoint may not receive the shortcut. Click once on the slide show screen, then press B again.
Check your screen-sharing selection
In Zoom, Teams, Google Meet, or similar tools, make sure you are sharing the slide show window or the correct monitor. If you share the wrong display, the black screen may happen somewhere the audience cannot see.
Test Presenter View
If Presenter View appears on the wrong screen, swap displays or adjust the monitor settings from PowerPoint’s Slide Show options. Presenter View is helpful, but it can be confusing the first time you use two screens.
Restart the slide show
If PowerPoint behaves oddly, exit the presentation with Esc and restart from the current slide. This often clears minor focus or display glitches.
Black Screen vs. Turning Off the Display
Do not confuse PowerPoint’s black screen feature with turning off your monitor or projector. The shortcut only affects the slide show view. Your computer remains awake, your presentation remains open, and your meeting continues.
This is important for online presenters. A PowerPoint black screen does not hide your entire computer from screen-sharing software unless the slide show is the only shared content. If you need privacy, stop sharing or switch to a safe screen. A black PowerPoint slide is a presentation tool, not a security blanket.
Extra Tips for Using the Black Screen Like a Pro
Use it sparingly
A black screen is effective because it is unexpected. If you press B every thirty seconds, your audience may wonder whether your laptop is having a midlife crisis.
Pair it with a verbal cue
Say something like, “Let’s pause the slides for a moment,” or “Before we look at the answer, think about this.” This makes the black screen feel intentional, not accidental.
Use it before discussion
Blanking the screen before asking a question helps people respond from their own thinking instead of reading from your slide.
Practice with your clicker
Some presentation remotes can be programmed with keyboard shortcuts. If your clicker supports it, assign one button to the B key. That gives you instant blackout control without walking back to your laptop.
Experience Notes: What Presenters Learn After Using the Black Screen Feature
After using PowerPoint’s black screen feature in real presentations, one thing becomes obvious: the shortcut is less about technology and more about control. Not the villain kind of control, of course. More like “I know where this presentation is going, and I am not letting a crowded slide steal the steering wheel.”
In many meetings, the audience starts reading the slide before the speaker finishes the first sentence. This is normal human behavior. People see text; people read text. But when you press B, the room changes. Heads lift. Side conversations often quiet down. The presenter becomes the main visual again. That small moment can make a huge difference, especially when explaining a complicated point.
The black screen is also surprisingly useful when a presentation becomes more conversational. For example, during a client meeting, someone may ask a question that deserves a direct answer rather than another bullet point. Leaving the slide up can pull the discussion backward. Blanking the screen says, without making a big production of it, “We are talking now.” It creates a clean break between slide delivery and human conversation.
Teachers and trainers often find the shortcut helpful during exercises. Suppose a slide shows instructions, and learners immediately start reading ahead or asking about step four before step one has begun. Pressing B lets the instructor explain the activity first, then bring the slide back when everyone is ready. It is a simple way to reduce cognitive clutter.
Another lesson: always test the shortcut in the actual room or meeting platform. On a laptop alone, everything may work perfectly. Add a projector, a second display, a conference-room control panel, and a video call, and suddenly your setup has more plot twists than a mystery novel. A one-minute test prevents awkward surprises.
It is also worth learning both the black and white screen options. Black is usually better for pausing attention, especially in dim rooms. White can be useful when the room is bright or when the projected surface is being used for writing. However, white can feel harsh on large displays, so use it with care.
The most important experience-based advice is this: do not apologize for using a black screen. If you press B intentionally, keep speaking. The audience will understand. In fact, many people will assume you are a polished presenter with secret PowerPoint powers. Let them believe it. You earned that tiny wizard hat.
Finally, remember that the black screen is not a magic fix for weak slides. It works best when combined with clear structure, concise visuals, and confident delivery. Use it to create pauses, guide attention, and make your presentation feel more human. Slides are helpful, but sometimes the most powerful visual is a blank screen and a speaker who knows exactly what to say next.
Conclusion
Making a computer screen go black with PowerPoint is one of the simplest presentation tricks you can learn. Start your slide show, press B or period, and PowerPoint displays a blank black screen. Press the same key again, and your slide returns. That is the whole magic trickno cables, no settings maze, no dramatic wrestling match with the projector.
Use the black screen when you want to pause the visuals, focus attention, invite discussion, or create a smoother transition. Use a permanent black slide when you want a planned break inside the deck. And always test your setup before presenting, especially when using multiple monitors or online meeting tools.
Master this small shortcut, and your presentations will feel more controlled, more conversational, and less like a runaway slideshow with a laser pointer addiction.


