
Table of Contents >> Show >> Hide
- What You’re Making (and Why It Works)
- Supplies Checklist
- 5 Steps at a Glance
- Step 1: Pick Your Tree Base (and Choose a Size)
- Step 2: Prep the Spoons (Snip, Paint, or Glitter)
- Step 3: Prep the Cone (Paint/Prime and Mark Guidelines)
- Step 4: Glue Spoons from Bottom to Top (Overlapping Rows)
- Step 5: Add a Topper, Decorate, Seal, and Display
- Troubleshooting: Fix Common Spoon-Tree Problems
- Style Variations: Make It Your Own
- Safety Notes (Because Hot Glue Is Not a Hug)
- How to Store Your Spoon Tree So It Survives Next Year
- Final Thoughts
- Personal Experience: Real-Life Lessons from Making Spoon Trees (Extra ~)
Want holiday decor that looks weirdly expensive but is secretly made from the same plastic spoons that came with your takeout?
Perfect. A plastic spoon Christmas tree is one of those DIY projects that makes visitors squint and say,
“Wait… is that cutlery?” while you casually pretend you buy your decorations from boutique winter villages where
everyone’s named “Noel.”
The best part: this craft is beginner-friendly, budget-friendly, and flexible. You can make it glittery, matte, modern,
frosted, rainbow (why not), or “I found this in a fancy store” chic. Below is a simple, reliable method you can knock out
in an afternoonwith tips that save time, reduce mess, and prevent the dreaded “why is my foam melting?” moment.
What You’re Making (and Why It Works)
This project works because spoon bowls naturally mimic layered evergreen branches. When you overlap them like shingles,
they create texture and depthso your tree looks full even if it’s only 9 inches tall. Add paint or glitter, and suddenly
you’ve got a DIY Christmas centerpiece that looks like it belongs on a magazine cover titled
“People Who Have Their Life Together”.
Supplies Checklist
You can keep it super simple or go full sparkle goblin. Here’s the “great results without chaos” supply list:
| Item | Why You Need It | Budget Tip |
|---|---|---|
| Plastic spoons (mini or regular) | They become the “branches” | Dollar store packs work great |
| Tree base (foam cone, paper mâché cone, or cardstock cone) | Gives the tree its shape | Cardstock cones are cheap and paint-friendly |
| Hot glue gun + glue sticks | Fast, strong bonding | Use mini glue sticks for less waste |
| Scissors or wire cutters | To snip spoon handles | Older scissors work fine (this is not a spa day for blades) |
| Paint (acrylic or spray) OR glue + glitter | Color + personality | Acrylic paint is easy and less fussy than spray |
| Optional: Mod Podge, glitter paint, acrylic sealer | Helps glitter stick; seals finish | Sealer saves your future self from glitter everywhere |
| Optional: ribbon, mini ornaments, beads, star topper | Final “holiday” look | Use gift-wrap ribbon and leftover ornaments |
How Many Spoons Do You Need?
It depends on cone size and spoon size, but here’s a practical planning guide:
- 6-inch cone: ~50–80 mini spoons
- 9-inch cone: ~60–110 regular spoons (more if you want ultra-dense layers)
- 12-inch cone: ~100–160 regular spoons
Pro tip: Buy one extra pack. Running out of spoons halfway through a row is how crafting turns into a dramatic monologue.
5 Steps at a Glance
- Pick your tree base and choose a size.
- Prep the spoons (snip, paint, or glitter).
- Prep the cone (paint/prime and mark guidelines).
- Glue spoons from bottom to top in overlapping rows.
- Add a topper, decorate, seal, and display.
Step 1: Pick Your Tree Base (and Choose a Size)
Your base determines your experience levellike choosing between “easy hike” and “why did I do this to myself.”
The good news is: all three options below can look adorable.
Option A: Foam Cone (Fastest)
Foam cones are widely available and sturdy. The only catch: some spray paints can damage foam if you paint it directly
without protection. If you plan to spray paint, consider priming first (more on that in Step 3).
Option B: Paper Mâché Cone (Most Paint-Friendly)
Paper mâché or cardboard-style cones handle spray paint beautifully and are less “chemically sensitive” than foam.
They’re a great choice if you want a smooth painted base.
Option C: DIY Cardstock Cone (Cheapest)
Roll heavy cardstock or poster board into a cone, tape the seam, and cut the bottom flat so it stands.
It’s surprisingly strong once the spoons are glued on (the spoons become armor).
Size Tip
For a table centerpiece, 6–10 inches is the sweet spot: cute, noticeable, and not tall enough to start
demanding rent.
Step 2: Prep the Spoons (Snip, Paint, or Glitter)
This step is where you decide your tree’s personality: minimalist modern? Vintage glam? “My house is basically an
ornament now”? Whatever you choose, prepping spoons first is easier than painting them after they’re attached.
2A. Snip the Handles
- For most rows, cut the handle off close to the spoon bowl.
- For the top few rows, leave a short nub (¼–½ inch) to give you more surface area to glue.
- For the very top, you can use fully cut spoons or even smaller spoons if you have them.
If you’re using thick spoons, wire cutters can save your hand from feeling like it just arm-wrestled a robot.
2B. Choose Your Finish: Paint OR Glitter
Paint (clean and modern):
- Acrylic craft paint works well and won’t attack foam.
- Spray paint gives smooth coverage fast, but do it outdoors or in a well-ventilated space.
- Metallics (gold, silver, champagne) hide imperfections and look fancy.
Glitter (festive and mildly chaotic):
- Brush glue (or Mod Podge) onto the spoon bowl area you want sparkly.
- Dip into glitter, then set on wax paper to dry.
- After drying, a light sealer coat helps keep glitter from migrating to your couch, your dog, and your soul.
Step 3: Prep the Cone (Paint/Prime and Mark Guidelines)
This step makes the final tree look polished. A base color that matches your spoons helps hide gaps (and protects your ego).
3A. Paint the Cone
- If your spoons are green (classic), paint the cone green.
- If your spoons are metallic, paint the cone a similar metallic shadeor black for drama.
- If you’re glittering spoons, a neutral base (white, silver, gold) makes the sparkle pop.
3B. If You’re Spray Painting Foam, Protect It
Some aerosol products can melt foam. If you’re using a foam cone and want a spray finish, use a foam-safe approach:
either prime with a foam-protecting primer, paint with acrylic by hand, or wrap the cone in paper before painting.
3C. Lightly Mark “Row Lines”
This is optional, but it helps keep rows neat. Use a pencil to lightly draw guide rings around the cone every 1–1.5 inches.
These lines are your “stay calm and keep it even” support system.
Step 4: Glue Spoons from Bottom to Top (Overlapping Rows)
This is the main event. Put on music, a holiday movie, or a podcastbecause hot-gluing spoon scales is relaxing in the same
way stacking pancakes is relaxing: repetitive, satisfying, and occasionally sticky.
4A. Start at the Bottom
- Apply a small bead of hot glue to the back of a spoon bowl.
- Press it onto the cone near the bottom edge, bowl facing outward.
- Hold for a few seconds until it sets.
- Repeat around the base to complete the first circle.
4B. Stagger the Next Row
For the second row, place spoons so they land between the spoons below (like brickwork). This staggering hides gaps
and looks more “tree-like.”
4C. Tighten the Rows as You Go Up
- As the cone narrows, spoons will naturally overlap more.
- If spoons start crowding, slightly angle them or trim handles shorter for better fit.
- For the top rows, use spoons with half-handles or handle nubs for easier placement.
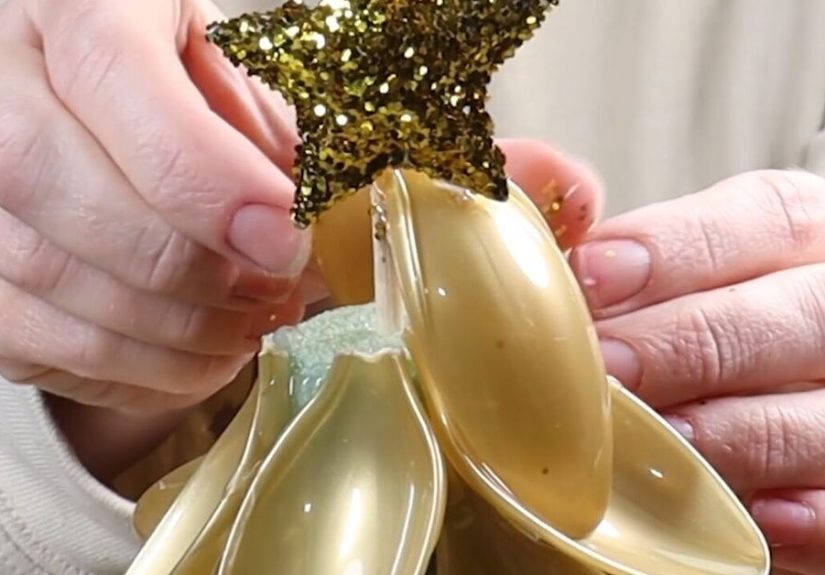
Step 5: Add a Topper, Decorate, Seal, and Display
This is where your spoon tree goes from “craft project” to “holiday decor I will brag about for years.”
Topper Ideas
- Classic: a small star ornament or tree topper
- Easy: a big bow (ribbon solves many problems)
- Modern: a wooden bead or matte black mini star
- Extra: a mini ornament cluster (tiny baubles + hot glue = instant glam)
Decoration Ideas That Stay Cute (Not Cluttered)
- Add a thin ribbon spiral down the tree (secure with tiny glue dots).
- Glue mini pearls or beads at random “branch tips.”
- Lightly dry-brush white paint on edges for a snowy look.
- Keep it monochrome (all white, all gold, all green) for a high-end vibe.
Seal It (Optional, but Helpful)
If you used glitter, a light acrylic sealant helps reduce shedding. If you used paint, sealing adds durability,
especially if you plan to store and reuse the tree next year.
Troubleshooting: Fix Common Spoon-Tree Problems
“My rows look uneven.”
Rotate the cone as you work and step back every few rows. If a row drifts upward, you can correct it by slightly lowering
the next few spoonslike steering a shopping cart back into the lane.
“I can see gaps.”
That’s why we paint the base cone. If gaps still bug you, tuck a spoon slightly under the overlap or add a small spoon
“filler” between two spoons.
“Glue strings are everywhere.”
Let glue cool a bit, then gently pull strings away. You can also hit strings with a quick blast of warm air (like from a
hair dryer on low) to help them shrinkcarefully, and never close enough to warp plastic.
“My foam cone reacted to spray paint.”
If the surface looks pitted, don’t panicspoons will cover most of it. For next time, use acrylic paint, a foam-safe primer,
or a paper wrap barrier before spraying.
Style Variations: Make It Your Own
Snowy Scandinavian
Use white spoons, a white base, and add subtle silver glitter only on spoon edges. Finish with a simple twine bow.
Glam Metallic Centerpiece
Glue spoons first, then spray the whole tree metallic gold. Add a velvet bow and place it on a cake stand.
Ombre “Designer” Tree
Paint spoons in three shades (dark at bottom, lighter toward top). The gradient effect looks intentional and expensive.
Kid-Friendly “No Spray Paint” Version
Use acrylic paint or leave spoons unpainted. Add stickers, pom-poms, and ribbon instead of glitter. (Hot glue still needs
supervisionmore on that below.)
Safety Notes (Because Hot Glue Is Not a Hug)
- Hot glue guns get hot fastkeep fingers clear of fresh glue.
- Unplug the glue gun when you’re done (or if you step away).
- Older kids can craft with low-temp glue guns, but only with responsible supervision.
- If you spray paint, do it outdoors or in strong ventilation and protect nearby surfaces from overspray.
How to Store Your Spoon Tree So It Survives Next Year
- Let everything cure fully (especially glue and sealers) before storing.
- Store upright in a box with tissue paper around it to prevent crushing spoon edges.
- Keep it away from heat sources (plastic can warp).
- Label the box: “SPOON TREE DO NOT SQUISH.” Future you will be grateful.
Final Thoughts
A cute plastic spoon Christmas tree is proof that holiday magic can be made from bargain-bin supplies,
a glue gun, and stubborn optimism. Whether you go minimalist or glitter-tastic, the technique is the same: layer,
overlap, and let the texture do the heavy lifting. And once you make one, you’ll start eyeing every plastic utensil like,
“You could be decor. You just don’t know it yet.”
Personal Experience: Real-Life Lessons from Making Spoon Trees (Extra ~)
The first time I made a plastic spoon Christmas tree, I thought it would take 20 minutes. That was adorable of me.
What actually happened was a full “holiday crafting montage” featuring hot glue strings stuck to my sweater, a suspicious
amount of glitter on my chair, and a growing respect for anyone who mass-produces handmade decor without losing their mind.
Here’s what surprised me most: the tree starts out looking kind of odd. The bottom row is slow, the cone is awkward to hold,
and you’re basically just attaching plastic half-moons to a pointy object. It feels like nothing is happening… and then
suddenly you’re three rows in and the texture starts showing up. That’s when it gets fun. The overlapping spoon bowls create
that “branchy” look almost by accident, and it’s weirdly satisfying to watch the tree become fuller with every round.
I also learned that “just eyeballing it” worksuntil it doesn’t. On one attempt, my rows drifted upward like they were trying
to escape the cone. The fix was simple: I stopped, rotated the cone, and forced myself to place spoons in a staggered pattern.
After that, the tree looked intentional again. That little “pause and step back” habit is honestly the best crafting trick:
your hands get so close to the project that you miss the big picture, and a five-second check saves you from a 20-minute redo.
Then there was the Great Glitter Situation. Glitter looks magical. Glitter also behaves like it has its own goals.
The first time I glittered spoons, I didn’t seal them. For days afterward, my home sparkled like a disco snowstorm.
The second time, I used a light sealer coat after the glitter dried, and the difference was hugestill sparkly, but not
“surprise glitter on your forehead at work” sparkly.
My favorite version ended up being the “glue first, paint later” approach: I assembled the tree with plain white spoons,
then lightly spray painted the whole thing gold. It unified the look instantly. The tree went from “cute craft” to “I bought
this at a holiday market” in about ten minutes. I added a ribbon topper and set it on a white plate with two mini trees beside
itsuddenly it looked like a planned centerpiece instead of a solo craft experiment.
The biggest lesson? This project is more forgiving than it looks. If your cone has dents, spoons cover it. If your paint job
isn’t perfect, texture hides it. If your rows get slightly uneven, decoration distracts the eye. The spoon tree is basically the
friend who shows up to a party and makes everyone else look better. And once you’ve made one, you’ll start thinking in “cone
projects”: candy trees, ribbon trees, feather trees… your craft brain will never be the same. (Sorry in advance.)


