
Table of Contents >> Show >> Hide
- Why a Tomato Cage Makes a Great Plant Stand
- Tools and Materials Checklist
- Pick the Right Cage and Pot (So It Doesn’t Wobble Like a Baby Deer)
- Method 1: The Classic Upside-Down Tomato Cage Plant Stand
- Method 2: The Trim-and-Top Plant Stand (More “Modern Pedestal”)
- Finish Options: Paint, Rope Wrap, or “Let It Be Rust Chic”
- Style Ideas That Make It Look “Store-Bought”
- Common Problems (and Easy Fixes)
- FAQ
- Real-World Lessons and Experiences (The Stuff You Learn After Making One)
- Conclusion
Tomato cages have one job in life: keep plants from flopping like they just heard bad gossip. But when tomato season ends,
those wire cones often get tossed into a garage corner to collect dust and mild shame. The good news: a tomato cage is basically
a pre-made metal frame begging to become a tall, modern plant standno fancy woodworking, no “measure twice, cry once” moments.
This DIY is quick, budget-friendly, and weirdly satisfying. In an afternoon, you can turn a basic wire cage into a stand that
lifts your favorite pot off the ground, adds height to a porch grouping, and makes even a humble pothos look like it pays rent.
You can keep it minimal and modern, go rustic with rope wrapping, or paint it a bold color that says, “Yes, I own spray paint
and I’m not afraid to use it.”
Why a Tomato Cage Makes a Great Plant Stand
The shape is doing you a favor: most tomato cages taper, which means you get a stable base and a smaller opening at the top that
can cradle a planter. Flip it, trim it, or tweak it, and you’ve got a lightweight stand that’s easy to move around for sunlight
changes (or for when you decide your living room “needs more vibes”).
- Instant height: Elevates plants for better display and airflow.
- Easy to customize: Cut it shorter, paint it, wrap it, or add a platform.
- Outdoor-friendly potential: Most cages are metal and can handle porch life with the right finish.
- Budget win: If you already have a cage, the “material cost” is basically your pride.
Tools and Materials Checklist
What you’ll need
- 1 wire tomato cage (standard cone style works best)
- Planter pot (a medium-to-large pot is easiest for stability)
- Work gloves (wire edges are not gentle)
- Safety glasses (especially if you’re cutting metal)
- Cutting tool (choose one): tin snips, bolt cutters, hacksaw, rotary tool, or angle grinder
- Metal file or sanding block (to tame sharp cut ends)
- Optional: spray paint + primer suitable for metal
- Optional: jute rope/hemp rope + hot glue gun or strong adhesive
- Optional: zip ties or wire (for minor shaping and reinforcement)
- Optional: a round paver, a plant saucer, or a wood circle (for extra stability)
Safety notes you shouldn’t skip
Cutting metal can throw off tiny shards and leave sharp points. Wear gloves and eye protection, work on a stable surface,
and keep kids/pets out of the splash zone. If you’re using power tools, take it slowthis is a plant stand, not a demolition derby.
Pick the Right Cage and Pot (So It Doesn’t Wobble Like a Baby Deer)
Before you cut anything, match your pot to the cage. You’re aiming for a pot that sits securely inside one of the cage rings
(or rests nicely on the top opening if you flip the cage). A pot that’s too small can slip, and a pot that’s too large can look
perched like it’s thinking about leaving.
Quick sizing tips
-
Heavier pot = more stable stand. If you’re using a lightweight plastic planter, consider adding rocks at the bottom
(or using a heavier cachepot) to lower the center of gravity. -
Test-fit first. Set your pot into different rings and note where it feels secure.
That ring becomes your “seat.” - Plan for your location. Indoors is easier. Outdoors (especially windy porches) may need a wider base or a paver underneath.
Many standard tomato cages are made from galvanized (zinc-coated) wire, which helps resist rust. That’s great for gardening,
but it also means paint adhesion can be tricky unless you prep correctly. If you want a long-lasting finish, don’t rush the prep step.
Method 1: The Classic Upside-Down Tomato Cage Plant Stand
This is the most popular approach because it’s fast and the shape works naturally. You flip the cage so the narrow opening becomes
the “top,” and the wider rings become the base structure. Then you adjust height and smooth any sharp ends.
Step 1: Flip and inspect the cage
Turn the tomato cage upside down. Look at the legs (the long prongs that normally stab into the soil). Those will now be pointing upward.
Decide if you want to remove them, shorten them, or bend them inward.
Step 2: Decide your final height
Place your pot near the cage and visualize the look. Do you want a tall stand for a front stoop statement? Or a shorter stand that fits
beside a chair indoors? Mark where you want to cut using painter’s tape or a marker.
Step 3: Cut (or bend) the legs
-
Cut option: Use tin snips, bolt cutters, or a hacksaw to remove the long legs so the top is clean and doesn’t look like a wire crown.
If you’re using an angle grinder or rotary tool, cut carefully and keep sparks away from anything flammable. -
Bend option: If your cage wire is thin enough, you can bend the legs inward to form little hooks or supports.
This can create a mini “basket” that helps keep the planter from shifting.
Once cut, use a metal file to smooth the ends. If you skip this, you’ll eventually discover the sharp edge with your shin.
Nobody deserves that.
Step 4: Create a stable “seat” for the pot
Many cages have rings that work as built-in shelves. Choose the ring where your pot feels most stable. If the ring spacing is wide
or the pot is narrow, add support:
- Simple fix: Zip-tie two short pieces of wire across the opening to create a tighter cradle.
- Upgrade: Add a round wood circle or plant saucer as a platform (secured with zip ties or wire).
- Indoor-friendly trick: A cork mat or rubber shelf liner between pot and wire helps prevent sliding.
Step 5: Test stability like you mean it
Put the empty pot in the stand and gently nudge from different angles. If it wobbles, widen the base slightly by adjusting the wire
feet (or place the stand on a paver). Once stable, add soil and plant. Repeat the nudge test. Congratulationsyour plant is now living upstairs.
Method 2: The Trim-and-Top Plant Stand (More “Modern Pedestal”)
If you want a cleaner, more sculptural look, you can cut the cage down to a specific ring and use the remaining frame as a minimalist pedestal.
This method looks especially good indoors with a sleek planter.
Step 1: Pick the ring your pot fits best
Set your pot into the cage and find the ring that hugs it comfortably. That ring becomes the top “lip” of your stand.
Step 2: Cut below the chosen ring
Cut the cage so the ring sits at the top and the legs below become the base. Smooth all cut points.
If your cage ends are uneven, trim them so the stand sits level.
Step 3: Add anti-scratch feet (optional but nice)
Indoors, add felt pads, rubber caps, or even a dab of hot glue on the tips so you don’t scratch floors.
Outdoors, skip the felt and use a paver under the stand if needed.
Finish Options: Paint, Rope Wrap, or “Let It Be Rust Chic”
Option A: Spray paint for a clean, cohesive look
Painting turns a basic tomato cage into something that looks intentionally designed. For best results:
- Clean first: Wash off dirt and oils. Let dry completely.
- Prep for galvanized metal: If your cage is zinc-coated, use a primer specifically rated for galvanized surfaces
and follow product directions for compatibility. - Use light coats: Several thin coats look smoother and resist drips better than one heavy “confidence coat.”
- Let it cure: “Dry to the touch” is not the same as fully cured. Give it time before placing a pot inside.
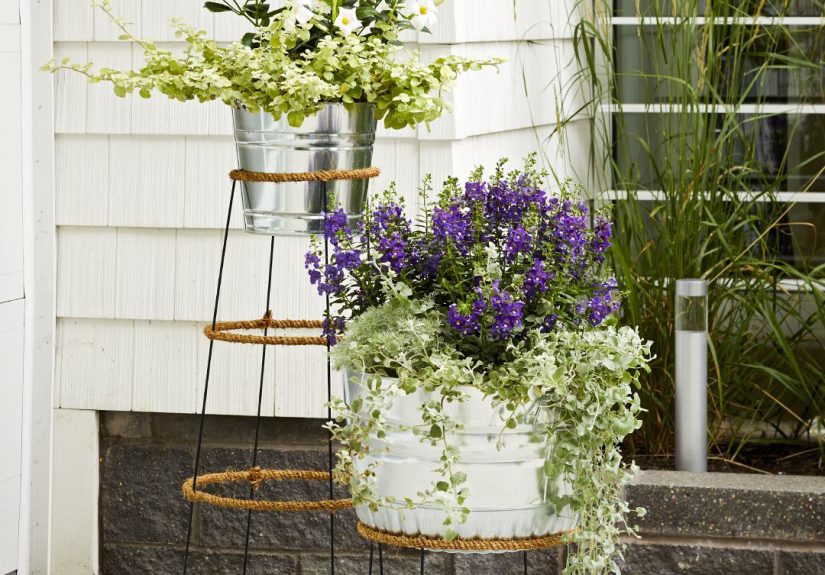
Option B: Rope-wrapped rings for rustic texture
Wrapping rope around the horizontal rings adds warmth and a farmhouse vibe without making the stand bulky. It also makes the wire
look more finished and hides minor imperfections.
- Start at a wire intersection so you can hide the rope end.
- Wrap tightly around the ring, keeping the rope snug and even.
- When you return to the start, trim the rope and secure with hot glue or a strong adhesive.
- Keep seams facing the back so the stand looks clean from the front.
Option C: Embrace patina
If your cage is already a little rusty, you can lean into the vintage lookespecially for outdoor spaces. The key is making sure
the structure is still sturdy and there are no sharp flakes or weak joints. A worn-in finish can look charming next to terra-cotta pots
and trailing greenery.
Style Ideas That Make It Look “Store-Bought”
The stand is the structure, but the styling sells the moment. Use height and contrast to your advantage.
Porch and patio groupings
- Three-height rule: Use one tall stand, one medium planter on the ground, and one shorter pot (or lantern) for balance.
- Color echo: Paint the stand a shade that repeats somewhere else (door color, outdoor pillow, or pot accent).
- Texture mix: Rope wrap + smooth ceramic pot + airy plant looks intentional and layered.
Indoor “plant corner” upgrade
- Match metal to your decor: Matte black feels modern; white feels bright; aged bronze looks vintage.
- Pick a plant with movement: Pothos, ivy, tradescantia, or a fern gives a cascading effect.
- Use a drip-safe setup: Add a saucer inside the pot or use a cachepot so you don’t water your floor.
Common Problems (and Easy Fixes)
“My pot slides around.”
Add a rubber shelf liner strip where the pot contacts the wire, or create a tighter cradle with zip ties and a couple of wire crossbars.
“The stand wobbles.”
First, make sure the legs are even. Trim or gently bend them so they sit flat. If you’re outdoors, place the stand on a paver or
use a heavier pot to stabilize it.
“The paint is peeling.”
This is usually a prep/primer issue, especially on galvanized metal. Clean thoroughly, use a primer rated for galvanized surfaces,
and follow dry/cure times. Light coats help, too.
“The wire ends look rough.”
File them smooth, then touch up with paint. If you want a softer finish, add rope wrapping or slip-on rubber caps over tips.
FAQ
Can I use a tomato cage plant stand outdoors year-round?
You can, but expect weather to do weather things. Paint or a protective finish can slow rust. If you live in a wet or coastal area,
consider bringing it under cover during storms and winter months, or embrace a patina finish and check it each season for stability.
What plants look best on a tall tomato cage stand?
Trailing plants are the easy winners because height gives them room to drape: pothos, ivy, philodendron, string-of-pearls (bright light),
spider plants, and ferns. Outdoors, try trailing petunias, sweet potato vine, or creeping jenny for that “waterfall” look.
Do I need to add a platform on top?
Not always. If your pot sits securely in a ring or opening, you’re fine. A platform helps if the pot is narrow, you want a flat surface,
or you’re making a stand that doubles as a mini side table.
What’s the fastest version of this DIY?
Flip the cage, cut the legs, file sharp ends, and drop in a pot that fits. That’s the “ten-minute glow-up” version.
Painting and wrapping are the upgrades.
Real-World Lessons and Experiences (The Stuff You Learn After Making One)
Most DIYs look perfectly calm on the internetlike the plant stand assembled itself while someone gently played acoustic guitar.
In real life, a tomato cage plant stand teaches you a few practical lessons fast, and it’s better to learn them on your first stand
than on your best pot with your favorite plant.
First, the “test-fit” step is not optional. People often assume any pot will sit neatly in any ring, and then discover their planter is
either (a) too small and wants to slip through like it’s escaping a boring party, or (b) too wide and perches awkwardly on top.
A quick dry run with an empty pot saves you from wrestling with a heavy, soil-filled planter later. If the fit is close-but-not-perfect,
adding a simple cross support (wire, zip ties, or a small platform) turns “wobbly” into “solid” without making the stand look homemade.
Second, stability is about weight distribution, not wishful thinking. A tall stand plus a top-heavy plant can tip if it’s in a high-traffic
area (kids, pets, energetic roommates, or that one friend who talks with their whole body). The most reliable fix is pairing the stand with
a heavier pot or adding weight lowlike a paver under the stand or stones in the bottom of the planter. Indoors, even placing the stand on a
grippy rug pad can make it feel dramatically sturdier.
Third, paint prep is where patience pays rent. Metal cagesespecially galvanized onescan be slick and coated with residues from manufacturing
or years of outdoor use. When DIYers skip cleaning and priming, the paint may look good for a week, then start flaking in high-contact spots
(like where the pot rubs). The stands that hold up best usually follow a simple rhythm: clean thoroughly, choose the right primer for the metal,
apply thin coats, and let everything cure before loading it up. If you’re short on time, a “rust chic” look can actually be a stylish choice
just make sure the structure is still strong and the edges are smooth.
Rope wrapping has its own personality. It looks amazing, but it’s happiest when wrapped tight and secured cleanly. A common experience is
starting with loose wraps and ending with gaps that show wire. Keeping steady tension and working in small sections makes it look intentional.
It also helps to hide seams toward the back so the front looks seamless. If your stand is outdoors, consider that natural rope can weather;
some people prefer to wrap only a few rings for accent instead of covering every ring, which reduces wear and keeps the look lighter.
Finally, most people end up making more than one. Once you have one stand, you’ll notice every corner that could use a little height:
the porch steps, the empty spot by the front door, the “sad plant corner” indoors. The best part is you can vary the height by cutting
different amounts and create a cohesive set. That’s when the DIY stops feeling like a one-off project and starts looking like a real design plan
the kind that makes guests assume you bought it on purpose.
Conclusion
A tomato cage plant stand is the rare DIY that’s both easy and genuinely useful. With a simple flip, a careful trim, and a few optional upgrades,
you can create a tall planter display that looks polished, saves floor space, and makes your plants feel like the main character. Whether you go
modern with a clean painted finish, rustic with rope-wrapped rings, or vintage with a little patina, the result is a functional piece that brings
height and style to any indoor or outdoor setup.
Make one, live with it for a day, and you’ll probably start eyeballing your other tomato cages like, “You could be decor too.”


