
Table of Contents >> Show >> Hide
- Why Dairy Free Ice Cream Can Be Tricky
- Ingredients for a Basic Dairy Free Vanilla Ice Cream
- How to Make Dairy Free Ice Cream: 13 Steps
- Step 1: Choose a Creamy Dairy-Free Base
- Step 2: Pick Your Sweeteners Wisely
- Step 3: Add a Thickener for Better Texture
- Step 4: Build Flavor Early
- Step 5: Heat the Base Gently
- Step 6: Blend Until Smooth
- Step 7: Chill the Base Completely
- Step 8: Prep Your Ice Cream Maker
- Step 9: Churn the Ice Cream
- Step 10: Add Mix-Ins at the End
- Step 11: Transfer and Freeze Until Firm
- Step 12: Let It Rest Before Scooping
- Step 13: Taste, Adjust, and Make It Yours
- Best Flavor Variations to Try
- Common Mistakes That Ruin Dairy Free Ice Cream
- No Ice Cream Maker? You Still Have Options
- How to Store Dairy Free Ice Cream
- Final Scoop
- Extra Experiences: What Making Dairy Free Ice Cream Is Really Like
- SEO Tags
If you have ever scooped a pint of dairy free ice cream and thought, “This is either going to be amazing or taste like a frozen regret,” welcome. You are among friends. The good news is that homemade dairy free ice cream can be rich, creamy, smooth, and wildly satisfying. The bad news is that it can also become a sad, icy block if you treat it like regular ice cream and hope for the best.
That is exactly why this guide exists. Whether you are avoiding dairy because of allergies, lactose intolerance, a plant-based lifestyle, or because your stomach has started filing formal complaints, learning how to make dairy free ice cream at home is easier than it looks. You just need the right base, the right ratio of fat to sweetness, and a little patience while the freezer does its thing.
In this step-by-step guide, you will learn how to make dairy free ice cream from scratch, how to avoid common texture mistakes, and how to customize flavors without turning your dessert into an edible science fair project. We will use a simple vanilla-style base as the foundation, but you can easily riff on it later with chocolate, berries, coffee, cookies, toasted coconut, or whatever your dessert-loving heart demands.
Why Dairy Free Ice Cream Can Be Tricky
Traditional ice cream gets a lot of help from dairy fat and milk proteins. When you remove those, you lose some of the creamy magic that keeps ice cream smooth and scoopable. That is why homemade dairy free ice cream usually relies on ingredients like full-fat coconut milk, cashews, oat milk, almond milk, or other plant-based options to rebuild that richness.
The real secret is balance. Too much water and the texture turns icy. Too little fat and it feels thin. Too little sugar and it freezes like a rock. Too many add-ins and suddenly your “ice cream” is just frozen trail mix with ambition. The goal is to create a base that is cold, smooth, and flavorful before it even hits the machine.
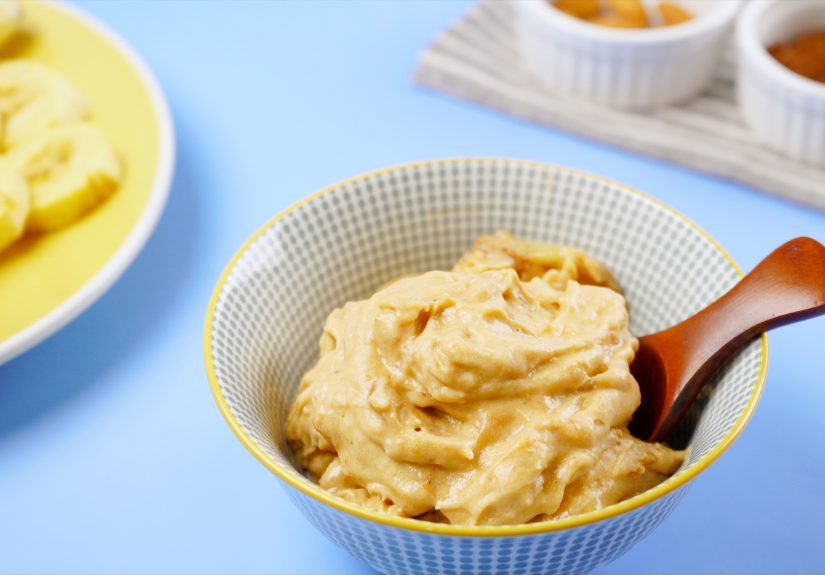
Ingredients for a Basic Dairy Free Vanilla Ice Cream
This version makes about 1 quart and works well in most home ice cream makers.
- 2 cans full-fat coconut milk
- 1 cup unsweetened oat milk or almond milk
- 3/4 cup granulated sugar
- 2 tablespoons maple syrup or light corn syrup
- 1 tablespoon cornstarch
- 1 tablespoon neutral oil or melted refined coconut oil
- 1 tablespoon vanilla extract
- 1/4 teaspoon fine sea salt
You can also swap the coconut milk for a cashew-based blend if you want a more neutral flavor. Coconut milk is popular because it adds body and creaminess, but some people prefer a base with less tropical personality. Coconut tends to walk into the room and announce itself.
How to Make Dairy Free Ice Cream: 13 Steps
Step 1: Choose a Creamy Dairy-Free Base
The first step is choosing the right milk. If your goal is classic scoopable ice cream, go with a higher-fat option like full-fat coconut milk or a cashew blend. Thin boxed plant milks can work, but using them alone often creates a colder, icier result. A blend usually works best: one rich milk for body and one lighter milk for balance.
Step 2: Pick Your Sweeteners Wisely
Sugar does more than sweeten. It also helps control how hard the ice cream freezes. Granulated sugar gives clean sweetness, while a little maple syrup or corn syrup helps improve texture and reduce iciness. No, syrup is not cheating. It is dessert engineering, and dessert engineering is noble work.
Step 3: Add a Thickener for Better Texture
A small amount of cornstarch, tapioca starch, or arrowroot can help bind water and improve creaminess. You do not want to overdo it, because then your frozen dessert starts feeling suspiciously pudding-adjacent. A tablespoon is usually enough for a home batch.
Step 4: Build Flavor Early
Stir the sugar, syrup, salt, vanilla, and starch into the milks before heating. Salt may seem tiny here, but it sharpens flavor and keeps the finished ice cream from tasting flat. Vanilla is your base note, and it matters more than people think. If your vanilla tastes cheap and dusty, your ice cream may too.
Step 5: Heat the Base Gently
Pour the mixture into a saucepan and heat it over medium heat, whisking often. You want it hot enough to dissolve the sugar and activate the starch, but not boiling like it is auditioning for a soup recipe. Heat until the mixture thickens slightly and looks silky.
Step 6: Blend Until Smooth
Once warmed, blend the base for 20 to 30 seconds. This step helps emulsify the fat and liquid so the texture stays smoother after freezing. If you are adding cocoa powder, dates, nut butter, or fruit puree, blending is especially helpful. It is the difference between “luxurious homemade dessert” and “why is this grainy?”
Step 7: Chill the Base Completely
Transfer the mixture to a bowl or container and chill it in the refrigerator for at least 4 hours, preferably overnight. This is one of the most important steps in the entire process. A cold base churns faster and freezes more evenly, which leads to smaller ice crystals and a creamier result. Warm base plus ice cream maker equals disappointment with a lid on it.
Step 8: Prep Your Ice Cream Maker
If your machine has a freezer bowl, make sure it has been frozen long enough. Many bowls need at least 24 hours in the freezer. If it is only half-frozen, your ice cream will also be half-committed, and no dessert should live that way. Read your machine instructions before you start.
Step 9: Churn the Ice Cream
Pour the cold base into the machine and churn according to the manufacturer’s directions, usually 20 to 30 minutes. The mixture should thicken into a soft-serve texture. Do not expect rock-solid scoops right out of the machine. At this stage, it should look creamy and airy, not fully firm.
Step 10: Add Mix-Ins at the End
If you want chocolate chips, crushed cookies, toasted nuts, fruit swirls, or brownie chunks, add them in the last few minutes of churning. Add them too early and they sink, break down, or turn your base muddy. Keep mix-ins small so every scoop gets a little fun without becoming impossible to serve.
Step 11: Transfer and Freeze Until Firm
Spoon the churned ice cream into a freezer-safe loaf pan or container. Press parchment paper or plastic wrap directly on the surface to reduce ice crystals, then cover and freeze for 2 to 4 hours. This is the hardening stage, where soft-serve becomes scoopable ice cream.
Step 12: Let It Rest Before Scooping
Homemade dairy free ice cream is often firmer straight from the freezer than store-bought versions, because it does not contain the same stabilizers and processing tricks. Let it sit on the counter for 5 to 10 minutes before scooping. This small wait makes a huge difference. Your wrist will thank you, and so will your spoon.
Step 13: Taste, Adjust, and Make It Yours
Your first batch is not the final boss level. It is the beginning. If you want it sweeter, richer, softer, or more intensely flavored, adjust the next batch. Add more vanilla. Swap oat milk for cashew milk. Stir in espresso powder. Fold in strawberry jam. Homemade dairy free ice cream gets better fast once you learn how your ingredients behave.
Best Flavor Variations to Try
Chocolate Dairy Free Ice Cream
Add 1/3 cup cocoa powder and a few ounces of melted dairy-free dark chocolate to the warm base. Chocolate covers a multitude of sins, including minor texture flaws and your decision to “just eyeball it” with the vanilla.
Strawberry Dairy Free Ice Cream
Roast or cook the strawberries first instead of blending in raw fruit. This removes excess water and concentrates flavor, which keeps the ice cream from turning icy and bland.
Coffee or Mocha
Whisk in instant espresso powder to the warm base, or add both coffee and cocoa for a mocha version. This is an excellent choice for adults who like their dessert to feel dramatic.
Banana “Nice Cream” Shortcut
If you need a fast dairy free frozen treat, frozen bananas blended with a splash of plant milk make a quick soft-serve-style dessert. It is not exactly the same as classic ice cream, but it is fast, creamy, and saves the day when the sweet craving arrives wearing hiking boots.
Common Mistakes That Ruin Dairy Free Ice Cream
- Using low-fat milk only: The result is often icy and thin.
- Skipping the chill time: A warm base churns poorly.
- Under-sweetening: Less sugar can mean a harder freeze.
- Adding watery fruit: Extra water often means bigger ice crystals.
- Overloading mix-ins: More is not always more.
- Expecting store-bought texture: Homemade is wonderful, but different.
No Ice Cream Maker? You Still Have Options
If you do not own an ice cream maker, do not panic and do not start pricing machines at midnight. You can still make a respectable no-churn version. Blend your base, chill it, pour it into a loaf pan, and freeze it. Stir every 30 to 45 minutes for the first 2 to 3 hours to break up ice crystals. It will not be identical to churned ice cream, but it can still be creamy and delicious.
Another option is a whipped coconut cream method. Chill canned coconut cream, whip the thick part until fluffy, then fold it with a sweetened flavor base and freeze. This creates a lighter, mousse-like frozen dessert that is especially good for vanilla, chocolate, or coffee flavors.
How to Store Dairy Free Ice Cream
Store homemade dairy free ice cream in an airtight freezer container. Press a layer of parchment or wrap against the surface for extra protection. For the best flavor and texture, eat it within one to two weeks. Will it technically survive longer? Probably. Will it still be at its best after freezer perfume and crystal creep move in? Not likely.
Final Scoop
Learning how to make dairy free ice cream is part recipe, part technique, and part joyful stubbornness. Once you understand that creaminess comes from fat, scoopability comes from sugar, and smooth texture comes from chilling and churning properly, the whole process becomes much easier. From there, you can make the dessert exactly the way you like it.
That is the beauty of homemade dairy free ice cream. You get control over the ingredients, the sweetness, the flavor, and the texture. You can make it coconut-forward, neutral, nutty, chocolate-heavy, fruit-bright, or gloriously overloaded with cookie chunks. You can also stand in your kitchen at 10:17 p.m. eating a test scoop straight from the container and calling it “quality control,” which is one of the great privileges of adulthood.
If your first batch is not perfect, keep going. The second batch is usually smarter, the third batch is usually better, and by the fourth batch you will start acting like the kind of person who casually says things like, “I prefer a cashew-oat base for vanilla.” That is when you know you have changed.
Extra Experiences: What Making Dairy Free Ice Cream Is Really Like
The funny thing about making dairy free ice cream at home is that the first attempt usually begins with optimism and ends with a spoon tapping against something frozen enough to survive re-entry from space. Many people start with the idea that plant-based ice cream should work exactly like regular ice cream, just with a different carton of milk. Then reality shows up in flip-flops and says, “Actually, texture is a whole thing.”
One of the most common experiences is discovering that not all dairy-free milks behave the same way. Almond milk can taste clean and pleasant, but on its own it may freeze too lean. Oat milk often gives a lovely body, but some brands are sweeter or thicker than others. Coconut milk brings luxury, but also a flavor that can dominate delicate ingredients. Cashew-based blends often land right in the middle, creamy and mellow, like the overachiever of the plant-milk world.
Another real-life lesson is that your freezer has a personality. Some freezers are gentle and consistent. Others seem personally offended by dessert. A batch that scoops beautifully in one kitchen may set up much firmer in another. That is why experienced home cooks learn to judge the ice cream by feel, not just time. If it needs 10 minutes on the counter before scooping, that is not failure. That is strategy.
Then there is the flavor-learning curve. Vanilla sounds simple until you realize it is actually a spotlight flavor. In chocolate ice cream, you can get away with a lot. In vanilla, everything shows. If your base is flat, the final result will taste flat. If your salt is balanced and your vanilla is fragrant, the entire batch suddenly tastes expensive. It is a strange kind of kitchen magic, and it makes people wildly opinionated about extracts.
Homemade dairy free ice cream also creates memorable kitchen moments. Kids love watching the liquid base slowly transform in the machine. Adults love pretending they are only checking the texture when they absolutely are sneaking bites. Friends who “do not usually like vegan desserts” somehow become very interested once chocolate chip coconut-cashew ice cream appears in a bowl. It has a way of converting skeptics one spoonful at a time.
Most of all, making it yourself builds confidence. You stop relying on expensive store pints that may or may not taste like freezer-burned optimism. You learn what works in your kitchen, with your machine, with your favorite ingredients. And eventually, the process becomes less about replacing dairy and more about creating a dessert that is simply good on its own terms. That is when homemade dairy free ice cream stops feeling like a substitute and starts feeling like a signature move.


