
Table of Contents >> Show >> Hide
- What Is Salt Cod and Why Cure Fish With Salt?
- Safety First: Important Guidelines for Salt-Curing Fish at Home
- Choosing the Right Fish for Salt Cod and Salt-Cured Fish
- Equipment and Ingredients You’ll Need
- Step-by-Step: How to Make Simple Salt Cod at Home
- How to Desalt and Cook Salt Cod
- Other Salt-Cured Fish You Can Make at Home
- Tips, Tricks, and Common Mistakes
- Real-World Experience: What You Learn After a Few Batches
- The first batch is usually too salty (and that’s okay)
- Thickness matters more than the clock
- Your fridge has microclimates
- Salt choice changes the flavor (and texture) more than you’d think
- Salt-cured fish is a meal-prep secret weapon
- Your nose becomes your best quality-control tool
- The biggest win: confidence
- Conclusion
If you’ve ever fallen in love with bacalao in a Spanish tapas bar, brandade in a French bistro, or Jamaican saltfish and ackee at brunch, you’ve already met salt-cured fish. The good news? You don’t have to rely on specialty shops to get it. With the right fish, plenty of salt, and a big respect for food safety, you can make salt cod and other salt-cured fish at home.
This guide walks you through how salt curing works, the safest way to do it in a home kitchen, and step-by-step instructions for making your own salt cod. We’ll also cover other salt-cured fish styleslike quick salt fish and cured salmonplus hard-earned tips and real-world experiences to help you avoid “oops, too salty” moments.
What Is Salt Cod and Why Cure Fish With Salt?
Salt cod is simply cod that’s been preserved by packing it in salt, sometimes followed by drying. Traditionally, this process let coastal communities store fish for months and ship it around the world without refrigeration. Today, most home versions are kept in the refrigerator or freezer, but the flavor and texture are still unique.
When you salt-cure fish, several things happen:
- Moisture is drawn out. Salt pulls water from the fish, making it less friendly to bacteria.
- Protein structure changes. The fish becomes firmer and more dense, perfect for flaking into stews, fritters, and spreads.
- Flavor concentrates. You get a deep, savory, slightly briny taste that fresh fish just can’t match.
Salt cod (often used for bacalao and other Mediterranean dishes) is the classic, but the same basic method works for other lean fishthink pollock, haddock, halibut, or even some rich fish when you’re doing shorter cures.
Safety First: Important Guidelines for Salt-Curing Fish at Home
Before we dive into the fun, we need one serious note: salt curing doesn’t magically make unsafe fish safe. Done incorrectly, home-cured fish can pose a risk of dangerous foodborne illness, including botulism, especially if whole uneviscerated fish are cured or if food is stored too warm or in low-oxygen conditions for long periods.
Use the right kind of fish
- Always start with eviscerated fish. In the U.S., regulators warn that curing whole, uneviscerated fish is a significant health hazard. For home curing, stick with clean fillets or skinned sides from a reputable source.
- Choose very fresh fish. It should smell like the ocean, not “fishy.” Avoid anything slimy, discolored, or with off odors.
Keep it cold
- Cure fish under refrigeration. Professional guidelines for cured and smoked fish stress strict temperature control to prevent harmful bacteria from growing. Treat curing fish like raw fish: it belongs in the fridge, not on the counter.
- Be cautious about room-temperature drying. Traditional outdoor drying is a controlled craft and depends on climate, airflow, and sometimes additional safety steps. For home cooks, it’s safer to dry fish on a rack in the refrigerator.
Skip home “long-term storage” experiments
- Don’t vacuum seal salt-cured fish and leave it in the fridge or pantry for months. Reduced oxygen can favor the growth of Clostridium botulinum if conditions are right.
- When in doubt, freeze. For most home kitchens, the safest plan is: cure, dry in the fridge, then freeze for longer storage.
Basic food safety rules still apply
- Wash hands and utensils thoroughly after handling raw fish.
- Use clean containers, racks, and towels or paper towels.
- Keep raw fish and curing fish away from ready-to-eat foods in your fridge.
This guide is meant for small-batch, home-scale curing with refrigerated storage. If you want truly shelf-stable salt fish like commercial products, that requires more precise control over salt levels, water activity, drying, and sometimes regulatory oversightnot a casual weekend project.
Choosing the Right Fish for Salt Cod and Salt-Cured Fish
The best fish for classic salt cod and similar cures are lean, white-fleshed species with firm texture:
- Atlantic or Pacific cod (skin on or off)
- Pollock
- Haddock
- Ling cod
- Halibut or other firm white fish
For “other salt-cured fish,” you can also experiment with:
- Salmon or trout for gravlax-style cures (shorter, milder, often with sugar and herbs).
- Mackerel, herring, or bluefish for strongly flavored cured fillets (again, shorter cures, always refrigerated).
Whatever you choose, avoid very thin fillets that will turn rubbery or extremely fatty fish if you plan a long curefat can oxidize and develop off flavors over time.
Equipment and Ingredients You’ll Need
Essential equipment
- Non-reactive container: Glass or stainless steel works best. Some curing guides recommend avoiding certain plastics because of concerns around chemicals like BPAplus glass is easy to sanitize.
- Cooling rack or small metal rack: To keep the fish elevated while it dries in the fridge.
- Plastic wrap, parchment, or a tight-fitting lid: To cover the curing container.
- Kitchen scale (optional but helpful): Great for weighing fish and salt if you want more precision.
Core ingredients
- Coarse sea salt or kosher salt: Your star player. Avoid iodized table salt, which can give off flavors.
- Optional sugar: Common in shorter cures (like salmon gravlax) to balance salt and add a gentle sweetness.
- Optional flavorings: Bay leaves, peppercorns, citrus zest, garlic, fresh thyme, dill, or other herbs, depending on the style you want.
For classic salt cod, traditional recipes often use salt in quantities close to the weight of the fish. For more modern, precisely controlled cures (especially for shorter times), some chefs use a percentage of salt based on the fish’s weightfor example, around 2–3% salt by weight for milder cured salmon, or higher percentages for firmer, saltier fish.
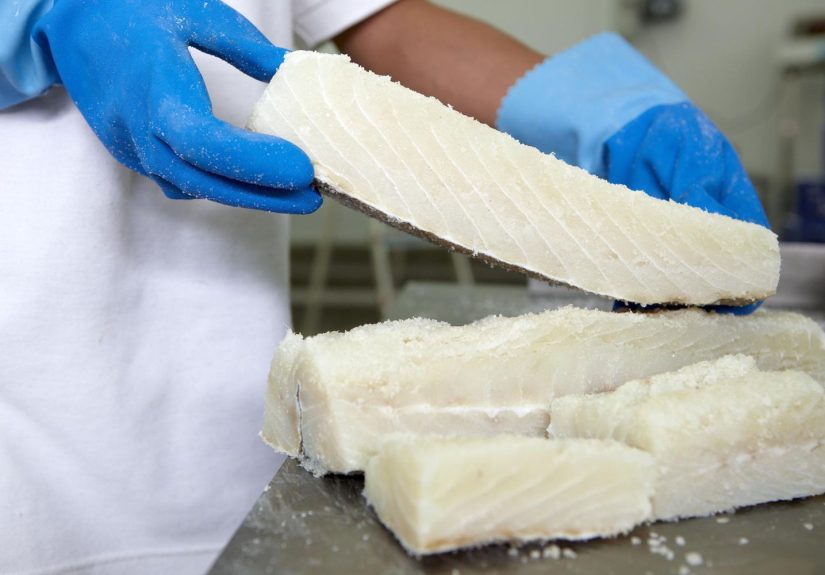
Step-by-Step: How to Make Simple Salt Cod at Home
Here’s a straightforward method to make a small batch of salt cod in your refrigerator. This gives you a firm, salty fillet suitable for soaking and then cooking in traditional recipes.
1. Prep the fish
- Start with fresh, firm cod fillets or loins. Remove pin bones with tweezers.
- Rinse the fish quickly under cold water to remove surface slime or scales.
- Pat the fish very dry with clean towels. The drier you start, the more efficiently the salt can work.
- Cut the fish into manageable piecesbig enough to cook with, but not so thick that the cure can’t penetrate (about 1 to 1½ inches thick is ideal).
2. Pack the fish in salt
- Pour a ½-inch layer of coarse salt into the bottom of your container.
- Lay the cod pieces on top in a single layer, skin side down if the skin is still on.
- Cover the fish completely with more salt, pressing it around the sides so no flesh is exposed. You want the pieces essentially buried in salt.
- Cover the container with plastic wrap or a lid and place it in the refrigerator.
Curing time: For cod pieces around 1 inch thick, plan on about 24–48 hours for this initial “wet” salting step. Thicker pieces can go longer. During this time, the salt will draw out moisture and the fish will firm up noticeably.
3. Rinse and dry the fish
- Remove the fish from the salt and discard the used salt.
- Rinse each piece briefly under cold water to remove surface salt.
- Pat the fish very dry again.
- Wrap the pieces loosely in a single layer of clean cheesecloth or place them on a rack set over a tray.
Return the fish to the refrigerator on the rack (uncovered or loosely covered) and let it dry for several daysoften 5–10 days, depending on thickness and your fridge conditions. The fish should become firmer and somewhat drier but not rock-hard. You’re aiming for a texture similar to commercial salt cod before soaking: stiff, dense, and slightly translucent.
4. Storing your homemade salt cod
- Once the fish has dried to your liking, wrap it in parchment or cheesecloth and place it in a zip-top bag.
- Store in the refrigerator for short-term use (a couple of weeks).
- For longer storage, freeze the salt cod. Freezing adds an extra safety margin and helps maintain quality over time.
Label your packets with the date and type of fish. Future you will be grateful when rummaging through the freezer.
How to Desalt and Cook Salt Cod
Before you cook, you have to undo some of your own hard work: desalting. This step rehydrates the fish and removes excess salt so your dish tastes pleasantly seasoned instead of ocean-level briny.
Step 1: Soak the salt cod
- Rinse the salt cod under cold running water to remove surface salt.
- Place it in a large bowl or container and cover with cold water.
- Refrigerate while soaking.
Soaking time:
- For typical salt cod pieces, plan on 24–48 hours.
- Change the water every 6–8 hours (2–4 times per day).
- Thinner pieces may be ready in less time; very thick loins may need up to 2–3 days.
The best test is simply to taste a small flake. You want it pleasantly seasoned, not aggressively salty. If it’s still too salty, change the water and keep soaking.
Step 2: Cook your salt cod
Once desalted, salt cod can be cooked in many ways. A few classic approaches:
- Gentle poaching: Simmer the soaked fish in barely bubbling water or milk for 5–10 minutes, just until it flakes. Then use it in chowders, casseroles, or fish cakes.
- Stews and braises: Add chunks of salt cod to tomato-based stews with potatoes, peppers, and olives for a Mediterranean-style bacalao dish.
- Spreads and dips: Whip poached salt cod with olive oil, garlic, and cream or potatoes for a silky brandade, perfect with crostini.
Remember that salt cod is already slightly seasoned, so taste before adding extra salt to your recipe.
Other Salt-Cured Fish You Can Make at Home
Once you’re comfortable making salt cod, you can apply similar principles to other fish. Just adjust the salt level and curing time to match the fattiness and thickness of the fish.
Quick salt fish for Caribbean-style dishes
For recipes that call for salt fish but don’t need a long drying stage, you can make a simple, faster version:
- Lightly season fresh white fish fillets with salt and let them sit in the fridge for a few hours or overnight.
- Rinse, then poach briefly to firm them and remove some salt.
- Flake the fish and use it in fritters, stews, or sautéed with onions and peppers.
Some Caribbean-style methods use lots of salt and a short boiling step to create a flavorful, ready-to-use salt fish in under a day. This isn’t as concentrated or long-keeping as traditional salt cod, but it works beautifully in recipes where the fish gets cooked again and mixed with other bold flavors.
Cured salmon and gravlax-style fish
For fatty fish like salmon or trout, you’ll usually use a shorter, gentler cure with a mix of salt and sugar:
- Weigh your fish fillet and calculate about 2–3% salt by weight for a mild cure, often paired with around 1–2% sugar.
- Mix the salt, sugar, and seasonings (like dill, pepper, citrus zest).
- Rub the cure all over the fish, wrap tightly, and refrigerate for 24–48 hours, turning occasionally.
- Rinse, pat dry, and slice thinly.
This method creates a silky, sliceable cured fish rather than a dried salt cod texture. It’s perfect for bagels, canapés, or serving with mustard sauce and rye bread.
Other fish to experiment with
Once you understand the interplay of salt, time, and temperature, you can try:
- Mackerel or herring: Short, strong cures for bold appetizers.
- Halibut and other firm white fish: Gentle cures that hold together nicely when sliced or flaked.
For all of these, keep the fish refrigerated during curing, avoid curing whole uneviscerated fish at home, and when in doubt, err on the side of shorter cures, milder saltiness, and freezing for storage.
Tips, Tricks, and Common Mistakes
- Using too little salt: If the fish isn’t fully surrounded by salt, parts of it can spoil instead of cure. When in doubt, use more salt and plan to soak longer.
- Going too warm: Room-temperature “rustic” curing looks romantic in old photos but can be risky in a modern home kitchen. Keep it cold.
- Skipping the drying stage: If you want that firm, traditional salt cod texture, don’t stop after the first day in saltgive it time to dry and mature in the fridge.
- Forgetting to taste during soaking: Recipes may say “soak 24 hours,” but thickness, starting salt level, and personal taste all vary. Tasting a small flake is the most reliable test.
- Over-salting the final dish: You’d be surprised how often people lovingly desalinate fish for two days and then dump in a tablespoon of salt at the stove. Taste first, season last.
Real-World Experience: What You Learn After a Few Batches
After your first batch, you’ll quickly discover that salt-cured fish is as much feel as formula. Here are some “experience lessons” that home cooks tend to learn the slightly messy, slightly salty way.
The first batch is usually too salty (and that’s okay)
Most people are so worried about safety that they pack on salt like they’re trying to preserve fish for a 16th-century voyage. The result? Your salt cod might taste like it’s auditioning to become a salt lick. The fix is simple: more soaking, more water changes, and more tasting. Over time, you’ll dial in a curing time that hits your sweet spot.
Thickness matters more than the clock
You’ll notice that two pieces from the same fillet can cure differently just because one end is thicker. The thinner end firms up quickly and desalts fast; the thicker end takes its time. That’s why professional guides emphasize thickness when they give timing ranges. At home, you’ll start to think of fish in terms of “thin tail piece,” “medium fillet,” and “chonky loin,” each with its own schedule.
Your fridge has microclimates
Another fun surprise: not all spots in your refrigerator are equal. A piece of fish drying on the top shelf near the fan might firm up faster than one on a crowded lower shelf near leftovers. After a batch or two, you’ll figure out where the “good drying corner” isusually somewhere with decent air circulation and no leaky containers nearby.
Salt choice changes the flavor (and texture) more than you’d think
Coarse sea salt, kosher salt, and specialty salts all behave a bit differently. Coarser salts dissolve more slowly and can create a more gradual cure; finer salts pack tighter and may draw moisture faster. Some cooks like the mineral complexity of sea salt, while others prefer the clean, predictable performance of kosher salt. It’s worth trying a couple of different salts over time and noticing how they affect texture, curing speed, and flavor.
Salt-cured fish is a meal-prep secret weapon
Once you have a batch of homemade salt cod or salt-cured fish in the fridge or freezer, weeknight dinners get easier. A typical “I have no idea what’s for dinner” night can turn into something impressive with minimal effort:
- Flake soaked salt cod into mashed potatoes with garlic and herbs for quick fish cakes.
- Add it to a simple tomato and olive stew, and suddenly you have a Mediterranean-style dinner.
- Stir cured salmon into warm pasta with lemon, butter, and dill for a dish that looks restaurant-level but took 20 minutes.
Because the fish is already salted and partially transformed, you’re basically starting with a pre-seasoned ingredient that brings big flavor with very little work at cooking time.
Your nose becomes your best quality-control tool
After a few rounds of curing fish, you get very good at listening to your nose. Fresh fish and properly cured fish smell clean, briny, maybe a little like the sea. Off smellssour, rancid, or aggressively funkyare a sign to toss it and start over. No recipe, thermometer, or timer can override your senses here. If something smells wrong, trust that instinct.
The biggest win: confidence
There’s something satisfying about taking a highly perishable ingredient like fresh fish and turning it into a deeply flavorful, longer-lasting product with just salt, time, and care. The first time you flake your own homemade salt cod into a bubbling pot of chowder or stew, it feels a little bit like magicand a little bit like you’ve leveled up your kitchen skills in a big way.
Once you respect the safety rules and understand the basics, making salt cod and other salt-cured fish at home becomes less intimidating and more like a fun, slightly nerdy kitchen hobby. And the payoffintense flavor, flexible meal prep, and bragging rightsis absolutely worth it.
Conclusion
Salt cod and other salt-cured fish are part history, part science experiment, and part flavor bomb. By choosing fresh, eviscerated fish, using plenty of salt, keeping everything cold, and giving the fish time to cure and dry, you can safely make your own at home. From classic bacalao-style dishes to quick salt fish and gravlax-style cures, there’s a whole world of recipes waiting once you have a stash of cured fish ready to go.
Start with a small batch, keep notes on times and textures, and tweak as you go. Before long, you’ll have your own “house style” for salt cod and other salt-cured fishand a new kitchen skill that connects you to centuries of culinary tradition.


