
Table of Contents >> Show >> Hide
- What the Fridge Water Inlet Valve Actually Does
- Signs the Water Inlet Valve May Need Replacement
- Tools and Materials You’ll Need
- Before You Replace the Valve
- Step-by-Step: How to Replace the Fridge Water Inlet Valve
- Step 1: Unplug the refrigerator and shut off the water
- Step 2: Pull the fridge out and protect the floor
- Step 3: Remove the rear lower access panel
- Step 4: Locate the water inlet valve
- Step 5: Disconnect the household water supply line
- Step 6: Take a photo of all wires and tubing connections
- Step 7: Disconnect the electrical connectors
- Step 8: Disconnect the refrigerator water tubes from the valve
- Step 9: Remove the old valve from the mounting bracket
- Step 10: Prep tubing if the new valve uses push-fit connectors
- Step 11: Install the new valve and reconnect tubing
- Step 12: Reconnect the electrical wires
- Step 13: Reconnect the household water supply line
- Step 14: Turn the water back on and check for leaks
- Step 15: Reinstall the rear panel and restore power
- Step 16: Flush and test the dispenser/ice maker
- Common Mistakes to Avoid
- When to Call a Pro
- DIY Experiences and Lessons Learned (Extended Real-World Notes)
- Conclusion
If your refrigerator suddenly stops making ice, dispenses water like it’s on a coffee break, or leaves a mysterious puddle behind the unit, there’s a good chance the water inlet valve is the culprit. The good news? This is one of those repairs that sounds scarier than it is. With the right replacement part, a few basic tools, and a little patience, you can usually handle it yourself in an afternoon.
This guide walks you through the entire process in plain Englishno weird repair jargon, no “just reverse the steps” nonsense. You’ll learn how to confirm the issue, safely remove the old valve, install the new one, and test for leaks so your fridge can get back to making ice like a champion.
What the Fridge Water Inlet Valve Actually Does
The water inlet valve is an electrically controlled valve mounted near the back-bottom area of most refrigerators. It opens when your fridge calls for waterusually for the ice maker, the water dispenser, or both. Many models use a dual valve setup (one path for the dispenser, one for the ice maker), while others may use a single or multi-port assembly depending on the brand and design.
In simple terms: no working valve, no water where it needs to go. That can mean no ice, weak water flow, inconsistent filling, or leaks around the valve body or fittings.
Signs the Water Inlet Valve May Need Replacement
Before you start unscrewing panels like a DIY action hero, make sure the valve is a likely cause. Common signs include:
- No water dispensing even though the fridge has power.
- Ice maker not making ice or making very small batches.
- Weak water flow from the dispenser (after ruling out a clogged filter).
- A humming or clicking sound when water is requested, but no water comes out.
- Water leaking behind the refrigerator near the valve or supply connection.
Quick sanity check: a bad valve is not the only possibility. A clogged water filter, frozen fill tube, shut-off valve issue, kinked supply line, or low household water pressure can cause similar symptoms. If your water supply line itself has weak flow, replacing the fridge valve won’t fix the problem.
Tools and Materials You’ll Need
Most fridge inlet valve replacements don’t require anything exotic. Here’s a typical setup:
- Correct replacement water inlet valve (matched by refrigerator model number)
- Phillips screwdriver
- Flathead screwdriver
- Nut driver (common sizes include 1/4-inch)
- Adjustable wrench or small wrench
- Needle-nose pliers (optional, helpful for wire connectors)
- Towel or shallow pan/bowl (there will be some water)
- Work gloves
- Phone camera (seriouslythis saves headaches)
- Razor blade or tubing cutter (only if trimming tubing for push-fit style valves)
Pro tip: Use your fridge’s exact model number when buying the valve. Water inlet valves can look almost identical while having different ports, coils, or brackets. “Close enough” is a great strategy for pizza toppings, not appliance parts.
Before You Replace the Valve
1) Confirm the water supply is actually on
Locate the shut-off valve that feeds the refrigerator. It’s often behind the fridge, under the kitchen sink, or in the basement/crawlspace. Make sure it’s open and the supply line isn’t kinked.
2) Rule out a clogged filter
If your fridge has a water filter and the dispenser flow gradually got weaker, replace the filter first. A clogged filter can mimic a failing inlet valve.
3) Check for obvious leaks or cracks
Pull the fridge out carefully and inspect the tubing and valve area. Sometimes the valve body cracks, or a fitting loosens over time. If the leak is clearly at the valve assembly, replacement is the right move.
4) Optional: basic electrical test
If you’re comfortable using a multimeter, you can test the valve solenoid(s) for continuity. Resistance ranges vary by model and valve design, so don’t assume one number fits every fridge. Use the valve label or service documentation if available. If there’s no continuity, the valve is done and ready for retirement.
Step-by-Step: How to Replace the Fridge Water Inlet Valve
Step 1: Unplug the refrigerator and shut off the water
Safety first. Unplug the fridge (or switch off the breaker if the plug is inaccessible), then shut off the water supply valve feeding the refrigerator. This repair involves both electricity and watertwo things that should not mingle on your kitchen floor.
If you have food that could spoil while the fridge is off, move it to a cooler if needed. Most replacements are quick, but no one wants warm yogurt as a side quest.
Step 2: Pull the fridge out and protect the floor
Carefully pull the refrigerator away from the wall so you can work behind it. Place cardboard, a mat, or soft material under the feet if needed to avoid scratching the floor. Put a towel under the back area to catch drips.
Step 3: Remove the rear lower access panel
Most refrigerators have a lower rear service panel (metal or fiberboard/cardboard) secured with screws. Remove it with a screwdriver or nut driver and set the screws aside in one safe spot. (Optional but smart: use a small cup so the screws don’t vanish into another dimension.)
Step 4: Locate the water inlet valve
Follow the household water supply line to where it connects to the fridge. That connection leads directly to the water inlet valve assembly. It’s usually mounted to the frame with a bracket near the bottom rear of the unit.
Step 5: Disconnect the household water supply line
Place your towel or bowl under the valve. Using a wrench, loosen the compression nut on the incoming supply line and disconnect it from the valve. A little water will spillthis is normal. A lot of water means someone forgot Step 1.
Step 6: Take a photo of all wires and tubing connections
Before disconnecting anything else, snap clear photos of the valve from a few angles. This is your cheat sheet for reassembly, especially if your model has multiple tubes and dual solenoids.
Step 7: Disconnect the electrical connectors
Remove the wire harness plug or individual wire connectors from the valve terminals. Some models have locking tabs; others use spade connectors. Pull on the connector body, not the wires. If your valve has multiple terminals, label them with tape if the connectors aren’t clearly keyed or color-coded.
Step 8: Disconnect the refrigerator water tubes from the valve
This part depends on your valve style:
- Compression fitting style: Loosen the fitting nut with a wrench and remove the tube.
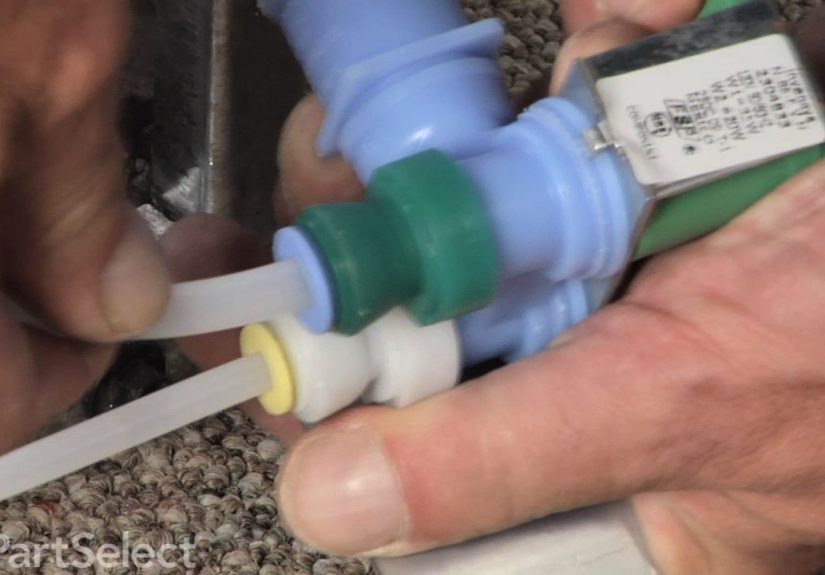
- Push-to-connect (quick-connect) style: Press the plastic collar/ring inward while gently pulling the tube out.
Some designs use retainers or small clips (including C-clips) that need to be removed first. Keep all clips; you may need them for the new valve. Also, note which tube goes to which portmixing them up can cause the ice maker and dispenser to behave very strangely.
Step 9: Remove the old valve from the mounting bracket
Unthread the screws securing the valve or bracket to the refrigerator frame. On some models, the valve is part of a bracket assembly; on others, the valve and bracket separate. Gently lift or slide the valve out.
Take a moment to compare the old and new parts side by side. Port count, bracket orientation, electrical terminals, and tubing connections should match. Minor cosmetic differences are common, but the functional layout should be equivalent.
Step 10: Prep tubing if the new valve uses push-fit connectors
If your old valve used compression fittings and your new one uses push-to-connect ports, inspect the tubing ends carefully. The tube opening should be clean, round, and flat. If it’s dented, scratched, or has an old compression mark, trim a small amount off the end so it seats properly.
Do not cut off more tubing than necessary. You want enough slack so the line isn’t strained when the fridge is pushed back into place.
Step 11: Install the new valve and reconnect tubing
Mount the new valve/bracket assembly to the fridge frame and tighten the screws securely.
Then reconnect the water tubes:
- Insert each tube into the correct port.
- On push-fit ports, push the tube in firmly until fully seated, then tug gently to confirm it locks.
- Reinstall any retaining clips or C-clips.
- For compression fittings, tighten the nuts snugly but don’t overtighten and crush the fitting.
Step 12: Reconnect the electrical wires
Reconnect the wire harness or terminals to the new valve exactly as they were on the old one. Use your photo as backup. If a connector feels loose, stop and confirm it’s on the correct terminal and fully seated.
Step 13: Reconnect the household water supply line
Reconnect the incoming water supply line to the inlet valve and tighten the compression nut. If your model or fitting type calls for thread sealing tape, use it only where appropriate (not all compression fittings need it). The goal is a secure sealnot Hulk-level torque.
Step 14: Turn the water back on and check for leaks
Open the shut-off valve slowly and inspect every connection at the inlet valve and supply line. Check for drips, weeping, or spray. If you see a leak:
- Shut the water off again.
- Reseat the tube or fitting.
- Inspect for cracks, damaged tubing ends, or a misaligned connector.
- Retest.
Do not skip this step. A tiny drip can become a major flooring project later.
Step 15: Reinstall the rear panel and restore power
Once everything is dry and leak-free, reinstall the lower rear access panel and secure it with screws. Plug the refrigerator back in (or restore the breaker).
Step 16: Flush and test the dispenser/ice maker
Run water through the dispenser for a few minutes (many techs recommend flushing several gallons) to clear air bubbles and any dust or debris from the new part. Then monitor the ice maker through the next few cycles.
If your fridge uses a filter, replace it if it’s old. A brand-new valve plus an old clogged filter is like putting new tires on a car with the parking brake on.
Common Mistakes to Avoid
- Buying the wrong valve: Always match by model number, not appearance.
- Forgetting to photograph connections: Memory gets fuzzy fast when wires all look the same.
- Not fully seating push-fit tubing: If it doesn’t seat all the way, it will leak.
- Overtightening compression fittings: Tight is good. “I bent the fitting” is not.
- Skipping the leak test: This is how people discover a problem after pushing the fridge back and going to bed.
- Ignoring low water pressure: If the supply is weak, the valve may not be the problem.
When to Call a Pro
DIY is great, but there are times to tag in a professional:
- You’re not comfortable working around appliance wiring
- The shut-off valve is stuck or leaking
- The supply line is corroded or damaged inside the wall
- The fridge has persistent leaks after reseating connections
- You suspect a control board issue (the valve never gets voltage)
Replacing the inlet valve fixes many water and ice problems, but it won’t solve everything. If the valve tests fine and the water supply is strong, you may need to troubleshoot the dispenser switch, filter head, frozen fill tube, or ice maker assembly.
DIY Experiences and Lessons Learned (Extended Real-World Notes)
One of the most common experiences with this repair is how small the original problem seems at first. It usually starts with something easy to ignore: the ice cubes get smaller, the dispenser flow slows down, or there’s a tiny puddle behind the fridge that mysteriously disappears after you wipe it. Many homeowners assume it’s “just the filter,” and sometimes it is. But when the issue keeps coming back, the inlet valve often ends up being the real cause.
A practical lesson many people learn the hard way is that the setup photos matter more than you think. The back of a refrigerator can look simple until the old valve is hanging loose and you’re staring at multiple tubes and connectors that all suddenly look identical. A few clear photos before disassembly can save 30 minutes of guessing and prevent accidental misrouting of the ice maker and dispenser lines.
Another common experience is discovering that the new replacement valve doesn’t match the old one exactly in appearance. This can be alarming for first-time DIYers, but it’s often normal. Manufacturers update parts, and many replacements use newer push-to-connect fittings instead of older compression-style connections. The important part is that the replacement is correct for the refrigerator model number. If the port layout and mounting points line up and the part is listed as compatible, a different shape or color is usually not a problem.
Leaks after installation are also extremely common on the first tryand usually fixable. In most cases, it’s not because the new valve is defective. It’s because a tube wasn’t fully seated, the tubing end was slightly damaged, or a compression fitting wasn’t aligned correctly. The good news is that slow drips are often easy to solve by shutting the water off, reseating the tube, trimming a damaged end, and reconnecting it carefully. This is why the leak test step is so important. Catching a drip immediately is a lot better than discovering it after the fridge has been pushed back for two days.
Many people are also surprised by how much water and air can be in the lines after the repair. The dispenser may sputter, spit, or make odd noises for a minute. That’s usually just trapped air working its way out. Flushing the system thoroughly helps stabilize flow and reduces the chance of the ice maker producing hollow or tiny cubes in the first cycle or two.
One more lesson worth sharing: moving the refrigerator is often the hardest part of the whole repair. The valve replacement itself is straightforward, but pulling a heavy fridge out safelyespecially on delicate floorstakes planning. Putting down cardboard or a furniture slider and giving yourself room to work makes a huge difference. A careful setup at the beginning makes the repair faster, safer, and much less frustrating.
In short, the real-world experience of replacing a fridge water inlet valve is usually this: the first 10 minutes feel cautious, the middle 20 minutes feel messy, and the last 10 minutes feel incredibly satisfying when the dispenser runs strong again and the floor stays dry. It’s a very doable repair for most homeowners, and one of those projects that builds confidence for the next appliance fix.
Conclusion
Replacing a refrigerator water inlet valve is one of the most practical DIY appliance repairs you can learn. It directly solves common issues like no ice, weak water dispensing, and leaks at the back of the fridgeand it usually only requires basic hand tools and a correct OEM-compatible part.
The key is to move in the right order: shut off power and water, document your connections, disconnect the lines carefully, install the new valve securely, and test for leaks before closing everything up. Do that, and you’ll save money, avoid water damage, and earn the right to brag every time someone grabs ice from your freezer.


